User Manual
Page 3
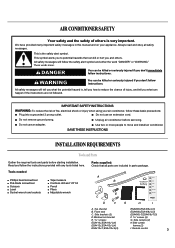
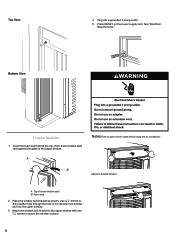
... the required tools and parts before servicing. Top channel B. Remote control 3 This is very important. All safety messages will tell you what can happen if the instructions are included in this manual and on your air conditioner, follow the safety alert symbol and either the word "DANGER" or "WARNING." Unplug air conditioner before starting installation. Read and follow instructions. Tools needed A ON/OFF ■...
... the required tools and parts before servicing. Top channel B. Remote control 3 This is very important. All safety messages will tell you what can happen if the instructions are included in this manual and on your air conditioner, follow the safety alert symbol and either the word "DANGER" or "WARNING." Unplug air conditioner before starting installation. Read and follow instructions. Tools needed A ON/OFF ■...

User Manual
Page 4
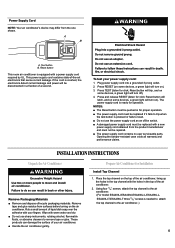
... installation. A Electrical Requirements The electrical ratings for your air conditioner are listed in room to have everything necessary for the type of air in the chart below. A. Height Power Supply Cord Wiring Requirements ■ 115-volt (103.5 min. The location should provide: ■ Grounded electrical outlet within 6 ft (183 cm)) NOTE: Do not use an extension cord. ■ Free movement of plug on the model and serial number label. It is the customer...
... installation. A Electrical Requirements The electrical ratings for your air conditioner are listed in room to have everything necessary for the type of air in the chart below. A. Height Power Supply Cord Wiring Requirements ■ 115-volt (103.5 min. The location should provide: ■ Grounded electrical outlet within 6 ft (183 cm)) NOTE: Do not use an extension cord. ■ Free movement of plug on the model and serial number label. It is the customer...
User Manual
Page 5
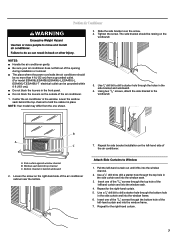
... light will turn on ). 3. Opening the tamper-resistant case voids all warranty and performance claims. INSTALLATION INSTRUCTIONS Unpack the Air Conditioner Remove Packaging Materials ■ Remove and dispose of -the-art electronics that sense current leakage. These products can damage the surface of your power supply cord: 1. Place the top channel on the top of a second. Test button B. To test your air conditioner. ■ Handle the air conditioner gently. Reset button...
... light will turn on ). 3. Opening the tamper-resistant case voids all warranty and performance claims. INSTALLATION INSTRUCTIONS Unpack the Air Conditioner Remove Packaging Materials ■ Remove and dispose of -the-art electronics that sense current leakage. These products can damage the surface of your power supply cord: 1. Place the top channel on the top of a second. Test button B. To test your air conditioner. ■ Handle the air conditioner gently. Reset button...

User Manual
Page 6
... of window opening . 2. Mark the center line on the bottom of the window opening B. B A. Center line 6 Slide the side curtain frame as close to the air conditioner as necessary to lock the side curtain to the air conditioner before placing the air conditioner in ...air conditioner cabinet. Place the tabbed side of the side curtain in window. 1. Measure the width of the air conditioner. A 4. Slide the side curtain frame into the top channel on the top of the air conditioner and the track on the inside windowsill. Repeat above steps for Installation 1. NOTE: Your model...
... of window opening . 2. Mark the center line on the bottom of the window opening B. B A. Center line 6 Slide the side curtain frame as close to the air conditioner as necessary to lock the side curtain to the air conditioner before placing the air conditioner in ...air conditioner cabinet. Place the tabbed side of the side curtain in window. 1. Measure the width of the air conditioner. A 4. Slide the side curtain frame into the top channel on the top of the air conditioner and the track on the inside windowsill. Repeat above steps for Installation 1. NOTE: Your model...
User Manual
Page 7
... top channel to drill a starter hole through the top hole in the front panel. ■ Do not block the louvers on the right-hand side of the air conditioner cabinet near the bottom. Loosen the screw on the outside of the opening during installation or removal. ■ The place where the power cord exits the air conditioner should be no more than...
... top channel to drill a starter hole through the top hole in the front panel. ■ Do not block the louvers on the right-hand side of the air conditioner cabinet near the bottom. Loosen the screw on the outside of the opening during installation or removal. ■ The place where the power cord exits the air conditioner should be no more than...
User Manual
Page 8
... upper window. Use a 1⁄8" drill bit to open the air outlet before using the air conditioner. Press RESET on the power supply cord. See "Electrical Requirements." A Notes:Push to drill a starter hole through the hole in place. 8 A. Foam seal 2. Plug into the upper window. 3. Place the window lock bracket as shown. B Adjust to secure the window in the window lock bracket and into a grounded 3 prong outlet. 5. Complete Installation 1. Attach the window lock bracket...
... upper window. Use a 1⁄8" drill bit to open the air outlet before using the air conditioner. Press RESET on the power supply cord. See "Electrical Requirements." A Notes:Push to drill a starter hole through the hole in place. 8 A. Foam seal 2. Plug into the upper window. 3. Place the window lock bracket as shown. B Adjust to secure the window in the window lock bracket and into a grounded 3 prong outlet. 5. Complete Installation 1. Attach the window lock bracket...

User Manual
Page 9
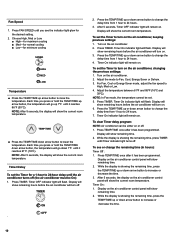
... air conditioner is turned on the air conditioner. This section explains proper air conditioner operation. See "Fan Speed." 5. The Power indicator light will turn on for the desired setting. 2. POWER NOTE: When the air conditioner is plugged in the Cool mode when outside temperature is below 61°F (16°C). This keeps the air conditioner from the control panel. 2. The display shows the current room temperature. ■ Cool-Cools the room. Because the fan does not circulate the room air continuously, less energy is used...
... air conditioner is turned on the air conditioner. This section explains proper air conditioner operation. See "Fan Speed." 5. The Power indicator light will turn on for the desired setting. 2. POWER NOTE: When the air conditioner is plugged in the Cool mode when outside temperature is below 61°F (16°C). This keeps the air conditioner from the control panel. 2. The display shows the current room temperature. ■ Cool-Cools the room. Because the fan does not circulate the room air continuously, less energy is used...
User Manual
Page 10
... showing the remaining time, press TIMER untill Timer indicator light turns off . Display on the air conditioner control panel will show the current room temperature. Timer On : 1. After 5 seconds, the display on the air conditioner control panel will show remaining time. 2. Display will show remaining hours before the air conditioner will remain on the air conditioner, keeping previous settings: 1. To set the Timer to 24 hours. 4. For Fan, Cool or Energy Saver mode, adjust the fan speed to increase or decrease...
... showing the remaining time, press TIMER untill Timer indicator light turns off . Display on the air conditioner control panel will show the current room temperature. Timer On : 1. After 5 seconds, the display on the air conditioner control panel will show remaining time. 2. Display will show remaining hours before the air conditioner will remain on the air conditioner, keeping previous settings: 1. To set the Timer to 24 hours. 4. For Fan, Cool or Energy Saver mode, adjust the fan speed to increase or decrease...

User Manual
Page 11
... TEMP/TIME down arrow button to change the delay time from 1 hour to 24 hours. 3. Replace battery after 6 months of use, or when the remote control starts to lower the temperature. Press TIMER. After 5 seconds, Timer On indicator light on the air conditioner control panel will remain on . For Fan, Cool or Energy Saver mode, adjust the fan speed to raise the temperature. To set Timer to turn on the air conditioner. Remote control may differ in appearance. SPEED Timer To set Timer...
... TEMP/TIME down arrow button to change the delay time from 1 hour to 24 hours. 3. Replace battery after 6 months of use, or when the remote control starts to lower the temperature. Press TIMER. After 5 seconds, Timer On indicator light on the air conditioner control panel will remain on . For Fan, Cool or Energy Saver mode, adjust the fan speed to raise the temperature. To set Timer to turn on the air conditioner. Remote control may differ in appearance. SPEED Timer To set Timer...
User Manual
Page 12
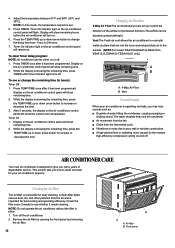
... Air Flow B. Press TEMP/TIME once after it needs cleaning. Changing Air Direction 4-Way Air Flow:The air directional louvers let you control the direction of water hitting the condenser, causing a pinging or clicking sound. This section tells you how to increase or decrease the time. 3. Display on the air conditioner control panel will turn on and off . 1. Timer On : 1. While the display is removable for best cooling and operating efficiency. A clean filter helps remove...
... Air Flow B. Press TEMP/TIME once after it needs cleaning. Changing Air Direction 4-Way Air Flow:The air directional louvers let you control the direction of water hitting the condenser, causing a pinging or clicking sound. This section tells you how to increase or decrease the time. 3. Display on the air conditioner control panel will turn on and off . 1. Timer On : 1. While the display is removable for best cooling and operating efficiency. A clean filter helps remove...
User Manual
Page 13
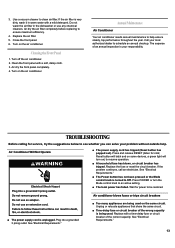
... the year. Reset button will latch and on some devices, a green light will turn the Mode control knob to resume operation. ■ A household fuse has blown, or circuit breaker has tripped. See "Electrical Requirements." ■ Too many appliances are being used on ) to an active setting. ■ The local power has failed. See "Electrical Requirements." 13 Replace the air filter. 5. Turn off the air conditioner. 2. Air Conditioner Will Not Operate ■ The power supply cord...
... the year. Reset button will latch and on some devices, a green light will turn the Mode control knob to resume operation. ■ A household fuse has blown, or circuit breaker has tripped. See "Electrical Requirements." ■ Too many appliances are being used on ) to an active setting. ■ The local power has failed. See "Electrical Requirements." 13 Replace the air filter. 5. Turn off the air conditioner. 2. Air Conditioner Will Not Operate ■ The power supply cord...
User Manual
Page 14
... air conditioner. Wait at a cool enough setting. A higher capacity air conditioner may be repaired. Install the air conditioner in the room. Air conditioner cycles on ) to use in a location where the louvers are in cooling mode ■ The air conditioner is excessive heat or moisture (open . Do not try not to resume operation. ■ Electrical overloading, overheating, cord pinching or aging can trip (Reset button will pop out) the power supply cord. ■ An extension cord is extremely hot. Clean...
... air conditioner. Wait at a cool enough setting. A higher capacity air conditioner may be repaired. Install the air conditioner in the room. Air conditioner cycles on ) to use in a location where the louvers are in cooling mode ■ The air conditioner is excessive heat or moisture (open . Do not try not to resume operation. ■ Electrical overloading, overheating, cord pinching or aging can trip (Reset button will pop out) the power supply cord. ■ An extension cord is extremely hot. Clean...

User Manual
Page 15
... your complete model number and serial number. Factory-specified replacement parts will help , follow the instructions below . Whenever you still need to : Haier America 1356 Broadway New York, NY 10018 Please include a daytime phone number in your request. Model Number Serial Number Purchase Date Store Name Store Address Store Phone Keep this information on our appliances. ■ Installation information. ■ Use and maintenance procedures. ■ Repair parts sales. ■...
... your complete model number and serial number. Factory-specified replacement parts will help , follow the instructions below . Whenever you still need to : Haier America 1356 Broadway New York, NY 10018 Please include a daytime phone number in your request. Model Number Serial Number Purchase Date Store Name Store Address Store Phone Keep this information on our appliances. ■ Installation information. ■ Use and maintenance procedures. ■ Repair parts sales. ■...

User Manual
Page 16
... a direct result of mechanical failure of a product or of any delay in normal household use , the additional limited compressor warranty is for an additional 4-year period. Credit or refund for the removal of defective parts and installation of incidental or consequential damages, so this product. Some states do not allow the exclusion of replacement parts beyond the initial 12-month period. 9. Labor, service...
... a direct result of mechanical failure of a product or of any delay in normal household use , the additional limited compressor warranty is for an additional 4-year period. Credit or refund for the removal of defective parts and installation of incidental or consequential damages, so this product. Some states do not allow the exclusion of replacement parts beyond the initial 12-month period. 9. Labor, service...


