Product Manual
Page 2
See grounding instructions in the installation section. 3) Never unplug your old refrigerator is used , we recommend that you can." 1 Do not use a cord that shows cracks or abrasion damage along its eating quality as you remove the doors. This will reduce the possibility of danger to children. 8) After your refrigerator before cleaning or before making any off-odor or off-color...
See grounding instructions in the installation section. 3) Never unplug your old refrigerator is used , we recommend that you can." 1 Do not use a cord that shows cracks or abrasion damage along its eating quality as you remove the doors. This will reduce the possibility of danger to children. 8) After your refrigerator before cleaning or before making any off-odor or off-color...

Product Manual
Page 3
... to record the model and serial number. Model number Serial number Date of purchase Staple your manual. You will need it to -use manual will guide you in getting the best use of explosive fumes. It is designed for using our Haier product. Leave the shelves in an enclosed cabinet. As per UL 250 Standards Thank you throw away your refrigerator. This easy-to obtain warranty service. 2 They are on...
... to record the model and serial number. Model number Serial number Date of purchase Staple your manual. You will need it to -use manual will guide you in getting the best use of explosive fumes. It is designed for using our Haier product. Leave the shelves in an enclosed cabinet. As per UL 250 Standards Thank you throw away your refrigerator. This easy-to obtain warranty service. 2 They are on...
Product Manual
Page 4
... Handle Installation 7 Door Alignment 8 Reversing the Door Swing 8 Reversing the Door Handles 11 Refrigerator Features And Use 12 Setting the controls 12 Adjusting control settings 12 Refrigerator Interior Shelves 13 Utility Drawer And Cover 14 Crisper and Crisper Cover 15 Refrigerator Door Shelves 17 Freezer Features 18 Changing the Light Bulb 20 Food Storage Information 20 Normal Operating Sounds 22 Proper Refrigerator Care and Cleaning 23 Cleaning and Maintenance 23 Light Bulb Replacement 24 Power Interruptions 24 Vacation and Moving Care 24 Troubleshooting 25 Warranty...
... Handle Installation 7 Door Alignment 8 Reversing the Door Swing 8 Reversing the Door Handles 11 Refrigerator Features And Use 12 Setting the controls 12 Adjusting control settings 12 Refrigerator Interior Shelves 13 Utility Drawer And Cover 14 Crisper and Crisper Cover 15 Refrigerator Door Shelves 17 Freezer Features 18 Changing the Light Bulb 20 Food Storage Information 20 Normal Operating Sounds 22 Proper Refrigerator Care and Cleaning 23 Cleaning and Maintenance 23 Light Bulb Replacement 24 Power Interruptions 24 Vacation and Moving Care 24 Troubleshooting 25 Warranty...

Product Manual
Page 5
English Parts And Features Picture for illustration purpose only Features and quantities may vary per model 1. Deli Drawer 5. Bin Door Shelf 18. Adjustable Freezer Shelf Divider 4 Half-Width Glass Shelf 4. Wire Basket 13. Dairy Bin 15. Door Storage Bin 17. Freezer Light 10. Freezer Shelf 12. Refrigerator Light 2. Crisper Cover 6. See-Through Crisper Drawers 7. Base Grille 14. Tilt-out Wire Door Shelf 19. Freezer Control 9. Ice Storage Container 11. Refrigerator Control 3. Egg Bin 16. Freezer Door Hinge Cover 21. Ice Tray 8. Door Handle 20.
English Parts And Features Picture for illustration purpose only Features and quantities may vary per model 1. Deli Drawer 5. Bin Door Shelf 18. Adjustable Freezer Shelf Divider 4 Half-Width Glass Shelf 4. Wire Basket 13. Dairy Bin 15. Door Storage Bin 17. Freezer Light 10. Freezer Shelf 12. Refrigerator Light 2. Crisper Cover 6. See-Through Crisper Drawers 7. Base Grille 14. Tilt-out Wire Door Shelf 19. Freezer Control 9. Ice Storage Container 11. Refrigerator Control 3. Egg Bin 16. Freezer Door Hinge Cover 21. Ice Tray 8. Door Handle 20.
Product Manual
Page 6
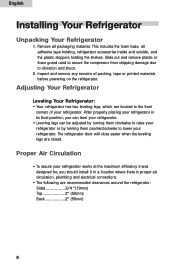
... Refrigerator: • Your refrigerator has two leveling legs, which are located in a location where there is proper air circulation, plumbing and electrical connections. • The following are raised. After properly placing your refrigerator in its final position, you should install it in the front comers of packing, tape or printed materials before powering on the refrigerator. Proper Air Circulation • To assure your refrigerator works...
... Refrigerator: • Your refrigerator has two leveling legs, which are located in a location where there is proper air circulation, plumbing and electrical connections. • The following are raised. After properly placing your refrigerator in its final position, you should install it in the front comers of packing, tape or printed materials before powering on the refrigerator. Proper Air Circulation • To assure your refrigerator works...
Product Manual
Page 7
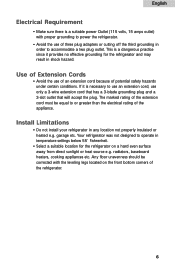
... Electrical Requirement • Make sure there is a suitable power Outlet (115 volts, 15 amps outlet) with the leveling legs located on a hard even surface away from direct sunlight or heat source e.g. Use of Extension Cords • Avoid the use only a 3-wire extension cord that has a 3-blade grounding plug and a 3-slot outlet that will accept the plug. Your refrigerator was not designed to power...
... Electrical Requirement • Make sure there is a suitable power Outlet (115 volts, 15 amps outlet) with the leveling legs located on a hard even surface away from direct sunlight or heat source e.g. Use of Extension Cords • Avoid the use only a 3-wire extension cord that has a 3-blade grounding plug and a 3-slot outlet that will accept the plug. Your refrigerator was not designed to power...

Product Manual
Page 9
Loosen the top hinge screws using a Phillips head screwdriver. 4. You can select your preference of the left/right door opening by following the procedure to make the change. Remove the top hinge cover. 3. fig. # 3 8 English Door Alignment (see fig. # 3) 1. Adjust the door or put a spacer in between and then tighten the screws. 5. Remove refrigerator door hinge cover screw. 2. Reversing the Door Swing Left/right door opening method: This product provides the reversing of door opening . Replace the top hinge cover.
Loosen the top hinge screws using a Phillips head screwdriver. 4. You can select your preference of the left/right door opening by following the procedure to make the change. Remove the top hinge cover. 3. fig. # 3 8 English Door Alignment (see fig. # 3) 1. Adjust the door or put a spacer in between and then tighten the screws. 5. Remove refrigerator door hinge cover screw. 2. Reversing the Door Swing Left/right door opening method: This product provides the reversing of door opening . Replace the top hinge cover.
Product Manual
Page 11
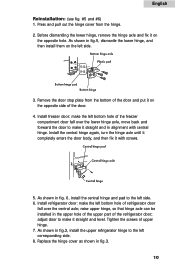
... and level. English Reinstallation: (see fig. #5 and #6) 1. adjust door to make the left side. 3. Install freezer door: make it straight and in fig.5, dismantle the lower hinge, and then install them on the opposite hole. raise upper hinge, so that hinge axle can be installed in fig.3. 10 Replace the hinge cover as shown in the upper hole of the upper part of upper hinge. 7. Install the central hinge again, turn the hinge...
... and level. English Reinstallation: (see fig. #5 and #6) 1. adjust door to make the left side. 3. Install freezer door: make it straight and in fig.5, dismantle the lower hinge, and then install them on the opposite hole. raise upper hinge, so that hinge axle can be installed in fig.3. 10 Replace the hinge cover as shown in the upper hole of the upper part of upper hinge. 7. Install the central hinge again, turn the hinge...
Product Manual
Page 13
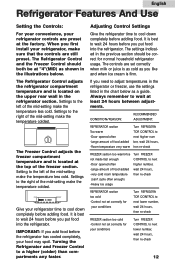
... left of the freezer section. IMPORANT: If you need to next lower number, wait 24 hours, then re-check FREEZER section too cold -Control not set correctly for normal household refrigerator usage. The controls are still preset. CONDITION/REASON: RECOMMENDED ADJUSTMENT: REFRIERATOR section Too warm -Door opened often -Large amount of food added -Room temperature very warm Turn REFRIGERA TOR CONTROL to the right of the mid-setting make the temperature...
... left of the freezer section. IMPORANT: If you need to next lower number, wait 24 hours, then re-check FREEZER section too cold -Control not set correctly for normal household refrigerator usage. The controls are still preset. CONDITION/REASON: RECOMMENDED ADJUSTMENT: REFRIERATOR section Too warm -Door opened often -Large amount of food added -Room temperature very warm Turn REFRIGERA TOR CONTROL to the right of the mid-setting make the temperature...
Product Manual
Page 14
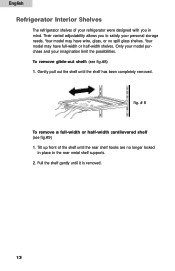
... pull out the shelf until the rear shelf hooks are no spill glass shelves. Only your model purchase and your personal storage needs. Their varied adjustability allows you in the rear metal shelf supports. 2. Your model may have full-width or half-width shelves. fig. # 8 To remove a full-width or half-width cantilevered shelf (see fig.#8) 1. Tilt up front of your refrigerator were designed with...
... pull out the shelf until the rear shelf hooks are no spill glass shelves. Only your model purchase and your personal storage needs. Their varied adjustability allows you in the rear metal shelf supports. 2. Your model may have full-width or half-width shelves. fig. # 8 To remove a full-width or half-width cantilevered shelf (see fig.#8) 1. Tilt up front of your refrigerator were designed with...
Product Manual
Page 15
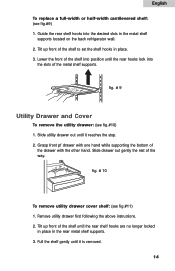
... the shelf to set the shelf hooks in the metal shelf supports located on the back refrigerator wall. 2. English To replace a full-width or half-width cantilevered shelf: (see fig.#10) 1. Grasp front pf drawer with the other hand. fig. # 10 To remove utility drawer cover shelf: (see fig.#11) 1. Tilt up front of the way. Guide the rear shelf hooks into position until it is removed. 14 Slide drawer...
... the shelf to set the shelf hooks in the metal shelf supports located on the back refrigerator wall. 2. English To replace a full-width or half-width cantilevered shelf: (see fig.#10) 1. Grasp front pf drawer with the other hand. fig. # 10 To remove utility drawer cover shelf: (see fig.#11) 1. Tilt up front of the way. Guide the rear shelf hooks into position until it is removed. 14 Slide drawer...

Product Manual
Page 16
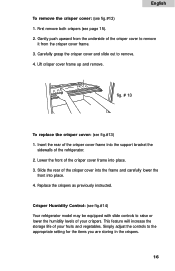
... the rear hooks lock into the desired slots in the metal shelf supports located on the back refrigerator wall. 2. Replace the crisper by placing the crisper properly in place. 3. Gently lift the front of the shelf to the stop. 2. Tilt up front of the crisper. 3. fig. # 12 15 fig. # 11 Crisper and Crisper Cover To remove and install the crisper: (see fig.#11) 1. English To install utility drawer cover shelf: (see...
... the rear hooks lock into the desired slots in the metal shelf supports located on the back refrigerator wall. 2. Replace the crisper by placing the crisper properly in place. 3. Gently lift the front of the shelf to the stop. 2. Tilt up front of the crisper. 3. fig. # 12 15 fig. # 11 Crisper and Crisper Cover To remove and install the crisper: (see fig.#11) 1. English To install utility drawer cover shelf: (see...
Product Manual
Page 17
... the support bracket the sidewalls of the crisper cover frame into place. 4. Lower the front of the refrigerator. 2. Replace the crispers as previously instructed. Simply adjust the controls to remove. 4. Lift crisper cover frame up and remove. Carefully grasp the crisper cover and slide out to the appropriate setting for the items you are storing in the crispers. 16 Slide the rear of your crispers. English To remove the crisper cover: (see...
... the support bracket the sidewalls of the crisper cover frame into place. 4. Lower the front of the refrigerator. 2. Replace the crispers as previously instructed. Simply adjust the controls to remove. 4. Lift crisper cover frame up and remove. Carefully grasp the crisper cover and slide out to the appropriate setting for the items you are storing in the crispers. 16 Slide the rear of your crispers. English To remove the crisper cover: (see...
Product Manual
Page 18
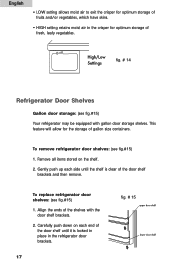
... storage of the door shelf brackets and then remove. To remove refrigerator door shelves: (see fig.#15) 1. To replace refrigerator door shelves: (see fig.#15) 1. Align the ends of gallon size containers. fig. # 14 Refrigerator Door Shelves Gallon door storage: (see fig.#15) Your refrigerator may be equipped with the door shelf brackets. 2. Remove all items stored on each side until it is clear of fresh, leafy vegetables. Carefully push down...
... storage of the door shelf brackets and then remove. To remove refrigerator door shelves: (see fig.#15) 1. To replace refrigerator door shelves: (see fig.#15) 1. Align the ends of gallon size containers. fig. # 14 Refrigerator Door Shelves Gallon door storage: (see fig.#15) Your refrigerator may be equipped with the door shelf brackets. 2. Remove all items stored on each side until it is clear of fresh, leafy vegetables. Carefully push down...
Product Manual
Page 21
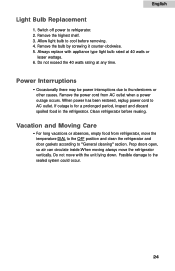
To change the refrigerator or freezer light bulb: 1. Food Storage Information Fresh Food • When storing fresh food, which is not prepackaged, be washed and dried then stored in a crisper set for low humidity. Be sure to replace the bulb with low humidity setting. 20 Plug in refrigerator or reconnect power. Unplug refrigerator or disconnect power. 2. If you do not have humidity controlled crisper place the items in...
To change the refrigerator or freezer light bulb: 1. Food Storage Information Fresh Food • When storing fresh food, which is not prepackaged, be washed and dried then stored in a crisper set for low humidity. Be sure to replace the bulb with low humidity setting. 20 Plug in refrigerator or reconnect power. Unplug refrigerator or disconnect power. 2. If you do not have humidity controlled crisper place the items in...

Product Manual
Page 22
... will prevent unnecessary energy use. • Fresh seafood should be used the same day as purchased. • When storing meats in the fresh food section, keep in the refrigerator. Follow the suggestions below for proper storage. • Packaging Recommendations: Plastic containers with high humidity setting. • Hot food should be allowed to cool before storing in...
... will prevent unnecessary energy use. • Fresh seafood should be used the same day as purchased. • When storing meats in the fresh food section, keep in the refrigerator. Follow the suggestions below for proper storage. • Packaging Recommendations: Plastic containers with high humidity setting. • Hot food should be allowed to cool before storing in...
Product Manual
Page 24
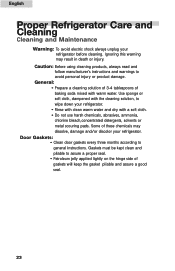
...; Petroleum jelly applied lightly on the hinge side of baking soda mixed with a soft cloth. • Do not use harsh chemicals, abrasives, ammonia, chlorine bleach,concentrated detergents, solvents or metal scouring pads. English Proper Refrigerator Care and Cleaning Cleaning and Maintenance Warning: To avoid electric shock always unplug your refrigerator. • Rinse with clean warm water and dry with warm water. Gaskets must be kept...
...; Petroleum jelly applied lightly on the hinge side of baking soda mixed with a soft cloth. • Do not use harsh chemicals, abrasives, ammonia, chlorine bleach,concentrated detergents, solvents or metal scouring pads. English Proper Refrigerator Care and Cleaning Cleaning and Maintenance Warning: To avoid electric shock always unplug your refrigerator. • Rinse with clean warm water and dry with warm water. Gaskets must be kept...
Product Manual
Page 25
... clean the refrigerator and door gaskets according to cool before reusing. Clean refrigerator before removing. 4. Power Interruptions • Occasionally there may be power interruptions due to AC outlet. Do not move the refrigerator vertically. Always replace with the unit lying down. When power has been restored, replug power cord to thunderstorms or other causes. Prop doors open, so air can circulate inside.When moving always move with appliance type light bulb rated...
... clean the refrigerator and door gaskets according to cool before reusing. Clean refrigerator before removing. 4. Power Interruptions • Occasionally there may be power interruptions due to AC outlet. Do not move the refrigerator vertically. Always replace with the unit lying down. When power has been restored, replug power cord to thunderstorms or other causes. Prop doors open, so air can circulate inside.When moving always move with appliance type light bulb rated...
Product Manual
Page 27
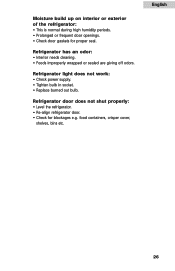
food containers, crisper cover, shelves, bins etc. Refrigerator door does not shut properly: • Level the refrigerator. • Re-align refrigerator door. • Check for proper seal. Moisture build up on interior or exterior of the refrigerator: • This is normal during high humidity periods. • Prolonged or frequent door openings. • Check door gaskets for blockages e.g. Refrigerator light does not work: • Check power supply. • Tighten bulb in socket. • Replace burned out...
food containers, crisper cover, shelves, bins etc. Refrigerator door does not shut properly: • Level the refrigerator. • Re-align refrigerator door. • Check for proper seal. Moisture build up on interior or exterior of the refrigerator: • This is normal during high humidity periods. • Prolonged or frequent door openings. • Check door gaskets for blockages e.g. Refrigerator light does not work: • Check power supply. • Tighten bulb in socket. • Replace burned out...
Product Manual
Page 28
... of purchase. This warranty gives you specific legal rights, and you may not apply to state. Defects other than an authorized dealer or service center. What will repair or replace, at our discretion any covered items during the warranty period so specified. 2. Damage from state to you . This warranty covers all parts except finish, and trim. 2. Haier America New York, NY 10018...
... of purchase. This warranty gives you specific legal rights, and you may not apply to state. Defects other than an authorized dealer or service center. What will repair or replace, at our discretion any covered items during the warranty period so specified. 2. Damage from state to you . This warranty covers all parts except finish, and trim. 2. Haier America New York, NY 10018...


