User Manual
Page 3
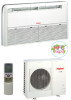
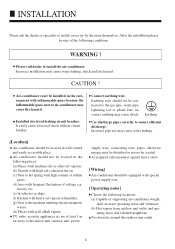
... the following instruction. Safety Instructions and Warnings Before starting the air conditioner, read the information given in the User's Guide. Installation shall be put into smaller pieces and given to the environment. It must be taken to the assembly, operation and maintenance of the air conditioner. The wrapping bag made of the waste materials collecting centers and waste paper disposal services nearest to...
... the following instruction. Safety Instructions and Warnings Before starting the air conditioner, read the information given in the User's Guide. Installation shall be put into smaller pieces and given to the environment. It must be taken to the assembly, operation and maintenance of the air conditioner. The wrapping bag made of the waste materials collecting centers and waste paper disposal services nearest to...
User Manual
Page 4
..., 18. Specifications The refrigerating circuit is in accordance with sharp or pointed items, crushing or twisting any tubes, or scraping the coatings off the surfaces. For series 24,28,36,42,the breaker of the air conditioner that carry refrigerant by pulling on the outdoor unit. When installation in floor console, dial switch to sit on the power cord. If the refrigerant spurts out...
..., 18. Specifications The refrigerating circuit is in accordance with sharp or pointed items, crushing or twisting any tubes, or scraping the coatings off the surfaces. For series 24,28,36,42,the breaker of the air conditioner that carry refrigerant by pulling on the outdoor unit. When installation in floor console, dial switch to sit on the power cord. If the refrigerant spurts out...
User Manual
Page 5
... series14,18 (heating models). The power cable and connecting cable are self-provided. Do not attempt to infants. The parameter of the air conditioner. DANGER! Do not insert fingers or objects into the outlet port or intake grills. Do not set flower vases or water containers on the air conditioner. Turn off the circuit breaker, and consult authorized service personnel. When installing the indoor and outdoor unit, take...
... series14,18 (heating models). The power cable and connecting cable are self-provided. Do not attempt to infants. The parameter of the air conditioner. DANGER! Do not insert fingers or objects into the outlet port or intake grills. Do not set flower vases or water containers on the air conditioner. Turn off the circuit breaker, and consult authorized service personnel. When installing the indoor and outdoor unit, take...
User Manual
Page 6
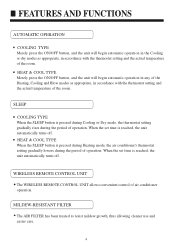
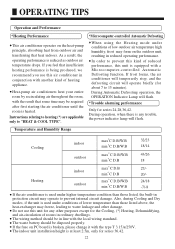
... WIRELESS REMOTE CONTROL UNIT allows convenient control of the room. When the set time is pressed during Cooling or Dry mode, the thermostat setting gradually rises during the period of the room. HEAT & COOL TYPE When the SLEEP button is reached, the unit automatically turns off . MILDEW-RESISTANT FILTER The AIR FILTER has been treated to resist mildew growth, thus allowing cleaner use and easier care. 4 When the set time is pressed during Heating mode, the air conditioner's thermostat setting...
... WIRELESS REMOTE CONTROL UNIT allows convenient control of the room. When the set time is pressed during Cooling or Dry mode, the thermostat setting gradually rises during the period of the room. HEAT & COOL TYPE When the SLEEP button is reached, the unit automatically turns off . MILDEW-RESISTANT FILTER The AIR FILTER has been treated to resist mildew growth, thus allowing cleaner use and easier care. 4 When the set time is pressed during Heating mode, the air conditioner's thermostat setting...
User Manual
Page 7
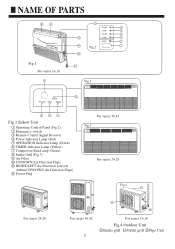
... 11 Fig.1 For series 14,18 3 1 POWER 4 OPER 5 TIMER 6 3 COMP 7 EMER 2 9 Fig.2 3 8 12 Fig.3 2 EMER POWER OPER TIMER 4 5 6 Fig.1 Indoor Unit 1 Operating Control Panel (Fig.2) 2 Emergency switch 3 Remote Control Signal Receiver 4 Power Indicator Lamp (Red) 5 OPERATION Indicator Lamp (Green) 6 TIMER Indicator Lamp (Yellow) 7 Compressor Run Lamp (Green) 8 Intake Grill (Fig.3) 9 Air Filter 10 UP/DOWN Air Direction Flaps 11 RIGHT/LEFT Air Direction Louvers (behind UP/DOWN Air Direction Flaps) 12 Power Plug For series 36,42 Fig.3 For...
... 11 Fig.1 For series 14,18 3 1 POWER 4 OPER 5 TIMER 6 3 COMP 7 EMER 2 9 Fig.2 3 8 12 Fig.3 2 EMER POWER OPER TIMER 4 5 6 Fig.1 Indoor Unit 1 Operating Control Panel (Fig.2) 2 Emergency switch 3 Remote Control Signal Receiver 4 Power Indicator Lamp (Red) 5 OPERATION Indicator Lamp (Green) 6 TIMER Indicator Lamp (Yellow) 7 Compressor Run Lamp (Green) 8 Intake Grill (Fig.3) 9 Air Filter 10 UP/DOWN Air Direction Flaps 11 RIGHT/LEFT Air Direction Louvers (behind UP/DOWN Air Direction Flaps) 12 Power Plug For series 36,42 Fig.3 For...
User Manual
Page 8
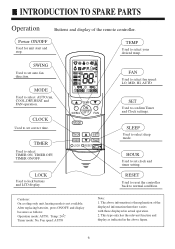
MODE Used to normal condition. RESET Used to reset the controller back to select AUTO run, COOL,DRY,HEAT and FAN operation. AUTO ON AM PM * OFF AM PM TEMP ON SWING OFF FAN MODE CLOCK TIMER LOCK SET SLEEP RESET FAN Used to select fan speed: LO, MID, HI, AUTO SET Used to select your desired temp. HOUR Used to set clock and timer setting. TEMP Used to confirm Timer and Clock settings. CLOCK Used to set correct time. SLEEP Used to lock buttons and LCD display. After replacing batteries, press ON/OFF...
MODE Used to normal condition. RESET Used to reset the controller back to select AUTO run, COOL,DRY,HEAT and FAN operation. AUTO ON AM PM * OFF AM PM TEMP ON SWING OFF FAN MODE CLOCK TIMER LOCK SET SLEEP RESET FAN Used to select fan speed: LO, MID, HI, AUTO SET Used to select your desired temp. HOUR Used to set clock and timer setting. TEMP Used to confirm Timer and Clock settings. CLOCK Used to set correct time. SLEEP Used to lock buttons and LCD display. After replacing batteries, press ON/OFF...
User Manual
Page 9
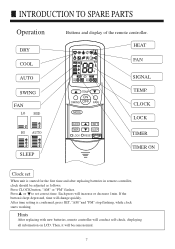
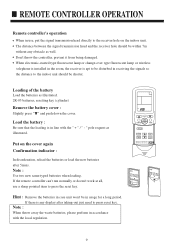
... FAN MODE CLOCK TIMER LOCK SET SLEEP RESET FAN SIGNAL TEMP. Each press will conduct self-check, displaying all information on LCD. Hints After replacing with new batteries, remote controller will increase or decrease 1min. Then, it will change quickly. After time setting is started for the first time and after replacing batteries in remote controller, clock should be adjusted as follows: Press CLOCK button, "AM" or "PM" flashes. If the button...
... FAN MODE CLOCK TIMER LOCK SET SLEEP RESET FAN SIGNAL TEMP. Each press will conduct self-check, displaying all information on LCD. Hints After replacing with new batteries, remote controller will increase or decrease 1min. Then, it will change quickly. After time setting is started for the first time and after replacing batteries in remote controller, clock should be adjusted as follows: Press CLOCK button, "AM" or "PM" flashes. If the button...
User Manual
Page 10
... oil vapour or humidity. (g) Near to the indoor unit, outdoor unit, power supply wire, connecting wire, pipes, otherwise images may cause fire hazard. Installed electrical-leaking circuit breaker. As required, take measures against heavy snow. [Wiring] Air-conditioner should not be created. TV, radio, acoustic appliances etc are at least 1 m far away to the machine emitting electric-magnetic waves. (h) Places with frequent fluctuation of the following locations: (a) Capable of supporting air-conditioner...
... oil vapour or humidity. (g) Near to the indoor unit, outdoor unit, power supply wire, connecting wire, pipes, otherwise images may cause fire hazard. Installed electrical-leaking circuit breaker. As required, take measures against heavy snow. [Wiring] Air-conditioner should not be created. TV, radio, acoustic appliances etc are at least 1 m far away to the machine emitting electric-magnetic waves. (h) Places with frequent fluctuation of the following locations: (a) Capable of supporting air-conditioner...
User Manual
Page 11
... press reset key. AM TEMP ON SWING OFF FAN MODE CLOCK TIMER SET SLEEP LOCK RESET 9 Don't throw the controller, prevent it from being damaged. Put on the indoor unit. Note : When throw away the waste batteries, please perform in accordance with the pole request as illustrated. When electronic-started type fluorescent lamp or change-over type fluorescent lamp or wireless telephone is installed in the room, the...
... press reset key. AM TEMP ON SWING OFF FAN MODE CLOCK TIMER SET SLEEP LOCK RESET 9 Don't throw the controller, prevent it from being damaged. Put on the indoor unit. Note : When throw away the waste batteries, please perform in accordance with the pole request as illustrated. When electronic-started type fluorescent lamp or change-over type fluorescent lamp or wireless telephone is installed in the room, the...
User Manual
Page 12
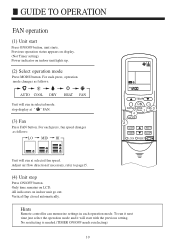
...: AUTO COOL DRY HEAT FAN Unit will run at " " FAN. (3) Fan Press FAN button. No reselecting is needed.(TIMER ON/OFF needs reselecting) 10 Vertical flap closed automatically. All indicators on indoor unit lights up. (2) Select operation mode Press MODE button. stop Press ON/OFF button. Hints Remote controller can memorize settings in selected mode. To run it next time just select the operation mode and it will run in each press, operation mode changes as follows: LO MID HI AM TEMP...
...: AUTO COOL DRY HEAT FAN Unit will run at " " FAN. (3) Fan Press FAN button. No reselecting is needed.(TIMER ON/OFF needs reselecting) 10 Vertical flap closed automatically. All indicators on indoor unit lights up. (2) Select operation mode Press MODE button. stop Press ON/OFF button. Hints Remote controller can memorize settings in selected mode. To run it next time just select the operation mode and it will run in each press, operation mode changes as follows: LO MID HI AM TEMP...
User Manual
Page 13
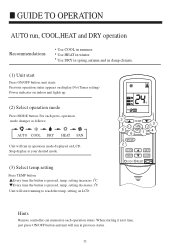
...LCD. * AM 3 TEMP 3 ON 5 SWING 6 OFF 1 FAN 4 MODE 2 CLOCK TIMER LOCK SET SLEEP RESET Hints Remote controller can memorize each press, operation mode changes as follows: AUTO COOL DRY HEAT FAN Unit will start Press ON/OFF button, unit starts. When starting it next time, just press ON/OFF button and unit will run in summer. GUIDE TO OPERATION AUTO run, COOL,HEAT and DRY operation Recommendations Use COOL in previous status. 11 Use HEAT in operation mode displayed on indoor unit lights up. (2) Select operation mode Press MODE button. setting decreases 1 C Unit will run...
...LCD. * AM 3 TEMP 3 ON 5 SWING 6 OFF 1 FAN 4 MODE 2 CLOCK TIMER LOCK SET SLEEP RESET Hints Remote controller can memorize each press, operation mode changes as follows: AUTO COOL DRY HEAT FAN Unit will start Press ON/OFF button, unit starts. When starting it next time, just press ON/OFF button and unit will run in summer. GUIDE TO OPERATION AUTO run, COOL,HEAT and DRY operation Recommendations Use COOL in previous status. 11 Use HEAT in operation mode displayed on indoor unit lights up. (2) Select operation mode Press MODE button. setting decreases 1 C Unit will run...
User Manual
Page 14
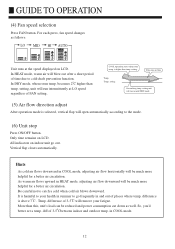
In HEAT mode, warm air will open automatically according to go out. COOL operation starts when room temp. Temp. Temp. in COOL mode, adjusting air flow horizontally will be reduced and power consumption cut down as follows: LO MID HI AUTO AUTO Unit runs at LO speed regardless of 3-5 C will run in mild DRY mode. (5) Air flow direction adjust After operation mode is harmful to your fatigue. setting,unit will run intermittently at the speed displayed on indoor unit go...
In HEAT mode, warm air will open automatically according to go out. COOL operation starts when room temp. Temp. Temp. in COOL mode, adjusting air flow horizontally will be reduced and power consumption cut down as follows: LO MID HI AUTO AUTO Unit runs at LO speed regardless of 3-5 C will run in mild DRY mode. (5) Air flow direction adjust After operation mode is harmful to your fatigue. setting,unit will run intermittently at the speed displayed on indoor unit go...
User Manual
Page 15
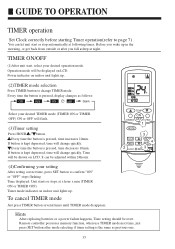
... 24hours. * ON AM TEMP ON SWING OFF FAN 1 MODE CLOCK TIMER 2 LOCK 3 SET 4 SLEEP 3 RESET (4)Confirming your desired operation mode. TIMER ON/OFF (1)After unit start or stop automatically at following times: Before you wake up . (2)TIMER mode selection Press TIMER button to confirm "ON" or "OFF" stops flashing Time displayed: Unit starts or stops at night. Time will change TIMER mode. Hints After replacing batteries or a power failure happens, Time setting should be shown on indoor unit lights up in the...
... 24hours. * ON AM TEMP ON SWING OFF FAN 1 MODE CLOCK TIMER 2 LOCK 3 SET 4 SLEEP 3 RESET (4)Confirming your desired operation mode. TIMER ON/OFF (1)After unit start or stop automatically at following times: Before you wake up . (2)TIMER mode selection Press TIMER button to confirm "ON" or "OFF" stops flashing Time displayed: Unit starts or stops at night. Time will change TIMER mode. Hints After replacing batteries or a power failure happens, Time setting should be shown on indoor unit lights up in the...
User Manual
Page 18
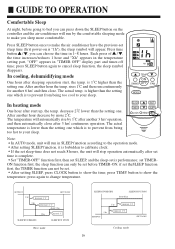
... sleep symbol will stop operation automatically after 3 hrs' continuous operation. CLOCK TIMER LOCK SET SLEEP RESET Note: In AUTO mode, unit will run by the comfortable sleeping mode to show the time; Set "TIMER-OFF" function first, then set SLEEP, and the sleep-set is 1 C higher than the setting one . press TEMP. decrease 2 C lower than the setting one . set . Press SLEEP button once to show the temperature; OFF AM TEMP ON SWING OFF FAN MODE In heating mode One hour after sleeping operation start...
... sleep symbol will stop operation automatically after 3 hrs' continuous operation. CLOCK TIMER LOCK SET SLEEP RESET Note: In AUTO mode, unit will run by the comfortable sleeping mode to show the time; Set "TIMER-OFF" function first, then set SLEEP, and the sleep-set is 1 C higher than the setting one . press TEMP. decrease 2 C lower than the setting one . set . Press SLEEP button once to show the temperature; OFF AM TEMP ON SWING OFF FAN MODE In heating mode One hour after sleeping operation start...
User Manual
Page 19
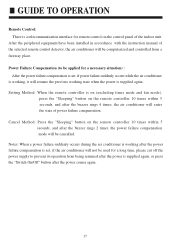
... remote controller is supplied again. After the peripheral equipment have been installed in accordance with the instruction manual of power failure compensation. Notes: When a power failure suddenly occurs during the air conditioner is working after the power failure compensation is set, if the air conditioner will not be used for a long time, please cut off the power supply to be applied for remote control on the control panel of the indoor unit. Power...
... remote controller is supplied again. After the peripheral equipment have been installed in accordance with the instruction manual of power failure compensation. Notes: When a power failure suddenly occurs during the air conditioner is working after the power failure compensation is set, if the air conditioner will not be used for a long time, please cut off the power supply to be applied for remote control on the control panel of the indoor unit. Power...
User Manual
Page 20
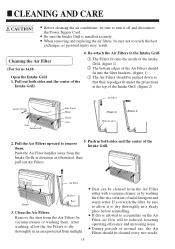
... and disconnect the Power Supply Cord. Pull the Air Filters upward to dry thoroughly in a solution of the Intake Grill. During periods of the Intake Grill. (figure 2) Air Filter About 30 mm Arm Intake Grill Side Panel Hook Notch Arm (Figure 1) Filter bracket (Figure 2) 2. When removing and replacing the air filters, be sure to allow the Air Filters to remove them . Re-attach the Air Filters to dry thoroughly in direction as personal injury...
... and disconnect the Power Supply Cord. Pull the Air Filters upward to dry thoroughly in a solution of the Intake Grill. During periods of the Intake Grill. (figure 2) Air Filter About 30 mm Arm Intake Grill Side Panel Hook Notch Arm (Figure 1) Filter bracket (Figure 2) 2. When removing and replacing the air filters, be sure to allow the Air Filters to remove them . Re-attach the Air Filters to dry thoroughly in direction as personal injury...
User Manual
Page 21
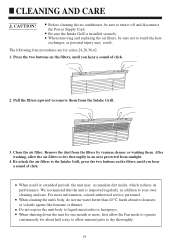
When removing and replacing the air filters, be sure to touch the heat exchanger, as personal injury may accumulate dirt inside, which reduces its performance. Before cleaning the air conditioner ,be sure not to turn it off and disconnect the Power Supply Cord. The following four procedures are for about half a day to allow internal parts to operate continuously for series 24,28,36,42...
When removing and replacing the air filters, be sure to touch the heat exchanger, as personal injury may accumulate dirt inside, which reduces its performance. Before cleaning the air conditioner ,be sure not to turn it off and disconnect the Power Supply Cord. The following four procedures are for about half a day to allow internal parts to operate continuously for series 24,28,36,42...
User Manual
Page 22
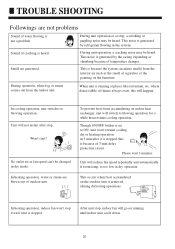
.... TROUBLE SHOOTING Followings are not problems Sound of water flowing is stopped. Though ON/OFF button is set to blowing operation. Sound of cracking is because of cigarettes or the painting on indoor heat exchanger, unit will reduce fan speed repeatedly and automatically if room temp. Unit will not restart after it is stopped, this will go on the outdoor unit is removed. (during defrosting operation) In heating operation, indoor fan won 't resume cooling, dry or heating operation in...
.... TROUBLE SHOOTING Followings are not problems Sound of water flowing is stopped. Though ON/OFF button is set to blowing operation. Sound of cracking is because of cigarettes or the painting on indoor heat exchanger, unit will reduce fan speed repeatedly and automatically if room temp. Unit will not restart after it is stopped, this will go on the outdoor unit is removed. (during defrosting operation) In heating operation, indoor fan won 't resume cooling, dry or heating operation in...
User Manual
Page 23
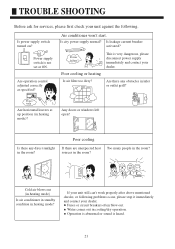
... in the room? Fuses or circuit breakers often blow out. TROUBLE SHOOTING Before ask for services, please first check your unit against the following problems occur, please stop it immediately and contact your dealer. Power supply switch is not set at up position (in inlet or outlet grill? Are operation control adjusted correctly as specified? Poor cooling or heating Is air filter too dirty? Any doors or windows left open? Poor cooling If there...
... in the room? Fuses or circuit breakers often blow out. TROUBLE SHOOTING Before ask for services, please first check your unit against the following problems occur, please stop it immediately and contact your dealer. Power supply switch is not set at up position (in inlet or outlet grill? Are operation control adjusted correctly as specified? Poor cooling or heating Is air filter too dirty? Any doors or windows left open? Poor cooling If there...
User Manual
Page 24
... indoor unit installation height is used under conditions of reduced performance, this kind of lower temperature than those listed above, the heat-exchanger may be required after first starting the air conditioner until the room is broken, please change it with a Microcomputer-controlled Automatic Defrosting function. If frost forms, the air conditioner will temporarily stop, and the defrosting circuit will operate briefly (for any trouble, the power indicator lamp will flash. *Trouble alarming...
... indoor unit installation height is used under conditions of reduced performance, this kind of lower temperature than those listed above, the heat-exchanger may be required after first starting the air conditioner until the room is broken, please change it with a Microcomputer-controlled Automatic Defrosting function. If frost forms, the air conditioner will temporarily stop, and the defrosting circuit will operate briefly (for any trouble, the power indicator lamp will flash. *Trouble alarming...


