
User Manual
Page 2
CONTENTS CAUTIONS 1-2 SAFETY PRECAUTIONS 3 FEATURES AND FUNCTIONS 4 NAME OF PARTS 5 INTRODUCTION TO SPARE PARTS 6-7 INSTALLATION 8 GUIDE TO OPERATION 9-15 CLEANING AND CARE 16 TROUBLE SHOOTING 17-18 OPERATING TIPS 19
CONTENTS CAUTIONS 1-2 SAFETY PRECAUTIONS 3 FEATURES AND FUNCTIONS 4 NAME OF PARTS 5 INTRODUCTION TO SPARE PARTS 6-7 INSTALLATION 8 GUIDE TO OPERATION 9-15 CLEANING AND CARE 16 TROUBLE SHOOTING 17-18 OPERATING TIPS 19
User Manual
Page 3
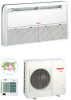
... Instructions and Warnings Before starting the air conditioner, read the information given in a air conditioner can be done by professional people, don't install unit by the relevant waste disposal center, and contribute to non-observation of the following instruction. The User's Guide contains very important observations relating to the assembly, operation and maintenance of the waste materials collecting centers and waste paper disposal services...
... Instructions and Warnings Before starting the air conditioner, read the information given in a air conditioner can be done by professional people, don't install unit by the relevant waste disposal center, and contribute to non-observation of the following instruction. The User's Guide contains very important observations relating to the assembly, operation and maintenance of the waste materials collecting centers and waste paper disposal services...
User Manual
Page 4
... accordance with specifications. Do not damage any parts of the air conditioner that carry refrigerant by pulling on the outdoor unit. 2 All electrical repairs must be no case should be carried out by qualified electricians. Always grip plug firmly and pull straight out from the outlet. For series 24,28,36,42,the breaker of the air conditioner should be all-pole switch;and...
... accordance with specifications. Do not damage any parts of the air conditioner that carry refrigerant by pulling on the outdoor unit. 2 All electrical repairs must be no case should be carried out by qualified electricians. Always grip plug firmly and pull straight out from the outlet. For series 24,28,36,42,the breaker of the air conditioner should be all-pole switch;and...
User Manual
Page 5
... expose the air conditioner directly to damage the power supply cord. Turn off the circuit breaker, and consult authorized service personnel. Do not block or cover the intake grill and outlet port. Avoid installing the air conditioner near the air conditioner. 3 SAFETY PRECAUTIONS WARNING! All the cables shall have got the European authentication certificate. Always consult authorized service personnel for lengthy periods in the fixed wiring. Do not...
... expose the air conditioner directly to damage the power supply cord. Turn off the circuit breaker, and consult authorized service personnel. Do not block or cover the intake grill and outlet port. Avoid installing the air conditioner near the air conditioner. 3 SAFETY PRECAUTIONS WARNING! All the cables shall have got the European authentication certificate. Always consult authorized service personnel for lengthy periods in the fixed wiring. Do not...
User Manual
Page 6
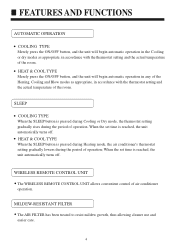
... with the thermostat setting and the actual temperature of the room. WIRELESS REMOTE CONTROL UNIT The WIRELESS REMOTE CONTROL UNIT allows convenient control of operation; When the set time is pressed during Heating mode, the air conditioner's thermostat setting gradually lowers during the period of operation. HEAT & COOL TYPE When the SLEEP button is reached, the unit automatically turns off . SLEEP COOLING TYPE When the SLEEP button is reached, the unit automatically turns off . When the set time is pressed during Cooling or Dry mode, the thermostat setting gradually rises...
... with the thermostat setting and the actual temperature of the room. WIRELESS REMOTE CONTROL UNIT The WIRELESS REMOTE CONTROL UNIT allows convenient control of operation; When the set time is pressed during Heating mode, the air conditioner's thermostat setting gradually lowers during the period of operation. HEAT & COOL TYPE When the SLEEP button is reached, the unit automatically turns off . SLEEP COOLING TYPE When the SLEEP button is reached, the unit automatically turns off . When the set time is pressed during Cooling or Dry mode, the thermostat setting gradually rises...
User Manual
Page 7
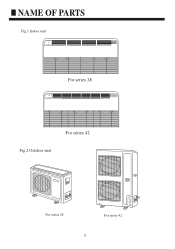
NAME OF PARTS Fig.1 Indoor unit For series 28 For series 42 Fig.2 Outdoor unit For series 28 For series 42 5
NAME OF PARTS Fig.1 Indoor unit For series 28 For series 42 Fig.2 Outdoor unit For series 28 For series 42 5
User Manual
Page 8
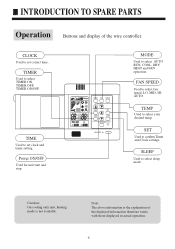
..., TIMER OFF, TIMER ON/OFF. Cautions: On cooling only unit, heating mode is the explanation of the wire controller. SET Used to select AUTO RUN, COOL, DRY, HEAT and FAN operation. Power ON/OFF Used for unit start and stop. AUTO SET % ROOM ON OFF AM AM PM PM MODE FAN SWING TEMP CLOCK TIMER SET SLEEP FILTER RESET RESET ON/OFF MODE Used to confirm Timer and Clock settings. FAN SPEED Used to select fan speed: LO, MID, HI, AUTO TEMP Used to select sleep mode. SLEEP Used to select your desired temp. CLOCK Used to set clock and timer setting...
..., TIMER OFF, TIMER ON/OFF. Cautions: On cooling only unit, heating mode is the explanation of the wire controller. SET Used to select AUTO RUN, COOL, DRY, HEAT and FAN operation. Power ON/OFF Used for unit start and stop. AUTO SET % ROOM ON OFF AM AM PM PM MODE FAN SWING TEMP CLOCK TIMER SET SLEEP FILTER RESET RESET ON/OFF MODE Used to confirm Timer and Clock settings. FAN SPEED Used to select fan speed: LO, MID, HI, AUTO TEMP Used to select sleep mode. SLEEP Used to select your desired temp. CLOCK Used to set clock and timer setting...
User Manual
Page 9
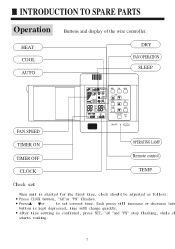
... to set When unit is confirmed, press SET, "AM "and "PM" stop flashing, while cl starts working. 7 After time setting is started for the first time, clock should be adjusted as follows: Press CLOCK button, "AM"or "PM" flashes. INTRODUCTION TO SPARE PARTS Operation HEAT COOL AUTO Buttons and display of the wire controller. DRY FAN OPERATION SLEEP FAN SPEED TIMER ON TIMER OFF CLOCK AUTO SET % ROOM ON OFF AM AM PM PM MODE FAN SWING TEMP CLOCK TIMER SET SLEEP FILTER RESET RESET ON/OFF OPERATING LAMP Remote control TEMP. Clock set...
... to set When unit is confirmed, press SET, "AM "and "PM" stop flashing, while cl starts working. 7 After time setting is started for the first time, clock should be adjusted as follows: Press CLOCK button, "AM"or "PM" flashes. INTRODUCTION TO SPARE PARTS Operation HEAT COOL AUTO Buttons and display of the wire controller. DRY FAN OPERATION SLEEP FAN SPEED TIMER ON TIMER OFF CLOCK AUTO SET % ROOM ON OFF AM AM PM PM MODE FAN SWING TEMP CLOCK TIMER SET SLEEP FILTER RESET RESET ON/OFF OPERATING LAMP Remote control TEMP. Clock set...

User Manual
Page 10
... or noises be located in well-vented and easily-accessible place. No obstacles around the outdoor unit outlet. 8 After the installation please be connected to the indoor unit, outdoor unit, power supply wire, connecting wire, pipes, otherwise images may cause water leaking, shock and fire hazard. Installed electrical-leaking circuit breaker. Please call dealer to the machine emitting electric-magnetic waves. (h) Places with heavy oil vapour or humidity. (g) Near to install the air-conditioner. CAUTION ! Earthing wire...
... or noises be located in well-vented and easily-accessible place. No obstacles around the outdoor unit outlet. 8 After the installation please be connected to the indoor unit, outdoor unit, power supply wire, connecting wire, pipes, otherwise images may cause water leaking, shock and fire hazard. Installed electrical-leaking circuit breaker. Please call dealer to the machine emitting electric-magnetic waves. (h) Places with heavy oil vapour or humidity. (g) Near to install the air-conditioner. CAUTION ! Earthing wire...
User Manual
Page 11
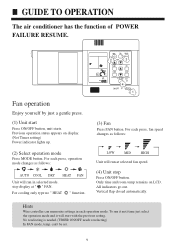
For each press, fan speed changes as follows: AUTO COOL DRY HEAT FAN Unit will run at selected fan speed. (4) Unit stop display at " " FAN. Only time and room temp remains on display. (Not Timer setting) Power indicator lights up. (2) Select operation mode Press MODE button. can memorize settings in selected mode. For each operation mode. Vertical flap closed automatically. No reselecting is needed.(TIMER ON/OFF needs reselecting) In FAN mode, temp. All indicators go out. Hints Wire controller can 't be set. 9 GUIDE TO OPERATION The air conditioner has the function...
For each press, fan speed changes as follows: AUTO COOL DRY HEAT FAN Unit will run at selected fan speed. (4) Unit stop display at " " FAN. Only time and room temp remains on display. (Not Timer setting) Power indicator lights up. (2) Select operation mode Press MODE button. can memorize settings in selected mode. For each operation mode. Vertical flap closed automatically. No reselecting is needed.(TIMER ON/OFF needs reselecting) In FAN mode, temp. All indicators go out. Hints Wire controller can 't be set. 9 GUIDE TO OPERATION The air conditioner has the function...
User Manual
Page 12
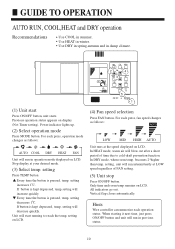
... ON/OFF button and unit will start Press ON/OFF button, unit starts. In HEAT mode, warm air will run in damp climate. (1) Unit start running to cold-draft prevention function. Previous operation status appears on LCD. AUTO SET AM MODE FAN SWING 2 TEMP 4 3 CLOCK SET TIMER SLEEP FILTER RESET RESET 5 ON/OFF 1 (4) Fan speed selection Press FAN button. GUIDE TO OPERATION AUTO RUN, COOL,HEAT and DRY operation Recommendations Use COOL in summer. setting, unit will blow out after a short period of FAN setting. (5) Unit stop Press ON/OFF button. If button is kept...
... ON/OFF button and unit will start Press ON/OFF button, unit starts. In HEAT mode, warm air will run in damp climate. (1) Unit start running to cold-draft prevention function. Previous operation status appears on LCD. AUTO SET AM MODE FAN SWING 2 TEMP 4 3 CLOCK SET TIMER SLEEP FILTER RESET RESET 5 ON/OFF 1 (4) Fan speed selection Press FAN button. GUIDE TO OPERATION AUTO RUN, COOL,HEAT and DRY operation Recommendations Use COOL in summer. setting, unit will blow out after a short period of FAN setting. (5) Unit stop Press ON/OFF button. If button is kept...
User Manual
Page 13
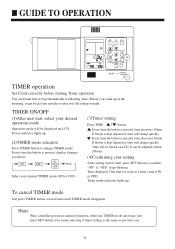
GUIDE TO OPERATION SET ON AM AM MODE FAN SWING TEMP CLOCK 2 TIMER SET 4 SLEEP 3 FILTER RESET RESET ON/OFF 1 TIMER operation Set Clock correctly before starting Timer operation. TIMER ON/OFF (1)After unit start or stop automatically at following time: Before you wake up in the morning, or get back from outside or after mode selecting if timer setting is kept depressed, time will change TIMER mode. Every time the button is kept depressed, time will change quickly. Every time...
GUIDE TO OPERATION SET ON AM AM MODE FAN SWING TEMP CLOCK 2 TIMER SET 4 SLEEP 3 FILTER RESET RESET ON/OFF 1 TIMER operation Set Clock correctly before starting Timer operation. TIMER ON/OFF (1)After unit start or stop automatically at following time: Before you wake up in the morning, or get back from outside or after mode selecting if timer setting is kept depressed, time will change TIMER mode. Every time the button is kept depressed, time will change quickly. Every time...
User Manual
Page 14
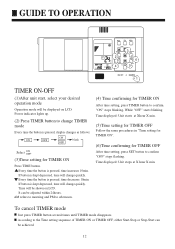
... will change quickly. Time displayed: Unit stops at Xhour X min. (5)Time setting for TIMER OFF Follow the same procedures in "Time setting for TIMER ON". (6)Time confirming for TIMER ON After time setting, press TIMER button to confirm "OFF" stops flashing. It can be achieved. 12 GUIDE TO OPERATION SET ON OFF AM PM MODE FAN SWING TEMP CLOCK 2 TIMER 3 SET 6 SLEEP 4 5 FILTER RESET RESET ON/OFF 1 TIMER ON-OFF (1)After unit start, select your desired operation mode Operation mode will be displayed on...
... will change quickly. Time displayed: Unit stops at Xhour X min. (5)Time setting for TIMER OFF Follow the same procedures in "Time setting for TIMER ON". (6)Time confirming for TIMER ON After time setting, press TIMER button to confirm "OFF" stops flashing. It can be achieved. 12 GUIDE TO OPERATION SET ON OFF AM PM MODE FAN SWING TEMP CLOCK 2 TIMER 3 SET 6 SLEEP 4 5 FILTER RESET RESET ON/OFF 1 TIMER ON-OFF (1)After unit start, select your desired operation mode Operation mode will be displayed on...

User Manual
Page 15
... "xh" appears in the humidity setting part, "OFF" appears in "TIMER OFF" display part and timer-off time; SETTING T 1 hr 1 hr 3 hrs SLEEP RUN BEGINS SHUT DOWN about 3 hrs SLEEP RUN STOPS Heat mode 13 SLEEP RUN BEGINS SLEEP RUN STOPS about 6 hrs 1 hr 1 hr SETTING T SHUT DOWN Cooling mode In cooling, dehumidifying mode In heating mode Note: In AUTO mode, unit will appear. GUIDE TO OPERATION Comfortable Sleep At night, before TIMER-ON; if set theSLEEP function first, the...
... "xh" appears in the humidity setting part, "OFF" appears in "TIMER OFF" display part and timer-off time; SETTING T 1 hr 1 hr 3 hrs SLEEP RUN BEGINS SHUT DOWN about 3 hrs SLEEP RUN STOPS Heat mode 13 SLEEP RUN BEGINS SLEEP RUN STOPS about 6 hrs 1 hr 1 hr SETTING T SHUT DOWN Cooling mode In cooling, dehumidifying mode In heating mode Note: In AUTO mode, unit will appear. GUIDE TO OPERATION Comfortable Sleep At night, before TIMER-ON; if set theSLEEP function first, the...
User Manual
Page 16
... downward blowing operation of cooling mode for many hours. If adjusted by using the SWING button on the remote controller. CAUTION Avoid direct air flow to the AIRFLOW mode. Recommendable stopping angle of remote controller. Do not touch the swing louver during SWING mode, it would cause an injure. (Only for 24,28,36,42 series.) LOUVER STOPPED When the LOUVER button is pushed during swing operation. GUIDE TO OPERATION...
... downward blowing operation of cooling mode for many hours. If adjusted by using the SWING button on the remote controller. CAUTION Avoid direct air flow to the AIRFLOW mode. Recommendable stopping angle of remote controller. Do not touch the swing louver during SWING mode, it would cause an injure. (Only for 24,28,36,42 series.) LOUVER STOPPED When the LOUVER button is pushed during swing operation. GUIDE TO OPERATION...
User Manual
Page 17
... the The trouble of the of the pipe of the room temp. When the air conditioner does not operate properly after recovering power stoppage. sensor temp. Setting Method: When the remote controller is on (excluding timer mode and fan mode), press the "Sleeping" button on the remote controller 10 times within 5 seconds, and after the buzzer rings 2 timer, the power failure compensation mode will enter the state of power failure compensation. The fuse or breaker often shuts...
... the The trouble of the of the pipe of the room temp. When the air conditioner does not operate properly after recovering power stoppage. sensor temp. Setting Method: When the remote controller is on (excluding timer mode and fan mode), press the "Sleeping" button on the remote controller 10 times within 5 seconds, and after the buzzer rings 2 timer, the power failure compensation mode will enter the state of power failure compensation. The fuse or breaker often shuts...
User Manual
Page 18
... not use water hotter than 40 C, harsh abrasive cleansers, or volatile agents like benzene or thinner. CLEANING AND CARE CAUTION! After washing, allow the Fan mode to turn it off and disconnect the Power Supply Cord. Do not expose the unit body to touch the heat exchanger, as personal injury may accumulate dirt inside, which reduces its performance. When removing and replacing the air filters...
... not use water hotter than 40 C, harsh abrasive cleansers, or volatile agents like benzene or thinner. CLEANING AND CARE CAUTION! After washing, allow the Fan mode to turn it off and disconnect the Power Supply Cord. Do not expose the unit body to touch the heat exchanger, as personal injury may accumulate dirt inside, which reduces its performance. When removing and replacing the air filters...
User Manual
Page 19
.../OFF button is set to blowing operation. is generated by the casing expanding or shrinking because of outdoor unit. This occurs when frost accumulated on the outdoor unit is removed. (during defrosting operation) In heating operation, indoor fan won 't resume cooling, dry or heating operation in the system. Smell are generated. In cooling operation, unit switches to ON, unit won 't stop After unit stop, indoor fan will go on running at stop . if room temp. Sound of water flowing is not a problem. TROUBLE SHOOTING Followings...
.../OFF button is set to blowing operation. is generated by the casing expanding or shrinking because of outdoor unit. This occurs when frost accumulated on the outdoor unit is removed. (during defrosting operation) In heating operation, indoor fan won 't resume cooling, dry or heating operation in the system. Smell are generated. In cooling operation, unit switches to ON, unit won 't stop After unit stop, indoor fan will go on running at stop . if room temp. Sound of water flowing is not a problem. TROUBLE SHOOTING Followings...
User Manual
Page 20
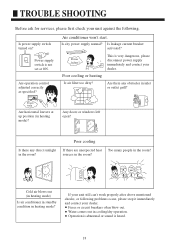
... contact your dealer. Air conditioner won't start. This is heard. 18 Is leakage current breaker activated? Poor cooling or heating Is air filter too dirty? Water comes out in the room? Is power supply switch turned on? Is city power supply normal? Are there any direct sunlight in inlet or outlet grill? Fuses or circuit breakers often blow out. Power supply switch is not set at up position (in heating mode)? TROUBLE SHOOTING Before ask for services, please first...
... contact your dealer. Air conditioner won't start. This is heard. 18 Is leakage current breaker activated? Poor cooling or heating Is air filter too dirty? Water comes out in the room? Is power supply switch turned on? Is city power supply normal? Are there any direct sunlight in inlet or outlet grill? Fuses or circuit breakers often blow out. Power supply switch is not set at up position (in heating mode)? TROUBLE SHOOTING Before ask for services, please first...
User Manual
Page 21
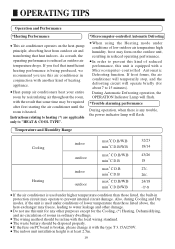
... internal circuit damage. During Automatic Defrosting operation, the OPERATION Indicator Lamp will flash. Do not use this unit for the Cooling, (*) Heating, Dehumidifying, and air-circulation of heating appliance. The indoor unit installation height is reduced as outdoor air temperature drops. As a result, the operating performance is at least 2.5m. 19 Instructions relating to heating (*) are applicable only to "HEAT & COOL TYPE". *Microcomputer-controlled Automatic Defrosting When using the Heating mode under higher temperature condition than those listed, the...
... internal circuit damage. During Automatic Defrosting operation, the OPERATION Indicator Lamp will flash. Do not use this unit for the Cooling, (*) Heating, Dehumidifying, and air-circulation of heating appliance. The indoor unit installation height is reduced as outdoor air temperature drops. As a result, the operating performance is at least 2.5m. 19 Instructions relating to heating (*) are applicable only to "HEAT & COOL TYPE". *Microcomputer-controlled Automatic Defrosting When using the Heating mode under higher temperature condition than those listed, the...


