
User Manual
Page 1
... the tumble dryer. 19 Fabric softeners or similar products should only be properly installed in operation. 11 Do not use this appliance to wash clothes which are properly intact. 13 The appliance is switched off then grasp the plug firmly and pull straight out from the outlet. 4 Replace worn power cords, loose plugs and faulty power outlets immediately. 5 Unplug your appliance before cleaning or before operating your appliance...
... the tumble dryer. 19 Fabric softeners or similar products should only be properly installed in operation. 11 Do not use this appliance to wash clothes which are properly intact. 13 The appliance is switched off then grasp the plug firmly and pull straight out from the outlet. 4 Replace worn power cords, loose plugs and faulty power outlets immediately. 5 Unplug your appliance before cleaning or before operating your appliance...
User Manual
Page 2
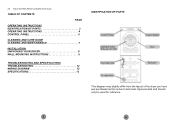
TABLE OF CONTENTS PAGE OPERATING INSTRUCTIONS IDENTIFICATION OF PARTS 3 OPERATING INSTRUCTIONS 4 CONTROL PANEL 6 CLEANING AND CARE GUIDE CLEANING AND MAINTAINANCE 7 INSTALLATION UNPACKING YOUR DRYER 8 WALL MOUNTING INSTRUCTIONS 9 TROUBLESHOOTING AND SPECIFICATIONS TROUBLESHOOTING 12 WIRING DIAGRAM 12 SPECIFICATIONS 13 IDENTIFICATION OF PARTS This diagram may slightly differ from the layout of the dryer you have just purchased as this is due to technical improvements and should only be used for reference. 2 3 23 Clean lint filter before and after each load.
TABLE OF CONTENTS PAGE OPERATING INSTRUCTIONS IDENTIFICATION OF PARTS 3 OPERATING INSTRUCTIONS 4 CONTROL PANEL 6 CLEANING AND CARE GUIDE CLEANING AND MAINTAINANCE 7 INSTALLATION UNPACKING YOUR DRYER 8 WALL MOUNTING INSTRUCTIONS 9 TROUBLESHOOTING AND SPECIFICATIONS TROUBLESHOOTING 12 WIRING DIAGRAM 12 SPECIFICATIONS 13 IDENTIFICATION OF PARTS This diagram may slightly differ from the layout of the dryer you have just purchased as this is due to technical improvements and should only be used for reference. 2 3 23 Clean lint filter before and after each load.
User Manual
Page 3
... cycle, the dryer will display "END." Turning on power Before turning on the lint filter and in a laundry bag. - Do not put small items in the duct, to the "OFF" position and turn off any dust and dirt inside the drum of the laundry load - Laundry loading Open the door and load the laundry into the dryer. Before operation, clean off any debris on the power of the dryer. Load to start the program. 6. Note: Check...
... cycle, the dryer will display "END." Turning on power Before turning on the lint filter and in a laundry bag. - Do not put small items in the duct, to the "OFF" position and turn off any dust and dirt inside the drum of the laundry load - Laundry loading Open the door and load the laundry into the dryer. Before operation, clean off any debris on the power of the dryer. Load to start the program. 6. Note: Check...
User Manual
Page 4
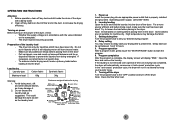
... start button. Do not use harsh or abrasive cleaners. LED screen This screen displays the remaining cycle time for custom setting. D - The delay range is fine. If you have set your dryer without the lint filter. Just a damp cloth is between 1 - 12 hours. B - To resume drying, press this button to "OFF" and try again. It allows you have set your drying time, select "SET" on the door...
... start button. Do not use harsh or abrasive cleaners. LED screen This screen displays the remaining cycle time for custom setting. D - The delay range is fine. If you have set your dryer without the lint filter. Just a damp cloth is between 1 - 12 hours. B - To resume drying, press this button to "OFF" and try again. It allows you have set your drying time, select "SET" on the door...
User Manual
Page 5
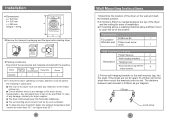
... ease of the washer. into the stud). Packing accessories Check list of the accessories and materials provided with the machine: Name Owner's Wall manual mounting kit Panel film Screw Quantity 4 To ensure the dryer operating normally, attention must be paid to perform better, the ambient temperature shall neither be electrified. In case of any restriction to open the lid of installation; Any damaged dryer must be...
... ease of the washer. into the stud). Packing accessories Check list of the accessories and materials provided with the machine: Name Owner's Wall manual mounting kit Panel film Screw Quantity 4 To ensure the dryer operating normally, attention must be paid to perform better, the ambient temperature shall neither be electrified. In case of any restriction to open the lid of installation; Any damaged dryer must be...
User Manual
Page 6
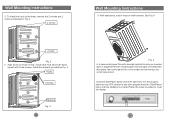
To install the hook to the dryer, remove the 2 screws and 2 corks as indicated in Fig. 3 and each hook should .be fixed up well with inverted symbols to revert the display. With assistance, mount dryer on the surface so that writing is the correct way around. 7.Hold the Start/Pause button and at the same time turn the program dial knob...
To install the hook to the dryer, remove the 2 screws and 2 corks as indicated in Fig. 3 and each hook should .be fixed up well with inverted symbols to revert the display. With assistance, mount dryer on the surface so that writing is the correct way around. 7.Hold the Start/Pause button and at the same time turn the program dial knob...
User Manual
Page 7
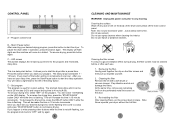
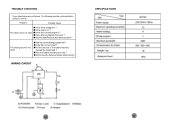
... set ? WIRING CIRCUIT SPECIFICATIONS Is the filter screen clean? Did the amount of the loaded laundry exceed the rated load ? Has the Start/Pause button been pressed ? Was the loaded laundry spun dry ? Is the power on ? The drying result is not good Was the correct drying program set ? TROUBLE SHOOTING Those listed below are not failures. The following must be confirmed before calling for service: Problem Possible Cause The dryer...
... set ? WIRING CIRCUIT SPECIFICATIONS Is the filter screen clean? Did the amount of the loaded laundry exceed the rated load ? Has the Start/Pause button been pressed ? Was the loaded laundry spun dry ? Is the power on ? The drying result is not good Was the correct drying program set ? TROUBLE SHOOTING Those listed below are not failures. The following must be confirmed before calling for service: Problem Possible Cause The dryer...


