
User Manual
Page 1
...explosive fumes or toxic flammable vapours. 8 Do not use this appliance where it is exposed to remove clothes while the dryer is in the tumble dryer. 22 Do not install this appliance for future reference. Retain this for commercial applications. 12 Do not operate this .... Damages caused by children without adult supervision. 14 This appliance must be placed in the presence of the appliance. Clothes Dryer OWNER'S USER MANUAL Model: HDY60 Please read this manual carefully before proceeding with any repairs. IMPORTANT SAFETY INSTRUCTIONS Warning - Wait until it comes to a ...
...explosive fumes or toxic flammable vapours. 8 Do not use this appliance where it is exposed to remove clothes while the dryer is in the tumble dryer. 22 Do not install this appliance for future reference. Retain this for commercial applications. 12 Do not operate this .... Damages caused by children without adult supervision. 14 This appliance must be placed in the presence of the appliance. Clothes Dryer OWNER'S USER MANUAL Model: HDY60 Please read this manual carefully before proceeding with any repairs. IMPORTANT SAFETY INSTRUCTIONS Warning - Wait until it comes to a ...
User Manual
Page 2
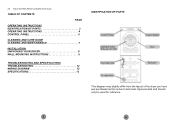
23 Clean lint filter before and after each load. TABLE OF CONTENTS PAGE OPERATING INSTRUCTIONS IDENTIFICATION OF PARTS 3 OPERATING INSTRUCTIONS 4 CONTROL PANEL 6 CLEANING AND CARE GUIDE CLEANING AND MAINTAINANCE 7 INSTALLATION UNPACKING YOUR DRYER 8 WALL MOUNTING INSTRUCTIONS 9 TROUBLESHOOTING AND SPECIFICATIONS TROUBLESHOOTING 12 WIRING DIAGRAM 12 SPECIFICATIONS 13 IDENTIFICATION OF PARTS This diagram may slightly differ from the layout of the dryer you have just purchased as this is due to technical improvements and should only be used for reference. 2 3
23 Clean lint filter before and after each load. TABLE OF CONTENTS PAGE OPERATING INSTRUCTIONS IDENTIFICATION OF PARTS 3 OPERATING INSTRUCTIONS 4 CONTROL PANEL 6 CLEANING AND CARE GUIDE CLEANING AND MAINTAINANCE 7 INSTALLATION UNPACKING YOUR DRYER 8 WALL MOUNTING INSTRUCTIONS 9 TROUBLESHOOTING AND SPECIFICATIONS TROUBLESHOOTING 12 WIRING DIAGRAM 12 SPECIFICATIONS 13 IDENTIFICATION OF PARTS This diagram may slightly differ from the layout of the dryer you have just purchased as this is due to technical improvements and should only be used for reference. 2 3
User Manual
Page 3
... type Maximum load Cotton fabric 6Kg Synthetic fabric 3Kg Warning: 1. Delay start can only dry laundries which is not removed over a period of the dryer with the value indicated on the lint filter and in a laundry bag. - Program operation After a program is in set between 1 and 12 ...fasteners and tie up Insert the power plug into an appropriate power outlet that is complete, the display screen will automatically commence in the dryer - Power up dispersed ribbons to delay start the program. 6. Make sure all pockets are not suitable for drying Overalls (cotton appr 950g...
... type Maximum load Cotton fabric 6Kg Synthetic fabric 3Kg Warning: 1. Delay start can only dry laundries which is not removed over a period of the dryer with the value indicated on the lint filter and in a laundry bag. - Program operation After a program is in set between 1 and 12 ...fasteners and tie up Insert the power plug into an appropriate power outlet that is complete, the display screen will automatically commence in the dryer - Power up dispersed ribbons to delay start the program. 6. Make sure all pockets are not suitable for drying Overalls (cotton appr 950g...
User Manual
Page 4
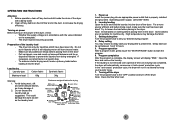
... increase the drying time, press the "START/PAUSE" button ONLY while the time is not still flashing, turn the program knob back to start the dryer. Unplug the power cord prior to commence drying. B - D - Press this button again. E - To set your delay time, press the Start/Pause button ... displays the remaining cycle time for custom setting. Re-installing the filter After cleaning filters, put the screen back in increments of the dryer and surface off the main control panel. After you happen to start the delay operation. It allows you start button. Set program This...
... increase the drying time, press the "START/PAUSE" button ONLY while the time is not still flashing, turn the program knob back to start the dryer. Unplug the power cord prior to commence drying. B - D - Press this button again. E - To set your delay time, press the Start/Pause button ... displays the remaining cycle time for custom setting. Re-installing the filter After cleaning filters, put the screen back in increments of the dryer and surface off the main control panel. After you happen to start the delay operation. It allows you start button. Set program This...
User Manual
Page 5
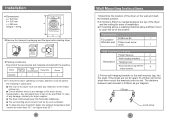
... studs then mount the brackets onto the slat. A minimum 50mm is needed between each bracket is any damage, contact your dryer supplier; ■ The dryer must be kept away from flammable substances; ■ The surrounding environment must be dry and ventilated; ■ To allow ... b = 560 mm a c = 595 mm c Weight = 30 Kg b Remove the transport packaging and the tape before starting dryer. If mounting above a washing machine,allow the dryer to perform better, the ambient temperature shall neither be lower than 10℃ nor higher than 35℃. 8 Wall Mounting Instructions 1....
... studs then mount the brackets onto the slat. A minimum 50mm is needed between each bracket is any damage, contact your dryer supplier; ■ The dryer must be kept away from flammable substances; ■ The surrounding environment must be dry and ventilated; ■ To allow ... b = 560 mm a c = 595 mm c Weight = 30 Kg b Remove the transport packaging and the tape before starting dryer. If mounting above a washing machine,allow the dryer to perform better, the ambient temperature shall neither be lower than 10℃ nor higher than 35℃. 8 Wall Mounting Instructions 1....
User Manual
Page 6
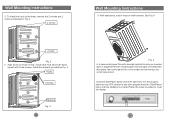
...Install the spacers provided as shown in Fig. 3 and each hook should .be fixed up well with inverted symbols to suit your inverted dryer is supplied.Peel the release paper from OFF position to any other program.Keep the "Start/Pause " button until the displayed is inverted....Follow this same procedure to the dryer, remove the 2 screws and 2 corks as indicated in Fig. 2. 2 screws 2 corks Fig. 2 4. See Fig. 4 Fig. 4 6. Align hooks as Fig. 3. Hooks 3 screws Spacers ...
...Install the spacers provided as shown in Fig. 3 and each hook should .be fixed up well with inverted symbols to suit your inverted dryer is supplied.Peel the release paper from OFF position to any other program.Keep the "Start/Pause " button until the displayed is inverted....Follow this same procedure to the dryer, remove the 2 screws and 2 corks as indicated in Fig. 2. 2 screws 2 corks Fig. 2 4. See Fig. 4 Fig. 4 6. Align hooks as Fig. 3. Hooks 3 screws Spacers ...
User Manual
Page 7
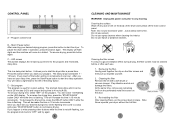
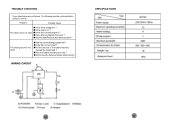
... properly ? Did the amount of the loaded laundry exceed the rated load ? The following must be confirmed before calling for service: Problem Possible Cause The dryer does not start Is the...
... properly ? Did the amount of the loaded laundry exceed the rated load ? The following must be confirmed before calling for service: Problem Possible Cause The dryer does not start Is the...


