User Manual
Page 1
HL15B/HL15E/HL19E/HL19W/HL22E LCD TV USER MANUAL Please read this manual carefully before using this TV set and keep it for future reference.
HL15B/HL15E/HL19E/HL19W/HL22E LCD TV USER MANUAL Please read this manual carefully before using this TV set and keep it for future reference.

User Manual
Page 2
...OPEN CAUTION: TO REDUCE THE RISK OF ELECTRIC SHOCK, DO NOT REMOVE COVER (OR BACK). THERE IS AN EXCLAMATION MARK IN THE TRIANGLE: THIS SYMBOL ALERTS YOU THAT IMPORTANT LITERATURE CONCERNING OPERATION AND MAINTENANCE HAS BEEN INCLUDED WITH THIS PRODUCT. CAUTION: TO REDUCE... INSIDE. NO USER SERVICEABLE PARTS INSIDE.FOR ANY PROBLEM, REFER SERVICING TO QUALIFIED SERVICE PERSONNEL. NOTE: SERVICING THE UNIT YOURSELF IS UNAUTHORIZED AND COULD LEAD TO INJURY OR PRODUCT DAMAGE. WARNING AND CAUTION CAUTION ! DO NOT USE ANY ABRASIVE CLEANSERS WHICH MAY SCRATCH OR DAMAGE THE LCD SCREEN. IT IS ...
...OPEN CAUTION: TO REDUCE THE RISK OF ELECTRIC SHOCK, DO NOT REMOVE COVER (OR BACK). THERE IS AN EXCLAMATION MARK IN THE TRIANGLE: THIS SYMBOL ALERTS YOU THAT IMPORTANT LITERATURE CONCERNING OPERATION AND MAINTENANCE HAS BEEN INCLUDED WITH THIS PRODUCT. CAUTION: TO REDUCE... INSIDE. NO USER SERVICEABLE PARTS INSIDE.FOR ANY PROBLEM, REFER SERVICING TO QUALIFIED SERVICE PERSONNEL. NOTE: SERVICING THE UNIT YOURSELF IS UNAUTHORIZED AND COULD LEAD TO INJURY OR PRODUCT DAMAGE. WARNING AND CAUTION CAUTION ! DO NOT USE ANY ABRASIVE CLEANSERS WHICH MAY SCRATCH OR DAMAGE THE LCD SCREEN. IT IS ...
User Manual
Page 5
...Front Panel Controls 2 Connection Options 3 Remote Control Key Functions 4 Remote Control 5 Installing Batteries 5 Connection Instructions 6 Grounding 6 External equipment Connections 6 Antenna Connection 6 PC Setup 7 VCR Setup 8 Cable TV Setup 9 External AV Source Setup 9 Basic Operating Instructions 10 Turn on the LCD-TV 10 Audio Control 10 Mute...10 Select the TV Channel You Want 11 Picture Mode 11 Sound Mode 11 Sleep...1. 1 INFO...11 GUIDE 11 -button 12 CH.LIST button 1. 2 FAV.LIST button 12 ARC button 12 Menu Operations 13 Video Menu Options 13 Video Menu Options...
...Front Panel Controls 2 Connection Options 3 Remote Control Key Functions 4 Remote Control 5 Installing Batteries 5 Connection Instructions 6 Grounding 6 External equipment Connections 6 Antenna Connection 6 PC Setup 7 VCR Setup 8 Cable TV Setup 9 External AV Source Setup 9 Basic Operating Instructions 10 Turn on the LCD-TV 10 Audio Control 10 Mute...10 Select the TV Channel You Want 11 Picture Mode 11 Sound Mode 11 Sleep...1. 1 INFO...11 GUIDE 11 -button 12 CH.LIST button 1. 2 FAV.LIST button 12 ARC button 12 Menu Operations 13 Video Menu Options 13 Video Menu Options...
User Manual
Page 8
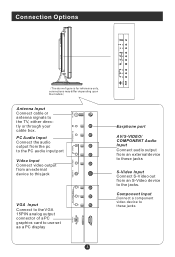
... IN L R Y Pb Pr Earphone port AV/S-VIDEO/ COMPONENT Audio Input Connect audio output from an external device to these jacks Connection Options ANT IN PC AUDIO IN R AUDIO IN L V VIDEO IN S-VIDEO Pr Pb COMPONENT IN Y VGA IN The above figure is for reference only, connections may differ depending upon the models Antenna Input Connect cable or antenna signals to the jacks. Component Input Connect a component video device to these jacks S-Video Input Connect S-Video out from an S-Video device to the TV, either directly or through your cable box.
... IN L R Y Pb Pr Earphone port AV/S-VIDEO/ COMPONENT Audio Input Connect audio output from an external device to these jacks Connection Options ANT IN PC AUDIO IN R AUDIO IN L V VIDEO IN S-VIDEO Pr Pb COMPONENT IN Y VGA IN The above figure is for reference only, connections may differ depending upon the models Antenna Input Connect cable or antenna signals to the jacks. Component Input Connect a component video device to these jacks S-Video Input Connect S-Video out from an S-Video device to the TV, either directly or through your cable box.
User Manual
Page 9
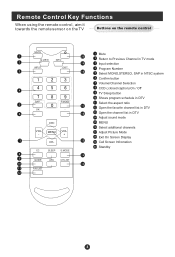
CC SLEEP S.MODE GUIDE ARC CH.LIST FAV.LIST Mute Return to Previous Channel in TV mode Input selection Program Number Select MONO,STEREO, SAP in NTSC system Confirm button Volume/Channel Selection CCD ( closed caption) On / Off TV Sleep button Shows program schedule in DTV Select the aspect ratio Open the favorite channel list in DTV Open the channel list in DTV Adjust sound mode MENU Select additional channels Adjust Picture Mode Exit On Screen Display Call Screen Infromation Standby Remote Control Key Functions When using the remote control, aim it towards the remote sensor on the TV...
CC SLEEP S.MODE GUIDE ARC CH.LIST FAV.LIST Mute Return to Previous Channel in TV mode Input selection Program Number Select MONO,STEREO, SAP in NTSC system Confirm button Volume/Channel Selection CCD ( closed caption) On / Off TV Sleep button Shows program schedule in DTV Select the aspect ratio Open the favorite channel list in DTV Open the channel list in DTV Adjust sound mode MENU Select additional channels Adjust Picture Mode Exit On Screen Display Call Screen Infromation Standby Remote Control Key Functions When using the remote control, aim it towards the remote sensor on the TV...
User Manual
Page 11
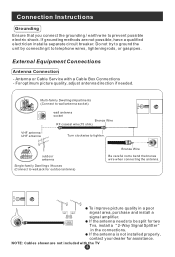
... wall jack for assistance. NOTE: Cables shown are not possible, have a qualified electrician install a separate circuit breaker. Connection Instructions Grounding Ensure that you connect the grounding / earth wire to tighten. External Equipment Connections Antenna Connection - Multi-family Dwellings/Apartments (Connect to wall antenna socket) VHF antenna UHF antenna wall antenna socket Bronze Wire RF coaxial wire (75 ohm) Turn clockwise to prevent possible electric shock. For optimum picture quality, adjust antenna direction if needed...
... wall jack for assistance. NOTE: Cables shown are not possible, have a qualified electrician install a separate circuit breaker. Connection Instructions Grounding Ensure that you connect the grounding / earth wire to tighten. External Equipment Connections Antenna Connection - Multi-family Dwellings/Apartments (Connect to wall antenna socket) VHF antenna UHF antenna wall antenna socket Bronze Wire RF coaxial wire (75 ohm) Turn clockwise to prevent possible electric shock. For optimum picture quality, adjust antenna direction if needed...
User Manual
Page 12
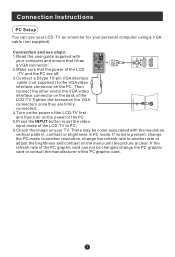
... a monitor for your personal computer using a VGA cable (not supplied). Connection Instructions PC Setup You can not be noise associated with your computer and ensure that it has a VGA connector; 2.Make sure that the power of the LCD -TV and the PC are firmly connected; 4.Turn on the power of the LCD-TV first , and then turn on the power of the PC; 5.Press the INPUT button to set the video input mode...
... a monitor for your personal computer using a VGA cable (not supplied). Connection Instructions PC Setup You can not be noise associated with your computer and ensure that it has a VGA connector; 2.Make sure that the power of the LCD -TV and the PC are firmly connected; 4.Turn on the power of the LCD-TV first , and then turn on the power of the PC; 5.Press the INPUT button to set the video input mode...
User Manual
Page 13
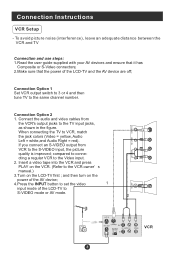
... use steps: 1.Read the user guide supplied with your AV devices and ensure that it has Composite or S-Video connectors; 2.Make sure that the power of the LCD-TV to the VCR owner s manual.) 3.Turn on the VCR. (Refer to S-VIDEO mode or AV mode. 2 VCR CR to the Video input. 2. compared to the same channel number. Connection Option 1 Set VCR output switch to 3 or 4 and then tune TV to conne- Connect the audio and video cables from V. Insert a video...
... use steps: 1.Read the user guide supplied with your AV devices and ensure that it has Composite or S-Video connectors; 2.Make sure that the power of the LCD-TV to the VCR owner s manual.) 3.Turn on the VCR. (Refer to S-VIDEO mode or AV mode. 2 VCR CR to the Video input. 2. compared to the same channel number. Connection Option 1 Set VCR output switch to 3 or 4 and then tune TV to conne- Connect the audio and video cables from V. Insert a video...
User Manual
Page 14
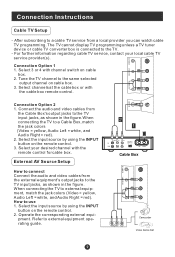
... cable TV programming. How to a Cable Box, match the jack colors (Video = yellow, Audio Left = white, and Audio Right = red). 2. Connection Instructions Cable TV Setup - For further information regarding cable TV service, contact your desired channel with the remote control for cable box. When connecting the TV to external equipment operating guide. Connection Option 1 1. Refer to external equipment, match the jack colors (Video = yellow, Audio Left = white, and Audio Right = red). Connection Option 2 1. Select the input source by using the INPUT button on cable box...
... cable TV programming. How to a Cable Box, match the jack colors (Video = yellow, Audio Left = white, and Audio Right = red). 2. Connection Instructions Cable TV Setup - For further information regarding cable TV service, contact your desired channel with the remote control for cable box. When connecting the TV to external equipment operating guide. Connection Option 1 1. Refer to external equipment, match the jack colors (Video = yellow, Audio Left = white, and Audio Right = red). Connection Option 2 1. Select the input source by using the INPUT button on cable box...
User Manual
Page 15
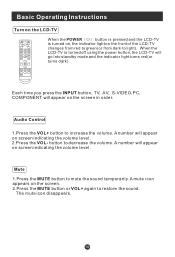
... the screen in order. CC SLEEP S.MODE GUIDE ARC CH.LIST FAV.LIST When the POWER button is pressed and the LCD-TV is turned off using the power button, the LCD-TV will appear on the LCD-TV MUTE Q.VIEW INPUT INFO EXIT SAP OK P.MODE CH+ VOL - MENU VOL + CH- Each time you press the INPUT button, TV, AV, S-VIDEO,PC, COMPONENT will go into standby mode and the indicator light turns red(or turns dark). button to decrease the volume.
... the screen in order. CC SLEEP S.MODE GUIDE ARC CH.LIST FAV.LIST When the POWER button is pressed and the LCD-TV is turned off using the power button, the LCD-TV will appear on the LCD-TV MUTE Q.VIEW INPUT INFO EXIT SAP OK P.MODE CH+ VOL - MENU VOL + CH- Each time you press the INPUT button, TV, AV, S-VIDEO,PC, COMPONENT will go into standby mode and the indicator light turns red(or turns dark). button to decrease the volume.
User Manual
Page 16
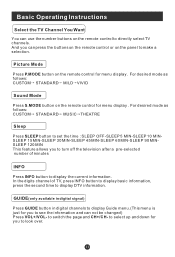
... button to directly select TV channels. GUIDE(only available in digital signal) Press GUIDE button in digital channels to display Guide menu.(This menu is just for you to see the information and can use the number buttons on the remote control for menu display . For desired mode as follows: CUSTOM STANDARD MILD VIVID Sound Mode Press S.MODE button on the panel to display DTV information. For desired mode as follows: CUSTOM STANDARD MUSIC THEATRE Sleep Press SLEEP button to set the time : SLEEP OFF-SLEEP 5 MIN-SLEEP...
... button to directly select TV channels. GUIDE(only available in digital signal) Press GUIDE button in digital channels to display Guide menu.(This menu is just for you to see the information and can use the number buttons on the remote control for menu display . For desired mode as follows: CUSTOM STANDARD MILD VIVID Sound Mode Press S.MODE button on the panel to display DTV information. For desired mode as follows: CUSTOM STANDARD MUSIC THEATRE Sleep Press SLEEP button to set the time : SLEEP OFF-SLEEP 5 MIN-SLEEP...
User Manual
Page 18
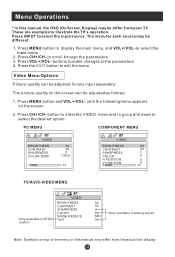
... any input separately . to select the main menu . 2. Press CH+/CH- Press CH+/CH- Press MENU button to display the main menu, and VOL+/VOL-to scroll through the parameters 3. The picture quality on top of the menu in analog signal MID 50 Note: Symbols on the screen can be differ from the actual set display Press MENU button and VOL+/VOL- PC MENU COMPONENT MENU VIDEO BRIGHTNESS CONTRAST SHARPNESS COLOR...
... any input separately . to select the main menu . 2. Press CH+/CH- Press CH+/CH- Press MENU button to display the main menu, and VOL+/VOL-to scroll through the parameters 3. The picture quality on top of the menu in analog signal MID 50 Note: Symbols on the screen can be differ from the actual set display Press MENU button and VOL+/VOL- PC MENU COMPONENT MENU VIDEO BRIGHTNESS CONTRAST SHARPNESS COLOR...
User Manual
Page 21
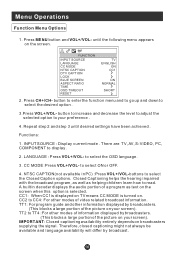
.... 4. Menu Operations Function Menu Options 1. Functions: 1. to display . 2. Press MENU button and VOL+/VOL- FUNCTION INPUT SOURCE LANGUAGE CC MODE NTSC CAPTION DTV CAPTION LOCK BLUE SCREEN ASPECT RATIO TIME OSD TIMEOUT RESET TV ENGLISH ON CC1 ON NORMAL SHORT 2. There are TV, AV, S-VIDEO, PC, COMPONENT to select the OSD language. 3. Closed Captioning helps the hearing impaired with the broadcast program, as well as text on your screen). TT1: For program guide and other modes of information displayed...
.... 4. Menu Operations Function Menu Options 1. Functions: 1. to display . 2. Press MENU button and VOL+/VOL- FUNCTION INPUT SOURCE LANGUAGE CC MODE NTSC CAPTION DTV CAPTION LOCK BLUE SCREEN ASPECT RATIO TIME OSD TIMEOUT RESET TV ENGLISH ON CC1 ON NORMAL SHORT 2. There are TV, AV, S-VIDEO, PC, COMPONENT to select the OSD language. 3. Closed Captioning helps the hearing impaired with the broadcast program, as well as text on your screen). TT1: For program guide and other modes of information displayed...
User Manual
Page 23
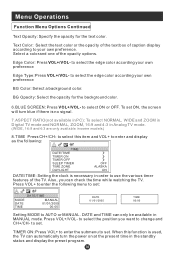
... set : DATE/TIME MODE DATE TIME MANUAL 01/01/2005 00:00 DATE 01/01/2005 TIME 00:00 Setting MODE to select the edge color according your own preference Edge Type: Press VOL+/VOL- DATE and TIME can automatically turn blue if there is no signal. 7.ASPECT RATIO(not available in PC): To select NORMAL, WIDE and ZOOM in Digital TV mode and NORMAL, ZOOM, 16:9 and 4:3 in Analog...
... set : DATE/TIME MODE DATE TIME MANUAL 01/01/2005 00:00 DATE 01/01/2005 TIME 00:00 Setting MODE to select the edge color according your own preference Edge Type: Press VOL+/VOL- DATE and TIME can automatically turn blue if there is no signal. 7.ASPECT RATIO(not available in PC): To select NORMAL, WIDE and ZOOM in Digital TV mode and NORMAL, ZOOM, 16:9 and 4:3 in Analog...

User Manual
Page 24
... to change and CH+/CH- to select the position you to disable the automatic setting of TIMER ON . This is automatically set . This menu item allows you live in PC mode . 2. SLEEP TIMER: The sleep timer automatically shuts off the TV after a preset time (from other areas where daylight signals are broadcasted. 9. Adjust Menu Options 1. Menu Operations Function Menu Options Continued TIMER ON MODE ON TIME OFF --:-- ON TIME --:-- Using this function can turn...
... to change and CH+/CH- to select the position you to disable the automatic setting of TIMER ON . This is automatically set . This menu item allows you live in PC mode . 2. SLEEP TIMER: The sleep timer automatically shuts off the TV after a preset time (from other areas where daylight signals are broadcasted. 9. Adjust Menu Options 1. Menu Operations Function Menu Options Continued TIMER ON MODE ON TIME OFF --:-- ON TIME --:-- Using this function can turn...

User Manual
Page 25
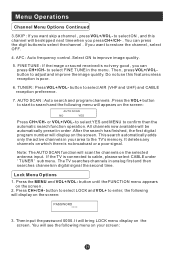
... AUTO SCAN 63.25MHZ 11.1 CABLE OFF ON Only available in analog signal Note: This menu appears only in TV mode . 2. Press CH+/CH- CLOCK : Adjust the TFT-LCD to select the desired option . 3.Press VOL+/VOL- Functions: 1. Channel Menu Options 1. to go up and down to match the PC input source clock frequency H POSITION : Picture horizontal position adjust V POSITION : Picture vertical position adjust . Menu Operations Adjust Menu Options Continued Functions: AUTO...
... AUTO SCAN 63.25MHZ 11.1 CABLE OFF ON Only available in analog signal Note: This menu appears only in TV mode . 2. Press CH+/CH- CLOCK : Adjust the TFT-LCD to select the desired option . 3.Press VOL+/VOL- Functions: 1. Channel Menu Options 1. to go up and down to match the PC input source clock frequency H POSITION : Picture horizontal position adjust V POSITION : Picture vertical position adjust . Menu Operations Adjust Menu Options Continued Functions: AUTO...
User Manual
Page 26
... , press VOL+/VOLbutton to cable, please select CABLE under ' TUNER ' sub menu. If the TV is no broadcast or a poor signal. to select FINE TUNE in digital signal the second time. If you want to restore the channel , select OFF. 4. You can press CH+/CH- button until the FUNCTION menu appears on which there is connected to adjust and improve the image quality. Menu Operations Channel Menu Options Continued 3.SKIP : If...
... , press VOL+/VOLbutton to cable, please select CABLE under ' TUNER ' sub menu. If the TV is no broadcast or a poor signal. to select FINE TUNE in digital signal the second time. If you want to restore the channel , select OFF. 4. You can press CH+/CH- button until the FUNCTION menu appears on which there is connected to adjust and improve the image quality. Menu Operations Channel Menu Options Continued 3.SKIP : If...
User Manual
Page 27
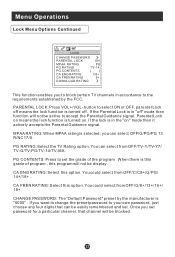
.... button to set the grade of program , this grade of the program . If the lock is turned on " mode then it actively accepts the Parental Guidance signal. Once you want to change the preset password to your own password, just choose any four digits that channel will not be blocked. CA FREN RATING: Select this option. PG CONTENTS: Press to select ON or OFF. CHANGE PASSWORD: The "Default Password" preset...
.... button to set the grade of program , this grade of the program . If the lock is turned on " mode then it actively accepts the Parental Guidance signal. Once you want to change the preset password to your own password, just choose any four digits that channel will not be blocked. CA FREN RATING: Select this option. PG CONTENTS: Press to select ON or OFF. CHANGE PASSWORD: The "Default Password" preset...
User Manual
Page 30
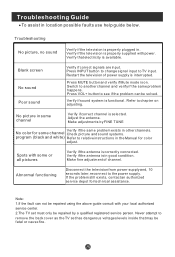
... properly plugged in some channel Check picture and sound systems. program (black and white) Refer to chapter on . Verify if the television is correctly connected. Press INPUT button to change signal input to remove the back cover as the TV set must only be fatal or cause fire. Note: 1.If the fault can be repaired using the above guide consult with power. Never attempt to TV input. Restart the television of channel...
... properly plugged in some channel Check picture and sound systems. program (black and white) Refer to chapter on . Verify if the television is correctly connected. Press INPUT button to change signal input to remove the back cover as the TV set must only be fatal or cause fire. Note: 1.If the fault can be repaired using the above guide consult with power. Never attempt to TV input. Restart the television of channel...
User Manual
Page 31
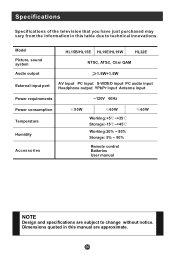
... are subject to technical innovations. Model Picture, sound system Audio output HL15B/HL15E HL19E/HL19W HL22E NTSC, ATSC, Cliar QAM 1.5W+1.5W External input port AV input PC input S-VIDEO input PC audio input Headphone output YPbPr input Antenna input Power requirements ~120V 60Hz Power consumption Temperature Humidity Accessories 50W 60W Working:+5 ~+35 Storage:-15 ~+45 Working:20% ~ 80% Storage: 5% ~ 90% Remote control Batteries User manual 60W NOTE Design and specifications are approximate. Specifications Specifications of the television that you have just purchased...
... are subject to technical innovations. Model Picture, sound system Audio output HL15B/HL15E HL19E/HL19W HL22E NTSC, ATSC, Cliar QAM 1.5W+1.5W External input port AV input PC input S-VIDEO input PC audio input Headphone output YPbPr input Antenna input Power requirements ~120V 60Hz Power consumption Temperature Humidity Accessories 50W 60W Working:+5 ~+35 Storage:-15 ~+45 Working:20% ~ 80% Storage: 5% ~ 90% Remote control Batteries User manual 60W NOTE Design and specifications are approximate. Specifications Specifications of the television that you have just purchased...


