User Manual
Page 1
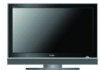
L1510B-A/L15A18-A/L19A18-A/L1912W-A LCD TV/DVD Player Combo USER MANUAL Please read this manual carefully before using this TV set and keep it for future reference.
L1510B-A/L15A18-A/L19A18-A/L1912W-A LCD TV/DVD Player Combo USER MANUAL Please read this manual carefully before using this TV set and keep it for future reference.
User Manual
Page 2
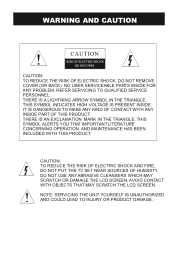
... SCRATCH THE LCD SCREEN. ! NO USER SERVICEABLE PARTS INSIDE.FOR ANY PROBLEM, REFER SERVICING TO QUALIFIED SERVICE PERSONNEL. THERE IS AN EXCLAMATION MARK IN THE TRIANGLE: THIS SYMBOL ALERTS YOU THAT IMPORTANT LITERATURE CONCERNING OPERATION AND MAINTENANCE HAS BEEN INCLUDED WITH THIS PRODUCT. CAUTION: TO REDUCE THE RISK OF ELECTRIC SHOCK AND FIRE, DO NOT PUT THE TV SET NEAR...
... SCRATCH THE LCD SCREEN. ! NO USER SERVICEABLE PARTS INSIDE.FOR ANY PROBLEM, REFER SERVICING TO QUALIFIED SERVICE PERSONNEL. THERE IS AN EXCLAMATION MARK IN THE TRIANGLE: THIS SYMBOL ALERTS YOU THAT IMPORTANT LITERATURE CONCERNING OPERATION AND MAINTENANCE HAS BEEN INCLUDED WITH THIS PRODUCT. CAUTION: TO REDUCE THE RISK OF ELECTRIC SHOCK AND FIRE, DO NOT PUT THE TV SET NEAR...
User Manual
Page 4
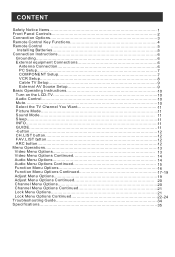
...Panel Controls 2 Connection Options 3 Remote Control Key Functions 4 Remote Control 5 Installing Batteries 5 Connection Instructions 6 Grounding 6 External equipment Connections 6 Antenna Connection 6 PC Setup 7 COMPONENT Setup 7 VCR Setup 8 Cable TV Setup 9 External AV Source Setup 9 Basic Operating Instructions 10 Turn on the LCD-TV 10 Audio Control 10 Mute...10 Select the TV Channel You Want 11 Picture Mode 11 Sound Mode 11 Sleep...1. 1 INFO...11 GUIDE 11 -button 12 CH.LIST button 1. 2 FAV.LIST button 12 ARC button 12 Menu Operations 13 Video Menu Options 13 Video...
...Panel Controls 2 Connection Options 3 Remote Control Key Functions 4 Remote Control 5 Installing Batteries 5 Connection Instructions 6 Grounding 6 External equipment Connections 6 Antenna Connection 6 PC Setup 7 COMPONENT Setup 7 VCR Setup 8 Cable TV Setup 9 External AV Source Setup 9 Basic Operating Instructions 10 Turn on the LCD-TV 10 Audio Control 10 Mute...10 Select the TV Channel You Want 11 Picture Mode 11 Sound Mode 11 Sleep...1. 1 INFO...11 GUIDE 11 -button 12 CH.LIST button 1. 2 FAV.LIST button 12 ARC button 12 Menu Operations 13 Video Menu Options 13 Video...
User Manual
Page 7
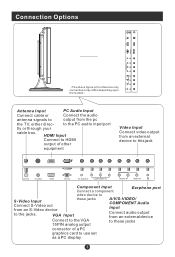
... is for reference only, connections may differ depending upon the models Antenna Input PC Audio Input Connect cable or Connect the audio antenna signals to output from an external device to this jack ANT IN S-VIDEO HDMI VGA IN Pr Pb Y PC AUDIO IN COMPONENT IN R L AUDIO IN V VIDEO IN Component Input Connect a component Earphone port video device to S-Video Input these jacks connector of other equipment Video Input Connect video output from the pc the TV, either direc- to the PC audio input port tly or through your cable box.
... is for reference only, connections may differ depending upon the models Antenna Input PC Audio Input Connect cable or Connect the audio antenna signals to output from an external device to this jack ANT IN S-VIDEO HDMI VGA IN Pr Pb Y PC AUDIO IN COMPONENT IN R L AUDIO IN V VIDEO IN Component Input Connect a component Earphone port video device to S-Video Input these jacks connector of other equipment Video Input Connect video output from the pc the TV, either direc- to the PC audio input port tly or through your cable box.
User Manual
Page 8
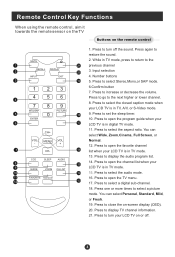
... LCD TV is in digital TV mode. 11. Press to display TV channel information. 21. Press to select the audio mode. 11 FAVORITE AUDIOLIST 12 16. Press to display the audio program list. Press to open the TV menu. 13 17. While in TV, A/V, or S-Video mode. Number buttons 3 19 5. Press to close the on the remote control 1. MENU VOL + Normal. 12. Press to turn off . Press to open the program guide when your LCD...
... LCD TV is in digital TV mode. 11. Press to display TV channel information. 21. Press to select the audio mode. 11 FAVORITE AUDIOLIST 12 16. Press to display the audio program list. Press to open the TV menu. 13 17. While in TV, A/V, or S-Video mode. Number buttons 3 19 5. Press to close the on the remote control 1. MENU VOL + Normal. 12. Press to turn off . Press to open the program guide when your LCD...
User Manual
Page 10
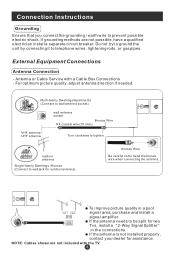
... methods are not included with a Cable Box Connections - External Equipment Connections Antenna Connection - outdoor antenna Single-family Dwellings /Houses (Connect to wall jack for two Tvs, install a 2-Way Signal Splitter in a poor signal area, purchase and install a signal amplifier. Do not try to ground the unit by connecting it to prevent possible electric shock. If the antenna needs to be split for outdoor antenna) Bronze Wire Be careful not to...
... methods are not included with a Cable Box Connections - External Equipment Connections Antenna Connection - outdoor antenna Single-family Dwellings /Houses (Connect to wall jack for two Tvs, install a 2-Way Signal Splitter in a poor signal area, purchase and install a signal amplifier. Do not try to ground the unit by connecting it to prevent possible electric shock. If the antenna needs to be split for outdoor antenna) Bronze Wire Be careful not to...
User Manual
Page 11
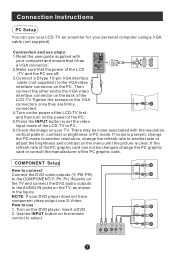
... cable ( not supplied ) to PC; 6.Check the image on the TV, as a monitor for your DVD player does not have component video output,use 1. If the refresh rate of the LCD-TV to the VGA video interface connector on the menu until the picture is present, change the PC mode to another rate or adjust the brightness and contrast on the PC. Connection and use steps: 1.Read the user guide supplied with the resolution...
... cable ( not supplied ) to PC; 6.Check the image on the TV, as a monitor for your DVD player does not have component video output,use 1. If the refresh rate of the LCD-TV to the VGA video interface connector on the menu until the picture is present, change the PC mode to another rate or adjust the brightness and contrast on the PC. Connection and use steps: 1.Read the user guide supplied with the resolution...
User Manual
Page 12
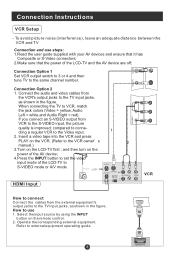
... S-VIDEO input, the picture quality is improved; If you connect an S-VIDEO output from VCR to VCR, match the jack colors (Video = yellow, Audio Left = white,and Audio Right = red). Select the input source by using the INPUT button on the VCR. (Refer to use steps: 1.Read the user guide supplied with your AV devices and ensure that it has Composite or S-Video connectors; 2.Make sure that the power of the LCD-TV to the same channel number. cting...
... S-VIDEO input, the picture quality is improved; If you connect an S-VIDEO output from VCR to VCR, match the jack colors (Video = yellow, Audio Left = white,and Audio Right = red). Select the input source by using the INPUT button on the VCR. (Refer to use steps: 1.Read the user guide supplied with your AV devices and ensure that it has Composite or S-Video connectors; 2.Make sure that the power of the LCD-TV to the same channel number. cting...
User Manual
Page 13
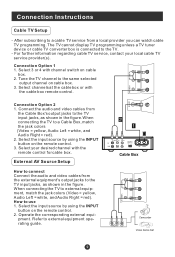
... - Select 3 or 4 with channel switch on cable box. 3. External AV Source Setup How to a Cable Box, match the jack colors (Video = yellow, Audio Left = white, and Audio Right = red). 2. Connection Option 1 1. Tune the TV channel to the TV input jacks, as shown in the figure. Select the input source by using the INPUT button on the remote control. 2. Select the input source by using the INPUT button on the remote control. 3. Select your local cable TV service provider(s). pment. Connection Option 2 1. When connecting the TV to external equipment operating guide...
... - Select 3 or 4 with channel switch on cable box. 3. External AV Source Setup How to a Cable Box, match the jack colors (Video = yellow, Audio Left = white, and Audio Right = red). 2. Connection Option 1 1. Tune the TV channel to the TV input jacks, as shown in the figure. Select the input source by using the INPUT button on the remote control. 2. Select the input source by using the INPUT button on the remote control. 3. Select your local cable TV service provider(s). pment. Connection Option 2 1. When connecting the TV to external equipment operating guide...
User Manual
Page 14
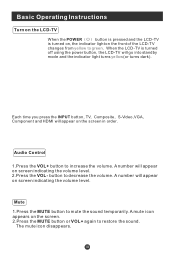
.... Each time you press the INPUT button, TV, Composite, S-Video,VGA, Component and HDMI will appear on screen indicating the volume level. 2.Press the VOL- A number will appear on screen indicating the volume level. A mute icon appears on the screen. 2.Press the MUTE button or VOL+ again to increase the volume. Audio Control 1.Press the VOL+ button to restore the sound. When the LCD-TV is turned on, the indicator light on...
.... Each time you press the INPUT button, TV, Composite, S-Video,VGA, Component and HDMI will appear on screen indicating the volume level. 2.Press the VOL- A number will appear on screen indicating the volume level. A mute icon appears on the screen. 2.Press the MUTE button or VOL+ again to increase the volume. Audio Control 1.Press the VOL+ button to restore the sound. When the LCD-TV is turned on, the indicator light on...
User Manual
Page 15
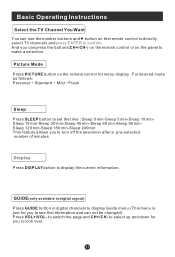
... press the buttons(CH+/CH-) on the remote control or on the panel to confirm. Basic Operating Instructions Select the TV Channel You Want You can use the number buttons and button on the remote control for menu display . to display the current information. Picture Mode Press PICTURE button on the remote control to directly select TV channels and press ENTER to make a selection. And you to turn off the television after a pre-selected number of minutes Display Press DISPLAY button to switch the page...
... press the buttons(CH+/CH-) on the remote control or on the panel to confirm. Basic Operating Instructions Select the TV Channel You Want You can use the number buttons and button on the remote control for menu display . to display the current information. Picture Mode Press PICTURE button on the remote control to directly select TV channels and press ENTER to make a selection. And you to turn off the television after a pre-selected number of minutes Display Press DISPLAY button to switch the page...

User Manual
Page 17
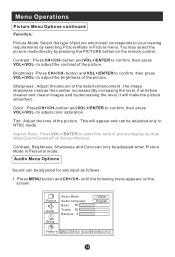
... the TV's operation. Menu Operations * In this manual may differ from your preference . 4. Press INPUT to select the desired option . 3. to go up and down to select the desired option . 3.Press VOL+/ENTER button to enter the Picture menu and CH+/CH- Picture Audio Setup Picture Mode Contrast 50 Brightness 50 Sharpness 50 Color 50 Tint 50 Aspect Ratio Personal Wide Feature Move /Enter Select /Exit/Menu Exit Note: The...
... the TV's operation. Menu Operations * In this manual may differ from your preference . 4. Press INPUT to select the desired option . 3. to go up and down to select the desired option . 3.Press VOL+/ENTER button to enter the Picture menu and CH+/CH- Picture Audio Setup Picture Mode Contrast 50 Brightness 50 Sharpness 50 Color 50 Tint 50 Aspect Ratio Personal Wide Feature Move /Enter Select /Exit/Menu Exit Note: The...
User Manual
Page 18
... only be adjusted only in NTSC mode Aspect Ratio: Press VOL+/ENTER to adjust the contrast of the picture. Audio Menu Options Sound can be adjusted when Picture Mode in Picture menu. until the following menu appears on the remote control. button and VOL+/ENTER to adjust color saturation. to confirm, then press VOL+/VOL- Press MENU button and CH+/CH- Menu Operations Picture Menu Options continued Function: Picture Mode: Select the type of picture which best corresponds to your viewing requirements by...
... only be adjusted only in NTSC mode Aspect Ratio: Press VOL+/ENTER to adjust the contrast of the picture. Audio Menu Options Sound can be adjusted when Picture Mode in Picture menu. until the following menu appears on the remote control. button and VOL+/ENTER to adjust color saturation. to confirm, then press VOL+/VOL- Press MENU button and CH+/CH- Menu Operations Picture Menu Options continued Function: Picture Mode: Select the type of picture which best corresponds to your viewing requirements by...

User Manual
Page 20
... Signal: In DTV mode, you can adjust the angle, orientation of the antenna etc to select Cable Auto, Air, Cable, Cable HRC, Cable IRC. It deletes any channels on the screen. Menu Operations Setup Menu Options 1. Press MENU button and CH+/CH- The channels found are automatically saved as below: Auto program Menu NTSC Channel 19 Not Found Analog Channels Found 2 Digital Channels Found 0 Progress(%) 12 Exit/Menu Stop Note: The TV searches channels in analog first and then searches channels...
... Signal: In DTV mode, you can adjust the angle, orientation of the antenna etc to select Cable Auto, Air, Cable, Cable HRC, Cable IRC. It deletes any channels on the screen. Menu Operations Setup Menu Options 1. Press MENU button and CH+/CH- The channels found are automatically saved as below: Auto program Menu NTSC Channel 19 Not Found Analog Channels Found 2 Digital Channels Found 0 Progress(%) 12 Exit/Menu Stop Note: The TV searches channels in analog first and then searches channels...
User Manual
Page 21
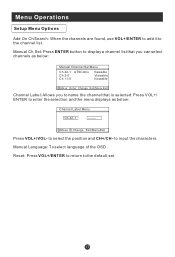
... Change Exit/Menu Exit Channel Label: Allows you to enter the selection and the menu displays as below : Channel Label Menu Ch 42-1 ------- Move Change Exit/Menu Exit Press VOL+/VOL- Reset: Press VOL+/ENTER to return to input the characters. to the default set. to the channel list. Press VOL+/ ENTER to name the channel that is selected. Menu Operations Setup Menu Options Add On Ch Search: When the channels are found, use...
... Change Exit/Menu Exit Channel Label: Allows you to enter the selection and the menu displays as below : Channel Label Menu Ch 42-1 ------- Move Change Exit/Menu Exit Press VOL+/VOL- Reset: Press VOL+/ENTER to return to input the characters. to the default set. to the channel list. Press VOL+/ ENTER to name the channel that is selected. Menu Operations Setup Menu Options Add On Ch Search: When the channels are found, use...
User Manual
Page 22
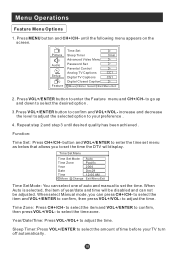
Picture Audio Setup Feature Time Set Sleep Timer 0min Advanced Video Menu Password Set Parental Control Analog TV Captions CC1 Digital TV Captions CS1 Digital Closed Caption Move /Enter Select /Exit/Menu Exit 2. Repeat step 2 and step 3 until the following menu appears on the screen. to select the item and VOL+/ENTER to confirm, then press VOL+/VOL- increase and decrease the level to adjust the selected option to enter the time set menu as below that allows you can not...
Picture Audio Setup Feature Time Set Sleep Timer 0min Advanced Video Menu Password Set Parental Control Analog TV Captions CC1 Digital TV Captions CS1 Digital Closed Caption Move /Enter Select /Exit/Menu Exit 2. Repeat step 2 and step 3 until the following menu appears on the screen. to select the item and VOL+/ENTER to confirm, then press VOL+/VOL- increase and decrease the level to adjust the selected option to enter the time set menu as below that allows you can not...

User Manual
Page 25
... a program as helping children learn how to confirm. PG: Parental Guidance Suggested -in DTV signal. Menu Operations Feature Menu Options Continued Press CH+/CH- to select Canadian Rating and VOL+/ENTER button to read the following list: Canadian English Rating Chart C: This type of rated programs are generally suitable for adult viewers only. There is intended for children 8 years and over. TEXT1: For program guide...
... a program as helping children learn how to confirm. PG: Parental Guidance Suggested -in DTV signal. Menu Operations Feature Menu Options Continued Press CH+/CH- to select Canadian Rating and VOL+/ENTER button to read the following list: Canadian English Rating Chart C: This type of rated programs are generally suitable for adult viewers only. There is intended for children 8 years and over. TEXT1: For program guide...

User Manual
Page 29
...and select the Closed Caption options. Password Set Press CH+/CH- Press MENU button and CH+/CH- button and then VOL+/ENTER button to enter te advanced video menu. HDMI Time Set Picture Sleep Timer Off Advanced Video Menu Audio Setup Feature Move /Enter Select /Exit/Menu Exit S-Video Picture Audio Setup Time Set Sleep Timer Advanced Video Menu Password Set Parental Control Digital TV Captions Off CC1 Feature Move /Enter Select /Exit/Menu Exit Time Set: Press CH+/CH- Digital TV Captions: Press CH+/CH- Parental Control Press CH+/CH- increase and decrease the level to adjust...
...and select the Closed Caption options. Password Set Press CH+/CH- Press MENU button and CH+/CH- button and then VOL+/ENTER button to enter te advanced video menu. HDMI Time Set Picture Sleep Timer Off Advanced Video Menu Audio Setup Feature Move /Enter Select /Exit/Menu Exit S-Video Picture Audio Setup Time Set Sleep Timer Advanced Video Menu Password Set Parental Control Digital TV Captions Off CC1 Feature Move /Enter Select /Exit/Menu Exit Time Set: Press CH+/CH- Digital TV Captions: Press CH+/CH- Parental Control Press CH+/CH- increase and decrease the level to adjust...
User Manual
Page 30
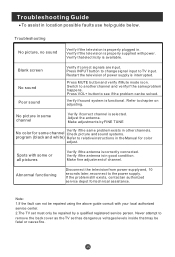
... color adjust. Blank screen No sound Poor sound Verify if correct signals are input. Switch to TV input. If the problem still exists, contact an authorized service depot for some channel Verify if correct channel is selected. Troubleshooting Guide To assist in good condition. Press INPUT button to change signal input to another channel and verify if the same problem happens. Press MUTE button and verify if Mute mode is available. Press VOL+ button to the power supply...
... color adjust. Blank screen No sound Poor sound Verify if correct signals are input. Switch to TV input. If the problem still exists, contact an authorized service depot for some channel Verify if correct channel is selected. Troubleshooting Guide To assist in good condition. Press INPUT button to change signal input to another channel and verify if the same problem happens. Press MUTE button and verify if Mute mode is available. Press VOL+ button to the power supply...
User Manual
Page 31
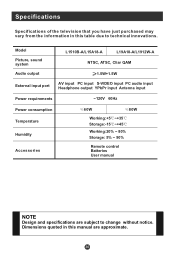
...Model Picture, sound system Audio output L1510B-A/L15A18-A L19A18-A/L1912W-A NTSC, ATSC, Cliar QAM 1.5W+1.5W External input port AV input PC input S-VIDEO input PC audio input Headphone output YPbPr input Antenna input Power requirements ~120V 60Hz Power consumption Temperature Humidity Accessories 60W 80W Working:+5 ~+35 Storage:-15 ~+45 Working:20% ~ 80% Storage: 5% ~ 90% Remote control Batteries User manual NOTE Design and specifications are approximate. Dimensions quoted in this manual are subject to technical innovations. Specifications Specifications of the television...
...Model Picture, sound system Audio output L1510B-A/L15A18-A L19A18-A/L1912W-A NTSC, ATSC, Cliar QAM 1.5W+1.5W External input port AV input PC input S-VIDEO input PC audio input Headphone output YPbPr input Antenna input Power requirements ~120V 60Hz Power consumption Temperature Humidity Accessories 60W 80W Working:+5 ~+35 Storage:-15 ~+45 Working:20% ~ 80% Storage: 5% ~ 90% Remote control Batteries User manual NOTE Design and specifications are approximate. Dimensions quoted in this manual are subject to technical innovations. Specifications Specifications of the television...


