User Manual
Page 1
HL15B/HL15E/HL19E/HL19W/HL22E LCD TV USER MANUAL Please read this manual carefully before using this TV set and keep it for future reference.
HL15B/HL15E/HL19E/HL19W/HL22E LCD TV USER MANUAL Please read this manual carefully before using this TV set and keep it for future reference.
User Manual
Page 2
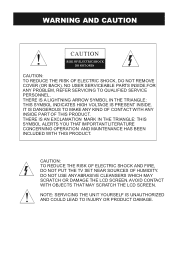
... THAT IMPORTANT LITERATURE CONCERNING OPERATION AND MAINTENANCE HAS BEEN INCLUDED WITH THIS PRODUCT. AVOID CONTACT WITH OBJECTS THAT MAY SCRATCH THE LCD SCREEN. ! CAUTION: TO REDUCE THE RISK OF ELECTRIC SHOCK AND FIRE, DO NOT PUT THE TV SET NEAR SOURCES OF HUMIDITY. NO USER SERVICEABLE PARTS INSIDE.FOR ANY PROBLEM, REFER SERVICING TO QUALIFIED SERVICE PERSONNEL. WARNING AND CAUTION...
... THAT IMPORTANT LITERATURE CONCERNING OPERATION AND MAINTENANCE HAS BEEN INCLUDED WITH THIS PRODUCT. AVOID CONTACT WITH OBJECTS THAT MAY SCRATCH THE LCD SCREEN. ! CAUTION: TO REDUCE THE RISK OF ELECTRIC SHOCK AND FIRE, DO NOT PUT THE TV SET NEAR SOURCES OF HUMIDITY. NO USER SERVICEABLE PARTS INSIDE.FOR ANY PROBLEM, REFER SERVICING TO QUALIFIED SERVICE PERSONNEL. WARNING AND CAUTION...

User Manual
Page 5
...Front Panel Controls 2 Connection Options 3 Remote Control Key Functions 4 Remote Control 5 Installing Batteries 5 Connection Instructions 6 Grounding 6 External equipment Connections 6 Antenna Connection 6 PC Setup 7 VCR Setup 8 Cable TV Setup 9 External AV Source Setup 9 Basic Operating Instructions 10 Turn on the LCD-TV 10 Audio Control 10 Mute...10 Select the TV Channel You Want 11 Picture Mode 11 Sound Mode 11 Sleep...1. 1 INFO...11 GUIDE 11 -button 12 CH.LIST button 1. 2 FAV.LIST button 12 ARC button 12 Menu Operations 13 Video Menu Options 13 Video Menu Options...
...Front Panel Controls 2 Connection Options 3 Remote Control Key Functions 4 Remote Control 5 Installing Batteries 5 Connection Instructions 6 Grounding 6 External equipment Connections 6 Antenna Connection 6 PC Setup 7 VCR Setup 8 Cable TV Setup 9 External AV Source Setup 9 Basic Operating Instructions 10 Turn on the LCD-TV 10 Audio Control 10 Mute...10 Select the TV Channel You Want 11 Picture Mode 11 Sound Mode 11 Sleep...1. 1 INFO...11 GUIDE 11 -button 12 CH.LIST button 1. 2 FAV.LIST button 12 ARC button 12 Menu Operations 13 Video Menu Options 13 Video Menu Options...
User Manual
Page 8
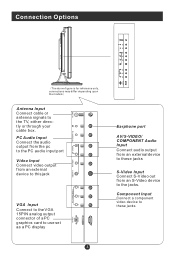
... IN L R Y Pb Pr Earphone port AV/S-VIDEO/ COMPONENT Audio Input Connect audio output from an external device to these jacks S-Video Input Connect S-Video out from an S-Video device to these jacks Component Input Connect a component video device to the jacks. Connection Options ANT IN PC AUDIO IN R AUDIO IN L V VIDEO IN S-VIDEO Pr Pb COMPONENT IN Y VGA IN The above figure is for reference only, connections may differ depending upon the models Antenna Input Connect cable or antenna signals to the TV, either directly or through your cable box.
... IN L R Y Pb Pr Earphone port AV/S-VIDEO/ COMPONENT Audio Input Connect audio output from an external device to these jacks S-Video Input Connect S-Video out from an S-Video device to these jacks Component Input Connect a component video device to the jacks. Connection Options ANT IN PC AUDIO IN R AUDIO IN L V VIDEO IN S-VIDEO Pr Pb COMPONENT IN Y VGA IN The above figure is for reference only, connections may differ depending upon the models Antenna Input Connect cable or antenna signals to the TV, either directly or through your cable box.
User Manual
Page 9
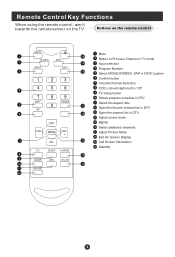
... on the TV Buttons on the remote control MUTE Q.VIEW INPUT INFO EXIT SAP OK P.MODE CH+ VOL - CC SLEEP S.MODE GUIDE ARC CH.LIST FAV.LIST Mute Return to Previous Channel in TV mode Input selection Program Number Select MONO,STEREO, SAP in NTSC system Confirm button Volume/Channel Selection CCD ( closed caption) On / Off TV Sleep button Shows program schedule in DTV Select the aspect ratio Open the favorite channel list in DTV Open the channel list in DTV Adjust sound mode MENU Select additional channels Adjust Picture Mode Exit On Screen Display Call Screen Infromation Standby
... on the TV Buttons on the remote control MUTE Q.VIEW INPUT INFO EXIT SAP OK P.MODE CH+ VOL - CC SLEEP S.MODE GUIDE ARC CH.LIST FAV.LIST Mute Return to Previous Channel in TV mode Input selection Program Number Select MONO,STEREO, SAP in NTSC system Confirm button Volume/Channel Selection CCD ( closed caption) On / Off TV Sleep button Shows program schedule in DTV Select the aspect ratio Open the favorite channel list in DTV Open the channel list in DTV Adjust sound mode MENU Select additional channels Adjust Picture Mode Exit On Screen Display Call Screen Infromation Standby
User Manual
Page 11
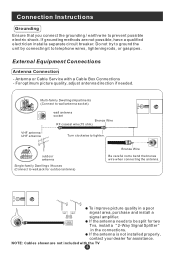
... careful not to wall jack for assistance. Antenna or Cable Service with the TV NOTE: Cables shown are not possible, have a qualified electrician install a separate circuit breaker. If the antenna needs to prevent possible electric shock. To improve picture quality in the connections. Do not try to ground the unit by connecting it to tighten. For optimum picture quality, adjust antenna direction if needed. External Equipment Connections Antenna Connection - If grounding...
... careful not to wall jack for assistance. Antenna or Cable Service with the TV NOTE: Cables shown are not possible, have a qualified electrician install a separate circuit breaker. If the antenna needs to prevent possible electric shock. To improve picture quality in the connections. Do not try to ground the unit by connecting it to tighten. For optimum picture quality, adjust antenna direction if needed. External Equipment Connections Antenna Connection - If grounding...
User Manual
Page 12
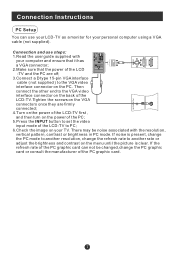
... the user guide supplied with the resolution, vertical pattern, contrast or brightness in PC mode. Then connect the other end to the VGA video interface connector on the back of the LCD-TV.Tighten the screws on the VGA connectors once they are off; 3.Connect a D type 15-pin VGAinterface cable ( not supplied ) to PC; 6.Check the image on the power of the PC; 5.Press the INPUT button to set the video input mode...
... the user guide supplied with the resolution, vertical pattern, contrast or brightness in PC mode. Then connect the other end to the VGA video interface connector on the back of the LCD-TV.Tighten the screws on the VGA connectors once they are off; 3.Connect a D type 15-pin VGAinterface cable ( not supplied ) to PC; 6.Check the image on the power of the PC; 5.Press the INPUT button to set the video input mode...
User Manual
Page 13
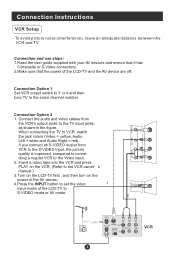
... VCR's output jacks to S-VIDEO mode or AV mode. 2 VCR When connecting the TV to set the video 1 input mode of the LCD-TV and the AV device are off; and then turn on the LCD-TV first ; Connection Instructions VCR Setup - Insert a video tape into the VCR and press PLAY on the VCR. (Refer to the VCR owner s manual.) 3.Turn on the power of the AV device; 4.Press the INPUT button to VCR, match the jack colors (Video = yellow, Audio Left = white,and Audio Right = red...
... VCR's output jacks to S-VIDEO mode or AV mode. 2 VCR When connecting the TV to set the video 1 input mode of the LCD-TV and the AV device are off; and then turn on the LCD-TV first ; Connection Instructions VCR Setup - Insert a video tape into the VCR and press PLAY on the VCR. (Refer to the VCR owner s manual.) 3.Turn on the power of the AV device; 4.Press the INPUT button to VCR, match the jack colors (Video = yellow, Audio Left = white,and Audio Right = red...

User Manual
Page 14
... INPUT button on the remote control. 3. Operate the corresponding external equi- Select channels at the cable box or with channel switch on cable box. 3. External AV Source Setup How to the TV input jacks, as shown in the figure.When connecting the TV to the same selected output channel on cable box. 2. For further information regarding cable TV service, contact your desired channel with the remote control for cable box. Tune the TV channel to a Cable Box, match the jack colors (Video = yellow, Audio Left = white, and Audio Right = red). 2. Connection...
... INPUT button on the remote control. 3. Operate the corresponding external equi- Select channels at the cable box or with channel switch on cable box. 3. External AV Source Setup How to the TV input jacks, as shown in the figure.When connecting the TV to the same selected output channel on cable box. 2. For further information regarding cable TV service, contact your desired channel with the remote control for cable box. Tune the TV channel to a Cable Box, match the jack colors (Video = yellow, Audio Left = white, and Audio Right = red). 2. Connection...
User Manual
Page 15
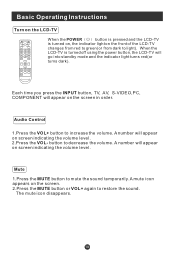
... light on the LCD-TV MUTE Q.VIEW INPUT INFO EXIT SAP OK P.MODE CH+ VOL - CC SLEEP S.MODE GUIDE ARC CH.LIST FAV.LIST When the POWER button is pressed and the LCD-TV is turned off using the power button, the LCD-TV will appear on screen indicating the volume level. Each time you press the INPUT button, TV, AV, S-VIDEO,PC, COMPONENT will go into standby mode and the indicator light turns red(or turns dark). A number will appear on the screen...
... light on the LCD-TV MUTE Q.VIEW INPUT INFO EXIT SAP OK P.MODE CH+ VOL - CC SLEEP S.MODE GUIDE ARC CH.LIST FAV.LIST When the POWER button is pressed and the LCD-TV is turned off using the power button, the LCD-TV will appear on screen indicating the volume level. Each time you press the INPUT button, TV, AV, S-VIDEO,PC, COMPONENT will go into standby mode and the indicator light turns red(or turns dark). A number will appear on the screen...
User Manual
Page 16
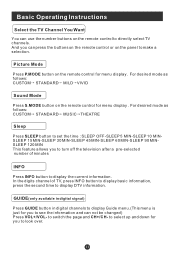
... can not be changed) Press VOL+/VOL- GUIDE(only available in digital signal) Press GUIDE button in digital channels to display Guide menu.(This menu is just for menu display . to select up and down for menu display . Basic Operating Instructions Select the TV Channel You Want You can use the number buttons on the remote control to look over. Picture Mode Press P.MODE button on the panel to display DTV information. In the digits channel of minutes INFO Press INFO button to display the current...
... can not be changed) Press VOL+/VOL- GUIDE(only available in digital signal) Press GUIDE button in digital channels to display Guide menu.(This menu is just for menu display . to select up and down for menu display . Basic Operating Instructions Select the TV Channel You Want You can use the number buttons on the remote control to look over. Picture Mode Press P.MODE button on the panel to display DTV information. In the digits channel of minutes INFO Press INFO button to display the current...
User Manual
Page 18
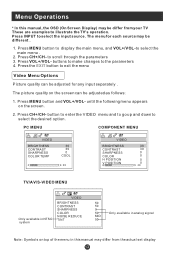
... MENU COMPONENT MENU VIDEO BRIGHTNESS CONTRAST SHARPNESS COLOR TEMP 30 30 0 COOL 30 VIDEO BRIGHTNESS CONTRAST SHARPNESS COLOR H POSITION V POSITION 30 30 0 0 0 0 30 TV/AV/S-VIDEO MENU Only available in NTSC system VIDEO BRIGHTNESS CONTRAST SHARPNESS COLOR NOISE REDUCE TINT 50 50 0 50 Only available in analog signal MID 50 Note: Symbols on top of the menu in this manual, the OSD (On Screen Display) may be adjusted...
... MENU COMPONENT MENU VIDEO BRIGHTNESS CONTRAST SHARPNESS COLOR TEMP 30 30 0 COOL 30 VIDEO BRIGHTNESS CONTRAST SHARPNESS COLOR H POSITION V POSITION 30 30 0 0 0 0 30 TV/AV/S-VIDEO MENU Only available in NTSC system VIDEO BRIGHTNESS CONTRAST SHARPNESS COLOR NOISE REDUCE TINT 50 50 0 50 Only available in analog signal MID 50 Note: Symbols on top of the menu in this manual, the OSD (On Screen Display) may be adjusted...

User Manual
Page 21
... 3 until the following menu appears on the screen when this option is turned on broadcasters supplying the signal. There are TV, AV, S-VIDEO, PC, COMPONENT to TT4 :For other modes of information displayed by broadcasters. (This blocks a large portion of video related broadcast information. TT2 to display . 2. INPUT SOURCE : Display current mode . TT1: For program guide and other modes of the picture on your screen). Therefore, closed captioning might not always...
... 3 until the following menu appears on the screen when this option is turned on broadcasters supplying the signal. There are TV, AV, S-VIDEO, PC, COMPONENT to TT4 :For other modes of information displayed by broadcasters. (This blocks a large portion of video related broadcast information. TT2 to display . 2. INPUT SOURCE : Display current mode . TT1: For program guide and other modes of the picture on your screen). Therefore, closed captioning might not always...

User Manual
Page 23
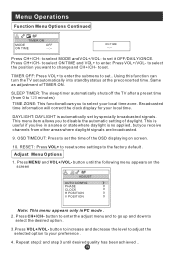
... enter the following : TIME DATE/TIME TIMER ON TIMER OFF SLEEP TIMER TIME ZONE DAYLIGHT OFF ALASKA ON DATE/TIME: Setting the clock is no signal. 7.ASPECT RATIO(not available in PC): To select NORMAL, WIDE and ZOOM in Digital TV mode and NORMAL, ZOOM, 16:9 and 4:3 in Analog TV mode. (WIDE, 16:9 and 4:3 are only available in the standby status and display the preset program. Press VOL+/VOL...
... enter the following : TIME DATE/TIME TIMER ON TIMER OFF SLEEP TIMER TIME ZONE DAYLIGHT OFF ALASKA ON DATE/TIME: Setting the clock is no signal. 7.ASPECT RATIO(not available in PC): To select NORMAL, WIDE and ZOOM in Digital TV mode and NORMAL, ZOOM, 16:9 and 4:3 in Analog TV mode. (WIDE, 16:9 and 4:3 are only available in the standby status and display the preset program. Press VOL+/VOL...
User Manual
Page 24
... to adjust the selected option to set it OFF/DAILY/ONCE. Menu Operations Function Menu Options Continued TIMER ON MODE ON TIME OFF --:-- TIMER OFF: Press VOL+ to enter the submenu to your preference . 4. RESET : Press VOL+ to reset some settings to enter. to select ON TIME and VOL+ to the factory default . Using this function can turn the TV set by specially broadcasted signals. Press CH+/CH- button to enter the adjust menu...
... to adjust the selected option to set it OFF/DAILY/ONCE. Menu Operations Function Menu Options Continued TIMER ON MODE ON TIME OFF --:-- TIMER OFF: Press VOL+ to enter the submenu to your preference . 4. RESET : Press VOL+ to reset some settings to enter. to select ON TIME and VOL+ to the factory default . Using this function can turn the TV set by specially broadcasted signals. Press CH+/CH- button to enter the adjust menu...

User Manual
Page 25
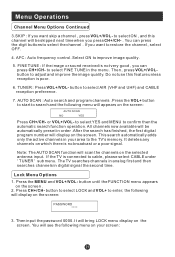
... and down to set the channel number. Menu Operations Adjust Menu Options Continued Functions: AUTO CONFIG : Automatically adjusts picture location frequency and phase parameters . button to enter the channel menu and to go up and down to select the desired option . 3.Press VOL+/VOL- CH NO. : Press VOL+/VOL- The display will show the current playing channel. 2. And display the channel name automatically in TV mode . 2. PHASE : Removes any horizontal distortion...
... and down to set the channel number. Menu Operations Adjust Menu Options Continued Functions: AUTO CONFIG : Automatically adjusts picture location frequency and phase parameters . button to enter the channel menu and to go up and down to select the desired option . 3.Press VOL+/VOL- CH NO. : Press VOL+/VOL- The display will show the current playing channel. 2. And display the channel name automatically in TV mode . 2. PHASE : Removes any horizontal distortion...
User Manual
Page 26
... search has finished, the first digital program number will scan the channels on the screen: AUTO SCAN NO YES Press CH+/CH- The TV searches channels in analog first and then searches channels in the menu . Press the MENU and VOL+/VOL- Then input the password 0000. You will appears on the selected antenna input. FINE TUNE : If the image or sound received is connected to select ON , and this feature unless...
... search has finished, the first digital program number will scan the channels on the screen: AUTO SCAN NO YES Press CH+/CH- The TV searches channels in analog first and then searches channels in the menu . Press the MENU and VOL+/VOL- Then input the password 0000. You will appears on the selected antenna input. FINE TUNE : If the image or sound received is connected to select ON , and this feature unless...
User Manual
Page 27
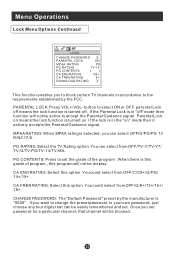
.../TV-MA. CHANGE PASSWORD: The "Default Password" preset by the FCC. Menu Operations Lock Menu Options Continued LOCK CHANGE PASSWORD PARENTAL LOCK ON MPAA RATING PG PG RATING TV-14 PG CONTENTS ( ) CA ENG RATING C8+ CA FREN RATING 8+ DOWNLOAD RATING This function enables you to block certain TV channels in the "on . If the Parental Lock is turned on " mode then it actively accepts the Parental Guidance signal. PARENTAL LOCK: Press VOL...
.../TV-MA. CHANGE PASSWORD: The "Default Password" preset by the FCC. Menu Operations Lock Menu Options Continued LOCK CHANGE PASSWORD PARENTAL LOCK ON MPAA RATING PG PG RATING TV-14 PG CONTENTS ( ) CA ENG RATING C8+ CA FREN RATING 8+ DOWNLOAD RATING This function enables you to block certain TV channels in the "on . If the Parental Lock is turned on " mode then it actively accepts the Parental Guidance signal. PARENTAL LOCK: Press VOL...
User Manual
Page 30
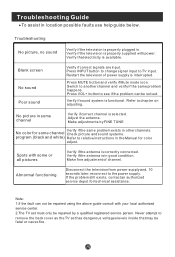
... pictures Verify if the antenna is correctly connected. Adjust the antenna. Blank screen No sound Poor sound Verify if correct signals are input. Press INPUT button to change signal input to another channel and verify if the same problem happens. Verify if the antenna is in . Make fine adjustment of power supply is interrupted. Note: 1.If the fault can be solved. Troubleshooting No picture, no sound Verify if the television is properly plugged in good condition. Switch...
... pictures Verify if the antenna is correctly connected. Adjust the antenna. Blank screen No sound Poor sound Verify if correct signals are input. Press INPUT button to change signal input to another channel and verify if the same problem happens. Verify if the antenna is in . Make fine adjustment of power supply is interrupted. Note: 1.If the fault can be solved. Troubleshooting No picture, no sound Verify if the television is properly plugged in good condition. Switch...
User Manual
Page 31
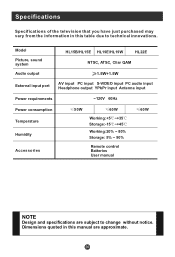
... in this manual are subject to technical innovations. Model Picture, sound system Audio output HL15B/HL15E HL19E/HL19W HL22E NTSC, ATSC, Cliar QAM 1.5W+1.5W External input port AV input PC input S-VIDEO input PC audio input Headphone output YPbPr input Antenna input Power requirements ~120V 60Hz Power consumption Temperature Humidity Accessories 50W 60W Working:+5 ~+35 Storage:-15 ~+45 Working:20% ~ 80% Storage: 5% ~ 90% Remote control Batteries User manual 60W NOTE Design and specifications are approximate. Specifications Specifications of the television that you...
... in this manual are subject to technical innovations. Model Picture, sound system Audio output HL15B/HL15E HL19E/HL19W HL22E NTSC, ATSC, Cliar QAM 1.5W+1.5W External input port AV input PC input S-VIDEO input PC audio input Headphone output YPbPr input Antenna input Power requirements ~120V 60Hz Power consumption Temperature Humidity Accessories 50W 60W Working:+5 ~+35 Storage:-15 ~+45 Working:20% ~ 80% Storage: 5% ~ 90% Remote control Batteries User manual 60W NOTE Design and specifications are approximate. Specifications Specifications of the television that you...


