
User Manual
Page 2
... the literature accompanying the appliance. The lightning flash with DVD models.) NO USER SERVICEABLE PARTS INSIDE. REFER SERVICING TO QUALIFIED SERVICE PERSONNEL. WARNING: TO PREVENT FIRE OR SHOCK HAZARD, DO NOT EXPOSE THIS APPLIANCE TO RAIN OR MOISTURE. CAUTION: These servicing instructions are qualified to the presence of electric shock. ! CAUTION: USE OF ANY CONTROLS, ADJUSTMENTS, OR PROCEDURES OTHER THAN THOSE SPECIFIED HEREIN...
... the literature accompanying the appliance. The lightning flash with DVD models.) NO USER SERVICEABLE PARTS INSIDE. REFER SERVICING TO QUALIFIED SERVICE PERSONNEL. WARNING: TO PREVENT FIRE OR SHOCK HAZARD, DO NOT EXPOSE THIS APPLIANCE TO RAIN OR MOISTURE. CAUTION: These servicing instructions are qualified to the presence of electric shock. ! CAUTION: USE OF ANY CONTROLS, ADJUSTMENTS, OR PROCEDURES OTHER THAN THOSE SPECIFIED HEREIN...

User Manual
Page 5
... Connection Instructions 7 External equipment Connections 7 Antenna Connection 7 VGA Setup 8.. Component Setup 8 VCR Setup 9 HDMI Input 9 Cable TV Setup 10 External Component Source Setup 10 Basic Operating Instructions 11 Switch On/Off the TV set for specific details. Please refer to your original set 11 Choose the input source 11 Audio Control 11 Mute...11 INFO...11 Select the TV Channel You Want 12 Picture Mode 12 Audio Mode 12 Sleep...12 GUIDE 12 ARC button 12 .Button 13 CH.LIST button 13 FAVORATE button 1..3. Menu Operations 14 Video Menu Options 14 Video Menu...
... Connection Instructions 7 External equipment Connections 7 Antenna Connection 7 VGA Setup 8.. Component Setup 8 VCR Setup 9 HDMI Input 9 Cable TV Setup 10 External Component Source Setup 10 Basic Operating Instructions 11 Switch On/Off the TV set for specific details. Please refer to your original set 11 Choose the input source 11 Audio Control 11 Mute...11 INFO...11 Select the TV Channel You Want 12 Picture Mode 12 Audio Mode 12 Sleep...12 GUIDE 12 ARC button 12 .Button 13 CH.LIST button 13 FAVORATE button 1..3. Menu Operations 14 Video Menu Options 14 Video Menu...

User Manual
Page 8
...-L S-VIDEO IN R-AUDIO IN-L VIDEO USB VGA IN PC AUDIO IN HDMI Pr Pb Y COMPONENT IN 1.ANT IN(Antenna Input) Connect cable or antenna signals to the TV, either directly or through your cable box. 2.Headphone jack : Headphone audio output terminal. 3.Audio in Connect audio output from an external device to these jacks. 4.S-VIDEO Connect S-Video out from an S-Video device to the jacks. 5.Audio in Connect audio output from an external device to these jacks. 6.Video in Connect video output from an external device to this jack. 7.USB input Connect a USB flash drive to view JPEG images or...
...-L S-VIDEO IN R-AUDIO IN-L VIDEO USB VGA IN PC AUDIO IN HDMI Pr Pb Y COMPONENT IN 1.ANT IN(Antenna Input) Connect cable or antenna signals to the TV, either directly or through your cable box. 2.Headphone jack : Headphone audio output terminal. 3.Audio in Connect audio output from an external device to these jacks. 4.S-VIDEO Connect S-Video out from an S-Video device to the jacks. 5.Audio in Connect audio output from an external device to these jacks. 6.Video in Connect video output from an external device to this jack. 7.USB input Connect a USB flash drive to view JPEG images or...

User Manual
Page 10
Remote Control Key Functions When using the remote control, aim it towards the remote sensor on the TV 1.Press to turn on and off the TV 2.Press to switch input source to USB in 1 USB DVD 3.Display the guide when you are watching analog or 2 21 digital channels GUIDE CCD MTS/SAP CH.LIST 4.Select a closed caption 3 22 4 PICTURE AUDIO ARC FAVORITE 23 5.Press repeatedly to cycle through the available picture 5 24 modes 6 25 6.Press to cycle through channels. For...
Remote Control Key Functions When using the remote control, aim it towards the remote sensor on the TV 1.Press to turn on and off the TV 2.Press to switch input source to USB in 1 USB DVD 3.Display the guide when you are watching analog or 2 21 digital channels GUIDE CCD MTS/SAP CH.LIST 4.Select a closed caption 3 22 4 PICTURE AUDIO ARC FAVORITE 23 5.Press repeatedly to cycle through the available picture 5 24 modes 6 25 6.Press to cycle through channels. For...

User Manual
Page 11
... different sound settings 16.Press to display the sleep timer option 17.Select MONO, STEREO, SAP in NTSC system 18.Press to change the aspect ratio 3.Select a closed caption 4.Show the input source 5.Press to open the on-screen menu 6.Volume/Channel Selection 7.Exit On Screen Display 8.Press to switch input source to USB in TV 14.Press to turn on and off the TV 15.Press to cycle through the available picture modes 2.Press to change a channel 19...
... different sound settings 16.Press to display the sleep timer option 17.Select MONO, STEREO, SAP in NTSC system 18.Press to change the aspect ratio 3.Select a closed caption 4.Show the input source 5.Press to open the on-screen menu 6.Volume/Channel Selection 7.Exit On Screen Display 8.Press to switch input source to USB in TV 14.Press to turn on and off the TV 15.Press to cycle through the available picture modes 2.Press to change a channel 19...

User Manual
Page 12
... improve picture quality in the connections. Antenna or Cable Service with the TV Bronze Wire outdoor antenna Be careful not to tighten. Single-family Dwellings /Houses (Connect to be split for two Tvs, install a 2-Way Signal Splitter in a poor signal area, purchase and install a signal amplifier. If the antenna needs to wall jack for assistance. NOTE: Cables shown are not included with a Cable Box Connections - For optimum picture quality, adjust antenna direction if needed. Connection Instructions External Equipment Connections Antenna Connection -
... improve picture quality in the connections. Antenna or Cable Service with the TV Bronze Wire outdoor antenna Be careful not to tighten. Single-family Dwellings /Houses (Connect to be split for two Tvs, install a 2-Way Signal Splitter in a poor signal area, purchase and install a signal amplifier. If the antenna needs to wall jack for assistance. NOTE: Cables shown are not included with a Cable Box Connections - For optimum picture quality, adjust antenna direction if needed. Connection Instructions External Equipment Connections Antenna Connection -

User Manual
Page 13
... the screws on the PC connectors once they are firmly connected; 4.Turn on the power of the LCD-TV first , and then turn on the remote control to set the video input mode of the PC graphic card. NOTE: If your personal computer using a VGA cable (not supplied). Use INPUT button on the power of the PC; 5.Press INPUT button to select the proper input. VGA IN PC AUDIO IN Connection and use steps: 1.Read the user guide supplied with the resolution...
... the screws on the PC connectors once they are firmly connected; 4.Turn on the power of the LCD-TV first , and then turn on the remote control to set the video input mode of the PC graphic card. NOTE: If your personal computer using a VGA cable (not supplied). Use INPUT button on the power of the PC; 5.Press INPUT button to select the proper input. VGA IN PC AUDIO IN Connection and use steps: 1.Read the user guide supplied with the resolution...

User Manual
Page 14
... the jack colors (Video = yellow, Audio Left = white,and Audio Right = red). Select the input source by using INPUT button on the remote control or on the LCD-TV first ; Pr R-AUDIO-L S-VIDEO IN R-AUDIO IN-L VIDEO Connection Option 2 1. When connecting the TV to the Video input. 2. Connection Instructions VCR Setup - If you connect an S-VIDEO output from VCR to external equipment operating guide. HDMI Refer to the S-VIDEO input, the picture quality is improved; Connect the audio and video cables from the external equipment's output jacks to the TV input jacks...
... the jack colors (Video = yellow, Audio Left = white,and Audio Right = red). Select the input source by using INPUT button on the remote control or on the LCD-TV first ; Pr R-AUDIO-L S-VIDEO IN R-AUDIO IN-L VIDEO Connection Option 2 1. When connecting the TV to the Video input. 2. Connection Instructions VCR Setup - If you connect an S-VIDEO output from VCR to external equipment operating guide. HDMI Refer to the S-VIDEO input, the picture quality is improved; Connect the audio and video cables from the external equipment's output jacks to the TV input jacks...

User Manual
Page 15
...same selected output channel on cable box. 2. Select the input source by using the INPUT button on the remote control. 2. Select the input source by using the INPUT button on the remote control. 3. The TV cannot display TV programming unless a TV tuner device or cable TV converter box is connected to use 1. R-AUDIO IN-L VIDEO Select 3 or 4 with the cable box remote control. Refer to external equipment, match the jack colors (Video = yellow, Audio Left = white, and Audio Right = red). After subscribing to a cable TV service from the Cable Box's output jacks to a Cable Box...
...same selected output channel on cable box. 2. Select the input source by using the INPUT button on the remote control. 2. Select the input source by using the INPUT button on the remote control. 3. The TV cannot display TV programming unless a TV tuner device or cable TV converter box is connected to use 1. R-AUDIO IN-L VIDEO Select 3 or 4 with the cable box remote control. Refer to external equipment, match the jack colors (Video = yellow, Audio Left = white, and Audio Right = red). After subscribing to a cable TV service from the Cable Box's output jacks to a Cable Box...

User Manual
Page 16
... the input source Change the picture source so you can watch your TV, VCR, DVD, Cable , or any other devices that are connected to decrease the volume. INFO Press INFO button to confirm . The mute icon disappears. Press ENTER button to display current program information. Audio Control 1.Press VOL+ button to select the desired items TV, Video, S-Video, Component DVD, PC, HDMI . 2. NOTE: The color of the LCD-TV changes from red to green. A number will...
... the input source Change the picture source so you can watch your TV, VCR, DVD, Cable , or any other devices that are connected to decrease the volume. INFO Press INFO button to confirm . The mute icon disappears. Press ENTER button to display current program information. Audio Control 1.Press VOL+ button to select the desired items TV, Video, S-Video, Component DVD, PC, HDMI . 2. NOTE: The color of the LCD-TV changes from red to green. A number will...

User Manual
Page 17
...-180 Min-240Min This function allows you to turn off the television after a pre-selected number of minutes GUIDE(only available in digital signal) Press GUIDE button in digital channels to display Guide menu.(This menu is just for menu display . ARC button Press to select the aspect ratio among Normal, Wide, Zoom and Cinema. (Display mode may differ from different inputs) Basic Operating Instructions Select the TV Channel You Want You can use the number buttons and button on the panel to make...
...-180 Min-240Min This function allows you to turn off the television after a pre-selected number of minutes GUIDE(only available in digital signal) Press GUIDE button in digital channels to display Guide menu.(This menu is just for menu display . ARC button Press to select the aspect ratio among Normal, Wide, Zoom and Cinema. (Display mode may differ from different inputs) Basic Operating Instructions Select the TV Channel You Want You can use the number buttons and button on the panel to make...

User Manual
Page 19
... menu in Custom mode only, the other modes are examples to illustrate the TV's operation. Video Mode Brightness Custom 50 Audio Contrast 50 Color 50 Channel Tint 0 Sharpness 50 Color Temperature Function Advanced Video Lock Video ENTER Adjust CH+/- Press MENU button and / until desired picture quality has been achieved . Select EXIT Back VOL+/- Press /ENTER button to enter the sub menu and / to go up and down to select the input...
... menu in Custom mode only, the other modes are examples to illustrate the TV's operation. Video Mode Brightness Custom 50 Audio Contrast 50 Color 50 Channel Tint 0 Sharpness 50 Color Temperature Function Advanced Video Lock Video ENTER Adjust CH+/- Press MENU button and / until desired picture quality has been achieved . Select EXIT Back VOL+/- Press /ENTER button to enter the sub menu and / to go up and down to select the input...

User Manual
Page 23
... signal. It deletes any channels on the screen. Analog Channels: 4 Digital Channels: 3 Antenna Function Lock 40% Channel Scan EXIT Cancel All channels now available will be automatically preset in order .After the search has finished, the first program number will appear in main menu only in your preference . 4. Channel Scan: Press /ENTER button to start to scan, press EXIT to your area to the TV's memory. Video Audio Channel Tuner Channel Scan Channel Skip Channel Label Function Lock Antenna Channel...
... signal. It deletes any channels on the screen. Analog Channels: 4 Digital Channels: 3 Antenna Function Lock 40% Channel Scan EXIT Cancel All channels now available will be automatically preset in order .After the search has finished, the first program number will appear in main menu only in your preference . 4. Channel Scan: Press /ENTER button to start to scan, press EXIT to your area to the TV's memory. Video Audio Channel Tuner Channel Scan Channel Skip Channel Label Function Lock Antenna Channel...

User Manual
Page 26
... digits button to set the time. When Auto mode on , the time can not be adjusted. Closed Caption: Press /ENTER to enter the submenu. Menu Operations Function Menu Options Continued Video Audio Time Zone Date/Time Sleep Timer Channel Function Lock Central Off Time Setup CH+/- Date/Time: Press /ENTER to enter the submenu. Select Off , you can not be adjusted. On Time/Off Time: Press / to select the position and digits button to set the time. Video Audio Auto Date Time Off 00:00:00 Channel Timer On Time...
... digits button to set the time. When Auto mode on , the time can not be adjusted. Closed Caption: Press /ENTER to enter the submenu. Menu Operations Function Menu Options Continued Video Audio Time Zone Date/Time Sleep Timer Channel Function Lock Central Off Time Setup CH+/- Date/Time: Press /ENTER to enter the submenu. Select Off , you can not be adjusted. On Time/Off Time: Press / to select the position and digits button to set the time. Video Audio Auto Date Time Off 00:00:00 Channel Timer On Time...

User Manual
Page 27
... you select default, the others are disable and can not be available and language availability will be on TV means CC mode is selected. Text Opacity: Press / to select the Closed Caption options. Select CC2 for secondary language translation such as helping children learn how to select the size of the picture on broadcasters supplying the signal. Select a color and one of the picture on . Menu Operations Function Menu Options...
... you select default, the others are disable and can not be available and language availability will be on TV means CC mode is selected. Text Opacity: Press / to select the Closed Caption options. Select CC2 for secondary language translation such as helping children learn how to select the size of the picture on broadcasters supplying the signal. Select a color and one of the picture on . Menu Operations Function Menu Options...
User Manual
Page 28
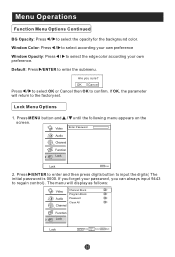
...: Video Channel Block Program Block Audio Password Clean All Channel Function Lock Lock ENTER Enter CH+/- Select VOL+/- Window Color: Press / to select according your password, you can always input 9443 to input the digits( The initial password is 0000. Lock Menu Options 1. Default: Press /ENTER to confirm. OK Cancel Press / to select OK or Cancel then OK to enter the submenu. Press MENU button and / until the following menu appears on the screen...
...: Video Channel Block Program Block Audio Password Clean All Channel Function Lock Lock ENTER Enter CH+/- Select VOL+/- Window Color: Press / to select according your password, you can always input 9443 to input the digits( The initial password is 0000. Lock Menu Options 1. Default: Press /ENTER to confirm. OK Cancel Press / to select OK or Cancel then OK to enter the submenu. Press MENU button and / until the following menu appears on the screen...

User Manual
Page 35
... the button on the remote to exit the USB mode. USB Input 1.1.Supporting media and file format: Digital pictures (.JPG) and digital music (.MP3)files Due to differences in the file code and file mode, It is possible that some files cannot be read. 2.Before starting operation, verify USB storage device is used then an identification problem may be halted due to excessive rate of card readers and can be connected to mobile...
... the button on the remote to exit the USB mode. USB Input 1.1.Supporting media and file format: Digital pictures (.JPG) and digital music (.MP3)files Due to differences in the file code and file mode, It is possible that some files cannot be read. 2.Before starting operation, verify USB storage device is used then an identification problem may be halted due to excessive rate of card readers and can be connected to mobile...

User Manual
Page 43
Parental Password Default Reset Note: Some functions may not be available depending on the type of disc. Press ENTER to the manufacturers original settings. DVD System Setup(Continued) DVD System Setup SETUP PLAY/ENTER DEFAULT: Resets all settings (except password and parental lock status) for this DVD player back to perform the reset. ..Preference Page..
Parental Password Default Reset Note: Some functions may not be available depending on the type of disc. Press ENTER to the manufacturers original settings. DVD System Setup(Continued) DVD System Setup SETUP PLAY/ENTER DEFAULT: Resets all settings (except password and parental lock status) for this DVD player back to perform the reset. ..Preference Page..

User Manual
Page 46
... screen No sound Poor sound Verify if correct signals are input. Refer to remove the back cover as the TV set has dangerous voltages levels inside that electricity is properly supplied with your local authorized service center. 2.The TV set must only be repaired using the above guide consult with power. If the problem still exists, contact an authorized service depot for some channel Check picture and sound systems. program (black...
... screen No sound Poor sound Verify if correct signals are input. Refer to remove the back cover as the TV set has dangerous voltages levels inside that electricity is properly supplied with your local authorized service center. 2.The TV set must only be repaired using the above guide consult with power. If the problem still exists, contact an authorized service depot for some channel Check picture and sound systems. program (black...

User Manual
Page 47
Dimensions quoted in this manual are subject to change without DVD 19 with DVD NTSC, ATSC, Clear QAM 1.5W+1.5W AV input PC input S-VIDEO input PC audio input YPbPr input Antenna input HDMI input Power requirements ~120V 60Hz Power consumption Temperature Humidity Accessories 60W 80W Working:+5 ~+35 Storage:-15 ~+45 Working:20% ~ 80% Storage: 5% ~ 90% Remote control Batteries User manual Warranty card NOTE Design and specifications are approximate. Specifications Model Picture, sound system Audio output External input port 19 without notice.
Dimensions quoted in this manual are subject to change without DVD 19 with DVD NTSC, ATSC, Clear QAM 1.5W+1.5W AV input PC input S-VIDEO input PC audio input YPbPr input Antenna input HDMI input Power requirements ~120V 60Hz Power consumption Temperature Humidity Accessories 60W 80W Working:+5 ~+35 Storage:-15 ~+45 Working:20% ~ 80% Storage: 5% ~ 90% Remote control Batteries User manual Warranty card NOTE Design and specifications are approximate. Specifications Model Picture, sound system Audio output External input port 19 without notice.


