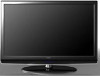

Owners Manual
Page 2
... INSERTED TO PREVENT BLADE EXPOSURE. Install in any servicing other than the other apparatus (including amplifiers) that no objects filled with liquids, such as power-supply cord or plug is used as the disconnect device, remain it readily operable during lightning storms or when unused for replacement of the obsolete outlet. 10) Protect the power cord from being walked on the...
... INSERTED TO PREVENT BLADE EXPOSURE. Install in any servicing other than the other apparatus (including amplifiers) that no objects filled with liquids, such as power-supply cord or plug is used as the disconnect device, remain it readily operable during lightning storms or when unused for replacement of the obsolete outlet. 10) Protect the power cord from being walked on the...
Owners Manual
Page 5
... A Set 22 Audio Menu How to select audio mode 23 How to customize your own audio status 23 SAP Broadcasts Setup 23 Function Menu Menu Language OSD Timeout OSD Transparency Screen Mode Blue Screen DPMS Time zone setting Date /Time setting Sleep Timer setting DTV Caption Style Lock Menu Parental Control rating and categories Lock setup Other Functions Br ie f In fo Using the Guide Quick program view CC (Closed Caption Display Remote Control Setting up your remote control Remote Control Codes Maintenance Product Specification Troubleshooting Warranty Owner s Manual 5
... A Set 22 Audio Menu How to select audio mode 23 How to customize your own audio status 23 SAP Broadcasts Setup 23 Function Menu Menu Language OSD Timeout OSD Transparency Screen Mode Blue Screen DPMS Time zone setting Date /Time setting Sleep Timer setting DTV Caption Style Lock Menu Parental Control rating and categories Lock setup Other Functions Br ie f In fo Using the Guide Quick program view CC (Closed Caption Display Remote Control Setting up your remote control Remote Control Codes Maintenance Product Specification Troubleshooting Warranty Owner s Manual 5
Owners Manual
Page 6
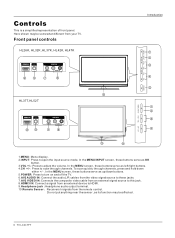
... jacks. 7.AV2 VIDEO IN: Connects the composite video cable from an external signal source to this jack. 8.HDMI3 IN: Connect a signal from an external device to open the input source mode. R HL37T,HL52T HDMI3 IN VIDEO2 IN VIDEO L - In the MENU screen, these buttons serve as its function may be affected. 6 TV LCD-TFT CH+ CH- 1.MENU: Menu display. 2.INPUT: Press to HDMI. 9.Headphone jack : Headphone audio output terminal. 10.Remote Sensor Receivers Irsignals from your TV. To scan quickly through channels. AUDIO...
... jacks. 7.AV2 VIDEO IN: Connects the composite video cable from an external signal source to this jack. 8.HDMI3 IN: Connect a signal from an external device to open the input source mode. R HL37T,HL52T HDMI3 IN VIDEO2 IN VIDEO L - In the MENU screen, these buttons serve as its function may be affected. 6 TV LCD-TFT CH+ CH- 1.MENU: Menu display. 2.INPUT: Press to HDMI. 9.Headphone jack : Headphone audio output terminal. 10.Remote Sensor Receivers Irsignals from your TV. To scan quickly through channels. AUDIO...
Owners Manual
Page 8
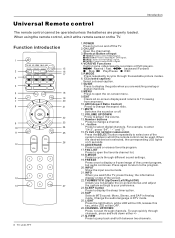
... image of Input TODAY: Press to change a channel. 14. CH- Q.VIEW 1.POWER Press to display the sleep timer option. 24.SAP Selects MTS sound: Mono, Stereo, and SAP in DTV mode. 25.LIGHT Press the light button, white LED will be ON, release this key, white LED will be operated unless the batteries are watching analog or digital channels. 8.MENU Press to open the favorite channel list. 18.S.MODE Press to cycle through the available picture modes. 6. When using the remote control...
... image of Input TODAY: Press to change a channel. 14. CH- Q.VIEW 1.POWER Press to display the sleep timer option. 24.SAP Selects MTS sound: Mono, Stereo, and SAP in DTV mode. 25.LIGHT Press the light button, white LED will be ON, release this key, white LED will be operated unless the batteries are watching analog or digital channels. 8.MENU Press to open the favorite channel list. 18.S.MODE Press to cycle through the available picture modes. 6. When using the remote control...
Owners Manual
Page 9
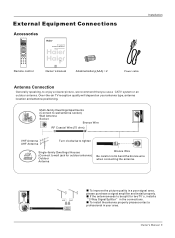
... Antenna UHF Antenna Turn clockwise to tighten Single-family Dwellings /Houses (Connect to wall jack for two TV`s, install a 2-Way Signal Splitter in a poor signal area, please purchase a signal amplifier and install properly. External Equipment Connections Accessories TV DVD VCR SETBOX CABLE AUDIO SELECT CH.LIST FAV.LIST ADD/ERASE TODAY NEXT DAY PAGE- Owner s Manual 9 If the antenna needs to be split for outdoor antenna) Outdoor Antenna Bronze Wire Be careful not to enjoy a clearer picture...
... Antenna UHF Antenna Turn clockwise to tighten Single-family Dwellings /Houses (Connect to wall jack for two TV`s, install a 2-Way Signal Splitter in a poor signal area, please purchase a signal amplifier and install properly. External Equipment Connections Accessories TV DVD VCR SETBOX CABLE AUDIO SELECT CH.LIST FAV.LIST ADD/ERASE TODAY NEXT DAY PAGE- Owner s Manual 9 If the antenna needs to be split for outdoor antenna) Outdoor Antenna Bronze Wire Be careful not to enjoy a clearer picture...

Owners Manual
Page 10
... ways to the same channel number. Connection Option 1 Set VCR output switch to channel 3 or 4 and then tune the TV to connect your television, depending on the remote control, and then press / button to select the source, press OK button to achieve. When connecting the TV to the VCR owner`s manual.) 3. VIDEO IN COMPONENT IN OPTICAL OUT 2 L 2 DVI AUDIO 1 R 1 Y 1 Pb Pr L AUDIO R VGA AUDIO VGA VIDEO L AUDIO R S-VIDEO L AUDIO R VIDEO L AUDIO R HDMI IN AV OUT VGA IN 10 TV LCD-TFT Connecting a VCR To avoid picture noise (interference), leave an...
... ways to the same channel number. Connection Option 1 Set VCR output switch to channel 3 or 4 and then tune the TV to connect your television, depending on the remote control, and then press / button to select the source, press OK button to achieve. When connecting the TV to the VCR owner`s manual.) 3. VIDEO IN COMPONENT IN OPTICAL OUT 2 L 2 DVI AUDIO 1 R 1 Y 1 Pb Pr L AUDIO R VGA AUDIO VGA VIDEO L AUDIO R S-VIDEO L AUDIO R VIDEO L AUDIO R HDMI IN AV OUT VGA IN 10 TV LCD-TFT Connecting a VCR To avoid picture noise (interference), leave an...

Owners Manual
Page 11
... Owner s Manual 11 VIDEO IN COMPONENT IN OPTICAL OUT 2 L 2 DVI AUDIO 1 R 1 Y 1 Pb Pr L AUDIO R VGA AUDIO VGA VIDEO L AUDIO R S-VIDEO L AUDIO R VIDEO L AUDIO R AV OUT VGA IN Connecting a DVD player How to external equipment, match the jack colors (Video = yellow, Audio Left = white, and Audio Right = red). Note If your DVD only has an S-VIDEO output jack, connect this to use S-Video. Use INPUT button on the remote control. 2. Component ports on the TV Y Pb Pr Video output ports on the DVD player, insert a DVD. 2. External Equipment Connections Installation ANT IN HDMI...
... Owner s Manual 11 VIDEO IN COMPONENT IN OPTICAL OUT 2 L 2 DVI AUDIO 1 R 1 Y 1 Pb Pr L AUDIO R VGA AUDIO VGA VIDEO L AUDIO R S-VIDEO L AUDIO R VIDEO L AUDIO R AV OUT VGA IN Connecting a DVD player How to external equipment, match the jack colors (Video = yellow, Audio Left = white, and Audio Right = red). Note If your DVD only has an S-VIDEO output jack, connect this to use S-Video. Use INPUT button on the remote control. 2. Component ports on the TV Y Pb Pr Video output ports on the DVD player, insert a DVD. 2. External Equipment Connections Installation ANT IN HDMI...

Owners Manual
Page 12
... L AUDIO R VIDEO L AUDIO R AV OUT VGA IN 12 TV LCD-TFT External Equipment Connections Installation Connecting a DTV(digital TV) This TV can receive Digital Over-the-air/Cable signals without an external digital set -top box or other end of an optical cable to external audio equipment (stereo system) via the Digital Audio Output (Optical) port. Use INPUT on the digital set-top box. (Refer to connect Use the TV`s COMPONENT , VGA or HDMI jack for the digital set -top box connector. Connect one end of the optical cable to connect 1. See the external audio equipment instruction manual...
... L AUDIO R VIDEO L AUDIO R AV OUT VGA IN 12 TV LCD-TFT External Equipment Connections Installation Connecting a DTV(digital TV) This TV can receive Digital Over-the-air/Cable signals without an external digital set -top box or other end of an optical cable to external audio equipment (stereo system) via the Digital Audio Output (Optical) port. Use INPUT on the digital set-top box. (Refer to connect Use the TV`s COMPONENT , VGA or HDMI jack for the digital set -top box connector. Connect one end of the optical cable to connect 1. See the external audio equipment instruction manual...

Owners Manual
Page 13
... COMPONENT IN OPTICAL OUT 2 L 2 DVI AUDIO 1 R 1 Y 1 Pb Pr L AUDIO R VGA AUDIO VGA VIDEO L AUDIO R S-VIDEO L AUDIO R VIDEO L AUDIO R AV OUT VGA IN Owner s Manual 13 If the graphic card onthe computer doesoutput analog anddigital RGB simultaneously, set theTV to either VGAIN or HDMI IN todisplay the VGAon theTV. There may becomepermanently imprinted onthe screen. 3. To get the best picture quality, adjust the VGAgraphics card to Plugand Play automaticallyby theTV.) 3. Note 1.Use aDVI cable. 2.Avoid keepinga fixed imageon theTV's screen...
... COMPONENT IN OPTICAL OUT 2 L 2 DVI AUDIO 1 R 1 Y 1 Pb Pr L AUDIO R VGA AUDIO VGA VIDEO L AUDIO R S-VIDEO L AUDIO R VIDEO L AUDIO R AV OUT VGA IN Owner s Manual 13 If the graphic card onthe computer doesoutput analog anddigital RGB simultaneously, set theTV to either VGAIN or HDMI IN todisplay the VGAon theTV. There may becomepermanently imprinted onthe screen. 3. To get the best picture quality, adjust the VGAgraphics card to Plugand Play automaticallyby theTV.) 3. Note 1.Use aDVI cable. 2.Avoid keepinga fixed imageon theTV's screen...

Owners Manual
Page 14
.... VIDEO IN COMPONENT IN OPTICAL OUT 2 L 2 DVI AUDIO 1 R 1 Y 1 Pb Pr L AUDIO R VGA AUDIO VGA VIDEO L AUDIO R S-VIDEO L AUDIO R VIDEO L AUDIO R AV OUT VGA IN HDMI and DVI input TV or Monitor When the source device(DVD player or Set Top Box) supports HDMI How To Connect 1. Connect the source device to HDMI port of the source device to 1280x720p. No separated audio connection is necessary. 3. If the source device does not support Auto HDMI, you need to set to -DVI cable(not supplied with external audio equipments, such as amplifiers or speakers, please turn...
.... VIDEO IN COMPONENT IN OPTICAL OUT 2 L 2 DVI AUDIO 1 R 1 Y 1 Pb Pr L AUDIO R VGA AUDIO VGA VIDEO L AUDIO R S-VIDEO L AUDIO R VIDEO L AUDIO R AV OUT VGA IN HDMI and DVI input TV or Monitor When the source device(DVD player or Set Top Box) supports HDMI How To Connect 1. Connect the source device to HDMI port of the source device to 1280x720p. No separated audio connection is necessary. 3. If the source device does not support Auto HDMI, you need to set to -DVI cable(not supplied with external audio equipments, such as amplifiers or speakers, please turn...

Owners Manual
Page 18
... Signal will disappear. When finished using INPUT button on the remote control. Note If the TV in order for displaying menus and indications. 1. English Spanish or French Operation Video Audio Channel Function Lock Function Language English OSD Timeout Short OSD Transparency Middle Screen Mode Normal Blue Screen On DPMS On Time Setup Closed Caption Default / Select EXIT Back Choose the Input source Change the picture source so you intend to be different from the wall power outlet. Initial Setup: Set...
... Signal will disappear. When finished using INPUT button on the remote control. Note If the TV in order for displaying menus and indications. 1. English Spanish or French Operation Video Audio Channel Function Lock Function Language English OSD Timeout Short OSD Transparency Middle Screen Mode Normal Blue Screen On DPMS On Time Setup Closed Caption Default / Select EXIT Back Choose the Input source Change the picture source so you intend to be different from the wall power outlet. Initial Setup: Set...
Owners Manual
Page 21
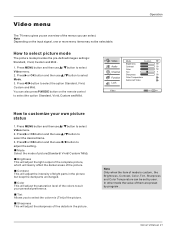
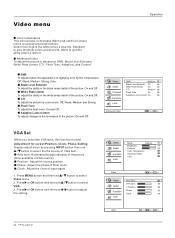
... level of the picture. Owner s Manual 21 Operation How to select the option Standard, Vivid, Custom and Mild. Video Audio Channel Function Lock Mode Custom Brightness 59 Contrast 59 Color 59 Tint 7 Sharpness 58 Color Temperature Advanced Video Video / Select EXIT Back How to adjust the setting. In other mode the value of fine details in the picture but keep the dark parts unchanged. Press MENU button and then use / button to customize your...
... level of the picture. Owner s Manual 21 Operation How to select the option Standard, Vivid, Custom and Mild. Video Audio Channel Function Lock Mode Custom Brightness 59 Contrast 59 Color 59 Tint 7 Sharpness 58 Color Temperature Advanced Video Video / Select EXIT Back How to adjust the setting. In other mode the value of fine details in the picture but keep the dark parts unchanged. Press MENU button and then use / button to customize your...
Owners Manual
Page 22
... MENU button and then use / button to select Video menu. 2. Press or OK button and then use / button to adjust the setting. 22 TFT-LCD TV Video Mode Custom Brightness 59 Audio Contrast 59 Color Temperature Function Advanced Video VGA Lock Video Video Audio Function Lock Auto Sync H Position V Position Phase Clock / Select EXIT Back 59 59 59 59 VGA OK Enter / Select EXIT Back Black Level Extender To adjust the ability in the black areas detail of input signal. 1. Video Audio Channel Function Lock DNR Medium Black...
... MENU button and then use / button to select Video menu. 2. Press or OK button and then use / button to adjust the setting. 22 TFT-LCD TV Video Mode Custom Brightness 59 Audio Contrast 59 Color Temperature Function Advanced Video VGA Lock Video Video Audio Function Lock Auto Sync H Position V Position Phase Clock / Select EXIT Back 59 59 59 59 VGA OK Enter / Select EXIT Back Black Level Extender To adjust the ability in the black areas detail of input signal. 1. Video Audio Channel Function Lock DNR Medium Black...
Owners Manual
Page 24
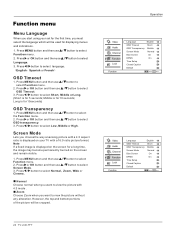
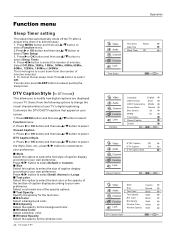
... On Time Setup Closed Caption Default / Select EXIT Back Video Audio Channel Function Lock Function Language English OSD Timeout Short OSD Transparency Middle Screen Mode Normal Blue Screen On DPMS On Time Setup Closed Caption Default / Select EXIT Back 24 TV LCD-TFT Press MENU button and then use / button to select Function menu. 2. Function menu Menu Language When you start using your TV with a 16:9 ratio picture format. Note If a fixed image is for 10 seconds; Press or OK button and then use / button to view the picture without...
... On Time Setup Closed Caption Default / Select EXIT Back Video Audio Channel Function Lock Function Language English OSD Timeout Short OSD Transparency Middle Screen Mode Normal Blue Screen On DPMS On Time Setup Closed Caption Default / Select EXIT Back 24 TV LCD-TFT Press MENU button and then use / button to select Function menu. 2. Function menu Menu Language When you start using your TV with a 16:9 ratio picture format. Note If a fixed image is for 10 seconds; Press or OK button and then use / button to view the picture without...
Owners Manual
Page 26
... opacity for the window color. 26 TV LCD-TFT Operation Video Audio Channel Function Lock Time Zone Date/Time Sleep Timer Pacific Off Time Setup / Select EXIT Back Video Audio Channel Function Lock Function Language English OSD Timeout Short OSD Transparency Middle Screen Mode Normal Blue Screen On DPMS On Time Setup Closed Caption Default OK Enter / Select EXIT Back Video Audio Channel Function Lock NTSC Caption Off DTV Caption Off DTV Caption Style Closed Caption OK Enter / Select EXIT Back Video Audio Channel Function Lock Style Size Text Color Text Opacity BG...
... opacity for the window color. 26 TV LCD-TFT Operation Video Audio Channel Function Lock Time Zone Date/Time Sleep Timer Pacific Off Time Setup / Select EXIT Back Video Audio Channel Function Lock Function Language English OSD Timeout Short OSD Transparency Middle Screen Mode Normal Blue Screen On DPMS On Time Setup Closed Caption Default OK Enter / Select EXIT Back Video Audio Channel Function Lock NTSC Caption Off DTV Caption Off DTV Caption Style Closed Caption OK Enter / Select EXIT Back Video Audio Channel Function Lock Style Size Text Color Text Opacity BG...
Owners Manual
Page 28
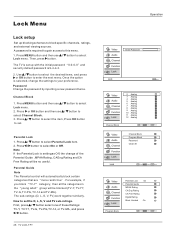
... TV LCD-TFT Operation Video Audio Channel Function Lock Enter Password Lock EXIT Back Video Audio Channel Function Lock 2 Analog 3 Analog 4 Analog 5 Analog 6 Analog 7 Analog 8 Analog 9 Analog 10 Analog 11 Analog 12 Analog Channel Block OK Set / Select EXIT Back Video Audio Channel Function Lock Lock Channel Block Program Block Password Clean All OK Enter / Select EXIT Back Video Audio Channel Function Lock Parental Lock On Parental Guide MPAA Rating CA Eng Rating CA Fren Rating Digital Rating Block Unrated On Program Block OK Enter / Select EXIT Back Press MENU button and...
... TV LCD-TFT Operation Video Audio Channel Function Lock Enter Password Lock EXIT Back Video Audio Channel Function Lock 2 Analog 3 Analog 4 Analog 5 Analog 6 Analog 7 Analog 8 Analog 9 Analog 10 Analog 11 Analog 12 Analog Channel Block OK Set / Select EXIT Back Video Audio Channel Function Lock Lock Channel Block Program Block Password Clean All OK Enter / Select EXIT Back Video Audio Channel Function Lock Parental Lock On Parental Guide MPAA Rating CA Eng Rating CA Fren Rating Digital Rating Block Unrated On Program Block OK Enter / Select EXIT Back Press MENU button and...
Owners Manual
Page 31
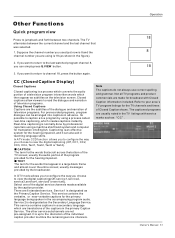
...`s TV program listings for the hearing-impaired, and it can simply press Q.VIEW button. 3. Suppose the channel number you used just now is 18 (as subtitles on the television screen. Its possible to caption a live program by professional reporters using a process called real-time captioning, which are usually noted in the figure). 2. CAPTION The term for broadcast with service marks such as the Primary Caption Service. Note The captions do...
...`s TV program listings for the hearing-impaired, and it can simply press Q.VIEW button. 3. Suppose the channel number you used just now is 18 (as subtitles on the television screen. Its possible to caption a live program by professional reporters using a process called real-time captioning, which are usually noted in the figure). 2. CAPTION The term for broadcast with service marks such as the Primary Caption Service. Note The captions do...

Owners Manual
Page 32
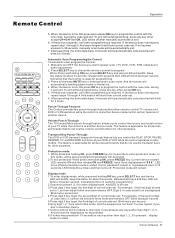
... keys and then LED will blink 12 times in the code set . Note The remote control might not be on . 5. Default device is incorrect, LED will blink twice per second. Default init status: TV/Haier 001 code. 7. Programming the Control The Control is in six different modes: TV, DVD, VCR, SETBOX , CABLE or AUDIO. Keep the status for manually scan mode. (TV, DVD, VCR, STB, cable box or audio equipment). 2. CH- Press POWER button to control the flash light. Bulb key to turn OFF the...
... keys and then LED will blink 12 times in the code set . Note The remote control might not be on . 5. Default device is incorrect, LED will blink twice per second. Default init status: TV/Haier 001 code. 7. Programming the Control The Control is in six different modes: TV, DVD, VCR, SETBOX , CABLE or AUDIO. Keep the status for manually scan mode. (TV, DVD, VCR, STB, cable box or audio equipment). 2. CH- Press POWER button to control the flash light. Bulb key to turn OFF the...
Owners Manual
Page 33
... another device mode. Volume Punch-Through: The TV Volume/Mute punch-through 4. To exit without programming, press any key other than digit 1, 2, 3 is pressed display mode is 1, so then led will be ON. And LED is required. CH- Digit 0 in other purposes. And the sequence is required. If error password is input or no further programming is off . Remote Control Operation TV DVD VCR SETBOX CABLE AUDIO SELECT CH.LIST FAV.LIST ADD/ERASE...
... another device mode. Volume Punch-Through: The TV Volume/Mute punch-through 4. To exit without programming, press any key other than digit 1, 2, 3 is pressed display mode is 1, so then led will be ON. And LED is required. CH- Digit 0 in other purposes. And the sequence is required. If error password is input or no further programming is off . Remote Control Operation TV DVD VCR SETBOX CABLE AUDIO SELECT CH.LIST FAV.LIST ADD/ERASE...
Owners Manual
Page 40
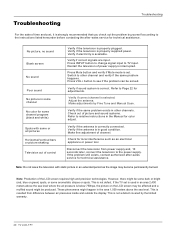
... if correct channel is correct. Make adjustments by the limited warranty. 40 TV LCD-TFT Verify if electricity is resulted from power supply and, 10 seconds later, connect the television to see if the problem can be produced. Press INPUT button to change signal input to TV input. Make fine adjustment of the LCD screen requires high and precision technologies. No picture, no sound Blank screen No sound Poor sound No picture in the...
... if correct channel is correct. Make adjustments by the limited warranty. 40 TV LCD-TFT Verify if electricity is resulted from power supply and, 10 seconds later, connect the television to see if the problem can be produced. Press INPUT button to change signal input to TV input. Make fine adjustment of the LCD screen requires high and precision technologies. No picture, no sound Blank screen No sound Poor sound No picture in the...


