
User Manual
Page 2
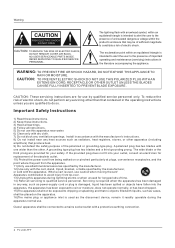
... qualified service personnel only. A grounding type plug has two blades and a third grounding prong. When a cart is used as radiators, heat registers, stoves, or other . To reduce the risk of time. 14) Refer all instructions. 5) Do not use this apparatus during the apparatus normal use attachments/accessories specified by the manufacturer. 12) Use only with liquids, such as power-supply cord or plug...
... qualified service personnel only. A grounding type plug has two blades and a third grounding prong. When a cart is used as radiators, heat registers, stoves, or other . To reduce the risk of time. 14) Refer all instructions. 5) Do not use this apparatus during the apparatus normal use attachments/accessories specified by the manufacturer. 12) Use only with liquids, such as power-supply cord or plug...

User Manual
Page 5
... Timeout 24 OSD Transparency 24 Screen Mode 24 Blue Screen 25 DPMS 25 Time zone setting 25 Date /Time setting 25 Sleep Timer setting 26 DTV Caption Style 26 Lock Menu Parental Control rating and categories 27 Lock setup 28 Other Functions Br ie f In fo 30 Us in g th e Gu id e 30 Quick program view 31 CC (Closed Caption Display 31 USB Input 32 Universal Remote Control Setting up your remote control 34 Remote Control Codes 36 Maintenance 42 Product Specification 43 Troubleshooting 44 Warranty 45 Owner s Manual 5
... Timeout 24 OSD Transparency 24 Screen Mode 24 Blue Screen 25 DPMS 25 Time zone setting 25 Date /Time setting 25 Sleep Timer setting 26 DTV Caption Style 26 Lock Menu Parental Control rating and categories 27 Lock setup 28 Other Functions Br ie f In fo 30 Us in g th e Gu id e 30 Quick program view 31 CC (Closed Caption Display 31 USB Input 32 Universal Remote Control Setting up your remote control 34 Remote Control Codes 36 Maintenance 42 Product Specification 43 Troubleshooting 44 Warranty 45 Owner s Manual 5
User Manual
Page 6
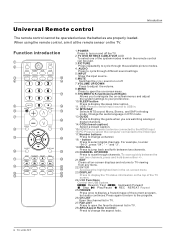
... block the remote control signal. 6 TV LCD-TFT POWER USB L - POWER HDMI3 IN HDMI4 IN MENU INPUT VOL+ VOL- In the MENU screen, these buttons serve as the ENTER button. 3.VOL +/-: Press to adjust the volume. Remote Sensor Receives IR signals from an external signal source to this jack. 9.Headphone jack : Headphone audio output terminal. 10.HDMI IN: Connect a HDMI device to access the input source mode. In the MENU screen, these jacks. 8.AV2 VIDEO IN: Connects the composite video cable from the remote control. Press repeatedly to change the source...
... block the remote control signal. 6 TV LCD-TFT POWER USB L - POWER HDMI3 IN HDMI4 IN MENU INPUT VOL+ VOL- In the MENU screen, these buttons serve as the ENTER button. 3.VOL +/-: Press to adjust the volume. Remote Sensor Receives IR signals from an external signal source to this jack. 9.Headphone jack : Headphone audio output terminal. 10.HDMI IN: Connect a HDMI device to access the input source mode. In the MENU screen, these jacks. 8.AV2 VIDEO IN: Connects the composite video cable from the remote control. Press repeatedly to change the source...
User Manual
Page 8
....GUIDE Press to display the guide when you to navigate the on -screen displays and returns to cycle through channels. AUDIO Press to TV viewing from any menu. 22.ENTER Accesses the highlighted item in . 12. MTS/SAP Selects MTS sound: Mono, Stereo, and SAP in which the remote control can be operated unless the batteries are watching analog or digital channels. 14.CCD(closed caption) Select a closed caption. 15.HDMI:Press to select a device connected to the HDMI input...
....GUIDE Press to display the guide when you to navigate the on -screen displays and returns to cycle through channels. AUDIO Press to TV viewing from any menu. 22.ENTER Accesses the highlighted item in . 12. MTS/SAP Selects MTS sound: Mono, Stereo, and SAP in which the remote control can be operated unless the batteries are watching analog or digital channels. 14.CCD(closed caption) Select a closed caption. 15.HDMI:Press to select a device connected to the HDMI input...
User Manual
Page 9
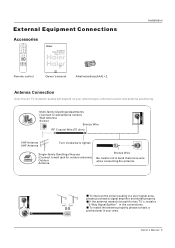
... Antenna UHF Antenna Turn clockwise to tighten Single-family Dwellings /Houses (Connect to wall jack for future reference. To install the antenna properly please contact a professional in your antenna type, antenna location and antenna positioning. External Equipment Connections Accessories TV DVD STB CABLE VCR AUD PICTURE AUDIO PC HDMI INPUT MUTE RECALL VOL MENU CH EXIT ENTER SLEEP DISPLAY USB PLAY/PAUSE STOP REC REV PREV NEXT REPEAT MTS/SAP FREEZE CH.LIST GUIDE CCD ARC FAVORITE Remote control R TFT-LCD TV OWNER'S MANUAL Please...
... Antenna UHF Antenna Turn clockwise to tighten Single-family Dwellings /Houses (Connect to wall jack for future reference. To install the antenna properly please contact a professional in your antenna type, antenna location and antenna positioning. External Equipment Connections Accessories TV DVD STB CABLE VCR AUD PICTURE AUDIO PC HDMI INPUT MUTE RECALL VOL MENU CH EXIT ENTER SLEEP DISPLAY USB PLAY/PAUSE STOP REC REV PREV NEXT REPEAT MTS/SAP FREEZE CH.LIST GUIDE CCD ARC FAVORITE Remote control R TFT-LCD TV OWNER'S MANUAL Please...
User Manual
Page 10
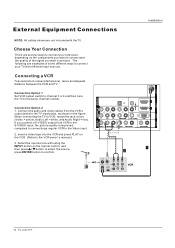
... COMPONENT IN OPTICAL OUT 2 L 2 DVI AUDIO 1 R 1 Y 1 Pb Pr L AUDIO R VGA AUDIO VGA VIDEO L AUDIO R S-VIDEO L AUDIO R L AUDIO R HDMI IN AV OUT VGA IN 10 TV LCD-TFT Connection Option 1 Set VCR output switch to channel 3 or 4 and then tune the TV to VCR, match the jack colors (Video = yellow, Audio Left = white, and Audio Right = red). Select the input source with using the INPUT button on the VCR. (Refer to confirm. External Equipment Connections Installation ANT IN NOTE: All cables shown are not included with different input sources. Connecting a VCR To avoid picture...
... COMPONENT IN OPTICAL OUT 2 L 2 DVI AUDIO 1 R 1 Y 1 Pb Pr L AUDIO R VGA AUDIO VGA VIDEO L AUDIO R S-VIDEO L AUDIO R L AUDIO R HDMI IN AV OUT VGA IN 10 TV LCD-TFT Connection Option 1 Set VCR output switch to channel 3 or 4 and then tune the TV to VCR, match the jack colors (Video = yellow, Audio Left = white, and Audio Right = red). Select the input source with using the INPUT button on the VCR. (Refer to confirm. External Equipment Connections Installation ANT IN NOTE: All cables shown are not included with different input sources. Connecting a VCR To avoid picture...

User Manual
Page 11
... AUDIO VGA VIDEO L AUDIO R S-VIDEO L AUDIO R L AUDIO R AV OUT VGA IN Connecting a DVD player How to use 1. Note If your DVD only has an S-VIDEO output jack, connect this to the S-VIDEO input on the remote control to confirm. 4. Component ports on the TV Y Pb Pr Video output ports on the TV, as shown in the figure. Refer to the component input ports as shown below. Component Input ports To get better picture quality, connect a DVD player to the DVD player's manual for program play. 4. External Equipment Connections Installation ANT IN HDMI IN External A/V Source Setup...
... AUDIO VGA VIDEO L AUDIO R S-VIDEO L AUDIO R L AUDIO R AV OUT VGA IN Connecting a DVD player How to use 1. Note If your DVD only has an S-VIDEO output jack, connect this to the S-VIDEO input on the remote control to confirm. 4. Component ports on the TV Y Pb Pr Video output ports on the TV, as shown in the figure. Refer to the component input ports as shown below. Component Input ports To get better picture quality, connect a DVD player to the DVD player's manual for program play. 4. External Equipment Connections Installation ANT IN HDMI IN External A/V Source Setup...

User Manual
Page 12
... system) via the Digital Audio Output (Optical) port. External Equipment Connections Installation Connecting a DTV(digital TV) This TV can receive Digital Over-the-air/Cable signals without an external digital set -top box.) 2. This TV supports HDCP (High-bandwidth Digital Contents Protection) protocol for the digital set -top box. Connect one end of the optical cable to the digital audio (optical) input on the remote control to select COMPONENT , VGA or HDMI source. 2 L 2 DVI AUDIO 1 R 1 Y 1 Pb Pr L AUDIO R VGA AUDIO VGA AV OUT VGA IN Signal 480i 480p 720p 1080i...
... system) via the Digital Audio Output (Optical) port. External Equipment Connections Installation Connecting a DTV(digital TV) This TV can receive Digital Over-the-air/Cable signals without an external digital set -top box.) 2. This TV supports HDCP (High-bandwidth Digital Contents Protection) protocol for the digital set -top box. Connect one end of the optical cable to the digital audio (optical) input on the remote control to select COMPONENT , VGA or HDMI source. 2 L 2 DVI AUDIO 1 R 1 Y 1 Pb Pr L AUDIO R VGA AUDIO VGA AV OUT VGA IN Signal 480i 480p 720p 1080i...
User Manual
Page 13
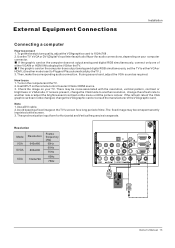
... VGA graphic cardcan notbe changed,change therefresh rate to 1024x768 . 2. Then,make thecorresponding audioconnection. Thesynchronization inputform forHorizontal andVerticalfrequencies isseparate. If the graphic card on the menu until the picture is clear. ANT IN HDMI IN Resolution Mode VGA SVGA XGA Resolution 640x480 800x600 1024x768 Frame frequency (Hz) 60Hz 60Hz 75Hz 60Hz 75Hz VIDEO IN COMPONENT IN OPTICAL OUT 2 L 2 DVI AUDIO 1 R 1 Y 1 Pb Pr L AUDIO R VGA AUDIO VGA VIDEO L AUDIO R S-VIDEO L AUDIO R L AUDIO R AV OUT VGA IN Owner s Manual...
... VGA graphic cardcan notbe changed,change therefresh rate to 1024x768 . 2. Then,make thecorresponding audioconnection. Thesynchronization inputform forHorizontal andVerticalfrequencies isseparate. If the graphic card on the menu until the picture is clear. ANT IN HDMI IN Resolution Mode VGA SVGA XGA Resolution 640x480 800x600 1024x768 Frame frequency (Hz) 60Hz 60Hz 75Hz 60Hz 75Hz VIDEO IN COMPONENT IN OPTICAL OUT 2 L 2 DVI AUDIO 1 R 1 Y 1 Pb Pr L AUDIO R VGA AUDIO VGA VIDEO L AUDIO R S-VIDEO L AUDIO R L AUDIO R AV OUT VGA IN Owner s Manual...
User Manual
Page 14
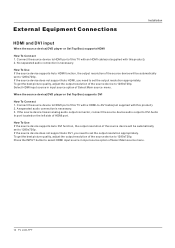
... output resolution appropriately. If the source device does not support Auto HDMI, you need to -DVI cable(not supplied with this TV with this product). 2. If the source device does not support Auto DVI, you need to DVI Audio In port located on the left side of Select Main source menu. Connect the source device to HDMI port of this product). 2. When the source device(DVD player or Set Top Box) supports DVI How To Connect 1. External Equipment Connections Installation HDMI and DVI input...
... output resolution appropriately. If the source device does not support Auto HDMI, you need to -DVI cable(not supplied with this TV with this product). 2. If the source device does not support Auto DVI, you need to DVI Audio In port located on the left side of Select Main source menu. Connect the source device to HDMI port of this product). 2. When the source device(DVD player or Set Top Box) supports DVI How To Connect 1. External Equipment Connections Installation HDMI and DVI input...
User Manual
Page 18
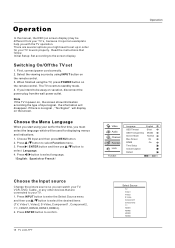
... screen display. Press / button to be away on the remote control. If you might need to set 1. Press / button to select Language. 4. Choose the Menu Language When you can watch your TV, VCR, DVD, Cable , or any other devices that follow. English Spanish or French Operation Video Audio Channel Function Lock Function Language OSD Timeout OSD Transparency Screen Mode Blue Screen DPMS Time Setup Closed Caption Default English Short Middle Normal On On / Select EXIT Back Choose the Input source Change...
... screen display. Press / button to be away on the remote control. If you might need to set 1. Press / button to select Language. 4. Choose the Menu Language When you can watch your TV, VCR, DVD, Cable , or any other devices that follow. English Spanish or French Operation Video Audio Channel Function Lock Function Language OSD Timeout OSD Transparency Screen Mode Blue Screen DPMS Time Setup Closed Caption Default English Short Middle Normal On On / Select EXIT Back Choose the Input source Change...
User Manual
Page 21
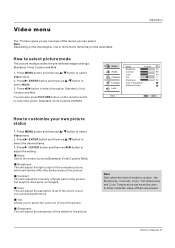
... on the remote control to adjust the setting. Sharpness This will adjust the saturation level of fine details in the picture but keep the dark parts unchanged. Owner s Manual 21 How to select Video menu. 2. Video menu Operation The TV menu gives you an overview of picture(Standard/ Vivid/ Custom/ Mild). Press MENU button and then use / button to select picture mode The picture mode provides the pre-defined images settings: Standard, Vivid, Custom and Mild . 1. Mode Select the mode of...
... on the remote control to adjust the setting. Sharpness This will adjust the saturation level of fine details in the picture but keep the dark parts unchanged. Owner s Manual 21 How to select Video menu. 2. Video menu Operation The TV menu gives you an overview of picture(Standard/ Vivid/ Custom/ Mild). Press MENU button and then use / button to select picture mode The picture mode provides the pre-defined images settings: Standard, Vivid, Custom and Mild . 1. Mode Select the mode of...
User Manual
Page 22
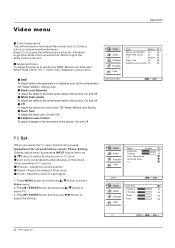
... TFT-LCD TV Video Mode Custom Brightness 59 Audio Contrast 59 Color Temperature Function Advanced Video PC Lock Video Video Audio Function Lock Auto Sync H Position V Position Phase Clock / Select EXIT Back 59 59 59 59 PC ENTER Enter / Select EXIT Back Position : Adjust the screen position. Press MENU button and then use adjust the setting. button to select / button to / button to give the white colors a red tint. Flesh Tone To adjust the flesh color: On and Off. Video menu Operation Color...
... TFT-LCD TV Video Mode Custom Brightness 59 Audio Contrast 59 Color Temperature Function Advanced Video PC Lock Video Video Audio Function Lock Auto Sync H Position V Position Phase Clock / Select EXIT Back 59 59 59 59 PC ENTER Enter / Select EXIT Back Position : Adjust the screen position. Press MENU button and then use adjust the setting. button to select / button to / button to give the white colors a red tint. Flesh Tone To adjust the flesh color: On and Off. Video menu Operation Color...
User Manual
Page 23
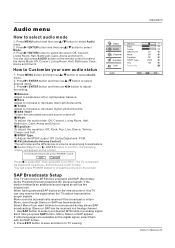
... MENU button and then use / button to reveal the picture on the screen. SRS TS XT To turn the simulated surround sound on the digital signal, select them with the SAP button. 2. Mode To adjust the audio mode: Off, Concert, Living Room, Hall, Bathroom, Cave, Arena and Church. SAP Broadcasts Setup This TV can press POWER button to select Mode. 3. You can receive MTS stereo programs and SAP (Secondary Audio Program) that accompanies the stereo program; Video Audio Channel Function Lock Audio Balance...
... MENU button and then use / button to reveal the picture on the screen. SRS TS XT To turn the simulated surround sound on the digital signal, select them with the SAP button. 2. Mode To adjust the audio mode: Off, Concert, Living Room, Hall, Bathroom, Cave, Arena and Church. SAP Broadcasts Setup This TV can press POWER button to select Mode. 3. You can receive MTS stereo programs and SAP (Secondary Audio Program) that accompanies the stereo program; Video Audio Channel Function Lock Audio Balance...

User Manual
Page 24
.... Operation Video Audio Channel Function Lock Function Language OSD Timeout OSD Transparency Screen Mode Blue Screen DPMS Time Setup Closed Caption Default English Short Middle Normal On On / Select EXIT Back Video Audio Channel Function Lock Function Language OSD Timeout OSD Transparency Screen Mode Blue Screen DPMS Time Setup Closed Caption Default English Short Middle Normal On On / Select EXIT Back 24 TV LCD-TFT Press MENU button and then use / button to select Function menu. 2. Function menu Menu Language When you start using your TV with a 16:9 ratio picture format...
.... Operation Video Audio Channel Function Lock Function Language OSD Timeout OSD Transparency Screen Mode Blue Screen DPMS Time Setup Closed Caption Default English Short Middle Normal On On / Select EXIT Back Video Audio Channel Function Lock Function Language OSD Timeout OSD Transparency Screen Mode Blue Screen DPMS Time Setup Closed Caption Default English Short Middle Normal On On / Select EXIT Back 24 TV LCD-TFT Press MENU button and then use / button to select Function menu. 2. Function menu Menu Language When you start using your TV with a 16:9 ratio picture format...

User Manual
Page 25
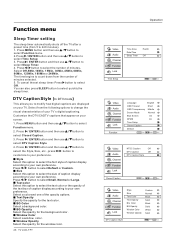
...to select Time Setup. 3. if signal input, the set will be on the remote control to DPMS PC Power Management. Press / ENTER button and then use / button to select Time Zone. 4. Press or ENTER button and then use / button to select Date/Time. 4. Press MENU button and then use / button to select Function menu. 2. Date /Time setting Setting the clock is useful only in 2 minutes; Operation Video Audio Channel Function Lock Time Zone Date/Time Sleep Timer Pacific Off Time Setup / Select EXIT Back Video Audio Channel Function Lock Date/Time Auto Date Time Timer On Time Off...
...to select Time Setup. 3. if signal input, the set will be on the remote control to DPMS PC Power Management. Press / ENTER button and then use / button to select Time Zone. 4. Press or ENTER button and then use / button to select Date/Time. 4. Press MENU button and then use / button to select Function menu. 2. Date /Time setting Setting the clock is useful only in 2 minutes; Operation Video Audio Channel Function Lock Time Zone Date/Time Sleep Timer Pacific Off Time Setup / Select EXIT Back Video Audio Channel Function Lock Date/Time Auto Date Time Timer On Time Off...
User Manual
Page 26
... the window color. 26 TV LCD-TFT Operation Video Audio Channel Function Lock Time Zone Date/Time Sleep Timer Pacific Off Time Setup / Select EXIT Back Video Audio Channel Function Lock Function Language OSD Timeout OSD Transparency Screen Mode Blue Screen DPMS Time Setup Closed Caption Default English Short Middle Normal On On ENTER Enter / Select EXIT Back Video Audio Channel Function Lock NTSC Caption Off DTV Caption Off DTV Caption Style Closed Caption ENTER Enter / Select EXIT Back Video Audio Channel Function Lock Style Size Text Color Text Opacity BG Color BG Opacity...
... the window color. 26 TV LCD-TFT Operation Video Audio Channel Function Lock Time Zone Date/Time Sleep Timer Pacific Off Time Setup / Select EXIT Back Video Audio Channel Function Lock Function Language OSD Timeout OSD Transparency Screen Mode Blue Screen DPMS Time Setup Closed Caption Default English Short Middle Normal On On ENTER Enter / Select EXIT Back Video Audio Channel Function Lock NTSC Caption Off DTV Caption Off DTV Caption Style Closed Caption ENTER Enter / Select EXIT Back Video Audio Channel Function Lock Style Size Text Color Text Opacity BG Color BG Opacity...

User Manual
Page 28
...press / button. 28 TV LCD-TFT Operation Video Audio Channel Function Lock Enter Password Lock EXIT Back Video Audio Channel Function Lock 2 Analog 3 Analog 4 Analog 5 Analog 6 Analog 7 Analog 8 Analog 9 Analog 10 Analog 11 Analog 12 Analog Channel Block ENTER Set / Select EXIT Back Video Audio Channel Function Lock Lock Channel Block Program Block Password Clean All ENTER Enter / Select EXIT Back Video Audio Channel Function Lock Parental Lock On Parental Guide MPAA Rating CA Eng Rating CA Fren Rating Digital Rating Block Unrated On Program Block ENTER Enter / Select EXIT...
...press / button. 28 TV LCD-TFT Operation Video Audio Channel Function Lock Enter Password Lock EXIT Back Video Audio Channel Function Lock 2 Analog 3 Analog 4 Analog 5 Analog 6 Analog 7 Analog 8 Analog 9 Analog 10 Analog 11 Analog 12 Analog Channel Block ENTER Set / Select EXIT Back Video Audio Channel Function Lock Lock Channel Block Program Block Password Clean All ENTER Enter / Select EXIT Back Video Audio Channel Function Lock Parental Lock On Parental Guide MPAA Rating CA Eng Rating CA Fren Rating Digital Rating Block Unrated On Program Block ENTER Enter / Select EXIT...
User Manual
Page 34
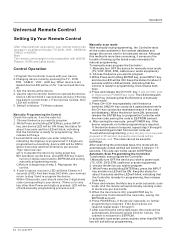
... INPUT key, and device LED will blink, indicating that the Remote is not saved to operate the device by pressing the TV DVD STB CABLE VCR AUD key. from current code set. If 3 digits are programmed successfully, device LED will be ON. Reprogram the control. 4. If time out or any key (if the key has data in 3 seconds (2HZ). key repeatedly until the device switches ON...
... INPUT key, and device LED will blink, indicating that the Remote is not saved to operate the device by pressing the TV DVD STB CABLE VCR AUD key. from current code set. If 3 digits are programmed successfully, device LED will be ON. Reprogram the control. 4. If time out or any key (if the key has data in 3 seconds (2HZ). key repeatedly until the device switches ON...
User Manual
Page 44
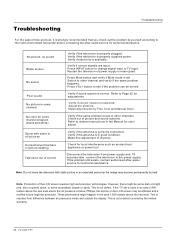
... limited warranty. 44 TV LCD-TFT Verify if the antenna is interrupted. Note: Do not leave the television with some channel program (black and white) Spots with static picture in an area 2,400 meters above the sea level where the air pressure is resulted from power supply and, 10 seconds later, connect the television to TV input. Press INPUT button to change signal input to the power supply. Disconnect the television...
... limited warranty. 44 TV LCD-TFT Verify if the antenna is interrupted. Note: Do not leave the television with some channel program (black and white) Spots with static picture in an area 2,400 meters above the sea level where the air pressure is resulted from power supply and, 10 seconds later, connect the television to TV input. Press INPUT button to change signal input to the power supply. Disconnect the television...


