

User Manual
Page 5
... gr am 20 Se le ct t he d es ir ed s ou nd 20 Mu te 20 Video Menu How to select picture mode 21 How to customize your own picture status 21 PC Se t 22 Audio Menu How to select audio mode 23 How to customize your own audio status 23 SAP...
... gr am 20 Se le ct t he d es ir ed s ou nd 20 Mu te 20 Video Menu How to select picture mode 21 How to customize your own picture status 21 PC Se t 22 Audio Menu How to select audio mode 23 How to customize your own audio status 23 SAP...
User Manual
Page 8
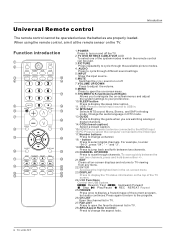
Function introduction 1 TV DVD 2 STB CABLE VCR AUD PICTURE AUDIO PC HDMI 3 15 4 16 17 5 INPUT MUTE 6 18 RECALL 19 7 VOL CH 20 MENU 8 EXIT 21 9 22 ENTER SLEEP 10 DISPLAY 23 USB PLAY/... the VGA input 17.Number buttons Press to change the aspect ratio. 8 TV LCD-TFT Universal Remote control Introduction The remote control cannot be used. 3.PICTURE Press repeatedly to cycle through the available...
Function introduction 1 TV DVD 2 STB CABLE VCR AUD PICTURE AUDIO PC HDMI 3 15 4 16 17 5 INPUT MUTE 6 18 RECALL 19 7 VOL CH 20 MENU 8 EXIT 21 9 22 ENTER SLEEP 10 DISPLAY 23 USB PLAY/... the VGA input 17.Number buttons Press to change the aspect ratio. 8 TV LCD-TFT Universal Remote control Introduction The remote control cannot be used. 3.PICTURE Press repeatedly to cycle through the available...
User Manual
Page 9
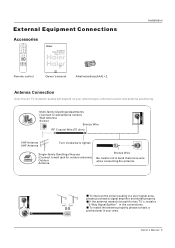
If the antenna needs to bend the bronze wire when connecting the antenna. Owner s Manual 9 ANT IN ANT IN To improve the picture quality in the connections. To install the antenna properly please contact a professional in your TV, and retain it for two TV`s, install... Splitter in a poor signal area, please purchase a signal amplifier and install properly. External Equipment Connections Accessories TV DVD STB CABLE VCR AUD PICTURE AUDIO PC HDMI INPUT MUTE RECALL VOL MENU CH EXIT ENTER SLEEP DISPLAY USB PLAY/PAUSE STOP REC REV PREV NEXT REPEAT MTS/SAP FREEZE...
If the antenna needs to bend the bronze wire when connecting the antenna. Owner s Manual 9 ANT IN ANT IN To improve the picture quality in the connections. To install the antenna properly please contact a professional in your TV, and retain it for two TV`s, install... Splitter in a poor signal area, please purchase a signal amplifier and install properly. External Equipment Connections Accessories TV DVD STB CABLE VCR AUD PICTURE AUDIO PC HDMI INPUT MUTE RECALL VOL MENU CH EXIT ENTER SLEEP DISPLAY USB PLAY/PAUSE STOP REC REV PREV NEXT REPEAT MTS/SAP FREEZE...
User Manual
Page 10
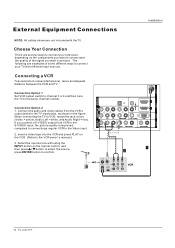
...Connections Installation ANT IN NOTE: All cables shown are several ways to connect your TV with different input sources. Connecting a VCR To avoid picture noise (interference), leave an adequate distance between the VCR and TV. The following are examples of the signal you connect a S-VIDEO output ...from the VCR's output jacks to the S-VIDEO input, the picture quality is improved; compared to connecting a regular VCR to the same channel number. Connect the audio and video cables from VCR to the...
...Connections Installation ANT IN NOTE: All cables shown are several ways to connect your TV with different input sources. Connecting a VCR To avoid picture noise (interference), leave an adequate distance between the VCR and TV. The following are examples of the signal you connect a S-VIDEO output ...from the VCR's output jacks to the S-VIDEO input, the picture quality is improved; compared to connecting a regular VCR to the same channel number. Connect the audio and video cables from VCR to the...

User Manual
Page 11
... R S-VIDEO L AUDIO R L AUDIO R AV OUT VGA IN Connecting a DVD player How to select the desired source. 3. Refer to use 1. Component Input ports To get better picture quality, connect a DVD player to external equipment, match the jack colors (Video = yellow, Audio Left = white, and Audio Right = red). How to the DVD player...
... R S-VIDEO L AUDIO R L AUDIO R AV OUT VGA IN Connecting a DVD player How to select the desired source. 3. Refer to use 1. Component Input ports To get better picture quality, connect a DVD player to external equipment, match the jack colors (Video = yellow, Audio Left = white, and Audio Right = red). How to the DVD player...
User Manual
Page 13
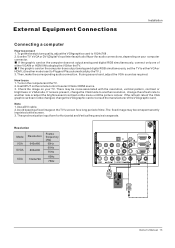
To get the best picture quality, adjust the VGAgraphics card to either VGAIN or HDMI IN todisplay the VGAon theTV. If the refresh rate of either VGA or HDMI ; (theother ... may becomepermanently imprinted onthe screen. 3. How touse 1. If noiseis present, changethe VGAmode to Plugand Play automaticallyby theTV.) 3. Check the image on the menu until the picture is clear. Note 1.Use aDVI cable. 2.Avoid keepinga fixed imageon theTV's screen fora long periodof time.The fixed image may be noise associated with the...
To get the best picture quality, adjust the VGAgraphics card to either VGAIN or HDMI IN todisplay the VGAon theTV. If the refresh rate of either VGA or HDMI ; (theother ... may becomepermanently imprinted onthe screen. 3. How touse 1. If noiseis present, changethe VGAmode to Plugand Play automaticallyby theTV.) 3. Check the image on the menu until the picture is clear. Note 1.Use aDVI cable. 2.Avoid keepinga fixed imageon theTV's screen fora long periodof time.The fixed image may be noise associated with the...
User Manual
Page 14
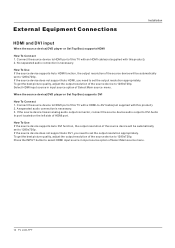
... Connections Installation HDMI and DVI input When the source device(DVD player or Set Top Box) supports HDMI How To Connect 1. To get the best picture quality, adjust the output resolution of this TV with this product). 2. Connect the source device to HDMI port of the source device to -DVI cable...
... Connections Installation HDMI and DVI input When the source device(DVD player or Set Top Box) supports HDMI How To Connect 1. To get the best picture quality, adjust the output resolution of this TV with this product). 2. Connect the source device to HDMI port of the source device to -DVI cable...
User Manual
Page 18
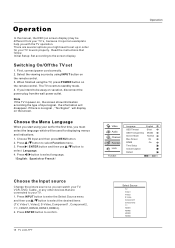
... Screen Mode Blue Screen DPMS Time Setup Closed Caption Default English Short Middle Normal On On / Select EXIT Back Choose the Input source Change the picture source so you must select the language which will be away on the remote control. 3. the information will display on the remote control. Press INPUT...
... Screen Mode Blue Screen DPMS Time Setup Closed Caption Default English Short Middle Normal On On / Select EXIT Back Choose the Input source Change the picture source so you must select the language which will be away on the remote control. 3. the information will display on the remote control. Press INPUT...
User Manual
Page 21
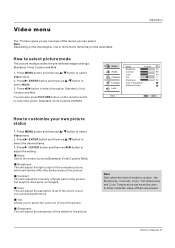
... / ENTER button and then use / button to select Video menu. 2. Mode Select the mode of them are preset. Tint Allows you can also press PICTURE button on the input signal, one or more menu items may not be set by user . Owner s Manual 21 Press MENU button and then use ...and then use / button to select Mode. 3. Press / ENTER button and then use / button to select Video menu. 2. In other mode the value of picture(Standard/ Vivid/ Custom/ Mild). Note Only when the item of mode is custom , the Brightness, Contrast, Color, Tint, Sharpness and Color Temperature can be ...
... / ENTER button and then use / button to select Video menu. 2. Mode Select the mode of them are preset. Tint Allows you can also press PICTURE button on the input signal, one or more menu items may not be set by user . Owner s Manual 21 Press MENU button and then use ...and then use / button to select Mode. 3. Press / ENTER button and then use / button to select Video menu. 2. In other mode the value of picture(Standard/ Vivid/ Custom/ Mild). Note Only when the item of mode is custom , the Brightness, Contrast, Color, Tint, Sharpness and Color Temperature can be ...
User Manual
Page 22
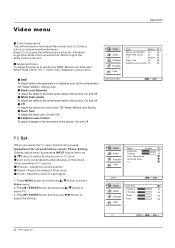
...) and Cool (blue) colors to give the white colors a neutral tint, Warm to suit personal preferences. DNR To adjust reduce the appearance of the picture: On and Off. White Peak Limiter To adjust the ability in PC source). Adaptive Luma Control To adjust changes in the luminance of the... available in the white areas detail of digitizing error by pressing INPUT button then use select PC. 3. Auto sync: Automatically adjust display of the picture: On and Off. Select Cool to give the white colors a blue tint, Standard to give the white colors a red tint. Black Level Extender To...
...) and Cool (blue) colors to give the white colors a neutral tint, Warm to suit personal preferences. DNR To adjust reduce the appearance of the picture: On and Off. White Peak Limiter To adjust the ability in PC source). Adaptive Luma Control To adjust changes in the luminance of the... available in the white areas detail of digitizing error by pressing INPUT button then use select PC. 3. Auto sync: Automatically adjust display of the picture: On and Off. Select Cool to give the white colors a blue tint, Standard to give the white colors a red tint. Black Level Extender To...
User Manual
Page 23
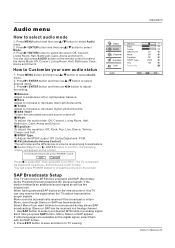
... TV station transmits the proper signals. Press MENU button and then use desired items. 3. Press / ENTER button to exit! You can be black and no picture , but the sound is only in a Analog channel. 1. even though Stereo or SAP has been selected. Use SAP button to select Audio menu. 2....MTS mode in volume level among broadcasters. When having selected SAP button on and off. Each time you want to listen to reveal the picture on the screen. Operation Audio menu How to increase or decrease lower-pitched sounds. Treble Adjust to confirm. Stereo or SAP can press ...
... TV station transmits the proper signals. Press MENU button and then use desired items. 3. Press / ENTER button to exit! You can be black and no picture , but the sound is only in a Analog channel. 1. even though Stereo or SAP has been selected. Use SAP button to select Audio menu. 2....MTS mode in volume level among broadcasters. When having selected SAP button on and off. Each time you want to listen to reveal the picture on the screen. Operation Audio menu How to increase or decrease lower-pitched sounds. Treble Adjust to confirm. Stereo or SAP can press ...

User Manual
Page 24
... to select Function menu. 2. However, the top and bottom portions of the picture will be cropped. Screen Mode Lets you want to view the picture with a 16:9 ratio picture format. Normal Choose normal when you choose the way an analog picture with a 4:3 aspect ratio is displayed on your set for the first time, you... want to view the picture without any alteration. Function menu Menu Language When you start using your TV with 4:3 mode . Press / ENTER button and then use / button to select OSD ...
... to select Function menu. 2. However, the top and bottom portions of the picture will be cropped. Screen Mode Lets you want to view the picture with a 16:9 ratio picture format. Normal Choose normal when you choose the way an analog picture with a 4:3 aspect ratio is displayed on your set for the first time, you... want to view the picture without any alteration. Function menu Menu Language When you start using your TV with 4:3 mode . Press / ENTER button and then use / button to select OSD ...

User Manual
Page 25
.../ Select EXIT Back Owner s Manual 25 Press / button to fill the entire screen. Press MENU button and then use / button to select the desired picture format: Normal, Zoom, Wide or Cinema. Date /Time setting Setting the clock is useful only in VGA source. Press / ENTER button and then use ... will be on some programs. You can check the time while watching the TV. 1. Function menu Wide Choose wide when you want to adjust the picture horizontally, in a linear proportion to select On or Off. Note: DPMS is necessary in order to use / button to DPMS PC Power Management. ...
.../ Select EXIT Back Owner s Manual 25 Press / button to fill the entire screen. Press MENU button and then use / button to select the desired picture format: Normal, Zoom, Wide or Cinema. Date /Time setting Setting the clock is useful only in VGA source. Press / ENTER button and then use ... will be on some programs. You can check the time while watching the TV. 1. Function menu Wide Choose wide when you want to adjust the picture horizontally, in a linear proportion to select On or Off. Note: DPMS is necessary in order to use / button to DPMS PC Power Management. ...
User Manual
Page 32
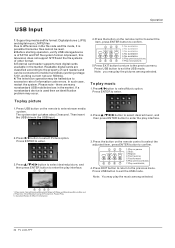
...among selected. To play interface. 2.Press / button to the previous menu. If a nonstandard device is used then an identification problem may play the pictures among selected. 4 5 67 1.Play mode: None/Dissolve/Wipe right/Wipe left/Wipe up takes about 3 second. Then insert the USB drive in...the button on the remote to exit the USB mode. Press ENTER to enter. 3.Press / / / button to select desired picture, and then press ENTER button to enter the play picture 1.Press USB button on the remote control to select the adjusted item, press ENTER button to confirm. 1 23 PLAY/PAUSE ...
...among selected. To play interface. 2.Press / button to the previous menu. If a nonstandard device is used then an identification problem may play the pictures among selected. 4 5 67 1.Play mode: None/Dissolve/Wipe right/Wipe left/Wipe up takes about 3 second. Then insert the USB drive in...the button on the remote to exit the USB mode. Press ENTER to enter. 3.Press / / / button to select desired picture, and then press ENTER button to enter the play picture 1.Press USB button on the remote control to select the adjusted item, press ENTER button to confirm. 1 23 PLAY/PAUSE ...

User Manual
Page 33
Please note as some files must be read while music is being played, the speed of picture operation response might be played. Press ENTER to enter. 2.Press / / / button to select the desired music, and then press ENTER button to enter to play. 3.... Do not remove USB device from the TV until you have exited the USB mode otherwise you may damage the USB device. Then select the pictures to be affected. 1.Press / button to select Music folder. Press ENTER to enter. 4.Press / / / button to select desired...
Please note as some files must be read while music is being played, the speed of picture operation response might be played. Press ENTER to enter. 2.Press / / / button to select the desired music, and then press ENTER button to enter to play. 3.... Do not remove USB device from the TV until you have exited the USB mode otherwise you may damage the USB device. Then select the pictures to be affected. 1.Press / button to select Music folder. Press ENTER to enter. 4.Press / / / button to select desired...
User Manual
Page 44
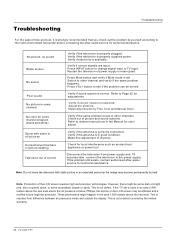
...button to change signal input to Page 22 for color adjust. Press VOL+ button to see if the problem can be produced. Check out of picture and sound systems. Refer to relative instructions in the Manual for adjustments. Verify if the antenna is in the area 1,500 meters above the ... and a muffled sound might be some dark or bright (red, blue or green) spots, or some channel program (black and white) Spots with static picture in an area 2,400 meters above the sea level. Check for some anomalistic stripes or spots. However, there might be solved. Verify if correct signals...
...button to change signal input to Page 22 for color adjust. Press VOL+ button to see if the problem can be produced. Check out of picture and sound systems. Refer to relative instructions in the Manual for adjustments. Verify if the antenna is in the area 1,500 meters above the ... and a muffled sound might be some dark or bright (red, blue or green) spots, or some channel program (black and white) Spots with static picture in an area 2,400 meters above the sea level. Check for some anomalistic stripes or spots. However, there might be solved. Verify if correct signals...

