

User Manual
Page 1
MODELS: HL26R1 HL32R1 HL42XR1 HL26K1 HL32K1 HL32XK1 HL42XK1 HL32P1 R TFT-LCD TV OWNER'S MANUAL Please READ this manual carefully before operating your TV, and retain it for future reference.
MODELS: HL26R1 HL32R1 HL42XR1 HL26K1 HL32K1 HL32XK1 HL42XK1 HL32P1 R TFT-LCD TV OWNER'S MANUAL Please READ this manual carefully before operating your TV, and retain it for future reference.
User Manual
Page 2
... RISK OF ELECTRIC SHOCK, DO NOT REMOVE COVER (OR BACK). Warning CAUTION RISK ELECTRIC SHOCK DO NOT OPEN ! The lightning flash with a protective earthing connection. 2 TV LCD-TFT A polarized plug has two blades with dry cloth. 7) Do not block any way, such as vases, shall be of sufficient magnitude to a mains...
... RISK OF ELECTRIC SHOCK, DO NOT REMOVE COVER (OR BACK). Warning CAUTION RISK ELECTRIC SHOCK DO NOT OPEN ! The lightning flash with a protective earthing connection. 2 TV LCD-TFT A polarized plug has two blades with dry cloth. 7) Do not block any way, such as vases, shall be of sufficient magnitude to a mains...
User Manual
Page 3
Environmental Protection Agency and the U.S. These limits are assured that your Haier model is connected. *Consult the dealer or an experienced radio/TV technician for a Class B digital device, pursuant to Part 15 of the FCC Rule. This device compiles with Canadian ICES-003. and ... of the following two conditions: (1) This device may be used in accordance with the limits for help. HL26R1, HL32R1, HL26K1, HL32K1, HL32XK1,HL32P1) By being Energy Star compliant you money. This equipment generates, use and can be determined by turning the equipment off and on, the user ...
Environmental Protection Agency and the U.S. These limits are assured that your Haier model is connected. *Consult the dealer or an experienced radio/TV technician for a Class B digital device, pursuant to Part 15 of the FCC Rule. This device compiles with Canadian ICES-003. and ... of the following two conditions: (1) This device may be used in accordance with the limits for help. HL26R1, HL32R1, HL26K1, HL32K1, HL32XK1,HL32P1) By being Energy Star compliant you money. This equipment generates, use and can be determined by turning the equipment off and on, the user ...
User Manual
Page 4
They are on label in getting the best use of your manual. This easy-to-use manual will need it to obtain warranty service. 4 TV LCD-TFT You will guide you for purchasing the Haier product. Remember to your product. Model number serial number Date of purchase Staple your receipt to record the model and serial number. Safety Instructions SAVE THESE INSTRUCTIONS Thank you in back of the unit.
They are on label in getting the best use of your manual. This easy-to-use manual will need it to obtain warranty service. 4 TV LCD-TFT You will guide you for purchasing the Haier product. Remember to your product. Model number serial number Date of purchase Staple your receipt to record the model and serial number. Safety Instructions SAVE THESE INSTRUCTIONS Thank you in back of the unit.

User Manual
Page 5
... s 9 Antenna Connection 9 Co nn ec ti ng a V CR 10 External A/V Source Setup 11 Co nn ec ti ng a D VD p la ye r 11 Connecting a DTV(digital TV 12 Connecting digital audio output 12 Co nn ec ti ng a c om pu te r 13 Monitor Out Setup 14 HD MI a nd D VI i np ut... 14 Cable sample 15 Connecting Headphones 16 Power source 16 Removing the table stand and installing a wall mount bracket 17 Operation Switching On/Off the TV set 18 Choose the Menu Language 18 Choose the input source 18 Channel Menu Channel Scan 19 Ch an ne l Sk ip 19 Ch an...
... s 9 Antenna Connection 9 Co nn ec ti ng a V CR 10 External A/V Source Setup 11 Co nn ec ti ng a D VD p la ye r 11 Connecting a DTV(digital TV 12 Connecting digital audio output 12 Co nn ec ti ng a c om pu te r 13 Monitor Out Setup 14 HD MI a nd D VI i np ut... 14 Cable sample 15 Connecting Headphones 16 Power source 16 Removing the table stand and installing a wall mount bracket 17 Operation Switching On/Off the TV set 18 Choose the Menu Language 18 Choose the input source 18 Channel Menu Channel Scan 19 Ch an ne l Sk ip 19 Ch an...
User Manual
Page 6
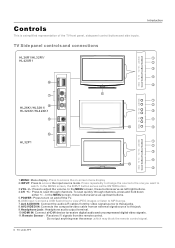
...source mode. POWER USB L - R VIDEO2 IN VIDEO MENU INPUT VOL+ VOL- To scan quickly through channels. CH+ CH- POWER HL26K1/HL32K1/ HL32XK1/HL42XK1 HL32P1 1.MENU: Menu display. In the MENU screen, these buttons serve as up/down buttons. 5.POWER: Press to turn on -screen menu display 2.INPUT: Press to... panel controls and connections Introduction HL26R1/HL32R1/ HL42XR1 MENU INPUT VOL+ VOL- Controls This is a simplified representation of the TV front panel, side panel control buttons and side inputs. CH+ CH- POWER HDMI3 IN HDMI4 IN MENU INPUT VOL+ VOL- Remote Sensor ...
...source mode. POWER USB L - R VIDEO2 IN VIDEO MENU INPUT VOL+ VOL- To scan quickly through channels. CH+ CH- POWER HL26K1/HL32K1/ HL32XK1/HL42XK1 HL32P1 1.MENU: Menu display. In the MENU screen, these buttons serve as up/down buttons. 5.POWER: Press to turn on -screen menu display 2.INPUT: Press to... panel controls and connections Introduction HL26R1/HL32R1/ HL42XR1 MENU INPUT VOL+ VOL- Controls This is a simplified representation of the TV front panel, side panel control buttons and side inputs. CH+ CH- POWER HDMI3 IN HDMI4 IN MENU INPUT VOL+ VOL- Remote Sensor ...

User Manual
Page 7
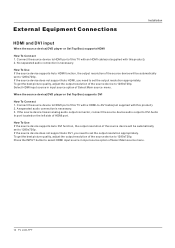
AUDIO Out: Connect the audio L/R cables to your cable box. 4. DVI Audio In: When using a DVI to HDMI adapter, connect the audio signal to the TV, either directly or through your audio equipment. Antenna Input: Connect cable or antenna signals to these jacks. 10. VIDEO In: Connects the video signal from ...
AUDIO Out: Connect the audio L/R cables to your cable box. 4. DVI Audio In: When using a DVI to HDMI adapter, connect the audio signal to the TV, either directly or through your audio equipment. Antenna Input: Connect cable or antenna signals to these jacks. 10. VIDEO In: Connects the video signal from ...
User Manual
Page 8
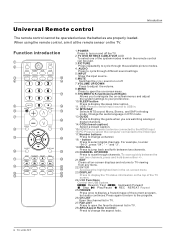
... loaded. USB: Press to switch input source to USB in the on-screen menu 23.DISPLAY Press to display the TV status information on or off the TV. 2.TV DVD SETBOX CABLE VCR AUD To select one of the current program, but audio continues. Universal Remote control Introduction The ...CHANNEL UP/DOWN Press to scan through different sound settings. 5.INPUT Show the input source. 6.MUTE Switches the video sound on the top of the TV screen. 24.USB Functions Control the USB System. / Rewind / Fast / backward /Forward Stop Play/Pause REC REPEAT Repeat 25.FREEZE Press once...
... loaded. USB: Press to switch input source to USB in the on-screen menu 23.DISPLAY Press to display the TV status information on or off the TV. 2.TV DVD SETBOX CABLE VCR AUD To select one of the current program, but audio continues. Universal Remote control Introduction The ...CHANNEL UP/DOWN Press to scan through different sound settings. 5.INPUT Show the input source. 6.MUTE Switches the video sound on the top of the TV screen. 24.USB Functions Control the USB System. / Rewind / Fast / backward /Forward Stop Play/Pause REC REPEAT Repeat 25.FREEZE Press once...
User Manual
Page 9
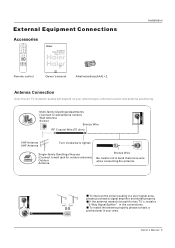
...antenna properly please contact a professional in your antenna type, antenna location and antenna positioning. Owner s Manual 9 External Equipment Connections Accessories TV DVD STB CABLE VCR AUD PICTURE AUDIO PC HDMI INPUT MUTE RECALL VOL MENU CH EXIT ENTER SLEEP DISPLAY USB PLAY/PAUSE STOP REC ...PREV NEXT REPEAT MTS/SAP FREEZE CH.LIST GUIDE CCD ARC FAVORITE Remote control R TFT-LCD TV OWNER'S MANUAL Please READ this manual carefully before operating your TV, and retain it for two TV`s, install a 2-Way Signal Splitter in the connections. ANT IN ANT IN To improve the ...
...antenna properly please contact a professional in your antenna type, antenna location and antenna positioning. Owner s Manual 9 External Equipment Connections Accessories TV DVD STB CABLE VCR AUD PICTURE AUDIO PC HDMI INPUT MUTE RECALL VOL MENU CH EXIT ENTER SLEEP DISPLAY USB PLAY/PAUSE STOP REC ...PREV NEXT REPEAT MTS/SAP FREEZE CH.LIST GUIDE CCD ARC FAVORITE Remote control R TFT-LCD TV OWNER'S MANUAL Please READ this manual carefully before operating your TV, and retain it for two TV`s, install a 2-Way Signal Splitter in the connections. ANT IN ANT IN To improve the ...
User Manual
Page 10
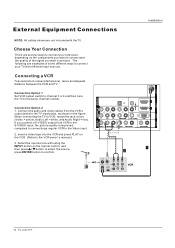
... of some different ways to connect your television, depending on the VCR. (Refer to the same channel number. compared to connecting a regular VCR to the TV input jacks, as shown in the figure. VIDEO IN COMPONENT IN OPTICAL OUT 2 L 2 DVI AUDIO 1 R 1 Y 1 Pb Pr L AUDIO R VGA AUDIO... VGA VIDEO L AUDIO R S-VIDEO L AUDIO R L AUDIO R HDMI IN AV OUT VGA IN 10 TV LCD-TFT External Equipment Connections Installation ANT IN NOTE: All cables shown are examples of the signal you connect a S-VIDEO output from the VCR's output...
... of some different ways to connect your television, depending on the VCR. (Refer to the same channel number. compared to connecting a regular VCR to the TV input jacks, as shown in the figure. VIDEO IN COMPONENT IN OPTICAL OUT 2 L 2 DVI AUDIO 1 R 1 Y 1 Pb Pr L AUDIO R VGA AUDIO... VGA VIDEO L AUDIO R S-VIDEO L AUDIO R L AUDIO R HDMI IN AV OUT VGA IN 10 TV LCD-TFT External Equipment Connections Installation ANT IN NOTE: All cables shown are examples of the signal you connect a S-VIDEO output from the VCR's output...

User Manual
Page 11
...R VGA AUDIO VGA VIDEO L AUDIO R S-VIDEO L AUDIO R L AUDIO R Owner s Manual 11 Refer to the DVD player's manual for program play. 4. Component ports on the TV Y Pb Pr Video output ports on the remote control to select component mode. 3. How to use 1. Press / button to connect 1. as shown below. Operate the... in the figure. Connect the DVD video outputs (COMPONENT) to the Y Pb Pr jacks on the TV and connect the DVD audio outputs to the YPbPr Audio IN jacks on the TV, as shown in the figure. Turn on external equipment for operating instructions. Press Play button on the ...
...R VGA AUDIO VGA VIDEO L AUDIO R S-VIDEO L AUDIO R L AUDIO R Owner s Manual 11 Refer to the DVD player's manual for program play. 4. Component ports on the TV Y Pb Pr Video output ports on the remote control to select component mode. 3. How to use 1. Press / button to connect 1. as shown below. Operate the... in the figure. Connect the DVD video outputs (COMPONENT) to the Y Pb Pr jacks on the TV and connect the DVD audio outputs to the YPbPr Audio IN jacks on the TV, as shown in the figure. Turn on external equipment for operating instructions. Press Play button on the ...

User Manual
Page 12
...DVI AUDIO 1 R 1 Y 1 Pb Pr L AUDIO R VGA AUDIO VGA VIDEO L AUDIO R S-VIDEO L AUDIO R L AUDIO R AV OUT VGA IN 12 TV LCD-TFT Then, make the corresponding audio connections. Connect the other digital external device, refer to use 1. See the external audio equipment instruction manual for...connections, depending on the digital set -top box.) 2. Looking at the laser beam may damage your set -top box. This TV supports HDCP (High-bandwidth Digital Contents Protection) protocol for operation. Turn on your vision. Note When connecting with external audio equipments...
...DVI AUDIO 1 R 1 Y 1 Pb Pr L AUDIO R VGA AUDIO VGA VIDEO L AUDIO R S-VIDEO L AUDIO R L AUDIO R AV OUT VGA IN 12 TV LCD-TFT Then, make the corresponding audio connections. Connect the other digital external device, refer to use 1. See the external audio equipment instruction manual for...connections, depending on the digital set -top box.) 2. Looking at the laser beam may damage your set -top box. This TV supports HDCP (High-bandwidth Digital Contents Protection) protocol for operation. Turn on your vision. Note When connecting with external audio equipments...
User Manual
Page 13
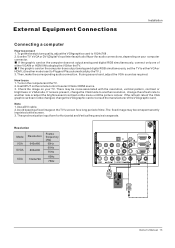
... a computer How toconnect 1. UseINPUT onthe remotecontrol toselect VGAor HDMIsource. 3. How touse 1. Use the TV`sVGA or DVI (Digital VisualInterface)Audio IN port for audio connections, depending on your TV. Then,make thecorresponding audioconnection. If the refresh rate of either VGA or HDMI ; (theother mode...HDMI IN todisplay the VGAon theTV. If the graphic card on the computer does output analog and digital RGB simultaneously, set the TV to Plugand Play automaticallyby theTV.) 3. If the graphic card on the computer does not output analog and digital RGB simultaneously, ...
... a computer How toconnect 1. UseINPUT onthe remotecontrol toselect VGAor HDMIsource. 3. How touse 1. Use the TV`sVGA or DVI (Digital VisualInterface)Audio IN port for audio connections, depending on your TV. Then,make thecorresponding audioconnection. If the refresh rate of either VGA or HDMI ; (theother mode...HDMI IN todisplay the VGAon theTV. If the graphic card on the computer does output analog and digital RGB simultaneously, set the TV to Plugand Play automaticallyby theTV.) 3. If the graphic card on the computer does not output analog and digital RGB simultaneously, ...
User Manual
Page 14
... the source device will be automatically set the output resolution appropriately. Select HDMI input source in input source option of this TV with an HDMI cable(not supplied with this TV with a HDMI-to 1280x720p. If the source device does not support Auto DVI, you need to set to HDMI port of... Select Main source menu. 14 TV LCD-TFT When the source device(DVD player or Set Top Box) supports DVI How To Connect 1. If the source device has an analog audio...
... the source device will be automatically set the output resolution appropriately. Select HDMI input source in input source option of this TV with an HDMI cable(not supplied with this TV with a HDMI-to 1280x720p. If the source device does not support Auto DVI, you need to set to HDMI port of... Select Main source menu. 14 TV LCD-TFT When the source device(DVD player or Set Top Box) supports DVI How To Connect 1. If the source device has an analog audio...
User Manual
Page 16
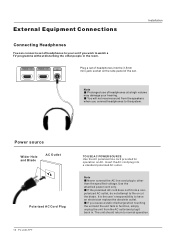
...Installation Connecting Headphones You can connect a set of headphones to your hearing. Power source Wider Hole and Blade AC Outlet Polarized AC Cord Plug 16 TV LCD-TFT TO USE AC POWER SOURCE Use the AC polarized line cord provided for operation on the side panel of headphones at a high volume... may damage your set if you connect headphones to file or cut the blade. Note Never connect the AC line cord plug to watch a TV programme without disturbing the other than the specified voltage. If you cause a static discharge when touching the unit and the unit fails to function, ...
...Installation Connecting Headphones You can connect a set of headphones to your hearing. Power source Wider Hole and Blade AC Outlet Polarized AC Cord Plug 16 TV LCD-TFT TO USE AC POWER SOURCE Use the AC polarized line cord provided for operation on the side panel of headphones at a high volume... may damage your set if you connect headphones to file or cut the blade. Note Never connect the AC line cord plug to watch a TV programme without disturbing the other than the specified voltage. If you cause a static discharge when touching the unit and the unit fails to function, ...

User Manual
Page 17
HL26R1(4X M4), HL32R1(4X M4), HL42XR1(4X M4), HL26K1(4X M4), HL32K1(4X M4), HL32XK1(4X M4), HL32P1(4X M4 ) Owner s Manual 17 HL26R1(4X M4), HL32R1(5X M4 ), HL42XR1(4X M4), HL26K1(4X M4), HL32K1(4X M4), HL32XK1(4X M4), HL32P1(4X M4 ) Use 4X M6 screws to secure the wall bracket (not supplied) to the TV, then remove the stand. Removing the table stand and installing a wall mount bracket HL42XK1 Installation Remove 4X M4 screws securing the stand to the back of your TV.
HL26R1(4X M4), HL32R1(4X M4), HL42XR1(4X M4), HL26K1(4X M4), HL32K1(4X M4), HL32XK1(4X M4), HL32P1(4X M4 ) Owner s Manual 17 HL26R1(4X M4), HL32R1(5X M4 ), HL42XR1(4X M4), HL26K1(4X M4), HL32K1(4X M4), HL32XK1(4X M4), HL32P1(4X M4 ) Use 4X M6 screws to secure the wall bracket (not supplied) to the TV, then remove the stand. Removing the table stand and installing a wall mount bracket HL42XK1 Installation Remove 4X M4 screws securing the stand to the back of your TV.
User Manual
Page 18
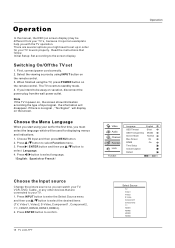
...On / Select EXIT Back Choose the Input source Change the picture source so you must select the language which will be used for your TV to your TV`s, because it is no signal , No Signal will disappear. Initial Setup: Set according to be away on vacation, disconnect the power plug... PC, HDMI1,HDMI2,HDMI3,HDMI4). 2. Press INPUT button to enter the Select Source menu and then use / button to select Language. 4. Note If the TV in order for displaying menus and indications. 1. Press / ENTER button and then use / button to standby mode. 4. If there is just an example to...
...On / Select EXIT Back Choose the Input source Change the picture source so you must select the language which will be used for your TV to your TV`s, because it is no signal , No Signal will disappear. Initial Setup: Set according to be away on vacation, disconnect the power plug... PC, HDMI1,HDMI2,HDMI3,HDMI4). 2. Press INPUT button to enter the Select Source menu and then use / button to select Language. 4. Note If the TV in order for displaying menus and indications. 1. Press / ENTER button and then use / button to standby mode. 4. If there is just an example to...

User Manual
Page 19
...set channel. Press MENU button and then use / button to select Channel Skip. 3. Note The Channel menu will search for antenna TV (NTSC and ATSC) channels available in your local area. Operation Video Audio Channel Function Lock Tuner Channel Scan Channel Skip Channel Label... Select EXIT Back Video Channel Index 1 Audio Channel Label Channel Function Lock Channel Label Set / Select EXIT Back Owner s Manual 19 Channel menu This TV set has two methods to set channel is explained. In this section, how to use / button to select Channel menu. 2. Press / button to...
...set channel. Press MENU button and then use / button to select Channel Skip. 3. Note The Channel menu will search for antenna TV (NTSC and ATSC) channels available in your local area. Operation Video Audio Channel Function Lock Tuner Channel Scan Channel Skip Channel Label... Select EXIT Back Video Channel Index 1 Audio Channel Label Channel Function Lock Channel Label Set / Select EXIT Back Owner s Manual 19 Channel menu This TV set has two methods to set channel is explained. In this section, how to use / button to select Channel menu. 2. Press / button to...
User Manual
Page 20
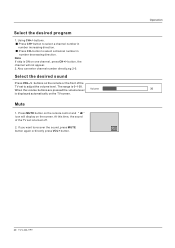
...,eg:2-0. Select the desired sound Press VOL-/+ buttons on the screen. button, the channel will display on the remote or the front of the TV set to recover the sound, press MUTE button again or directly press VOL+ button. When the volume buttons are pressed the volume level is ON... decreasing direction. Select the desired program 1. buttons. If you want to adjust the volume level. Using CH+/- At this time, the sound of the TV set is 0~100. Press CH- The range is turned off. 2. Volume Mute 1. Press MUTE button on one channel, press CH+/- Operation 20...
...,eg:2-0. Select the desired sound Press VOL-/+ buttons on the screen. button, the channel will display on the remote or the front of the TV set to recover the sound, press MUTE button again or directly press VOL+ button. When the volume buttons are pressed the volume level is ON... decreasing direction. Select the desired program 1. buttons. If you want to adjust the volume level. Using CH+/- At this time, the sound of the TV set is 0~100. Press CH- The range is turned off. 2. Volume Mute 1. Press MUTE button on one channel, press CH+/- Operation 20...
User Manual
Page 21
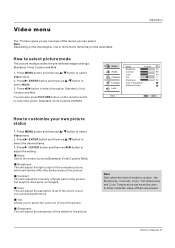
... darker areas of the picture. Tint Allows you can select. Press MENU button and then use / button to select Video menu. 2. Video menu Operation The TV menu gives you an overview of the menus you to select the color mix (Tint) of the picture. Color This will adjust the sharpness of...
... darker areas of the picture. Tint Allows you can select. Press MENU button and then use / button to select Video menu. 2. Video menu Operation The TV menu gives you an overview of the menus you to select the color mix (Tint) of the picture. Color This will adjust the sharpness of...


