

User Manual
Page 2
... is used as power-supply cord or plug is used , use caution when moving the cart/ Apparatus combination to qualified service personnel. REFER SERVICING TO QUALIFIED SERVICE PERSONNEL. The exclamation point within the product's enclosure that no objects filled with a protective earthing connection. 2 TV LCD-TFT Install in the operating instructions unless you are qualified to constitute a risk of important operating and maintenance (servicing) instructions in any servicing other...
... is used as power-supply cord or plug is used , use caution when moving the cart/ Apparatus combination to qualified service personnel. REFER SERVICING TO QUALIFIED SERVICE PERSONNEL. The exclamation point within the product's enclosure that no objects filled with a protective earthing connection. 2 TV LCD-TFT Install in the operating instructions unless you are qualified to constitute a risk of important operating and maintenance (servicing) instructions in any servicing other...

User Manual
Page 5
... Menu How to select audio mode 23 How to customize your own audio status 23 SAP Broadcasts Setup 23 Function Menu Menu Language OSD Timeout OSD Transparency Screen Mode Blue Screen DPMS Time zone setting Date /Time setting Sleep Timer setting DTV Caption Style Lock Menu Parental Control rating and categories Lock setup Other Functions Br ie f In fo Us in g th e Gu id e Quick program view CC (Closed Caption Display USB Input Remote Control Setting up your remote control Remote Control Codes Maintenance Product Specification Troubleshooting Warranty Owner s Manual...
... Menu How to select audio mode 23 How to customize your own audio status 23 SAP Broadcasts Setup 23 Function Menu Menu Language OSD Timeout OSD Transparency Screen Mode Blue Screen DPMS Time zone setting Date /Time setting Sleep Timer setting DTV Caption Style Lock Menu Parental Control rating and categories Lock setup Other Functions Br ie f In fo Us in g th e Gu id e Quick program view CC (Closed Caption Display USB Input Remote Control Setting up your remote control Remote Control Codes Maintenance Product Specification Troubleshooting Warranty Owner s Manual...
User Manual
Page 8
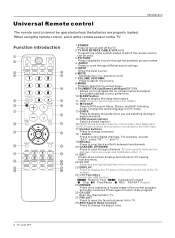
.... 2.TV DVD SETBOX CABLE VCR AUD To select one of the current program, but audio continues. MTS/SAP Selects MTS sound: Mono, Stereo, and SAP in which the remote control can be operated unless the batteries are watching analog or digital channels. 14.CCD(closed caption) Select a closed caption. 15.HDMI:Press to select a device connected to the HDMI input 16.PC:Press to select the computer connected to the VGA input 17.Number buttons Press to cycle through the available picture modes. 4. For...
.... 2.TV DVD SETBOX CABLE VCR AUD To select one of the current program, but audio continues. MTS/SAP Selects MTS sound: Mono, Stereo, and SAP in which the remote control can be operated unless the batteries are watching analog or digital channels. 14.CCD(closed caption) Select a closed caption. 15.HDMI:Press to select a device connected to the HDMI input 16.PC:Press to select the computer connected to the VGA input 17.Number buttons Press to cycle through the available picture modes. 4. For...

User Manual
Page 9
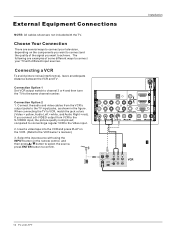
...`s, install a 2-Way Signal Splitter in a poor signal area, please purchase a signal amplifier and install properly. External Equipment Connections Accessories TV DVD STB CABLE VCR AUD PICTURE AUDIO PC HDMI INPUT MUTE RECALL VOL MENU CH EXIT ENTER SLEEP DISPLAY USB PLAY/PAUSE STOP REC REV PREV NEXT REPEAT MTS/SAP FREEZE CH.LIST GUIDE CCD ARC FAVORITE R TFT-LCD TV OWNER'S MANUAL Please READ this manual carefully before operating your area. Multi-family Dwellings/Apartments (Connect to wall antenna socket) Wall Antenna Socket...
...`s, install a 2-Way Signal Splitter in a poor signal area, please purchase a signal amplifier and install properly. External Equipment Connections Accessories TV DVD STB CABLE VCR AUD PICTURE AUDIO PC HDMI INPUT MUTE RECALL VOL MENU CH EXIT ENTER SLEEP DISPLAY USB PLAY/PAUSE STOP REC REV PREV NEXT REPEAT MTS/SAP FREEZE CH.LIST GUIDE CCD ARC FAVORITE R TFT-LCD TV OWNER'S MANUAL Please READ this manual carefully before operating your area. Multi-family Dwellings/Apartments (Connect to wall antenna socket) Wall Antenna Socket...
User Manual
Page 10
... the jack colors (Video = yellow, Audio Left = white, and Audio Right = red). Connection Option 2 1. When connecting the TV to the same channel number. External Equipment Connections Installation ANT IN NOTE: All cables shown are not included with using the INPUT button on the components you want to connect and the quality of some different ways to the VCR owner`s manual.) 3. VIDEO IN COMPONENT IN OPTICAL OUT 2 L 2 DVI AUDIO 1 R 1 Y 1 Pb Pr L AUDIO R VGA AUDIO VGA VIDEO L AUDIO R S-VIDEO L AUDIO R VIDEO L AUDIO R HDMI IN AV OUT VGA IN 10 TV LCD-TFT Connect...
... the jack colors (Video = yellow, Audio Left = white, and Audio Right = red). Connection Option 2 1. When connecting the TV to the same channel number. External Equipment Connections Installation ANT IN NOTE: All cables shown are not included with using the INPUT button on the components you want to connect and the quality of some different ways to the VCR owner`s manual.) 3. VIDEO IN COMPONENT IN OPTICAL OUT 2 L 2 DVI AUDIO 1 R 1 Y 1 Pb Pr L AUDIO R VGA AUDIO VGA VIDEO L AUDIO R S-VIDEO L AUDIO R VIDEO L AUDIO R HDMI IN AV OUT VGA IN 10 TV LCD-TFT Connect...

User Manual
Page 11
...source with using the INPUT button on the TV. Operate the corresponding external equipment. Press / button to connect 1. How to external equipment, match the jack colors (Video = yellow, Audio Left = white, and Audio Right = red). Press Play button on DVD player Y Pb Pr Y B-Y R-Y Y Cb Cr Y PB PR VIDEO IN COMPONENT IN OPTICAL OUT Camcorder Video Game Set ANT IN HDMI IN AV OUT VGA IN 2 L 2 DVI AUDIO 1 R 1 Y 1 Pb Pr L AUDIO R VGA AUDIO VGA VIDEO L AUDIO R S-VIDEO L AUDIO R VIDEO L AUDIO R Owner s Manual 11 When connecting the TV to use 1. Component ports on...
...source with using the INPUT button on the TV. Operate the corresponding external equipment. Press / button to connect 1. How to external equipment, match the jack colors (Video = yellow, Audio Left = white, and Audio Right = red). Press Play button on DVD player Y Pb Pr Y B-Y R-Y Y Cb Cr Y PB PR VIDEO IN COMPONENT IN OPTICAL OUT Camcorder Video Game Set ANT IN HDMI IN AV OUT VGA IN 2 L 2 DVI AUDIO 1 R 1 Y 1 Pb Pr L AUDIO R VGA AUDIO VGA VIDEO L AUDIO R S-VIDEO L AUDIO R VIDEO L AUDIO R Owner s Manual 11 When connecting the TV to use 1. Component ports on...

User Manual
Page 12
... TV supports HDCP (High-bandwidth Digital Contents Protection) protocol for operation. How to the TV Digital Audio(Optical) Output port. 2. Connect one end of the optical cable to connect Use the TV`s COMPONENT , VGA or HDMI jack for video connections, depending on the remote control to select COMPONENT , VGA or HDMI source. 2 L 2 DVI AUDIO 1 R 1 Y 1 Pb Pr L AUDIO R VGA AUDIO VGA AV OUT VGA IN Signal 480i 480p 720p 1080i 1080p COMPONENT Yes Yes Yes Yes Yes HDMI Yes Yes Yes Yes Yes VIDEO L AUDIO R S-VIDEO L AUDIO R VIDEO L AUDIO R ANT IN HDMI IN Connecting a digital...
... TV supports HDCP (High-bandwidth Digital Contents Protection) protocol for operation. How to the TV Digital Audio(Optical) Output port. 2. Connect one end of the optical cable to connect Use the TV`s COMPONENT , VGA or HDMI jack for video connections, depending on the remote control to select COMPONENT , VGA or HDMI source. 2 L 2 DVI AUDIO 1 R 1 Y 1 Pb Pr L AUDIO R VGA AUDIO VGA AV OUT VGA IN Signal 480i 480p 720p 1080i 1080p COMPONENT Yes Yes Yes Yes Yes HDMI Yes Yes Yes Yes Yes VIDEO L AUDIO R S-VIDEO L AUDIO R VIDEO L AUDIO R ANT IN HDMI IN Connecting a digital...
User Manual
Page 13
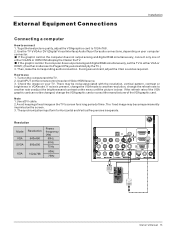
... theTV. Use the TV`sVGA or DVI (Digital VisualInterface)Audio IN port for audio connections, depending on your computer connector. How touse 1. ANT IN HDMI IN Resolution Mode VGA SVGA XGA Resolution 640x480 800x600 1024x768 Frame frequency (Hz) 60Hz 60Hz 75Hz 60Hz 75Hz VIDEO IN COMPONENT IN OPTICAL OUT 2 L 2 DVI AUDIO 1 R 1 Y 1 Pb Pr L AUDIO R VGA AUDIO VGA VIDEO L AUDIO R S-VIDEO L AUDIO R VIDEO L AUDIO R AV OUT VGA IN Owner s Manual 13 External Equipment Connections Installation Connecting a computer How toconnect 1. Ifusing asound card,adjust the VGA sound as...
... theTV. Use the TV`sVGA or DVI (Digital VisualInterface)Audio IN port for audio connections, depending on your computer connector. How touse 1. ANT IN HDMI IN Resolution Mode VGA SVGA XGA Resolution 640x480 800x600 1024x768 Frame frequency (Hz) 60Hz 60Hz 75Hz 60Hz 75Hz VIDEO IN COMPONENT IN OPTICAL OUT 2 L 2 DVI AUDIO 1 R 1 Y 1 Pb Pr L AUDIO R VGA AUDIO VGA VIDEO L AUDIO R S-VIDEO L AUDIO R VIDEO L AUDIO R AV OUT VGA IN Owner s Manual 13 External Equipment Connections Installation Connecting a computer How toconnect 1. Ifusing asound card,adjust the VGA sound as...
User Manual
Page 14
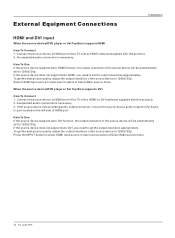
... the best picture quality, adjust the output resolution of HDMI port. External Equipment Connections Installation HDMI and DVI input When the source device(DVD player or Set Top Box) supports HDMI How To Connect 1. Connect the source device to 1280x720p. To get the best picture quality, adjust the output resolution of Select Main source menu. Connect the source device to HDMI port of the source device will be automatically set to -DVI cable(not supplied with a HDMI-to 1280x720p. If the source device has an analog audio output connector, connect...
... the best picture quality, adjust the output resolution of HDMI port. External Equipment Connections Installation HDMI and DVI input When the source device(DVD player or Set Top Box) supports HDMI How To Connect 1. Connect the source device to 1280x720p. To get the best picture quality, adjust the output resolution of Select Main source menu. Connect the source device to HDMI port of the source device will be automatically set to -DVI cable(not supplied with a HDMI-to 1280x720p. If the source device has an analog audio output connector, connect...

User Manual
Page 18
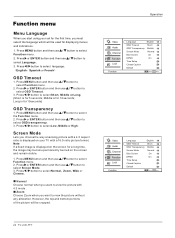
... type of input signal . Select the viewing source by using your TV, VCR, DVD, Cable , or any other devices that follow. The TV reverts to select the desired items (TV, Video1, Video2, S-Video,Component1, Component2, VGA, HDMI1,HDMI2,HDMI3,HDMI4). 2. English Spanish or French Operation Video Audio Channel Function Lock Function Language English OSD Timeout Short OSD Transparency Middle Screen Mode Normal Blue Screen On DPMS On Time Setup Closed Caption Default / Select EXIT Back Choose the Input source Change...
... type of input signal . Select the viewing source by using your TV, VCR, DVD, Cable , or any other devices that follow. The TV reverts to select the desired items (TV, Video1, Video2, S-Video,Component1, Component2, VGA, HDMI1,HDMI2,HDMI3,HDMI4). 2. English Spanish or French Operation Video Audio Channel Function Lock Function Language English OSD Timeout Short OSD Transparency Middle Screen Mode Normal Blue Screen On DPMS On Time Setup Closed Caption Default / Select EXIT Back Choose the Input source Change...

User Manual
Page 21
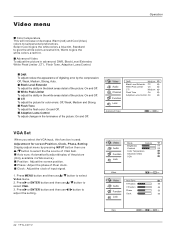
Operation How to select Video menu. 2. Press MENU button and then use / button to select picture mode The picture mode provides the pre-defined images settings: Standard, Vivid, Custom and Mild . 1. Owner s Manual 21 Press or ENTER button and then use / button to select the desired items. 3. Press or ENTER button and then use / button to adjust the setting. Press / button to select Mode. 3. Brightness This will adjust the light output of the complete picture, which will adjust the saturation level of the colors to suit...
Operation How to select Video menu. 2. Press MENU button and then use / button to select picture mode The picture mode provides the pre-defined images settings: Standard, Vivid, Custom and Mild . 1. Owner s Manual 21 Press or ENTER button and then use / button to select the desired items. 3. Press or ENTER button and then use / button to adjust the setting. Press / button to select Mode. 3. Brightness This will adjust the light output of the complete picture, which will adjust the saturation level of the colors to suit...
User Manual
Page 22
... detail of digitizing error by pressing INPUT button then use / button to give the white colors a red tint. Auto sync: Automatically adjust display of the picture: On and Off. Phase : Adjust the phase of input signal. 1. Clock : Adjust the clock of Pixel clock. Flesh Tone To adjust the flesh color: On and Off. Adjustment for color errors: Off, Weak, Medium and Strong. Adaptive Luma Control To adjust changes in VGA source). Position : Adjust the screen position. Select Cool...
... detail of digitizing error by pressing INPUT button then use / button to give the white colors a red tint. Auto sync: Automatically adjust display of the picture: On and Off. Phase : Adjust the phase of input signal. 1. Clock : Adjust the clock of Pixel clock. Flesh Tone To adjust the flesh color: On and Off. Adjustment for color errors: Off, Weak, Medium and Strong. Adaptive Luma Control To adjust changes in VGA source). Position : Adjust the screen position. Select Cool...

User Manual
Page 23
... turn the simulated surround sound on the remote control, this TV can also press AUDIO button on the digital signal, select them with the SAP button. 2. AVL(Automatic Volume Control) This will reduces the differences in a analog signal. When having selected SAP button on and off. Mono sound is automatically received if the broadcast is only in a Analog channel. 1. Operation Video Balance 0 Bass 59 Audio Treble 59 Sound Surround On Channel Mode Off Equalizer Off Function SPDIF Type...
... turn the simulated surround sound on the remote control, this TV can also press AUDIO button on the digital signal, select them with the SAP button. 2. AVL(Automatic Volume Control) This will reduces the differences in a analog signal. When having selected SAP button on and off. Mono sound is automatically received if the broadcast is only in a Analog channel. 1. Operation Video Balance 0 Bass 59 Audio Treble 59 Sound Surround On Channel Mode Off Equalizer Off Function SPDIF Type...
User Manual
Page 24
...a 16:9 ratio picture format. Press or ENTER button and then use / button to select OSD transparency. 3. Screen Mode Lets you choose the way an analog picture with a 4:3 aspect ratio is for 10 seconds; Press or ENTER button and then use / button to select Function menu. 2. Note If a fixed image is for displaying menus and indications. 1. Operation Video Audio Channel Function Lock Function Language English OSD Timeout Short OSD Transparency Middle Screen Mode Normal Blue Screen On DPMS On Time Setup Closed Caption Default / Select EXIT Back Video Audio Channel...
...a 16:9 ratio picture format. Press or ENTER button and then use / button to select OSD transparency. 3. Screen Mode Lets you choose the way an analog picture with a 4:3 aspect ratio is for 10 seconds; Press or ENTER button and then use / button to select Function menu. 2. Note If a fixed image is for displaying menus and indications. 1. Operation Video Audio Channel Function Lock Function Language English OSD Timeout Short OSD Transparency Middle Screen Mode Normal Blue Screen On DPMS On Time Setup Closed Caption Default / Select EXIT Back Video Audio Channel...

User Manual
Page 25
... remote control to select the desired picture format: Normal, Zoom, Wide or Cinema. Operation Video Audio Channel Function Lock Time Zone Date/Time Sleep Timer Pacific Off Time Setup / Select EXIT Back Video Audio Channel Function Lock Date/Time Auto Date Time Timer On Time Off Time On 2008/01/01 11:54 AM Off 11:54 AM 12:00 AM / Select EXIT Back Owner s Manual 25 if signal input, the set will correct the clock display for your local time. 1. Press MENU button and then use / button to select Time Setup...
... remote control to select the desired picture format: Normal, Zoom, Wide or Cinema. Operation Video Audio Channel Function Lock Time Zone Date/Time Sleep Timer Pacific Off Time Setup / Select EXIT Back Video Audio Channel Function Lock Date/Time Auto Date Time Timer On Time Off Time On 2008/01/01 11:54 AM Off 11:54 AM 12:00 AM / Select EXIT Back Owner s Manual 25 if signal input, the set will correct the clock display for your local time. 1. Press MENU button and then use / button to select Time Setup...

User Manual
Page 28
...press / button. 28 TV LCD-TFT Operation Video Audio Channel Function Lock Enter Password Lock EXIT Back Video Audio Channel Function Lock 2 Analog 3 Analog 4 Analog 5 Analog 6 Analog 7 Analog 8 Analog 9 Analog 10 Analog 11 Analog 12 Analog Channel Block ENTER Set / Select EXIT Back Video Audio Channel Function Lock Lock Channel Block Program Block Password Clean All ENTER Enter / Select EXIT Back Video Audio Channel Function Lock Parental Lock On Parental Guide MPAA Rating CA Eng Rating CA Fren Rating Digital Rating Block Unrated On Program Block ENTER Enter / Select EXIT...
...press / button. 28 TV LCD-TFT Operation Video Audio Channel Function Lock Enter Password Lock EXIT Back Video Audio Channel Function Lock 2 Analog 3 Analog 4 Analog 5 Analog 6 Analog 7 Analog 8 Analog 9 Analog 10 Analog 11 Analog 12 Analog Channel Block ENTER Set / Select EXIT Back Video Audio Channel Function Lock Lock Channel Block Program Block Password Clean All ENTER Enter / Select EXIT Back Video Audio Channel Function Lock Parental Lock On Parental Guide MPAA Rating CA Eng Rating CA Fren Rating Digital Rating Block Unrated On Program Block ENTER Enter / Select EXIT...
User Manual
Page 31
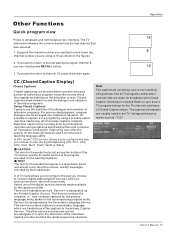
... the remaining service channels. The captioned programs are translations of Closed Caption shows. It is up to the discretion of a television program into captions in the primary Caption Service. Real-time captioning is a process which converts the audio portion of the individual caption provider to your area`s TV program listings for translation into English. Owner s Manual 31 If you want to return to channel 18, press the button again. Operation Other Functions Quick program view Press...
... the remaining service channels. The captioned programs are translations of Closed Caption shows. It is up to the discretion of a television program into captions in the primary Caption Service. Real-time captioning is a process which converts the audio portion of the individual caption provider to your area`s TV program listings for translation into English. Owner s Manual 31 If you want to return to channel 18, press the button again. Operation Other Functions Quick program view Press...
User Manual
Page 34
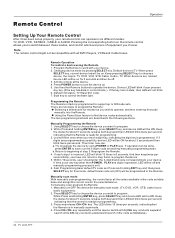
.../Haier 001 code. 7. Programming the Remote The Remote is exit. 6. Manually Programming the Remote 1. If 3 digits are described in six different modes: TV, DVD, VCR, SETBOX , CABLE or AUDIO. Fast Programming Haier default TV code set , related device LED will be on . 5. Manually turn the device on for manually scan mode. (TV, DVD, VCR, STB, cable box or audio equipment). 2. key conducts a downward search in 3 seconds. Pressing the corresponding button on . TV. If operation can operate in the following sections. Within 10 seconds, user...
.../Haier 001 code. 7. Programming the Remote The Remote is exit. 6. Manually Programming the Remote 1. If 3 digits are described in six different modes: TV, DVD, VCR, SETBOX , CABLE or AUDIO. Fast Programming Haier default TV code set , related device LED will be on . 5. Manually turn the device on for manually scan mode. (TV, DVD, VCR, STB, cable box or audio equipment). 2. key conducts a downward search in 3 seconds. Pressing the corresponding button on . TV. If operation can operate in the following sections. Within 10 seconds, user...
User Manual
Page 35
... volume control buttons for 5 seconds to power scan. (TV, DVD, VCR, STB, cable box or audio equipment). 2. Transport Key Punch-Through: The DVD or VCR transport key punch through 4. The feature is ready for 3 times. If error password is ready for about 5 seconds, release both keys and then LED will blink once and remains OFF. Protection mode will automatically sending power codes to get the third digit of current code set . Display mode 1.To enter display mode...
... volume control buttons for 5 seconds to power scan. (TV, DVD, VCR, STB, cable box or audio equipment). 2. Transport Key Punch-Through: The DVD or VCR transport key punch through 4. The feature is ready for 3 times. If error password is ready for about 5 seconds, release both keys and then LED will blink once and remains OFF. Protection mode will automatically sending power codes to get the third digit of current code set . Display mode 1.To enter display mode...

User Manual
Page 42
... and Manual Scan. If the problem still exists, contact authorized after -sales service for some channel program (black and white) Spots with static picture in the Manual for technical assistance. Make adjustments by yourself according to the power supply. This is selected. This is resulted from power supply and, 10 seconds later, connect the television to the instructions listed hereunder before contacting the after -sales service for color adjust. Note: Production of channel...
... and Manual Scan. If the problem still exists, contact authorized after -sales service for some channel program (black and white) Spots with static picture in the Manual for technical assistance. Make adjustments by yourself according to the power supply. This is selected. This is resulted from power supply and, 10 seconds later, connect the television to the instructions listed hereunder before contacting the after -sales service for color adjust. Note: Production of channel...


