
User Manual
Page 1
01 0090500981 HLA26 HLA32 HLA37 HLA40 HLA42 LCD COLOR TELEVISION OPERATING INSTRUCTIONS ◆Wide view-angle display, high contrast ◆MTS/SAP ◆HDMI
01 0090500981 HLA26 HLA32 HLA37 HLA40 HLA42 LCD COLOR TELEVISION OPERATING INSTRUCTIONS ◆Wide view-angle display, high contrast ◆MTS/SAP ◆HDMI
User Manual
Page 2
... CONCERNING. DO NOT USE ANY ABRASIVE CLEANSERS WHICH MAY SCRATCH OR DAMAGE THE LCD SCREEN. CONTENTS Warning and caution 2 Important safety instructions 4 Buttons and interface position 5 Preparation for remote control 6 Remote control panel 7 Basic operation 8 Screen display 9 TV program setting 10 Image control 11 Sound control 12 Function setting 13 Time setting...17 Signal source setting 18 Other setting function 19 External audio and video equipment connection 20 Using your TV as a computer display 21 Specifications 22 Trouble shooting guide 23 WARNING AND CAUTION...
... CONCERNING. DO NOT USE ANY ABRASIVE CLEANSERS WHICH MAY SCRATCH OR DAMAGE THE LCD SCREEN. CONTENTS Warning and caution 2 Important safety instructions 4 Buttons and interface position 5 Preparation for remote control 6 Remote control panel 7 Basic operation 8 Screen display 9 TV program setting 10 Image control 11 Sound control 12 Function setting 13 Time setting...17 Signal source setting 18 Other setting function 19 External audio and video equipment connection 20 Using your TV as a computer display 21 Specifications 22 Trouble shooting guide 23 WARNING AND CAUTION...

User Manual
Page 3
...cause a fire. All service work must be used for an extended period, unplug the unit from the AC wall outlet. WARNING AND CAUTION • To prevent fire, do not use or store any abnormal sounds or smells from entering the set. •I If the set is clear of electric ... solid connection with the AC wall socket in direct sunlight. / e. / ;• ,/ • , !-;"--;-. Do not use a damaged power plug or put the unit near a heat source or it from entering the set and clean. Do not plug / unplug the unit while your hands are dirty, unplug he set along the wire connected to ...
...cause a fire. All service work must be used for an extended period, unplug the unit from the AC wall outlet. WARNING AND CAUTION • To prevent fire, do not use or store any abnormal sounds or smells from entering the set. •I If the set is clear of electric ... solid connection with the AC wall socket in direct sunlight. / e. / ;• ,/ • , !-;"--;-. Do not use a damaged power plug or put the unit near a heat source or it from entering the set and clean. Do not plug / unplug the unit while your hands are dirty, unplug he set along the wire connected to ...
User Manual
Page 4
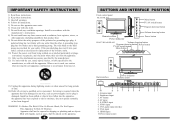
... heat. 9) Do not defeat the safety purposes of the polarized or grounding-type plug. CH + VO L- VGA audio input interface 8. A polarized plug has two blades with the apparatus. VO L+ VOL+ Volume down/up button Remote sensor Power indicator Power button HLA37/HLA40/HLA42 Volume down/up button Program down /up button Power button TV/AV switch button Menu button MENU TV/AV CH- The wide blade or the third prong are provided for...
... heat. 9) Do not defeat the safety purposes of the polarized or grounding-type plug. CH + VO L- VGA audio input interface 8. A polarized plug has two blades with the apparatus. VO L+ VOL+ Volume down/up button Remote sensor Power indicator Power button HLA37/HLA40/HLA42 Volume down/up button Program down /up button Power button TV/AV switch button Menu button MENU TV/AV CH- The wide blade or the third prong are provided for...
User Manual
Page 5
...; SLEEP ← Buttons and Descriptions 1 1 Power button 8 2 Mute button 3 TV/AV switch button 4 4 Display button 5 5 CCD mode selection button 6 Parental guidance button 7 SAP button 9 8 Picture size selection button 9 Digit selection button 10 Program recall button 11 Program scan button 10 112 Picture mode selection button 13 Sound mode selection button 13 14 Program up/down button, direction selection button 15 15 Volume up/down , then open the cover of TV set to the remote may occur. Do not mix battery types. REMOTE CONTROL PANEL MUTE TV/AV SIZE POWER 2 3 SAP P.G. As...
...; SLEEP ← Buttons and Descriptions 1 1 Power button 8 2 Mute button 3 TV/AV switch button 4 4 Display button 5 5 CCD mode selection button 6 Parental guidance button 7 SAP button 9 8 Picture size selection button 9 Digit selection button 10 Program recall button 11 Program scan button 10 112 Picture mode selection button 13 Sound mode selection button 13 14 Program up/down button, direction selection button 15 15 Volume up/down , then open the cover of TV set to the remote may occur. Do not mix battery types. REMOTE CONTROL PANEL MUTE TV/AV SIZE POWER 2 3 SAP P.G. As...
User Manual
Page 6
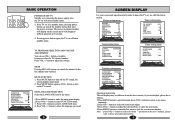
...channel number. button to select the menu "operation in the menu. 1.Press MENU button to select every menu separately. 2.Press CH+/- LANGUAGE ENGLISH BLUE SCREEN OFF OSD SETTING IMAGE POSITION ADVANCE SAVE MODE AUTO PARENT CONTROL FUNCTION SWAP Pressing RECALL button can use CH+/- Picture setting menu Tuner setting menu PICTURE CONTRAST BRIGHTNESS TINT COLOR SHARPNESS COLOR TEMP. SKIP FINE TUNE AUTO SCAN CATV 11 PAL M OFF PICTURE Sound setting menu SOUND STANDARD BALANCE 50 AVC ON EQUALIZER SURROUND ON DIGITAL BASS ON TUNER Timer setting menu SLEEP TIMER...
...channel number. button to select the menu "operation in the menu. 1.Press MENU button to select every menu separately. 2.Press CH+/- LANGUAGE ENGLISH BLUE SCREEN OFF OSD SETTING IMAGE POSITION ADVANCE SAVE MODE AUTO PARENT CONTROL FUNCTION SWAP Pressing RECALL button can use CH+/- Picture setting menu Tuner setting menu PICTURE CONTRAST BRIGHTNESS TINT COLOR SHARPNESS COLOR TEMP. SKIP FINE TUNE AUTO SCAN CATV 11 PAL M OFF PICTURE Sound setting menu SOUND STANDARD BALANCE 50 AVC ON EQUALIZER SURROUND ON DIGITAL BASS ON TUNER Timer setting menu SLEEP TIMER...
User Manual
Page 7
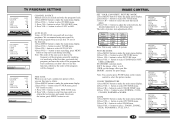
... Contrast Brightness *Tint Color Sharpness VOLWeak Dark Green Light Blur VOL+ Strong Bright Red Thick Sharp Note: Tint is as following table. button to select AUTO SCAN. 4.Press VOL+/- USER: set for sport image. button to enter. 3. C SYS. SKIP FINE TUNE AUTO SCAN CATV 11 PAL M OFF CHANNEL SOURCE Manual search can also press P.STD button on the remote control to the frequency of the program, generally speaking, it...
... Contrast Brightness *Tint Color Sharpness VOLWeak Dark Green Light Blur VOL+ Strong Bright Red Thick Sharp Note: Tint is as following table. button to select AUTO SCAN. 4.Press VOL+/- USER: set for sport image. button to enter. 3. C SYS. SKIP FINE TUNE AUTO SCAN CATV 11 PAL M OFF CHANNEL SOURCE Manual search can also press P.STD button on the remote control to the frequency of the program, generally speaking, it...
User Manual
Page 8
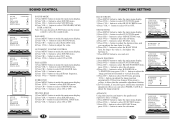
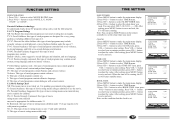
... SAVE MODE AUTO CLOSED CAPTION OFF PARENT CONTROL 13 FUNCTION Note: You can adjust the image position automatically. button to select SOUND menu. 3.Press CH+/- button to select ON or OFF. SOUND 12 FUNCTION SETTING BLUE SCREEN 1.Press MENU button to make the main menu display. 2.Press VOL+/- OSD SETTING 1.Press MENU button to select the sound modes. button to select H-POSITION or V-POSITION item, press VOL+/- button to enter the sub-menu. 4.Press CH+/- button can also press S.STD button on the remote control...
... SAVE MODE AUTO CLOSED CAPTION OFF PARENT CONTROL 13 FUNCTION Note: You can adjust the image position automatically. button to select SOUND menu. 3.Press CH+/- button to select ON or OFF. SOUND 12 FUNCTION SETTING BLUE SCREEN 1.Press MENU button to make the main menu display. 2.Press VOL+/- OSD SETTING 1.Press MENU button to select the sound modes. button to select H-POSITION or V-POSITION item, press VOL+/- button to enter the sub-menu. 4.Press CH+/- button can also press S.STD button on the remote control...
User Manual
Page 9
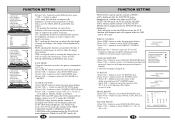
... function can reduce the power consumption of CLOSED CAPTION2/CLOSE CAPTION3/CLOSE CAPTION4 will be displayed after the FUNCTION menu disappears; CLOSED CAPTION 1.Press MENU button to the image content dynamically optimize. button to confirm. 3. in a similar way, in order to select SAVE MODE item. 4.Press VOL+/- When it will remind you need to select CHANGE PASSWORD item. 2.Press VOL+/- CHANGE PASSWORD 1.Press CH+/- Later you input password(the default password is in order to...
... function can reduce the power consumption of CLOSED CAPTION2/CLOSE CAPTION3/CLOSE CAPTION4 will be displayed after the FUNCTION menu disappears; CLOSED CAPTION 1.Press MENU button to the image content dynamically optimize. button to confirm. 3. in a similar way, in order to select SAVE MODE item. 4.Press VOL+/- When it will remind you need to select CHANGE PASSWORD item. 2.Press VOL+/- CHANGE PASSWORD 1.Press CH+/- Later you input password(the default password is in order to...
User Manual
Page 10
.... After setting, press MENU button to select TIME OFF item, press VOL+/- SLEEP TIMER CLOCK TIME OFF BOOK TIME BOOK CHAN. TV Program Ratings NR: Not Rated- TV-Y7: Directed for children. this means that the clock is coming, the TV set . PG-13: Parents Strongly Cautioned- NC-17: This type of movie rating means adults only. 16 TIME SETTING SLEEP TIMER 1.Press MENU button to select TIMER menu. 3.Press CH+/- X: This type of...
.... After setting, press MENU button to select TIME OFF item, press VOL+/- SLEEP TIMER CLOCK TIME OFF BOOK TIME BOOK CHAN. TV Program Ratings NR: Not Rated- TV-Y7: Directed for children. this means that the clock is coming, the TV set . PG-13: Parents Strongly Cautioned- NC-17: This type of movie rating means adults only. 16 TIME SETTING SLEEP TIMER 1.Press MENU button to select TIMER menu. 3.Press CH+/- X: This type of...

User Manual
Page 11
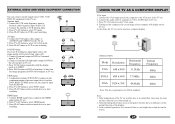
... to HDMI port of the source device will be automatically set to -HDMI connecting includes both video and audio. To get the best picture quality, adjust the DVD Player or Set Top Box's output resolution to 1280x720p, and the PC graphics card's output resolution to set to 1280x720p. -If the source device does not support Auto HDMI, you need to 1024x768, 60Hz. -If the source device has an HDMI output, no other audio connection is necessary. button to select...
... to HDMI port of the source device will be automatically set to -HDMI connecting includes both video and audio. To get the best picture quality, adjust the DVD Player or Set Top Box's output resolution to 1280x720p, and the PC graphics card's output resolution to set to 1280x720p. -If the source device does not support Auto HDMI, you need to 1024x768, 60Hz. -If the source device has an HDMI output, no other audio connection is necessary. button to select...
User Manual
Page 12
... the TV set .. 2. Press TV/AV button to start watching. Press PLAY button on the computer, the screen image of the display. 3. VCR L R AUDIO IN S-VIDEO VIDEO IN IN DVD L R AUDIO IN S-VIDEO VIDEO IN IN DVD L R AUDIO IN Y Cb/Pb Cr/Pr DVD HDMI DVD 20 USING YOUR TV AS A COMPUTER DISPLAY VGA input 1. Connect the audio cable in TV set . AUDIO port in computer to select VGA mode. 4. Press TV/AV button to VGA- Turning on the external device to select HDMI mode. 3. At this TV set . VGA VGA-AUDIO RESOLUTION: Mode Resolution VGA 640 x 480...
... the TV set .. 2. Press TV/AV button to start watching. Press PLAY button on the computer, the screen image of the display. 3. VCR L R AUDIO IN S-VIDEO VIDEO IN IN DVD L R AUDIO IN S-VIDEO VIDEO IN IN DVD L R AUDIO IN Y Cb/Pb Cr/Pr DVD HDMI DVD 20 USING YOUR TV AS A COMPUTER DISPLAY VGA input 1. Connect the audio cable in TV set . AUDIO port in computer to select VGA mode. 4. Press TV/AV button to VGA- Turning on the external device to select HDMI mode. 3. At this TV set . VGA VGA-AUDIO RESOLUTION: Mode Resolution VGA 640 x 480...
User Manual
Page 13
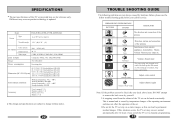
...; Working humidity: 20%-80% Storage temperature: -15℃~+45℃ Storage humidity: 5%-90% Accessory User's manual (×1) Remote control (×1) Power cord (×1) Battery (×2) The design and specifications are subject to change without notice. 22 TROUBLE SHOOTING GUIDE The following problems are for service: BREAKDOWN PHENOMENON PICTURE SOUND CHECK FOR Picture with Snow The direction and connection of the Noise antenna Double or Triple Image Normal Disturb Noise Direction...
...; Working humidity: 20%-80% Storage temperature: -15℃~+45℃ Storage humidity: 5%-90% Accessory User's manual (×1) Remote control (×1) Power cord (×1) Battery (×2) The design and specifications are subject to change without notice. 22 TROUBLE SHOOTING GUIDE The following problems are for service: BREAKDOWN PHENOMENON PICTURE SOUND CHECK FOR Picture with Snow The direction and connection of the Noise antenna Double or Triple Image Normal Disturb Noise Direction...


