User Manual
Page 1
R HLC15B A / HLC15E D / HLC19W A / HLC19E A / HLC22E A LCD TV/DVD Player Combo USER MANUAL Please read this manual carefully before using this TV set and keep it for future reference.
R HLC15B A / HLC15E D / HLC19W A / HLC19E A / HLC22E A LCD TV/DVD Player Combo USER MANUAL Please read this manual carefully before using this TV set and keep it for future reference.

User Manual
Page 2
...CAUTION: TO REDUCE THE RISK OF ELECTRIC SHOCK, DO NOT REMOVE COVER (OR BACK). THERE IS AN EXCLAMATION MARK IN THE TRIANGLE: THIS SYMBOL ALERTS YOU THAT IMPORTANT LITERATURE CONCERNING OPERATION AND MAINTENANCE HAS BEEN INCLUDED WITH THIS PRODUCT. IT IS DANGEROUS...INSIDE. DO NOT USE ANY ABRASIVE CLEANSERS WHICH MAY SCRATCH OR DAMAGE THE LCD SCREEN. NOTE: SERVICING THE UNIT YOURSELF IS UNAUTHORIZED AND COULD LEAD TO INJURY OR PRODUCT DAMAGE. WARNING AND CAUTION CAUTION ! NO USER SERVICEABLE PARTS INSIDE.FOR ANY PROBLEM, REFER SERVICING TO QUALIFIED SERVICE PERSONNEL. AVOID CONTACT...
...CAUTION: TO REDUCE THE RISK OF ELECTRIC SHOCK, DO NOT REMOVE COVER (OR BACK). THERE IS AN EXCLAMATION MARK IN THE TRIANGLE: THIS SYMBOL ALERTS YOU THAT IMPORTANT LITERATURE CONCERNING OPERATION AND MAINTENANCE HAS BEEN INCLUDED WITH THIS PRODUCT. IT IS DANGEROUS...INSIDE. DO NOT USE ANY ABRASIVE CLEANSERS WHICH MAY SCRATCH OR DAMAGE THE LCD SCREEN. NOTE: SERVICING THE UNIT YOURSELF IS UNAUTHORIZED AND COULD LEAD TO INJURY OR PRODUCT DAMAGE. WARNING AND CAUTION CAUTION ! NO USER SERVICEABLE PARTS INSIDE.FOR ANY PROBLEM, REFER SERVICING TO QUALIFIED SERVICE PERSONNEL. AVOID CONTACT...

User Manual
Page 5
... original set for specific details. Component Setup 7 VCR Setup 8 HDMI Input 8 Cable TV Setup 9 External Component Source Setup 9 Basic Operating Instructions 10 Turn on the LCD-TV 10 Audio Control 10 Mute...10 Select the TV Channel You Want 11 Picture Mode 11 Audio Mode 11 Sleep...11 INFO...11 GUIDE 11 -button 12 CH.LIST button 12 FAV.LIST button 12 ARC button 12 Menu Operations 13 Picture Menu Options 13 Picture Menu Options Continued 14 Audio Menu Options 14 Audio Menu Options Continued 15 Set up Menu Options 16 Feature Menu Options 18 Feature Menu Options...
... original set for specific details. Component Setup 7 VCR Setup 8 HDMI Input 8 Cable TV Setup 9 External Component Source Setup 9 Basic Operating Instructions 10 Turn on the LCD-TV 10 Audio Control 10 Mute...10 Select the TV Channel You Want 11 Picture Mode 11 Audio Mode 11 Sleep...11 INFO...11 GUIDE 11 -button 12 CH.LIST button 12 FAV.LIST button 12 ARC button 12 Menu Operations 13 Picture Menu Options 13 Picture Menu Options Continued 14 Audio Menu Options 14 Audio Menu Options Continued 15 Set up Menu Options 16 Feature Menu Options 18 Feature Menu Options...
User Manual
Page 8
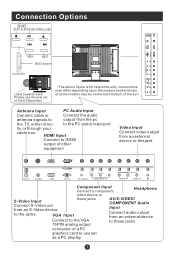
... IN COMPONENT IN R L AUDIO IN V VIDEO IN Component Input Connect a component Headphone video device to S-Video Input these jacks connector of a PC graphics card to use set Antenna Input PC Audio Input Connect cable or Connect the audio antenna signals to output from an S-Video device to the jacks. VGA Input Connect to the VGA 15PIN analog output AV/S-VIDEO/ COMPONENT Audio Input Connect audio output from an external device to the PC audio input port tly or through your cable box. Connection Options DVD STOP PLAY/PAUSE OPEN/CLOSE ANT IN S-VIDEO HDMI VGA IN...
... IN COMPONENT IN R L AUDIO IN V VIDEO IN Component Input Connect a component Headphone video device to S-Video Input these jacks connector of a PC graphics card to use set Antenna Input PC Audio Input Connect cable or Connect the audio antenna signals to output from an S-Video device to the jacks. VGA Input Connect to the VGA 15PIN analog output AV/S-VIDEO/ COMPONENT Audio Input Connect audio output from an external device to the PC audio input port tly or through your cable box. Connection Options DVD STOP PLAY/PAUSE OPEN/CLOSE ANT IN S-VIDEO HDMI VGA IN...
User Manual
Page 10
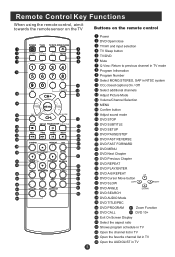
... AUDIO PROGRAM ZOOM D.CALL 10+ EXIT ARC GUIDE CH.LIST FAV.LIST AUDIOLIST Power DVD Open/close TV/AV and input selection TV Sleep button TV/DVD Mute Q View: Return to previous channel in TV mode Program Infromation Program Number Select MONO,STEREO, SAP in NTSC system CC( closed caption) On / Off Select additional channels Adjust Picture Mode Volume/Channel Selection MENU Confirm button Adjust sound mode DVD STOP DVD SUBTITLE DVD SETUP DVD PAUSE/STEP DVD FAST REVERSE DVD FAST FORWARD DVD MENU DVD Next Chapter DVD Previous Chapter DVD REPEAT DVD PLAY/ENTER DVD...
... AUDIO PROGRAM ZOOM D.CALL 10+ EXIT ARC GUIDE CH.LIST FAV.LIST AUDIOLIST Power DVD Open/close TV/AV and input selection TV Sleep button TV/DVD Mute Q View: Return to previous channel in TV mode Program Infromation Program Number Select MONO,STEREO, SAP in NTSC system CC( closed caption) On / Off Select additional channels Adjust Picture Mode Volume/Channel Selection MENU Confirm button Adjust sound mode DVD STOP DVD SUBTITLE DVD SETUP DVD PAUSE/STEP DVD FAST REVERSE DVD FAST FORWARD DVD MENU DVD Next Chapter DVD Previous Chapter DVD REPEAT DVD PLAY/ENTER DVD...
User Manual
Page 11
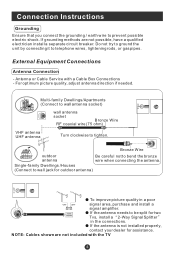
... antenna UHF antenna Turn clockwise to be split for two Tvs, install a 2-Way Signal Splitter in a poor signal area, purchase and install a signal amplifier. If the antenna needs to tighten. Connection Instructions Grounding Ensure that you connect the grounding / earth wire to bend the bronze wire when connecting the antenna. NOTE: Cables shown are not possible, have a qualified electrician install a separate circuit breaker. External Equipment Connections Antenna Connection - For optimum picture quality, adjust antenna direction...
... antenna UHF antenna Turn clockwise to be split for two Tvs, install a 2-Way Signal Splitter in a poor signal area, purchase and install a signal amplifier. If the antenna needs to tighten. Connection Instructions Grounding Ensure that you connect the grounding / earth wire to bend the bronze wire when connecting the antenna. NOTE: Cables shown are not possible, have a qualified electrician install a separate circuit breaker. External Equipment Connections Antenna Connection - For optimum picture quality, adjust antenna direction...
User Manual
Page 12
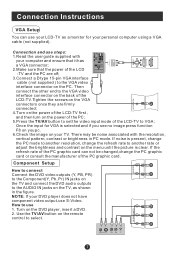
.../AV button to set the video input mode of the LCD-TV to VGA; There may be changed,change the refresh rate to the AUDIO IN jacks on your personal computer using a VGA cable (not supplied). Component Setup How to connect Connect the DVD video outputs (Y, PB, PR) to the Component(Y, Pb, Pr) IN jacks on the TV and connect the DVD audio outputs to another rate or adjust the brightness and contrast on the menu until the picture is selected and...
.../AV button to set the video input mode of the LCD-TV to VGA; There may be changed,change the refresh rate to the AUDIO IN jacks on your personal computer using a VGA cable (not supplied). Component Setup How to connect Connect the DVD video outputs (Y, PB, PR) to the Component(Y, Pb, Pr) IN jacks on the TV and connect the DVD audio outputs to another rate or adjust the brightness and contrast on the menu until the picture is selected and...

User Manual
Page 13
... the user guide supplied with your AV devices and ensure that it has Composite or S-Video connectors; 2.Make sure that the power of the LCD-TV to the Video input. 1 2. Operate the corresponding external equipment. Connection Option 2 1. Refer to the same channel number. HDMI Connection Instructions VCR Setup - If you connect an S-VIDEO output from the external equipment's HDMI output jacks to the S-VIDEO input, the picture quality is improved; VCR HDMI Input How to connect Connect the cables from VCR to the TV input jacks, as...
... the user guide supplied with your AV devices and ensure that it has Composite or S-Video connectors; 2.Make sure that the power of the LCD-TV to the Video input. 1 2. Operate the corresponding external equipment. Connection Option 2 1. Refer to the same channel number. HDMI Connection Instructions VCR Setup - If you connect an S-VIDEO output from the external equipment's HDMI output jacks to the S-VIDEO input, the picture quality is improved; VCR HDMI Input How to connect Connect the cables from VCR to the TV input jacks, as...
User Manual
Page 14
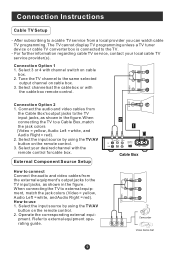
... remote control. 3. The TV cannot display TV programming unless a TV tuner device or cable TV converter box is connected to a cable TV service from a local provider you can watch cable TV programming. Select 3 or 4 with channel switch on cable box. 3. Tune the TV channel to external equipment, match the jack colors (Video = yellow, Audio Left = white, and Audio Right = red). Connect the audio and video cables from the external equipment's output jacks to a Cable Box, match the jack colors (Video = yellow, Audio Left = white, and Audio Right = red). 2. External Component Source Setup...
... remote control. 3. The TV cannot display TV programming unless a TV tuner device or cable TV converter box is connected to a cable TV service from a local provider you can watch cable TV programming. Select 3 or 4 with channel switch on cable box. 3. Tune the TV channel to external equipment, match the jack colors (Video = yellow, Audio Left = white, and Audio Right = red). Connect the audio and video cables from the external equipment's output jacks to a Cable Box, match the jack colors (Video = yellow, Audio Left = white, and Audio Right = red). 2. External Component Source Setup...
User Manual
Page 15
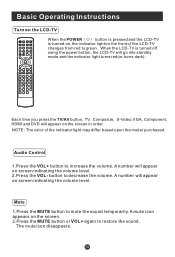
... + S.MODE STOP SETUP PAUSE/STEP SUBTITLE REV FWD . button to increase the volume. When the LCD-TV is turned on, the indicator light on the LCD-TV POWER TV/AV TV/DVD OPEN/CLOSE SLEEP Q.VIEW INFO MUTE 1234 56 90 SAP 78 CC P.MODE CH+ VOL - Each time you press the TV/AV button, TV, Composite, S-Video,VGA, Component, HDMI and DVD will go into standby mode and the indicator light turns red(or turns dark). OK MENU...
... + S.MODE STOP SETUP PAUSE/STEP SUBTITLE REV FWD . button to increase the volume. When the LCD-TV is turned on, the indicator light on the LCD-TV POWER TV/AV TV/DVD OPEN/CLOSE SLEEP Q.VIEW INFO MUTE 1234 56 90 SAP 78 CC P.MODE CH+ VOL - Each time you press the TV/AV button, TV, Composite, S-Video,VGA, Component, HDMI and DVD will go into standby mode and the indicator light turns red(or turns dark). OK MENU...
User Manual
Page 16
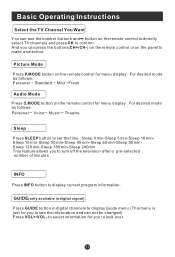
... min-Sleep 240min This feature allows you can use the number buttons and button on the remote control to directly select TV channels and press OK to confirm. to select information for menu display . Basic Operating Instructions Select the TV Channel You Want You can press the buttons(CH+/CH-) on the remote control or on the panel to make a selection. GUIDE(only available in digital signal) Press GUIDE button in digital channels to display Guide menu.(This menu is just for menu display . Picture Mode Press P.MODE button...
... min-Sleep 240min This feature allows you can use the number buttons and button on the remote control to directly select TV channels and press OK to confirm. to select information for menu display . Basic Operating Instructions Select the TV Channel You Want You can press the buttons(CH+/CH-) on the remote control or on the panel to make a selection. GUIDE(only available in digital signal) Press GUIDE button in digital channels to display Guide menu.(This menu is just for menu display . Picture Mode Press P.MODE button...
User Manual
Page 18
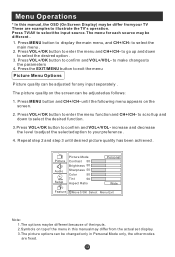
... MENU button to select the input source. to make changes to enter the menu function and CH+/CH- Press the EXIT/MENU button to exit the menu Picture Menu Options Picture quality can be changed only in Personal Mode only, the other modes are examples to illustrate the TV's operation. Press VOL+/OK button to the parameters 4. Picture Audio Setup Picture Mode Contrast 50 Brightness 50 Sharpness 50 Color 50 Tint 50 Aspect Ratio Personal...
... MENU button to select the input source. to make changes to enter the menu function and CH+/CH- Press the EXIT/MENU button to exit the menu Picture Menu Options Picture quality can be changed only in Personal Mode only, the other modes are examples to illustrate the TV's operation. Press VOL+/OK button to the parameters 4. Picture Audio Setup Picture Mode Contrast 50 Brightness 50 Sharpness 50 Color 50 Tint 50 Aspect Ratio Personal...
User Manual
Page 19
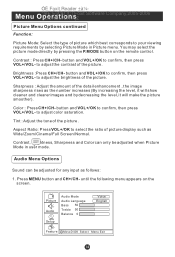
... be adjusted when Picture Mode in Picture menu. Contrast : Press CH+/CH- Tint : Adjust the tone of the picture. to your viewing requirements by pressing the P.MODE button on the screen. Audio Menu Options Sound can only be adjusted for any input as Wide/Zoom/Cinema/Full Screen/Normal. You may select the picture mode directly by selecting Picture Mode in user mode. Brightness :Press CH+/CH- to select the ratio of the picture. button and VOL+/OK to adjust color saturation. Aspect Ratio...
... be adjusted when Picture Mode in Picture menu. Contrast : Press CH+/CH- Tint : Adjust the tone of the picture. to your viewing requirements by pressing the P.MODE button on the screen. Audio Menu Options Sound can only be adjusted for any input as Wide/Zoom/Cinema/Full Screen/Normal. You may select the picture mode directly by selecting Picture Mode in user mode. Brightness :Press CH+/CH- to select the ratio of the picture. button and VOL+/OK to adjust color saturation. Aspect Ratio...

User Manual
Page 22
... default set. Reset: Press VOL+/OK to return to select the position and CH+/CH- Menu Operations Setup Menu Options Add On Ch Search: When the channels are found, use VOL+/OK to add it to enter the selection and the menu displays as below: Manual Channel Set Menu Ch 42-1 ATSCdmo Ch 2-0 Ch 11-0 Viewable Viewable Viewable Move OK Change Menu Exit Channel Label: Allows you can select channels as below: Channel...
... default set. Reset: Press VOL+/OK to return to select the position and CH+/CH- Menu Operations Setup Menu Options Add On Ch Search: When the channels are found, use VOL+/OK to add it to enter the selection and the menu displays as below: Manual Channel Set Menu Ch 42-1 ATSCdmo Ch 2-0 Ch 11-0 Viewable Viewable Viewable Move OK Change Menu Exit Channel Label: Allows you can select channels as below: Channel...
User Manual
Page 23
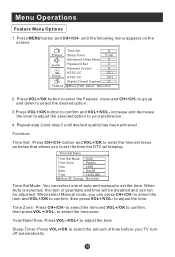
Picture Audio Setup Feature Time Set Sleep Timer 0 min Advanced Video Menu Password Set Parental Control NTSC CC CC1 ATSC CC CS1 Digital Closed Caption Move /OK Select Menu Exit 2. When Auto is selected, the item of year/date and time will display. Press VOL+/OK button to select the time zone. to enter the Feature menu and CH+/CH- Year/Date/Time: Press VOL-/VOL+ to confirm and VOL+/VOL- Time Zone: Press CH+/CH- Menu Operations Feature Menu Options 1. to...
Picture Audio Setup Feature Time Set Sleep Timer 0 min Advanced Video Menu Password Set Parental Control NTSC CC CC1 ATSC CC CS1 Digital Closed Caption Move /OK Select Menu Exit 2. When Auto is selected, the item of year/date and time will display. Press VOL+/OK button to select the time zone. to enter the Feature menu and CH+/CH- Year/Date/Time: Press VOL-/VOL+ to confirm and VOL+/VOL- Time Zone: Press CH+/CH- Menu Operations Feature Menu Options 1. to...
User Manual
Page 30
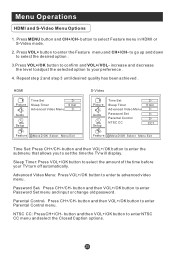
Menu Operations HDMI and S-Video Menu Options 1. Press VOL+ button to enter Password Set menu and input or change old password. HDMI Picture Audio Time Set Sleep Timer Advanced Video Menu 0 min Setup Feature Move /OK Select Menu Exit S-Video Picture Audio Setup Time Set Sleep Timer Advanced Video Menu Password Set Parental Control NTSC CC 0 min CC1 Feature Move /OK Select Menu Exit Time Set: Press CH+/CH- button and then VOL+/OK button to enter the Feature menu and CH+/CH- Repeat step 2 and step 3 until desired quality has been achieved . Sleep Timer: Press VOL+/OK...
Menu Operations HDMI and S-Video Menu Options 1. Press VOL+ button to enter Password Set menu and input or change old password. HDMI Picture Audio Time Set Sleep Timer Advanced Video Menu 0 min Setup Feature Move /OK Select Menu Exit S-Video Picture Audio Setup Time Set Sleep Timer Advanced Video Menu Password Set Parental Control NTSC CC 0 min CC1 Feature Move /OK Select Menu Exit Time Set: Press CH+/CH- button and then VOL+/OK button to enter the Feature menu and CH+/CH- Repeat step 2 and step 3 until desired quality has been achieved . Sleep Timer: Press VOL+/OK...
User Manual
Page 32
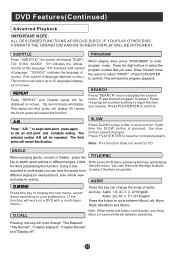
... Playback IMPORTANT NOTE: ALL DESCRIBED FUNCTIONS AFOR DVD DISCS. You can then use the digit buttons recorded in slow motion. IF YOU PLAY OTHER DISC FORMATS THE OPERATION AND ON SCREEN DISPLAY WILL BE DIFFERENT. When playing discs, press "PROGRAM" to set an end point and complete setting. The selected section A-B will cancel this button to play a disc in multi-angle you can change the mode of language;
... Playback IMPORTANT NOTE: ALL DESCRIBED FUNCTIONS AFOR DVD DISCS. You can then use the digit buttons recorded in slow motion. IF YOU PLAY OTHER DISC FORMATS THE OPERATION AND ON SCREEN DISPLAY WILL BE DIFFERENT. When playing discs, press "PROGRAM" to set an end point and complete setting. The selected section A-B will cancel this button to play a disc in multi-angle you can change the mode of language;

User Manual
Page 37
DVD System Setup(Continued) DVD System Setup SETUP PLAY/ENTER DEFAULT: Resets all settings (except password and parental lock status) for this DVD player back to perform the reset. ..Preference Page.. Parental Password Default Reset Note: Some functions may not be available depending on the type of disc. Press ENTER to the manufacturers original settings.
DVD System Setup(Continued) DVD System Setup SETUP PLAY/ENTER DEFAULT: Resets all settings (except password and parental lock status) for this DVD player back to perform the reset. ..Preference Page.. Parental Password Default Reset Note: Some functions may not be available depending on the type of disc. Press ENTER to the manufacturers original settings.
User Manual
Page 40
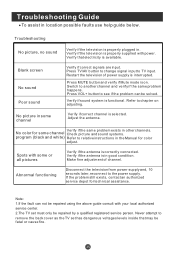
... service depot for some channel Verify if correct channel is in some channel Check picture and sound systems. program (black and white) Refer to the power supply. Troubleshooting Guide To assist in other channels. Verify if the antenna is selected. Note: 1.If the fault can be fatal or cause fire. Press TV/AV button to change signal input to another channel and verify if the same problem happens. Switch to TV input. No picture...
... service depot for some channel Verify if correct channel is in some channel Check picture and sound systems. program (black and white) Refer to the power supply. Troubleshooting Guide To assist in other channels. Verify if the antenna is selected. Note: 1.If the fault can be fatal or cause fire. Press TV/AV button to change signal input to another channel and verify if the same problem happens. Switch to TV input. No picture...
User Manual
Page 41
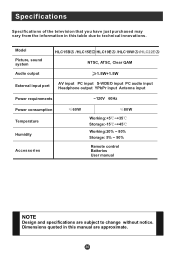
Model Picture, sound system Audio output HLC15B A /HLC15E D HLC19E A /HLC19W A /HLC22E A NTSC, ATSC, Clear QAM 1.5W+1.5W External input port AV input PC input S-VIDEO input PC audio input Headphone output YPbPr input Antenna input Power requirements ~120V 60Hz Power consumption Temperature Humidity Accessories 60W 80W Working:+5 ~+35 Storage:-15 ~+45 Working:20% ~ 80% Storage: 5% ~ 90% Remote control Batteries User manual NOTE Design and specifications are approximate. Dimensions quoted in this manual are subject to technical innovations. Specifications Specifications of the ...
Model Picture, sound system Audio output HLC15B A /HLC15E D HLC19E A /HLC19W A /HLC22E A NTSC, ATSC, Clear QAM 1.5W+1.5W External input port AV input PC input S-VIDEO input PC audio input Headphone output YPbPr input Antenna input Power requirements ~120V 60Hz Power consumption Temperature Humidity Accessories 60W 80W Working:+5 ~+35 Storage:-15 ~+45 Working:20% ~ 80% Storage: 5% ~ 90% Remote control Batteries User manual NOTE Design and specifications are approximate. Dimensions quoted in this manual are subject to technical innovations. Specifications Specifications of the ...


