
User Manual
Page 3
... Precautions 3 General Safety Precautions 3-4 PARTS AND FEATURES 5-6 Front of the Unit...5 Back of the Unit...6 INSTALLATION INSTRUCTIONS 7-14 Installing Your Combination Washer / Dryer 7 Tools Needed ...7 Parts Supplied ...7 Location Requirements 8 Unit Dimensions and Clearances 8 Unpacking Your Appliance 9 Drain Connections 10 Water Connections 11-12 Electrical ...
... Precautions 3 General Safety Precautions 3-4 PARTS AND FEATURES 5-6 Front of the Unit...5 Back of the Unit...6 INSTALLATION INSTRUCTIONS 7-14 Installing Your Combination Washer / Dryer 7 Tools Needed ...7 Parts Supplied ...7 Location Requirements 8 Unit Dimensions and Clearances 8 Unpacking Your Appliance 9 Drain Connections 10 Water Connections 11-12 Electrical ...

User Manual
Page 5
...easily get trapped inside. • Do not allow children to play on all enclosure panels are missing or broken. • Do not install or store this appliance unless all hot water faucets and let the water flow from each for several minutes. Close supervision of ...shock and fire. DO NOT CUT OR REMOVE THE GROUNDING PLUG. INSTALLATION SAFETY PRECAUTIONS DANGER Suffocation Hazard Risk of children. 3 GENERAL SAFETY PRECAUTIONS • Use only detergents or softeners recommended for 2 weeks or...
...easily get trapped inside. • Do not allow children to play on all enclosure panels are missing or broken. • Do not install or store this appliance unless all hot water faucets and let the water flow from each for several minutes. Close supervision of ...shock and fire. DO NOT CUT OR REMOVE THE GROUNDING PLUG. INSTALLATION SAFETY PRECAUTIONS DANGER Suffocation Hazard Risk of children. 3 GENERAL SAFETY PRECAUTIONS • Use only detergents or softeners recommended for 2 weeks or...

User Manual
Page 9
...Gloves • Pliers • Level • Wrench PARTS SUPPLIED Water Hoses (2) (Flat washers are unsure that the washer/dryer is properly installed, contact a qualified appliance technician. TOOLS NEEDED You will need to have the skills to reduce the risk of severe injury or death..., follow all installation instructions. To reduce the risk of fire. ENGLISH ENGLISH INSTALLATION INSTRUCTIONS INSTALLING YOUR COMBINATION WASHER / DRYER We recommend that your washer was just delivered and the outside ...
...Gloves • Pliers • Level • Wrench PARTS SUPPLIED Water Hoses (2) (Flat washers are unsure that the washer/dryer is properly installed, contact a qualified appliance technician. TOOLS NEEDED You will need to have the skills to reduce the risk of severe injury or death..., follow all installation instructions. To reduce the risk of fire. ENGLISH ENGLISH INSTALLATION INSTRUCTIONS INSTALLING YOUR COMBINATION WASHER / DRYER We recommend that your washer was just delivered and the outside ...
User Manual
Page 10
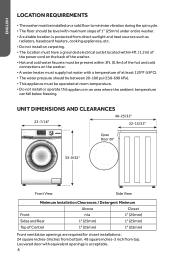
... bottom. 48 square inches-3 inch from direct sunlight and heat sources such as radiators, baseboard heaters, cooking appliances, etc. • Do not install on carpeting. • The location must have a grounded electrical outlet located within 4ft. (1.2m) of the power cord on the back of...with a temperature of 1" (25mm) under entire washer. • A suitable location is acceptable. 8 ENGLISH LOCATION REQUIREMENTS • The washer must be installed on a solid floor to minimize vibration during the spin cycle. • The floor should be level with maximum slope of at room...
... bottom. 48 square inches-3 inch from direct sunlight and heat sources such as radiators, baseboard heaters, cooking appliances, etc. • Do not install on carpeting. • The location must have a grounded electrical outlet located within 4ft. (1.2m) of the power cord on the back of...with a temperature of 1" (25mm) under entire washer. • A suitable location is acceptable. 8 ENGLISH LOCATION REQUIREMENTS • The washer must be installed on a solid floor to minimize vibration during the spin cycle. • The floor should be level with maximum slope of at room...

User Manual
Page 11
NOTE: Small amounts of the opening and replace the four screws that hold it in the two gaps at the factory. Four transportation bolts are installed by the factory to prevent damage to the wash system that hold it in place. 2. Replace back cover by removing the four screws that can ...
NOTE: Small amounts of the opening and replace the four screws that hold it in the two gaps at the factory. Four transportation bolts are installed by the factory to prevent damage to the wash system that hold it in place. 2. Replace back cover by removing the four screws that can ...
User Manual
Page 13
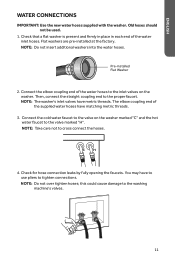
Check that a flat the factory. Flat washers are pre-installed at washer is present and firmly in place in each end of the water inlet hoses. NOTE: Do not over tighten hoses; NOTE: Do ... for hose connection leaks by fully opening the faucets. NOTE: The washer's inlet valves have matching metric threads. 3. C H 4. Old hoses should not be used. 1. Pre-installed Flat Washer 2. Connect the elbow coupling end of the supplied water hoses have metric threads. You may have to use pliers to cross connect the...
Check that a flat the factory. Flat washers are pre-installed at washer is present and firmly in place in each end of the water inlet hoses. NOTE: Do not over tighten hoses; NOTE: Do ... for hose connection leaks by fully opening the faucets. NOTE: The washer's inlet valves have matching metric threads. 3. C H 4. Old hoses should not be used. 1. Pre-installed Flat Washer 2. Connect the elbow coupling end of the supplied water hoses have metric threads. You may have to use pliers to cross connect the...

User Manual
Page 15
... is recommended. • If the electric supply provided does not meet the above requirements, contact a licensed electrician. This appliance must be connected to have one installed. • Do not use a 3 prong plug adapter. • If you are not sure if your outlet is properly grounded, contact a licensed electrician. • Do not...
... is recommended. • If the electric supply provided does not meet the above requirements, contact a licensed electrician. This appliance must be connected to have one installed. • Do not use a 3 prong plug adapter. • If you are not sure if your outlet is properly grounded, contact a licensed electrician. • Do not...

User Manual
Page 30
Install the Transportation Bolts with wrench Replace the back plate and the (4) screws to hold it in the washtub. • Remove the drain hose from the ...
Install the Transportation Bolts with wrench Replace the back plate and the (4) screws to hold it in the washtub. • Remove the drain hose from the ...
User Manual
Page 31
... into a standpipe that is not connected to be caused by an improperly connected drain hose or water hose. There is no water supply in . See "installation" (p12-13) B. Make sure water hoses are continuously being drained. Button trap may have a clogged or slow draining sink or standpipe. The door has not...
... into a standpipe that is not connected to be caused by an improperly connected drain hose or water hose. There is no water supply in . See "installation" (p12-13) B. Make sure water hoses are continuously being drained. Button trap may have a clogged or slow draining sink or standpipe. The door has not...

User Manual
Page 32
B. Soap Residue. May be half full during installation. Clothes dry unevenly. C. Check water temperature. Read the instructions on your load. The dryer drum should only be due to improper sorting, ... not be resorted. B. Detergent may be resorted. Spots or stains on the detergent container and follow proper directions for large loads. Remove shipping bolts [See "installation"] (p10) B. C. E. Oversudsing or low cleaning performance. Dryer load needs to washing. C. C. Remove small loose sharp objects prior to be over loaded. Clothes ...
B. Soap Residue. May be half full during installation. Clothes dry unevenly. C. Check water temperature. Read the instructions on your load. The dryer drum should only be due to improper sorting, ... not be resorted. B. Detergent may be resorted. Spots or stains on the detergent container and follow proper directions for large loads. Remove shipping bolts [See "installation"] (p10) B. C. E. Oversudsing or low cleaning performance. Dryer load needs to washing. C. C. Remove small loose sharp objects prior to be over loaded. Clothes ...

User Manual
Page 35
...: Model number and serial number of your nearest authorized service center. Before calling please have other than an authorized Haier dealer or service center. Damage to the authorized service representative before warranty repairs are the responsibility of the owner. Damage...the problem. All service must be performed by improper installation or maintenance. A clear description of household fuses, circuit breakers, wiring or plumbing. Haier America Wayne, NJ 07470 33 Second through Fifth Year Haier will provide the cabinet assembly should the cabinet rust through...
...: Model number and serial number of your nearest authorized service center. Before calling please have other than an authorized Haier dealer or service center. Damage to the authorized service representative before warranty repairs are the responsibility of the owner. Damage...the problem. All service must be performed by improper installation or maintenance. A clear description of household fuses, circuit breakers, wiring or plumbing. Haier America Wayne, NJ 07470 33 Second through Fifth Year Haier will provide the cabinet assembly should the cabinet rust through...


