
User Manual
Page 2
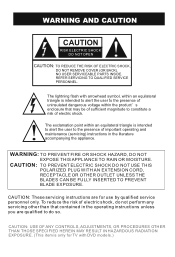
... REMOVE COVER (OR BACK). CAUTION: TO PREVENT ELECTRIC SHOCK DO NOT USE THIS POLARIZED PLUG WITH AN EXTENSION CORD, RECEPTACLE OR OTHER OUTLET UNLESS THE BLADES CAN BE FULLY INSERTED TO PREVENT BLADE EXPOSURE. CAUTION: These servicing instructions...user to the presence of sufficient magnitude to do so. CAUTION: USE OF ANY CONTROLS, ADJUSTMENTS, OR PROCEDURES OTHER THAN THOSE SPECIFIED HEREIN MAY RESULT IN HAZARDOUS RADIATION EXPOSURE. (This item is only for use by qualified service personnel only. REFER SERVICING TO QUALIFIED SERVICE PERSONNEL. The lightning flash with DVD models...
... REMOVE COVER (OR BACK). CAUTION: TO PREVENT ELECTRIC SHOCK DO NOT USE THIS POLARIZED PLUG WITH AN EXTENSION CORD, RECEPTACLE OR OTHER OUTLET UNLESS THE BLADES CAN BE FULLY INSERTED TO PREVENT BLADE EXPOSURE. CAUTION: These servicing instructions...user to the presence of sufficient magnitude to do so. CAUTION: USE OF ANY CONTROLS, ADJUSTMENTS, OR PROCEDURES OTHER THAN THOSE SPECIFIED HEREIN MAY RESULT IN HAZARDOUS RADIATION EXPOSURE. (This item is only for use by qualified service personnel only. REFER SERVICING TO QUALIFIED SERVICE PERSONNEL. The lightning flash with DVD models...
User Manual
Page 5
Component Setup 8 VCR Setup 9 HDMI Input 9 Cable TV Setup 10 External Component Source Setup 10 Basic Operating Instructions 11 Switch On/Off the TV set for specific details. Please refer to your original set 11 Choose the input source 11 Audio Control 11 Mute...11 INFO...11 Select the TV Channel You Want 12 Picture Mode 12 Audio Mode 12 Sleep...12 GUIDE 12 ARC button 12 -button 13 CH.LIST button 13 FAV.LIST button 13 Menu Operations 14 Video Menu Options 14 Video Menu Options Continued 15 Audio Menu Options 16 Audio Menu Options...
Component Setup 8 VCR Setup 9 HDMI Input 9 Cable TV Setup 10 External Component Source Setup 10 Basic Operating Instructions 11 Switch On/Off the TV set for specific details. Please refer to your original set 11 Choose the input source 11 Audio Control 11 Mute...11 INFO...11 Select the TV Channel You Want 12 Picture Mode 12 Audio Mode 12 Sleep...12 GUIDE 12 ARC button 12 -button 13 CH.LIST button 13 FAV.LIST button 13 Menu Operations 14 Video Menu Options 14 Video Menu Options Continued 15 Audio Menu Options 16 Audio Menu Options...
User Manual
Page 8
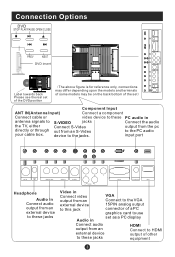
Connect the audio output from the pc to the PC audio input port ANT IN R AUDIO IN L VIDEO IN S-VIDEO Pr Pb Y R AUDIO L VGA IN PC AUDIO IN HDMI Headphone Audio in Connect audio output from an external device to these jacks Video in Connect video output from an external device to this jack VGA Connect to the VGA 15PIN analog output connector of other equipment L R AUDIO Connection Options DVD STOP PLAY/PAUSE OPEN/CLOSE HDMI PC AUDIO IN VGA IN Y Pb PREV NEXT DVD insert Pr S-VIDEO VIDEO IN R AUDIO IN L ANT IN...
Connect the audio output from the pc to the PC audio input port ANT IN R AUDIO IN L VIDEO IN S-VIDEO Pr Pb Y R AUDIO L VGA IN PC AUDIO IN HDMI Headphone Audio in Connect audio output from an external device to these jacks Video in Connect video output from an external device to this jack VGA Connect to the VGA 15PIN analog output connector of other equipment L R AUDIO Connection Options DVD STOP PLAY/PAUSE OPEN/CLOSE HDMI PC AUDIO IN VGA IN Y Pb PREV NEXT DVD insert Pr S-VIDEO VIDEO IN R AUDIO IN L ANT IN...
User Manual
Page 10
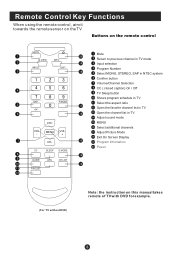
...PBC SEARCH AUDIO PROGRAM ZOOM D.CALL 10+ EXIT ARC GUIDE CH.LIST FAV.LIST (For TV with DVD) Power DVD Open/close Input selection TV Sleep button TV/DVD Mute Return to previous channel in TV mode Program Infromation Program Number Select MONO,STEREO, SAP in NTSC system CC( closed caption) On / Off Select additional channels Adjust Picture Mode Volume/Channel Selection MENU Confirm button Adjust sound mode DVD STOP DVD SUBTITLE DVD SETUP DVD PAUSE/STEP DVD FAST REVERSE DVD FAST FORWARD DVD MENU DVD Next Chapter DVD Previous Chapter DVD REPEAT DVD PLAY/ENTER DVD...
...PBC SEARCH AUDIO PROGRAM ZOOM D.CALL 10+ EXIT ARC GUIDE CH.LIST FAV.LIST (For TV with DVD) Power DVD Open/close Input selection TV Sleep button TV/DVD Mute Return to previous channel in TV mode Program Infromation Program Number Select MONO,STEREO, SAP in NTSC system CC( closed caption) On / Off Select additional channels Adjust Picture Mode Volume/Channel Selection MENU Confirm button Adjust sound mode DVD STOP DVD SUBTITLE DVD SETUP DVD PAUSE/STEP DVD FAST REVERSE DVD FAST FORWARD DVD MENU DVD Next Chapter DVD Previous Chapter DVD REPEAT DVD PLAY/ENTER DVD...
User Manual
Page 11
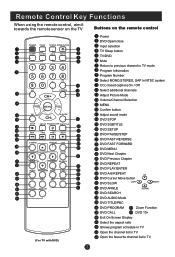
... CC SLEEP S.MODE GUIDE ARC CH.LIST FAV.LIST Mute Return to previous channel in TV mode Input selection Program Number Select MONO, STEREO, SAP in NTSC system Confirm button Volume/Channel Selection CC ( closed caption) On / Off TV Sleep button Shows program schedule in TV Select the aspect ratio Open the favorite channel list in TV Open the channel list in TV Adjust sound mode MENU Select additional channels Adjust Picture Mode Exit On Screen Display Program Infromation Power (For TV without DVD) Note: the instruction on the remote control MUTE Q.VIEW INPUT INFO EXIT SAP OK P.MODE...
... CC SLEEP S.MODE GUIDE ARC CH.LIST FAV.LIST Mute Return to previous channel in TV mode Input selection Program Number Select MONO, STEREO, SAP in NTSC system Confirm button Volume/Channel Selection CC ( closed caption) On / Off TV Sleep button Shows program schedule in TV Select the aspect ratio Open the favorite channel list in TV Open the channel list in TV Adjust sound mode MENU Select additional channels Adjust Picture Mode Exit On Screen Display Program Infromation Power (For TV without DVD) Note: the instruction on the remote control MUTE Q.VIEW INPUT INFO EXIT SAP OK P.MODE...

User Manual
Page 12
... ohm) VHF antenna UHF antenna Turn clockwise to prevent possible electric shock. Antenna or Cable Service with the TV If grounding methods are not included with a Cable Box Connections - External Equipment Connections Antenna Connection - Single-family Dwellings /Houses (Connect to be split for outdoor antenna) To improve picture quality in the connections. If the antenna needs to wall jack for two Tvs, install a 2-Way Signal Splitter in a poor signal area, purchase and install a signal amplifier. Bronze...
... ohm) VHF antenna UHF antenna Turn clockwise to prevent possible electric shock. Antenna or Cable Service with the TV If grounding methods are not included with a Cable Box Connections - External Equipment Connections Antenna Connection - Single-family Dwellings /Houses (Connect to be split for outdoor antenna) To improve picture quality in the connections. If the antenna needs to wall jack for two Tvs, install a 2-Way Signal Splitter in a poor signal area, purchase and install a signal amplifier. Bronze...
User Manual
Page 13
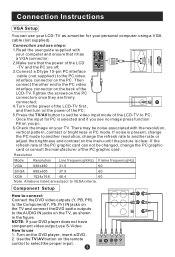
.... 6.Check the image on the DVD player, insert a DVD. 2. NOTE: If your DVD player does not have component video output,use steps: 1.Read the user guide supplied with the resolution, vertical pattern, contrast or brightness in the figure. Connection Instructions VGA Setup You can not be noise associated with your computer and ensure that it has a VGA connector; 2.Make sure that the power of the LCD-TV.Tighten the screws on the...
.... 6.Check the image on the DVD player, insert a DVD. 2. NOTE: If your DVD player does not have component video output,use steps: 1.Read the user guide supplied with the resolution, vertical pattern, contrast or brightness in the figure. Connection Instructions VGA Setup You can not be noise associated with your computer and ensure that it has a VGA connector; 2.Make sure that the power of the LCD-TV.Tighten the screws on the...
User Manual
Page 14
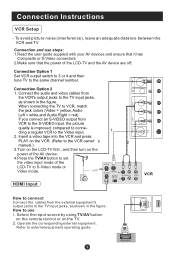
... sure that the power of the LCD-TV to the TV input jacks, as shown in the figure. When connecting the TV to the Video input. 1 2. HDMI cting a regular VCR to VCR, match the jack colors (Video = yellow, Audio Left = white,and Audio Right = red). Connection Instructions VCR Setup - Connect the audio and video cables from VCR to the same channel number. and then turn on the LCD-TV first ; Select the input source by using TV/AV button on the remote control or on...
... sure that the power of the LCD-TV to the TV input jacks, as shown in the figure. When connecting the TV to the Video input. 1 2. HDMI cting a regular VCR to VCR, match the jack colors (Video = yellow, Audio Left = white,and Audio Right = red). Connection Instructions VCR Setup - Connect the audio and video cables from VCR to the same channel number. and then turn on the LCD-TV first ; Select the input source by using TV/AV button on the remote control or on...

User Manual
Page 15
... button on the remote control. 2. The TV cannot display TV programming unless a TV tuner device or cable TV converter box is connected to external equipment, match the jack colors (Video = yellow, Audio Left = white, and Audio Right = red). Select 3 or 4 with channel switch on cable box. 3. Select channels at the cable box or with the remote control for cable box. Select the input source by using the TV/AV button on the remote control. 3. For further information regarding cable TV service, contact your desired channel with the cable box remote control. When connecting...
... button on the remote control. 2. The TV cannot display TV programming unless a TV tuner device or cable TV converter box is connected to external equipment, match the jack colors (Video = yellow, Audio Left = white, and Audio Right = red). Select 3 or 4 with channel switch on cable box. 3. Select channels at the cable box or with the remote control for cable box. Select the input source by using the TV/AV button on the remote control. 3. For further information regarding cable TV service, contact your desired channel with the cable box remote control. When connecting...
User Manual
Page 16
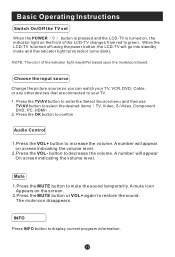
... the LCD-TV is turned off using the power button, the LCD-TV will appear On screen indicating the volume level. INFO Press INFO button to select the desired items TV, Video, S-Video, Component DVD, PC, HDMI . 2. Press the TV/AV button to enter the Select Source menu and then use TV/AV button to display current program information. A number will go into standby mode and the indicator light turns red(or turns dark). Choose the input source Change the picture...
... the LCD-TV is turned off using the power button, the LCD-TV will appear On screen indicating the volume level. INFO Press INFO button to select the desired items TV, Video, S-Video, Component DVD, PC, HDMI . 2. Press the TV/AV button to enter the Select Source menu and then use TV/AV button to display current program information. A number will go into standby mode and the indicator light turns red(or turns dark). Choose the input source Change the picture...

User Manual
Page 17
... you can use the number buttons and button on the remote control to directly select TV channels and press OK to confirm. ARC button Press to look over. For desired mode as follows: Mild Standard Vivid Custom Audio Mode Press S.MODE button on the remote control for you to select the aspect ratio among Full Screen, Normal, Wide, Zoom and Cinema. (Display mode may differ from different inputs) to select information for menu display . Basic Operating Instructions Select the TV Channel You...
... you can use the number buttons and button on the remote control to directly select TV channels and press OK to confirm. ARC button Press to look over. For desired mode as follows: Mild Standard Vivid Custom Audio Mode Press S.MODE button on the remote control for you to select the aspect ratio among Full Screen, Normal, Wide, Zoom and Cinema. (Display mode may differ from different inputs) to select information for menu display . Basic Operating Instructions Select the TV Channel You...
User Manual
Page 19
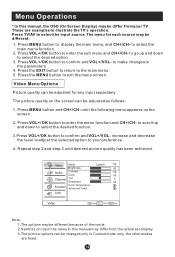
... make changes to confirm and VOL+/VOL- Press the EXIT button to return to display the main menu, and CH+/CH- Video Mode Brightness Custom 50 Audio Contrast 50 Color 50 Channel Tint 0 Sharpness 50 Color Temperature Function Advanced Video Lock Video OK Adjust CH+/- Press MENU button to the main menu. 5. Video Menu Options Picture quality can be different because of the inputs. 2.Symbols on the screen. 2. until desired picture quality has...
... make changes to confirm and VOL+/VOL- Press the EXIT button to return to display the main menu, and CH+/CH- Video Mode Brightness Custom 50 Audio Contrast 50 Color 50 Channel Tint 0 Sharpness 50 Color Temperature Function Advanced Video Lock Video OK Adjust CH+/- Press MENU button to the main menu. 5. Video Menu Options Picture quality can be different because of the inputs. 2.Symbols on the screen. 2. until desired picture quality has...
User Manual
Page 23
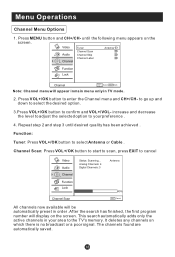
... Cable . This search automatically adds only the active channels in TV mode. 2. to go up and down to select the desired option . 3.Press VOL+/OK button to the TV's memory. Video Audio Channel Tuner Channel Scan Channel Skip Channel Label Antenna Function Lock Channel CH+/- The channels found are automatically saved. Repeat step 2 and step 3 until the following menu appears on which there is no broadcast or a poor signal. Analog Channels: 4 Digital Channels: 3 Channel Scan Antenna...
... Cable . This search automatically adds only the active channels in TV mode. 2. to go up and down to select the desired option . 3.Press VOL+/OK button to the TV's memory. Video Audio Channel Tuner Channel Scan Channel Skip Channel Label Antenna Function Lock Channel CH+/- The channels found are automatically saved. Repeat step 2 and step 3 until the following menu appears on which there is no broadcast or a poor signal. Analog Channels: 4 Digital Channels: 3 Channel Scan Antenna...
User Manual
Page 26
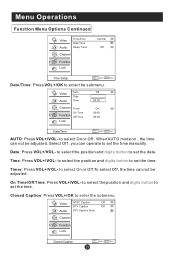
... adjusted. When AUTO mode on , the time can operate to set the time manually. On Time/Off Time: Press VOL+/VOL- Video Audio Auto Date Time Off 00:00 Channel Timer On Time Function Off Time Lock On 00:00 00:00 Date/Time CH+/- Video NTSC Caption Off DTV Caption Off Audio DTV Caption Style Channel Function Lock Closed Caption CH+/- Select EXIT Back VOL+/- Menu Operations Function Menu Options Continued Video Audio Time Zone Date/Time Sleep Timer Channel Function Lock Central Off Time Setup CH+/- to select the position and digits button to set...
... adjusted. When AUTO mode on , the time can operate to set the time manually. On Time/Off Time: Press VOL+/VOL- Video Audio Auto Date Time Off 00:00 Channel Timer On Time Function Off Time Lock On 00:00 00:00 Date/Time CH+/- Video NTSC Caption Off DTV Caption Off Audio DTV Caption Style Channel Function Lock Closed Caption CH+/- Select EXIT Back VOL+/- Menu Operations Function Menu Options Continued Video Audio Time Zone Date/Time Sleep Timer Channel Function Lock Central Off Time Setup CH+/- to select the position and digits button to set...

User Manual
Page 27
... translation of Default and Custom. Video Style Size Audio Text Color Text Opacity Channel BG Color BG Opacity Function Window Color Lock Window Opacity Custom Large White Solid Black Solid Black Solid DTV Caption Style CH+/- to select the Closed Caption options. to select a background color. to CC4: For other language that may be on the screen when this option is turned on broadcasters supplying the signal. CC1: When CC1is displayed on...
... translation of Default and Custom. Video Style Size Audio Text Color Text Opacity Channel BG Color BG Opacity Function Window Color Lock Window Opacity Custom Large White Solid Black Solid Black Solid DTV Caption Style CH+/- to select the Closed Caption options. to select a background color. to CC4: For other language that may be on the screen when this option is turned on broadcasters supplying the signal. CC1: When CC1is displayed on...
User Manual
Page 28
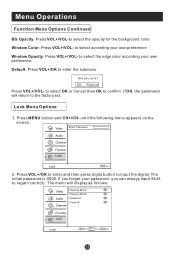
... press digits button to confirm. If you forget your password, you sure? Lock Menu Options 1. Are you can always input 9443 to the factory set. The menu will return to regain control) . Default: Press VOL+/OK to select the opacity for the background color. If OK, the parameter will display as follows: Video Channel Block Program Block Audio Password Clean All Channel Function Lock Lock OK Enter CH+/- Enter Password Video Audio Channel Function Lock Lock EXIT Back 2. Select...
... press digits button to confirm. If you forget your password, you sure? Lock Menu Options 1. Are you can always input 9443 to the factory set. The menu will return to regain control) . Default: Press VOL+/OK to select the opacity for the background color. If OK, the parameter will display as follows: Video Channel Block Program Block Audio Password Clean All Channel Function Lock Lock OK Enter CH+/- Enter Password Video Audio Channel Function Lock Lock EXIT Back 2. Select...
User Manual
Page 36
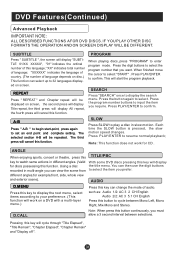
... "PROGRAM" to select. Press the program number buttons to 32 languages displayed on screen. SLOW Press SLOW to play a disc in multi-angle you can view the scene from to cycle between selections. D.CALL Note: When press this language; Press the button again to enter program mode. DVD Features(Continued) Advanced Playback IMPORTANT NOTE: ALL DESCRIBED FUNCTIONS AFOR DVD DISCS. IF YOU PLAY OTHER DISC FORMATS THE OPERATION...
... "PROGRAM" to select. Press the program number buttons to 32 languages displayed on screen. SLOW Press SLOW to play a disc in multi-angle you can view the scene from to cycle between selections. D.CALL Note: When press this language; Press the button again to enter program mode. DVD Features(Continued) Advanced Playback IMPORTANT NOTE: ALL DESCRIBED FUNCTIONS AFOR DVD DISCS. IF YOU PLAY OTHER DISC FORMATS THE OPERATION...
User Manual
Page 41
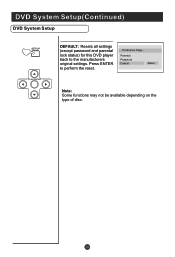
DVD System Setup(Continued) DVD System Setup SETUP PLAY/ENTER DEFAULT: Resets all settings (except password and parental lock status) for this DVD player back to perform the reset. ..Preference Page.. Parental Password Default Reset Note: Some functions may not be available depending on the type of disc. Press ENTER to the manufacturers original settings.
DVD System Setup(Continued) DVD System Setup SETUP PLAY/ENTER DEFAULT: Resets all settings (except password and parental lock status) for this DVD player back to perform the reset. ..Preference Page.. Parental Password Default Reset Note: Some functions may not be available depending on the type of disc. Press ENTER to the manufacturers original settings.
User Manual
Page 44
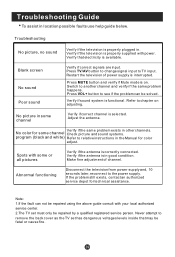
... color for some or all pictures Verify if the antenna is on adjusting. Abnormal functioning Disconnect the television from power supply and, 10 seconds later, reconnect to TV input. Note: 1.If the fault can be repaired by a qualified registered service person. Blank screen No sound Poor sound Verify if correct signals are input. Spots with some channel Check picture and sound systems. program (black and white) Refer to relative instructions in...
... color for some or all pictures Verify if the antenna is on adjusting. Abnormal functioning Disconnect the television from power supply and, 10 seconds later, reconnect to TV input. Note: 1.If the fault can be repaired by a qualified registered service person. Blank screen No sound Poor sound Verify if correct signals are input. Spots with some channel Check picture and sound systems. program (black and white) Refer to relative instructions in...

User Manual
Page 45
Dimensions quoted in this manual are subject to change without DVD 19 with DVD 22 NTSC, ATSC, Clear QAM 1.5W+1.5W AV input PC input S-VIDEO input PC audio input YPbPr input Antenna input Power requirements ~120V 60Hz Power consumption 50W Temperature Humidity Accessories 60W 80W Working:+5 ~+35 Storage:-15 ~+45 Working:20% ~ 80% Storage: 5% ~ 90% Remote control Batteries User manual 70W NOTE Design and specifications are approximate. Specifications Model Picture, sound system Audio output External input port 15 19 without notice.
Dimensions quoted in this manual are subject to change without DVD 19 with DVD 22 NTSC, ATSC, Clear QAM 1.5W+1.5W AV input PC input S-VIDEO input PC audio input YPbPr input Antenna input Power requirements ~120V 60Hz Power consumption 50W Temperature Humidity Accessories 60W 80W Working:+5 ~+35 Storage:-15 ~+45 Working:20% ~ 80% Storage: 5% ~ 90% Remote control Batteries User manual 70W NOTE Design and specifications are approximate. Specifications Model Picture, sound system Audio output External input port 15 19 without notice.


