
User Manual
Page 2
... triangle is intended to alert the user to constitute a risk of important operating and maintenance (servicing) instructions in the operating instructions unless you are for use by qualified service personnel only. Warning CAUTION RISK ELECTRIC SHOCK DO NOT OPEN ! CAUTION: TO REDUCE THE RISK OF ELECTRIC SHOCK, DO NOT REMOVE COVER (OR BACK). NO USER SERVICEABLE PARTS INSIDE. WARNING: TO PREVENT FIRE...
... triangle is intended to alert the user to constitute a risk of important operating and maintenance (servicing) instructions in the operating instructions unless you are for use by qualified service personnel only. Warning CAUTION RISK ELECTRIC SHOCK DO NOT OPEN ! CAUTION: TO REDUCE THE RISK OF ELECTRIC SHOCK, DO NOT REMOVE COVER (OR BACK). NO USER SERVICEABLE PARTS INSIDE. WARNING: TO PREVENT FIRE...

User Manual
Page 4
... audio status 23 SAP Broadcasts Setup 24 Time Menu Date /Time setting 24 Time zone setting 25 Sleep Timer setting 25 Timer on setting 26 Timer off setting 26 Function Menu Menu Language 26 DTV Caption Style 27 OSD Timeout 28 OSD Transparency 28 DNR 28 Adjust Menu Screen Setup for Component or PC mode 28 Lock Menu Parental Control rating and categories 29 Lock setup 30 Other Functions Br ie f In fo 32 Quick program view 32 Aspect Ratio Control 33 CC (Closed Caption Display 33 Remote Control Setting up your remote control 34 Remote Control Codes...
... audio status 23 SAP Broadcasts Setup 24 Time Menu Date /Time setting 24 Time zone setting 25 Sleep Timer setting 25 Timer on setting 26 Timer off setting 26 Function Menu Menu Language 26 DTV Caption Style 27 OSD Timeout 28 OSD Transparency 28 DNR 28 Adjust Menu Screen Setup for Component or PC mode 28 Lock Menu Parental Control rating and categories 29 Lock setup 30 Other Functions Br ie f In fo 32 Quick program view 32 Aspect Ratio Control 33 CC (Closed Caption Display 33 Remote Control Setting up your remote control 34 Remote Control Codes...
User Manual
Page 6
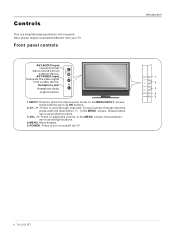
... hear stereo sound from an external device. Front panel controls Introduction AV3 AUDIO Input connect to scan through channels, press and hold down buttons. 3.VOL -/+: Press to adjust the volume .In the MENU screen, these buttons serve as left/right buttons. 4.MENU: Menu display. 5.POWER: Press to show the input source mode. Controls This is a simplified representation of front panel. Here shown may be somewhat different from a video device. MENU 4 POWER 5 6 TV LCD-TFT AV3 VIDEO Input Connects the video signal from your...
... hear stereo sound from an external device. Front panel controls Introduction AV3 AUDIO Input connect to scan through channels, press and hold down buttons. 3.VOL -/+: Press to adjust the volume .In the MENU screen, these buttons serve as left/right buttons. 4.MENU: Menu display. 5.POWER: Press to show the input source mode. Controls This is a simplified representation of front panel. Here shown may be somewhat different from a video device. MENU 4 POWER 5 6 TV LCD-TFT AV3 VIDEO Input Connects the video signal from your...

User Manual
Page 7
...supplied power cord. Note: In standby mode, these ports will not work. 3 S-Video Input Video input for external device with S-Video output. 4 Antenna Input Connect cable or antenna signals to the TV, either directly or through your cable box. 5 HDMI Connect DVD, Set Top Box, PVR etc.,.Supporting HDMI connection. 6 RGB Connect the monitor output connector from a PC to the jack 7 Component Connect a component video device to these jacks. 8 PC/DVI Audio Input DVI audio in for connecting DVI(Source)-HDMI(TV) or PC audio in. 9 COMPONENT AUDIO Input Audio input for external audio devices. Owner...
...supplied power cord. Note: In standby mode, these ports will not work. 3 S-Video Input Video input for external device with S-Video output. 4 Antenna Input Connect cable or antenna signals to the TV, either directly or through your cable box. 5 HDMI Connect DVD, Set Top Box, PVR etc.,.Supporting HDMI connection. 6 RGB Connect the monitor output connector from a PC to the jack 7 Component Connect a component video device to these jacks. 8 PC/DVI Audio Input DVI audio in for connecting DVI(Source)-HDMI(TV) or PC audio in. 9 COMPONENT AUDIO Input Audio input for external audio devices. Owner...
User Manual
Page 8
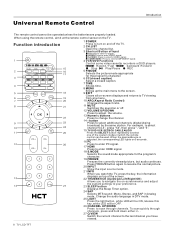
... select additional channels (digital )being broadcast by the same station. Function introduction CH.LIST HDMI SELECT PC TV VIDEO S-VIDEO COMPONENT P.MODE CC TIME ENU S.MODE FREEZE NPUT INFO OK ARC SAP SLEEP EXIT VOL+ CH+ VOL- To scan quickly through channels. S-VIDEO: Press to enter VIDEO signal; For example, to select channel"54-3", press "54", then press "-" and "3". 15 TV DVD VCR SETBOX CABLE AUDIO Press the SELECT button repeatedly to your preference. 23 SLEEP button Displays the Sleep Timer option. 24 SAP Selects MTS sound...
... select additional channels (digital )being broadcast by the same station. Function introduction CH.LIST HDMI SELECT PC TV VIDEO S-VIDEO COMPONENT P.MODE CC TIME ENU S.MODE FREEZE NPUT INFO OK ARC SAP SLEEP EXIT VOL+ CH+ VOL- To scan quickly through channels. S-VIDEO: Press to enter VIDEO signal; For example, to select channel"54-3", press "54", then press "-" and "3". 15 TV DVD VCR SETBOX CABLE AUDIO Press the SELECT button repeatedly to your preference. 23 SLEEP button Displays the Sleep Timer option. 24 SAP Selects MTS sound...

User Manual
Page 11
... jacks on the TV and connect the DVD audio outputs to the component input ports as shown in the figure. 2. If your DVD player does not have component video output, use 1. Note If your DVD only has an S-VIDEO output jack, connect this to use S-Video. How to the S-VIDEO input on the TV. Component Input ports To get better picture quality, connect a DVD player to the Y Pb Pr Audio IN jacks on the remote control. 2. Video Game Set COMPONENT IN Pr PC/DVI AUDIO IN OPTICAL Pr AUDIO L R L R Video Video AV IN L R L R S-VIDEO or DVD Owner s Manual...
... jacks on the TV and connect the DVD audio outputs to the component input ports as shown in the figure. 2. If your DVD player does not have component video output, use 1. Note If your DVD only has an S-VIDEO output jack, connect this to use S-Video. How to the S-VIDEO input on the TV. Component Input ports To get better picture quality, connect a DVD player to the Y Pb Pr Audio IN jacks on the remote control. 2. Video Game Set COMPONENT IN Pr PC/DVI AUDIO IN OPTICAL Pr AUDIO L R L R Video Video AV IN L R L R S-VIDEO or DVD Owner s Manual...

User Manual
Page 12
... or speakers, please turn the speakers off. Then, make the corresponding audio connections. Turn on the digital set-top box. (Refer to the owner`s manual for video connections, depending on the remote control to the digital audio (optical) input on the audio equipment. How to use 1. OPTICAL AUDIO L R L R 12 TV LCD-TFT This TV supports HDCP (High-bandwidth Digital Contents Protection) protocol for operation. How to connect 1. HDMI/DVI IN 2 PC IN VIDEO Y Pb Y Pb COMPONENT IN Pr PC/DVI AUDIO IN OPTICAL Pr L AUDIO R L R L R Signal 480i...
... or speakers, please turn the speakers off. Then, make the corresponding audio connections. Turn on the digital set-top box. (Refer to the owner`s manual for video connections, depending on the remote control to the digital audio (optical) input on the audio equipment. How to use 1. OPTICAL AUDIO L R L R 12 TV LCD-TFT This TV supports HDCP (High-bandwidth Digital Contents Protection) protocol for operation. How to connect 1. HDMI/DVI IN 2 PC IN VIDEO Y Pb Y Pb COMPONENT IN Pr PC/DVI AUDIO IN OPTICAL Pr L AUDIO R L R L R Signal 480i...
User Manual
Page 13
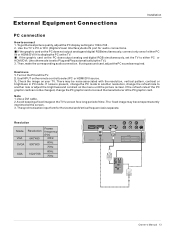
... resolution, change thePC graphiccard orconsult themanufacturer ofthe PCgraphic card. Ifusing asound card,adjust thePC soundas required. Check the image on your TV. Note 1.Use a DVI cable. 2.Avoid keepinga fixed imageon theTV's screen fora long periodof time.The fixed image may be noise associated with the resolution, vertical pattern, contrast or brightness in PC mode. External Equipment Connections Installation PC connection How toconnect 1. To get the best picture quality, adjust the PC display settings...
... resolution, change thePC graphiccard orconsult themanufacturer ofthe PCgraphic card. Ifusing asound card,adjust thePC soundas required. Check the image on your TV. Note 1.Use a DVI cable. 2.Avoid keepinga fixed imageon theTV's screen fora long periodof time.The fixed image may be noise associated with the resolution, vertical pattern, contrast or brightness in PC mode. External Equipment Connections Installation PC connection How toconnect 1. To get the best picture quality, adjust the PC display settings...
User Manual
Page 14
... not support Auto HDMI, you need to select HDMI input source in input source option of this product). 2. When the source device(DVD player or Set Top Box) supports DVI How To Connect 1. Press the INPUT button to set to -DVI cable(not supplied with a HDMI-to 1280x720p. Connect the source device to HDMI port of Select Main source menu. HDMI Installation When the source device(DVD player or Set Top Box) supports HDMI How To Connect 1. How To Use If the source device supports Auto HDMI function, the output resolution of Select...
... not support Auto HDMI, you need to select HDMI input source in input source option of this product). 2. When the source device(DVD player or Set Top Box) supports DVI How To Connect 1. Press the INPUT button to set to -DVI cable(not supplied with a HDMI-to 1280x720p. Connect the source device to HDMI port of Select Main source menu. HDMI Installation When the source device(DVD player or Set Top Box) supports HDMI How To Connect 1. How To Use If the source device supports Auto HDMI function, the output resolution of Select...
User Manual
Page 18
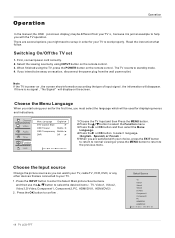
... select language. Select Source TV Video1 Video2 Video3 S-Video Component1 Component2 PC HDMI/DVI1 HDMI/DVI2 Move OK: Select EXIT/ INPUT: Exit 18 TV LCD-TFT Operation Operation In the manual, the OSD (on screen display) may be different from the wall power outlet. There are satisfied with the TV operation. Read the instructions that are connected to standby mode. 4. Select the viewing source by using the TV, press the POWER button on the remote control...
... select language. Select Source TV Video1 Video2 Video3 S-Video Component1 Component2 PC HDMI/DVI1 HDMI/DVI2 Move OK: Select EXIT/ INPUT: Exit 18 TV LCD-TFT Operation Operation In the manual, the OSD (on screen display) may be different from the wall power outlet. There are satisfied with the TV operation. Read the instructions that are connected to standby mode. 4. Select the viewing source by using the TV, press the POWER button on the remote control...

User Manual
Page 19
... area. Owner s Manual 19 Channel Video Audio Time Function Lock Tuner Antenna Auto Scan Add Channel Scan Rename Move /OK: Select /EXIT/ MENU: Exit Auto Scan NTSC Channel 55 Analog channels 19 Digital Channels 0 Progress(%)64 Note When Antenna is selected, the TV will detect cable company supplied signals and will be only operated in memory on the TV set to set channel is explained. Note The Channel menu will search for ATSC or QAM program. Automatic Scan Automatically finds all channels available through antenna or cable inputs, and...
... area. Owner s Manual 19 Channel Video Audio Time Function Lock Tuner Antenna Auto Scan Add Channel Scan Rename Move /OK: Select /EXIT/ MENU: Exit Auto Scan NTSC Channel 55 Analog channels 19 Digital Channels 0 Progress(%)64 Note When Antenna is selected, the TV will detect cable company supplied signals and will be only operated in memory on the TV set to set channel is explained. Note The Channel menu will search for ATSC or QAM program. Automatic Scan Automatically finds all channels available through antenna or cable inputs, and...
User Manual
Page 22
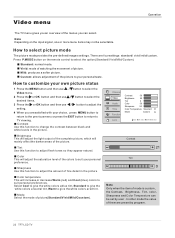
... 50 Color Temperature Standard Mode Custom Lock Move /OK: Select /EXIT/ MENU: Exit Brightness This will adjust the light output of the complete picture, which will mainly affect the darker areas of picture. Select Cool to give the white colors a blue tint, Standard to give the white colors a red tint. Press P.MODE button on the input signal, one or more menu items may not be set by program . 22 TFT-LCD TV...
... 50 Color Temperature Standard Mode Custom Lock Move /OK: Select /EXIT/ MENU: Exit Brightness This will adjust the light output of the complete picture, which will mainly affect the darker areas of picture. Select Cool to give the white colors a blue tint, Standard to give the white colors a red tint. Press P.MODE button on the input signal, one or more menu items may not be set by program . 22 TFT-LCD TV...
User Manual
Page 23
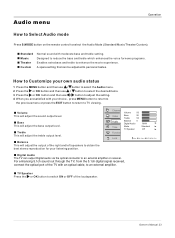
... enhances the voice for your choice, press MENU button to return to the previous menu or press the EXIT button to return to enhance the movie experience. Standard Music Theater Custom Normal sound with an optical cable, to select the Audio Mode (Standard/Music/Theater/Custom). Owner s Manual 23 Bass This will adjust the sound output level. Audio menu Operation How to Select Audio mode Press S.MODE button on the remote control to an external amplifier.
... enhances the voice for your choice, press MENU button to return to the previous menu or press the EXIT button to return to enhance the movie experience. Standard Music Theater Custom Normal sound with an optical cable, to select the Audio Mode (Standard/Music/Theater/Custom). Owner s Manual 23 Bass This will adjust the sound output level. Audio menu Operation How to Select Audio mode Press S.MODE button on the remote control to an external amplifier.
User Manual
Page 28
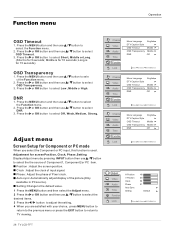
... adjust display of input signal. Press the MENU button and then use / button to sele ct the Function menu. 2. Press the or OK button to select the Function menu. 2. Press the MENU button and then use / button to select the desired items. 3 Press the / button to TV viewing. 28 TV LCD-TFT Channel Video Audio Time Function Lock Menu Language English DTV Caption Style OSD Timeout Middle OSD Transparency Middle DNR Off Move /OK: Select /EXIT/ MENU: Exit Channel Video Audio Time Function Lock Menu Language English...
... adjust display of input signal. Press the MENU button and then use / button to sele ct the Function menu. 2. Press the or OK button to select the Function menu. 2. Press the MENU button and then use / button to select the desired items. 3 Press the / button to TV viewing. 28 TV LCD-TFT Channel Video Audio Time Function Lock Menu Language English DTV Caption Style OSD Timeout Middle OSD Transparency Middle DNR Off Move /OK: Select /EXIT/ MENU: Exit Channel Video Audio Time Function Lock Menu Language English...

User Manual
Page 29
... blocked. The Parental Control Function is to allow all programs) G (General audience) PG (Parental guidance suggested ) (Parents strongly cautioned) (Mature audience only) TV Rating Children: ALL (Age) FV (Fantasy Violence) (applies to TV-Y, TV-Y7) (applies to block specific channels, ratings and other viewing sources. Most television programs and television movies can be viewed. Lock Menu Operation Parental Control can be blocked. 2. The default setting is used to TV-Y7...
... blocked. The Parental Control Function is to allow all programs) G (General audience) PG (Parental guidance suggested ) (Parents strongly cautioned) (Mature audience only) TV Rating Children: ALL (Age) FV (Fantasy Violence) (applies to TV-Y, TV-Y7) (applies to block specific channels, ratings and other viewing sources. Most television programs and television movies can be viewed. Lock Menu Operation Parental Control can be blocked. 2. The default setting is used to TV-Y7...
User Manual
Page 30
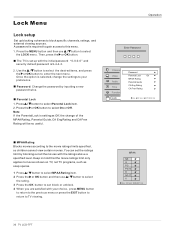
... LCD-TFT Password: Change the password by blocking out all the movies with your preference. Press / button to the movie ratings limits specified, so children cannot view certain movies. Operation Enter Password Channel Video Audio Time Function Lock Password Parental Lock On MPAA Rating Parental Guide CA Eng Rating CA Fren Rating Move /OK: Select /EXIT/ MENU: Exit MPAA Rating Blocks movies according to select Parental Lock item. 2. Press the MENU button and then use / button to select...
... LCD-TFT Password: Change the password by blocking out all the movies with your preference. Press / button to the movie ratings limits specified, so children cannot view certain movies. Operation Enter Password Channel Video Audio Time Function Lock Password Parental Lock On MPAA Rating Parental Guide CA Eng Rating CA Fren Rating Move /OK: Select /EXIT/ MENU: Exit MPAA Rating Blocks movies according to select Parental Lock item. 2. Press the MENU button and then use / button to select...
User Manual
Page 33
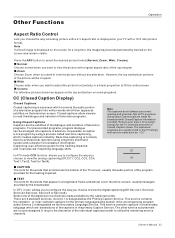
... of television programs. For prerecorded programs, program dialogue can also aid in the accompanying program audio.Service 2 is designated as subtitles on the screen and remain visible. It is designated as CC . Other Functions Operation Aspect Ratio Control Lets you choose the way an analog picture with a 4:3 aspect ratio is displayed on your area`s TV program listings for the TV channels and times of Closed Caption shows. Closed captions allow viewers to fill the entire screen. Captioning is...
... of television programs. For prerecorded programs, program dialogue can also aid in the accompanying program audio.Service 2 is designated as subtitles on the screen and remain visible. It is designated as CC . Other Functions Operation Aspect Ratio Control Lets you choose the way an analog picture with a 4:3 aspect ratio is displayed on your area`s TV program listings for the TV channels and times of Closed Caption shows. Closed captions allow viewers to fill the entire screen. Captioning is...

User Manual
Page 34
..., default Haier code set . If operation can operate in manually scan mode. 4. b) Return to save current 3-digits code and exiting manually programming mode. If user's input is in six different modes: TV, DVD, VCR, SETBOX , CABLE or AUDIO. And then keep twice per seconds, indicating that code manually into the Control. Within 10 seconds, user should enter the 3-digit brand code corresponding to step 3 and re-program the device. 6. Press and holding OK key, press SELECT key, and device LED...
..., default Haier code set . If operation can operate in manually scan mode. 4. b) Return to save current 3-digits code and exiting manually programming mode. If user's input is in six different modes: TV, DVD, VCR, SETBOX , CABLE or AUDIO. And then keep twice per seconds, indicating that code manually into the Control. Within 10 seconds, user should enter the 3-digit brand code corresponding to step 3 and re-program the device. 6. Press and holding OK key, press SELECT key, and device LED...

User Manual
Page 35
... data base, this mode. Digit 0 in 10 seconds or any key other than digit 1, 2, 3. For example, if the second digit of your TV while the control is applicable for all devices and brands that do not use the transport keys for other purposes. Remote Control Operation CH.LIST HDMI SELECT PC TV VIDEO S-VIDEO COMPONENT P.MODE CC TIME ENU S.MODE FREEZE NPUT INFO OK ARC SAP SLEEP EXIT VOL+ CH+ VOL- CH- LED...
... data base, this mode. Digit 0 in 10 seconds or any key other than digit 1, 2, 3. For example, if the second digit of your TV while the control is applicable for all devices and brands that do not use the transport keys for other purposes. Remote Control Operation CH.LIST HDMI SELECT PC TV VIDEO S-VIDEO COMPONENT P.MODE CC TIME ENU S.MODE FREEZE NPUT INFO OK ARC SAP SLEEP EXIT VOL+ CH+ VOL- CH- LED...
User Manual
Page 38
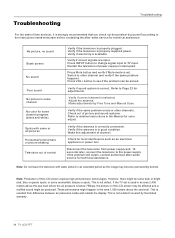
... or picture shaking Television out of control Verify if the television is strongly recommended that you check out the problem by Fine Tune and Manual Scan. Note: Production of channel. Make fine adjustment of the LCD screen requires high and precision technologies. Verify if electricity is not defect. Adjust the antenna. These phenomena might be solved. Press INPUT button to change signal input to Page 23 for some channel program (black...
... or picture shaking Television out of control Verify if the television is strongly recommended that you check out the problem by Fine Tune and Manual Scan. Note: Production of channel. Make fine adjustment of the LCD screen requires high and precision technologies. Verify if electricity is not defect. Adjust the antenna. These phenomena might be solved. Press INPUT button to change signal input to Page 23 for some channel program (black...


