

User Manual
Page 1
HLH15BB/15HL25S/HLE20BB/20AL25S/HLH19BB/HLH19W LCD TV USER MANUAL Please read this manual carefully before using this TV set and keep it for future reference.
HLH15BB/15HL25S/HLE20BB/20AL25S/HLH19BB/HLH19W LCD TV USER MANUAL Please read this manual carefully before using this TV set and keep it for future reference.
User Manual
Page 2
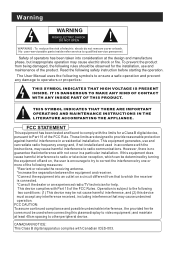
... should be observed for the installation, use and can be not cause harmful interference, and (2) this equipment does cause harmful interference to radio or television reception, which the receiver is no guarantee that may cause undesired operation. No user-serviceable parts inside refer service to other peripheral device. Safety of electric shock do not remove cover or back. Read...
... should be observed for the installation, use and can be not cause harmful interference, and (2) this equipment does cause harmful interference to radio or television reception, which the receiver is no guarantee that may cause undesired operation. No user-serviceable parts inside refer service to other peripheral device. Safety of electric shock do not remove cover or back. Read...
User Manual
Page 3
... touch dangerous voltage point or short out parts that they may expose you are not likely to your home, consult your appliance dealer or local power company. 9)Do not defeat the safety purpose of power source indicated on the AC cord power plug is securely connected. 10)Power cord protection ---Power supply cords should be blocked. Use only with one wider than the other...
... touch dangerous voltage point or short out parts that they may expose you are not likely to your home, consult your appliance dealer or local power company. 9)Do not defeat the safety purpose of power source indicated on the AC cord power plug is securely connected. 10)Power cord protection ---Power supply cords should be blocked. Use only with one wider than the other...
User Manual
Page 5
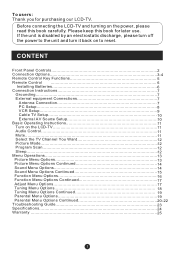
... turn it back on the LCD-TV 11 Audio Control 11 Mute...11 Select the TV Channel You Want 12 Picture Mode 12 Program Scan 12 Sleep...1. 2 Menu Operations 13 Picture Menu Options 13 Picture Menu Options Continued 14 Sound Menu Options 14 Sound Menu Options Continued 15 Function Menu Options 16 Function Menu Options Continued 17 Adjust Menu Options 17 Tuning Menu Options 18 Tuning Menu Options Continued 19 Parental Menu Options 19 Parental Menu Options Continued 20-22 Troubleshooting Guide 23 Specifications...
... turn it back on the LCD-TV 11 Audio Control 11 Mute...11 Select the TV Channel You Want 12 Picture Mode 12 Program Scan 12 Sleep...1. 2 Menu Operations 13 Picture Menu Options 13 Picture Menu Options Continued 14 Sound Menu Options 14 Sound Menu Options Continued 15 Function Menu Options 16 Function Menu Options Continued 17 Adjust Menu Options 17 Tuning Menu Options 18 Tuning Menu Options Continued 19 Parental Menu Options 19 Parental Menu Options Continued 20-22 Troubleshooting Guide 23 Specifications...
User Manual
Page 7
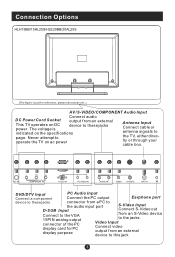
... power Antenna Input Connect cable or antenna signals to these jacks connector from a PC to the audio input port D-SUB Input S-Video Input Connect S-Video out Connect to the VGA 15PIN analog output connector of the PC display card for reference, please see actual unit. ) AV /S-VIDEO/COMPONENT Audio Input DC Power Cord Socket This TV operates on the specifications page. Connection Options HLH15BB/15HL25S/HLE20BB/20AL25S (The figure is Connect audio output from an external device to the TV, either directly or through your cable box...
... power Antenna Input Connect cable or antenna signals to these jacks connector from a PC to the audio input port D-SUB Input S-Video Input Connect S-Video out Connect to the VGA 15PIN analog output connector of the PC display card for reference, please see actual unit. ) AV /S-VIDEO/COMPONENT Audio Input DC Power Cord Socket This TV operates on the specifications page. Connection Options HLH15BB/15HL25S/HLE20BB/20AL25S (The figure is Connect audio output from an external device to the TV, either directly or through your cable box...

User Manual
Page 8
... power supply switch is just for reference, please see the real. DVD/DTV Input Connect a component video/audiodevice to the TV, either directly or through your cable box. Connection Options HLH19BB/HLH19W ANT IN PC AUDIO IN R AUDIO IN L V VIDEO IN S-VIDEO Pr Pb COMPONENT IN Y VGA IN The figure is on the back of a PC display card to use set ) Antenna Input Connect cable or antenna signals to these jacks S-Video Input Connect S-Video out from an external device to these jacks PC Audio Input Connect the audio output...
... power supply switch is just for reference, please see the real. DVD/DTV Input Connect a component video/audiodevice to the TV, either directly or through your cable box. Connection Options HLH19BB/HLH19W ANT IN PC AUDIO IN R AUDIO IN L V VIDEO IN S-VIDEO Pr Pb COMPONENT IN Y VGA IN The figure is on the back of a PC display card to use set ) Antenna Input Connect cable or antenna signals to these jacks S-Video Input Connect S-Video out from an external device to these jacks PC Audio Input Connect the audio output...
User Manual
Page 11
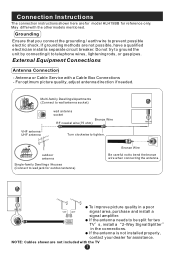
... and install a signal amplifier. Do not try to ground the unit by connecting it to be split for reference only. Antenna or Cable Service with the other models mentioned. If the antenna needs to telephone wires, lightening rods, or gas pipes. May differ with a Cable Box Connections - For optimum picture quality, adjust antenna direction if needed. External Equipment Connections Antenna Connection - outdoor antenna Single-family Dwellings /Houses (Connect to wall jack for assistance. Connection Instructions The connection instructions shown...
... and install a signal amplifier. Do not try to ground the unit by connecting it to be split for reference only. Antenna or Cable Service with the other models mentioned. If the antenna needs to telephone wires, lightening rods, or gas pipes. May differ with a Cable Box Connections - For optimum picture quality, adjust antenna direction if needed. External Equipment Connections Antenna Connection - outdoor antenna Single-family Dwellings /Houses (Connect to wall jack for assistance. Connection Instructions The connection instructions shown...

User Manual
Page 12
... screws on the VGA connectors once they are firmly connected; 4.Turn on the power of the LCD-TV first , and then turn on the power of the PC; 5.Press the TV/AV button to set the video input mode of the LCD-TV to another resolution, change the PC graphic card or consult the manufacturer of the PC graphic card can use steps: 1.Read the user guide supplied with the resolution...
... screws on the VGA connectors once they are firmly connected; 4.Turn on the power of the LCD-TV first , and then turn on the power of the PC; 5.Press the TV/AV button to set the video input mode of the LCD-TV to another resolution, change the PC graphic card or consult the manufacturer of the PC graphic card can use steps: 1.Read the user guide supplied with the resolution...
User Manual
Page 13
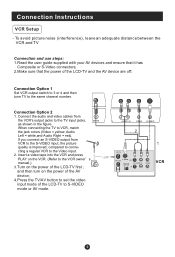
.../AV button to set the video input mode of the LCD-TV to VCR, match the jack colors (Video = yellow, Audio Left = white,and Audio Right = red). and then turn on the power of the LCD-TV and the AV device are off; When connecting the TV to S-VIDEO mode or AV mode. To avoid picture noise (interference), leave an adequate distance between the VCR and TV Connection and use steps: 1.Read the user guide supplied with...
.../AV button to set the video input mode of the LCD-TV to VCR, match the jack colors (Video = yellow, Audio Left = white,and Audio Right = red). and then turn on the power of the LCD-TV and the AV device are off; When connecting the TV to S-VIDEO mode or AV mode. To avoid picture noise (interference), leave an adequate distance between the VCR and TV Connection and use steps: 1.Read the user guide supplied with...
User Manual
Page 14
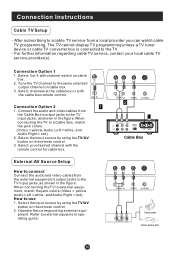
... same selected output channel on the remote control. 3. Operate the corresponding external equi- Select 3 or 4 with the remote control for cable box. Select your local cable TV service provider(s). How to the TV. - pment. The TV cannot display TV programming unless a TV tuner device or cable TV converter box is connected to use 1. Select the input source by using the TV/AV button on cable box. 3. Refer to a Cable Box, match the jack colors (Video = yellow, Audio Left = white, and Audio Right = red). 2. Connect the audio and video cables from...
... same selected output channel on the remote control. 3. Operate the corresponding external equi- Select 3 or 4 with the remote control for cable box. Select your local cable TV service provider(s). How to the TV. - pment. The TV cannot display TV programming unless a TV tuner device or cable TV converter box is connected to use 1. Select the input source by using the TV/AV button on cable box. 3. Refer to a Cable Box, match the jack colors (Video = yellow, Audio Left = white, and Audio Right = red). 2. Connect the audio and video cables from...
User Manual
Page 15
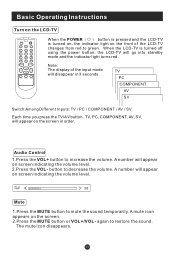
... the LCD-TV is turned on, the indicator light on screen indicating the volume level. 30 Mute 1.Press the MUTE button to increase the volume. VOL + CCD SLEEP SCAN When the POWER button is pressed and the LCD-TV is turned off using the power button, the LCD-TV will appear on the front of the input mode will disappear in order. A number will go into standby mode and the indicator light turns red.
... the LCD-TV is turned on, the indicator light on screen indicating the volume level. 30 Mute 1.Press the MUTE button to increase the volume. VOL + CCD SLEEP SCAN When the POWER button is pressed and the LCD-TV is turned off using the power button, the LCD-TV will appear on the front of the input mode will disappear in order. A number will go into standby mode and the indicator light turns red.
User Manual
Page 16
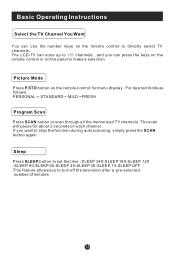
... auto scanning, simply press the SCAN button again . Basic Operating Instructions Select the TV Channel You Want You can press the keys on the remote control or on the panel to make a selection. For desired mode as follows: PERSONAL STANDARD MILD FRESH Program Scan Press SCAN button to directly select TV channels. The LCD-TV can store up to 181 channels , and you can use the number keys on each channel . Picture Mode Press P.STD button on the remote control...
... auto scanning, simply press the SCAN button again . Basic Operating Instructions Select the TV Channel You Want You can press the keys on the remote control or on the panel to make a selection. For desired mode as follows: PERSONAL STANDARD MILD FRESH Program Scan Press SCAN button to directly select TV channels. The LCD-TV can store up to 181 channels , and you can use the number keys on each channel . Picture Mode Press P.STD button on the remote control...
User Manual
Page 17
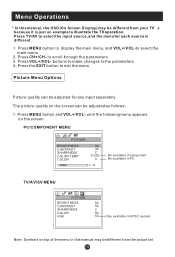
buttons to make changes to scroll through the parameters 3. Press the EXIT button to exit the menu Picture Menu Options Picture quality can be adjusted for each source is just an example to illustrate the TV operation. The picture quality on the screen can be adjusted as follows: 1. PC/COMPONENT MENU PICTURE BRIGHTNESS CONTRAST SHARPNESS COLOR TEMP COLOR 30 30 2 COOL 0 30 No available in component No available in...
buttons to make changes to scroll through the parameters 3. Press the EXIT button to exit the menu Picture Menu Options Picture quality can be adjusted for each source is just an example to illustrate the TV operation. The picture quality on the screen can be adjusted as follows: 1. PC/COMPONENT MENU PICTURE BRIGHTNESS CONTRAST SHARPNESS COLOR TEMP COLOR 30 30 2 COOL 0 30 No available in component No available in...

User Manual
Page 18
...). Appear and be adjusted for any input as the number increase. Press MENU and VOL+/VOL- button to enter the picture menu and to go up and down to your preference . 4. Repeat step 2 and step 3 until the following menu appears on the screen SOUND VOLUME BALANCE BASS TREBLE AUDIO MODE AVL 50 0 30 70 VOICE OFF COLOR : Press VOL+/VOL- button to increase and decrease...
...). Appear and be adjusted for any input as the number increase. Press MENU and VOL+/VOL- button to enter the picture menu and to go up and down to your preference . 4. Repeat step 2 and step 3 until the following menu appears on the screen SOUND VOLUME BALANCE BASS TREBLE AUDIO MODE AVL 50 0 30 70 VOICE OFF COLOR : Press VOL+/VOL- button to increase and decrease...
User Manual
Page 20
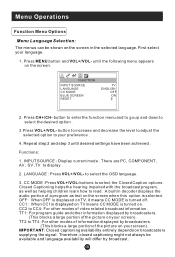
... Closed Caption options. CC MODE :Press VOL+/VOL-buttons to select the desired option . 3.Press VOL+/VOL- There are PC, COMPONENT , AV , SV ,TV to select the OSD language. 3. TT1: For program guide and other modes of the picture on the screen in decoder displays the audio portion of the picture on the screen when this option is selected. button to increase and decrease the level to adjust the selected...
... Closed Caption options. CC MODE :Press VOL+/VOL-buttons to select the desired option . 3.Press VOL+/VOL- There are PC, COMPONENT , AV , SV ,TV to select the OSD language. 3. TT1: For program guide and other modes of the picture on the screen in decoder displays the audio portion of the picture on the screen when this option is selected. button to increase and decrease the level to adjust the selected...

User Manual
Page 22
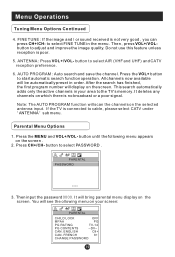
... select ON , and this channel will show the current playing channel. button to increase and decrease the level to adjust the selected option to select the channel . The display will be skipped next time when you press CH+/CH- . You can press the digit buttons to your preference . 4.Repeat step 2 and step 3 until the following menu appears on the screen TUNING CHANNEL SKIP AFC FINE TUNE ANTENNA AUTO PROGRAM...
... select ON , and this channel will show the current playing channel. button to increase and decrease the level to adjust the selected option to select the channel . The display will be skipped next time when you press CH+/CH- . You can press the digit buttons to your preference . 4.Repeat step 2 and step 3 until the following menu appears on the screen TUNING CHANNEL SKIP AFC FINE TUNE ANTENNA AUTO PROGRAM...
User Manual
Page 23
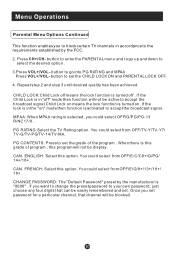
... CH+/CH- FINE TUNE : If the image and / or sound received is no broadcast or a poor signal. Do not use this feature unless reception is connected to cable, please select CATV under ' ANTENNA ' sub menu. Note: The AUTO PROGRAM function will bring parental menu display on the selected antenna input. PARENTAL PASSWORD ---- 3. This search automatically adds only the active channels in your screen: PARENTAL CHILD LOCK OFF MPAA PG PG RATING TV-14...
... CH+/CH- FINE TUNE : If the image and / or sound received is no broadcast or a poor signal. Do not use this feature unless reception is connected to cable, please select CATV under ' ANTENNA ' sub menu. Note: The AUTO PROGRAM function will bring parental menu display on the selected antenna input. PARENTAL PASSWORD ---- 3. This search automatically adds only the active channels in your screen: PARENTAL CHILD LOCK OFF MPAA PG PG RATING TV-14...
User Manual
Page 24
PG CONTENTS: Press to set the CHILD LOCK ON and PARENTAL LOCK OFF. 4. ENGLISH: Select this option. CHANGE PASSWORD: The "Default Password" preset by the FCC. 2. If the lock is in the "on" mode then function is "0000" . MPAA: When MPAA rating is turned on means the lock function is selected, you could select from OFF/E/C/C8+/G/PG/ 14+/18+ . CAN. If the Child Lock is in "off...
PG CONTENTS: Press to set the CHILD LOCK ON and PARENTAL LOCK OFF. 4. ENGLISH: Select this option. CHANGE PASSWORD: The "Default Password" preset by the FCC. 2. If the lock is in the "on" mode then function is "0000" . MPAA: When MPAA rating is turned on means the lock function is selected, you could select from OFF/E/C/C8+/G/PG/ 14+/18+ . CAN. If the Child Lock is in "off...
User Manual
Page 27
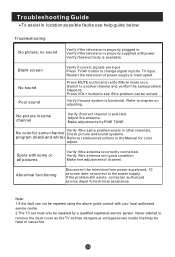
Troubleshooting No picture, no sound Verify if the television is selected. Switch to TV input. No color for some channel Check picture and sound systems. program (black and white) Refer to relative instructions in . Make fine adjustment of power supply is on adjusting. Verify that may be solved. Blank screen No sound Poor sound Verify if correct signals are input. Press VOL+ button to remove the back cover as the TV set must only be repaired by FINE...
Troubleshooting No picture, no sound Verify if the television is selected. Switch to TV input. No color for some channel Check picture and sound systems. program (black and white) Refer to relative instructions in . Make fine adjustment of power supply is on adjusting. Verify that may be solved. Blank screen No sound Poor sound Verify if correct signals are input. Press VOL+ button to remove the back cover as the TV set must only be repaired by FINE...
User Manual
Page 28
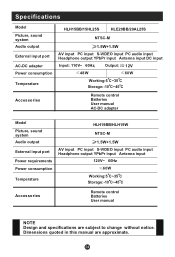
... DC input Input: 110V~ 60Hz, 48W Output: --- 12V 60W Working:5 C~35 C Storage:-10 C~45 C Accessories Remote control Batteries User manual AC-DC adapter Model Picture, sound system Audio output External input port Power requirements Power consumption Temperature HLH19BB/HLH19W NTSC-M 1.5W+1.5W AV input PC input S-VIDEO input PC audio input Headphone output YPbPr input Antenna input 120V~ 60Hz 60W Working:5 C~35 C Storage:-10 C~45 C Accessories Remote control Batteries User manual NOTE Design and specifications are approximate. Dimensions quoted in this manual are subject to change...
... DC input Input: 110V~ 60Hz, 48W Output: --- 12V 60W Working:5 C~35 C Storage:-10 C~45 C Accessories Remote control Batteries User manual AC-DC adapter Model Picture, sound system Audio output External input port Power requirements Power consumption Temperature HLH19BB/HLH19W NTSC-M 1.5W+1.5W AV input PC input S-VIDEO input PC audio input Headphone output YPbPr input Antenna input 120V~ 60Hz 60W Working:5 C~35 C Storage:-10 C~45 C Accessories Remote control Batteries User manual NOTE Design and specifications are approximate. Dimensions quoted in this manual are subject to change...


