
User Manual
Page 1
AUTOMATIC DRUM WASHING MACHINE USER MANUAL HMS1060TVE HMS1060TVEME
AUTOMATIC DRUM WASHING MACHINE USER MANUAL HMS1060TVE HMS1060TVEME
User Manual
Page 2
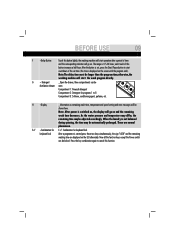
...- 20 BEFORE USE USING THE APPLIANCE MAINTENANCE >COMPONENTS 03 >PREPARATION 04 >SAFETY INSTRUCTIONS 05 >INSTALLATION 06 >CONTROL PANEL 08 >PROGRAM SELECTION 10 >CLEANING & CARE 16 >CONSUMPTION AND TECHNICAL DATA .. 11 >DISPLAY CODES 18 >WASHING METHODS 12 >TROUBLESHOOTING 19 LEGEND Yes No Optional For your safety, any instructions in this manual with this product,please contact your local city office,your household waste disposal service or the...
...- 20 BEFORE USE USING THE APPLIANCE MAINTENANCE >COMPONENTS 03 >PREPARATION 04 >SAFETY INSTRUCTIONS 05 >INSTALLATION 06 >CONTROL PANEL 08 >PROGRAM SELECTION 10 >CLEANING & CARE 16 >CONSUMPTION AND TECHNICAL DATA .. 11 >DISPLAY CODES 18 >WASHING METHODS 12 >TROUBLESHOOTING 19 LEGEND Yes No Optional For your safety, any instructions in this manual with this product,please contact your local city office,your household waste disposal service or the...
User Manual
Page 3
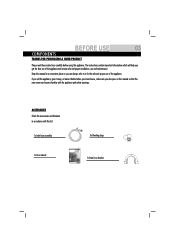
... the appliance and ensure safe and proper installation, use of the appliance. BEFORE USE 03 COMPONENTS THANKS FOR PURCHASING A HAIER PRODUCT Please read these instructions carefully before using this list: 1x Inlet hose assembly 1x User manual 3x Blanking plugs 1x Drain hose bracket The instructions contain important information which will help you also pass on this manual so that the new owner can become familiar with this appliance.
... the appliance and ensure safe and proper installation, use of the appliance. BEFORE USE 03 COMPONENTS THANKS FOR PURCHASING A HAIER PRODUCT Please read these instructions carefully before using this list: 1x Inlet hose assembly 1x User manual 3x Blanking plugs 1x Drain hose bracket The instructions contain important information which will help you also pass on this manual so that the new owner can become familiar with this appliance.
User Manual
Page 4
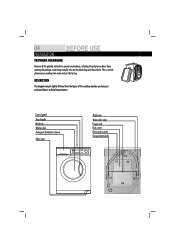
Control panel Door handle Work top Washer door Detergent distribution drawer Filter cover Drain hose Water inlet valve Power cord Back cover Back cover screws Transportation bolts T2 S1 S2 T1 T3 S3 Upon opening the package, water drops may be seen on the plastic bag and the porthole. DESCRIPTION This diagram may be slightly different from water tests in the factory. This is normal phenomenon resulting from the layout of the washing machine you have...
Control panel Door handle Work top Washer door Detergent distribution drawer Filter cover Drain hose Water inlet valve Power cord Back cover Back cover screws Transportation bolts T2 S1 S2 T1 T3 S3 Upon opening the package, water drops may be seen on the plastic bag and the porthole. DESCRIPTION This diagram may be slightly different from water tests in the factory. This is normal phenomenon resulting from the layout of the washing machine you have...
User Manual
Page 5
... plastic and rubber components from being entangled. Open the detergent distribution drawer during the washing process - Force the washer door open shortly after each wash program and switch it off the water supply and refix. Check that the transport bolt are removed. ... Touch or use the washing machine until the hoses are firm and no water can leak. Use flammable detergent or dry cleaning agent. ... Remove or insert the plug in close...
... plastic and rubber components from being entangled. Open the detergent distribution drawer during the washing process - Force the washer door open shortly after each wash program and switch it off the water supply and refix. Check that the transport bolt are removed. ... Touch or use the washing machine until the hoses are firm and no water can leak. Use flammable detergent or dry cleaning agent. ... Remove or insert the plug in close...
User Manual
Page 6
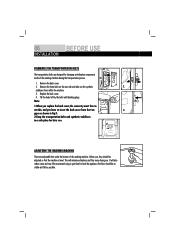
06 BEFORE USE INSTALLATION DISMANTLE THE TRANSPORTATION BOLTS The transportation bolts are adjustable feet under the bottom of the washing machine during use . gaps as possible. It will minimise vibrations and thus noise during the transportation process. 1. We recommend using a spirit level to insert the back cover from within the machine. 3. Replace the back cover. 4. Before use, they should be adjusted so that the machine is level. Note...
06 BEFORE USE INSTALLATION DISMANTLE THE TRANSPORTATION BOLTS The transportation bolts are adjustable feet under the bottom of the washing machine during use . gaps as possible. It will minimise vibrations and thus noise during the transportation process. 1. We recommend using a spirit level to insert the back cover from within the machine. 3. Replace the back cover. 4. Before use, they should be adjusted so that the machine is level. Note...
User Manual
Page 7
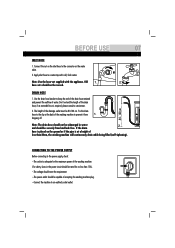
... be rated for the maximum power of the washing machine (For safety, fuses in the power circuit should be submerged in water 2. CONNECTING TO THE POWER SUPPLY Before connecting to the power supply, check: ¬ The socket is at a height of accepting the washing machine plug. ¬ Connect the machine to the clip at the back of water. Note: Use the hose-set supplied with cold, fresh water. Use the drain hose bracket...
... be rated for the maximum power of the washing machine (For safety, fuses in the power circuit should be submerged in water 2. CONNECTING TO THE POWER SUPPLY Before connecting to the power supply, check: ¬ The socket is at a height of accepting the washing machine plug. ¬ Connect the machine to the clip at the back of water. Note: Use the hose-set supplied with cold, fresh water. Use the drain hose bracket...
User Manual
Page 8
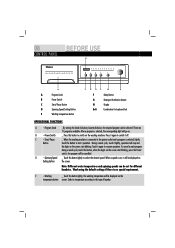
...it again to switch on the washing machine. B ¬ Power Switch _ Press this button lightly, the washing temperature will go on the temperature button screen. E ¬ Washing _ Touch this button to resume operation. 08 BEFORE USE CONTROL PANEL Prewash Cotton Synthetic Wool Cashmere Silk Quick Wash Rinse Spin Drain A Program knob B Power Switch C Start/Pause Button D Spinning Speed Setting Button E Washing temperature button F Delay Button G Detergent distribution drawer H Display E+F: Combination for different laundries. Wash using the default...
...it again to switch on the washing machine. B ¬ Power Switch _ Press this button lightly, the washing temperature will go on the temperature button screen. E ¬ Washing _ Touch this button to resume operation. 08 BEFORE USE CONTROL PANEL Prewash Cotton Synthetic Wool Cashmere Silk Quick Wash Rinse Spin Drain A Program knob B Power Switch C Start/Pause Button D Spinning Speed Setting Button E Washing temperature button F Delay Button G Detergent distribution drawer H Display E+F: Combination for different laundries. Wash using the default...
User Manual
Page 9
...;Display _Information as remaining wash time, temperature and speed setting and error messages will be locked. Now all the function keys except the Power switch can be distribution drawer seen: Compartment 1: Prewash detergent 2 3 1 Compartment 2: Detergent for keyboard lock keyboard lock After a programme is 0.5-24 hours; E+F ¬Combination for E+F: Combination for programs 1 to cancel this button increases a half hour. BEFORE USE 09 F ¬Delay Button Touch this button lightly, the washing machine will start operation...
...;Display _Information as remaining wash time, temperature and speed setting and error messages will be locked. Now all the function keys except the Power switch can be distribution drawer seen: Compartment 1: Prewash detergent 2 3 1 Compartment 2: Detergent for keyboard lock keyboard lock After a programme is 0.5-24 hours; E+F ¬Combination for E+F: Combination for programs 1 to cancel this button increases a half hour. BEFORE USE 09 F ¬Delay Button Touch this button lightly, the washing machine will start operation...
User Manual
Page 10
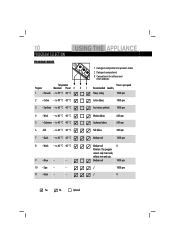
... 7 ¬ Quick - - to 90 °C 40 °C Cotton fabrics 1000 rpm 3 ¬ Synthetic - - to 60 °C 40 °C 9 ¬ Rinse - - - - 10 ¬ Spin - - - - 11 ¬ Drain - - - - to 40 °C 40 °C Medium-soil 1000 rpm 8 ¬ Wash - - to 90 °C 40 °C 2 3 1 31 1 Detergent compartment for prewash mode 2 Detergent compartment 3 Compartment for softener and other additives Preset spin speed Recommended Laundry Heavy...
... 7 ¬ Quick - - to 90 °C 40 °C Cotton fabrics 1000 rpm 3 ¬ Synthetic - - to 60 °C 40 °C 9 ¬ Rinse - - - - 10 ¬ Spin - - - - 11 ¬ Drain - - - - to 40 °C 40 °C Medium-soil 1000 rpm 8 ¬ Wash - - to 90 °C 40 °C 2 3 1 31 1 Detergent compartment for prewash mode 2 Detergent compartment 3 Compartment for softener and other additives Preset spin speed Recommended Laundry Heavy...

User Manual
Page 11
... 60456 test program / Energy label program with Cotton 60°C and 1000rpm spin speed. The actual time used may vary due to different water pressure, initial water temperature, etc. PROGRAM ¬ Prewash ¬ Cotton*) ¬ Cotton ¬ Synthetic ¬ Wool ¬ Cashmere ¬ Silk ¬ Quick ¬ Wash MAX. TECHNICAL DATA HMS1060TVE HMS1060TVEME Power source Max. working current (A) Water pressure (MPa) Nominal load (kg) Spinning speed (r/min) Washing...
... 60456 test program / Energy label program with Cotton 60°C and 1000rpm spin speed. The actual time used may vary due to different water pressure, initial water temperature, etc. PROGRAM ¬ Prewash ¬ Cotton*) ¬ Cotton ¬ Synthetic ¬ Wool ¬ Cashmere ¬ Silk ¬ Quick ¬ Wash MAX. TECHNICAL DATA HMS1060TVE HMS1060TVEME Power source Max. working current (A) Water pressure (MPa) Nominal load (kg) Spinning speed (r/min) Washing...
User Manual
Page 12
... hooks, make sure the buttons are . ¬ Separate white clothes from coloured ones. brooches). Follow the instructions given on tightly and place small items such as bed sheets, bedspreads, etc. ¬ Turn shirts inside out. POWER SUPPLY Connect the washing machine to the power supply (220V to check if they are sewn on the label of fabric such as socks, belts...
... hooks, make sure the buttons are . ¬ Separate white clothes from coloured ones. brooches). Follow the instructions given on tightly and place small items such as bed sheets, bedspreads, etc. ¬ Turn shirts inside out. POWER SUPPLY Connect the washing machine to the power supply (220V to check if they are sewn on the label of fabric such as socks, belts...
User Manual
Page 13
... LOADING THE MACHINE Open the washer door, put the required detergent and softening agent into the corresponding compartments. Note: Do not add more detergent than needed. Special nonfoaming detergent produces good washing results. Please follow the dosage recommendation on the handle of detergent used. Please turn the program knob to prevent the laundry from being tainted by the quality of the detergent distribution drawer. There are instructions on the detergent...
... LOADING THE MACHINE Open the washer door, put the required detergent and softening agent into the corresponding compartments. Note: Do not add more detergent than needed. Special nonfoaming detergent produces good washing results. Please follow the dosage recommendation on the handle of detergent used. Please turn the program knob to prevent the laundry from being tainted by the quality of the detergent distribution drawer. There are instructions on the detergent...
User Manual
Page 14
.... WASHING Press the Start/Pause button. Open the washer door and take out the laundry. Let the door open while not used. Only use higher temperature than 60°C. Follow the dosage recommendation on the detergent package to the preset programs. The washing machine will appear on the "Control panel" pages (08 and 09) for one full wash load. 2. See "Operational functions" on the display. Collect clothes for selecting temperature and spin speed. Modern detergents...
.... WASHING Press the Start/Pause button. Open the washer door and take out the laundry. Let the door open while not used. Only use higher temperature than 60°C. Follow the dosage recommendation on the detergent package to the preset programs. The washing machine will appear on the "Control panel" pages (08 and 09) for one full wash load. 2. See "Operational functions" on the display. Collect clothes for selecting temperature and spin speed. Modern detergents...
User Manual
Page 15
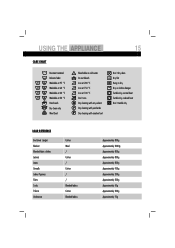
USING THE APPLIANCE 15 CARE CHART Resistant material Delicate fabric Washable at 95 °C Washable at 60 °C Washable at 40 °C Washable at 30 °C Hand wash Dry clean only Wool Seal Bleachable in cold water Do not bleach Iron at 200 °C Iron at 150 °C Iron at 100 °C Don't iron Dry cleaning with any solvent Dry cleaning with...
USING THE APPLIANCE 15 CARE CHART Resistant material Delicate fabric Washable at 95 °C Washable at 60 °C Washable at 40 °C Washable at 30 °C Hand wash Dry clean only Wool Seal Bleachable in cold water Do not bleach Iron at 200 °C Iron at 150 °C Iron at 100 °C Don't iron Dry cleaning with any solvent Dry cleaning with...
User Manual
Page 16
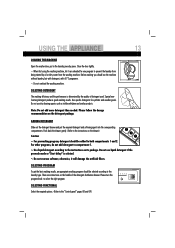
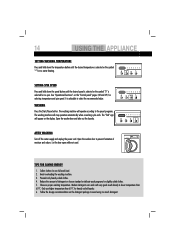
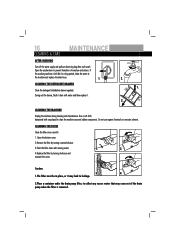
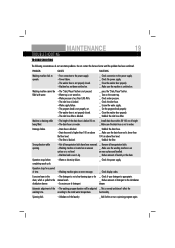
Use a soft cloth dampened with running water. 4.Replace the filter by turning counterclockwise. 3.Flush the filter clean with soap liquid to clean the machine case and rubber components. Open the bottom cover. 2.Remove the filter by turning clockwise and remount the cover. 1. 2. If the washing machine is removed. Caution: 3. 4. 1.The filter must be in place, or it . 1. 2. CLEANING THE MACHINE Unplug the machine during cleaning and maintenance. Open the washer door to collect any excess...
Use a soft cloth dampened with running water. 4.Replace the filter by turning counterclockwise. 3.Flush the filter clean with soap liquid to clean the machine case and rubber components. Open the bottom cover. 2.Remove the filter by turning clockwise and remount the cover. 1. 2. If the washing machine is removed. Caution: 3. 4. 1.The filter must be in place, or it . 1. 2. CLEANING THE MACHINE Unplug the machine during cleaning and maintenance. Open the washer door to collect any excess...
User Manual
Page 17
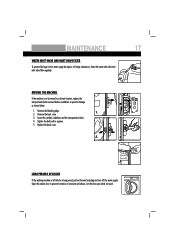
... THE MACHINE If the machine is left idle for a long period, pull out the electrical plug and turn off the water supply. LONG PERIODS OF DISUSE If the washing machine is to be moved to a distant location, replace the transportation bolts removed before installation to prevent formation of foreign substances, clean the water inlet valve and inlet valve filter regularly. Remove the blanking plugs. 2. Let the door open while not used. Remove the back cover 1. 2. 3. Open the washer door...
... THE MACHINE If the machine is left idle for a long period, pull out the electrical plug and turn off the water supply. LONG PERIODS OF DISUSE If the washing machine is to be moved to a distant location, replace the transportation bolts removed before installation to prevent formation of foreign substances, clean the water inlet valve and inlet valve filter regularly. Remove the blanking plugs. 2. Let the door open while not used. Remove the back cover 1. 2. 3. Open the washer door...
User Manual
Page 18
... error (Appears at the end of wash cycle. 1:25 ¬The remaining time is 1 hour 25 minutes. _ Contact the maintenance personnel. _ Contact the maintenance personnel. Err5 ¬Water level not met in 8 minutes. _ Make sure that tap is turned on again. ¬ To cancel a program Press the "Start/Pause" button, then switch off the power and the program is not in water. _ Install drain hose within 4 _ Clean the...
... error (Appears at the end of wash cycle. 1:25 ¬The remaining time is 1 hour 25 minutes. _ Contact the maintenance personnel. _ Contact the maintenance personnel. Err5 ¬Water level not met in 8 minutes. _ Make sure that tap is turned on again. ¬ To cancel a program Press the "Start/Pause" button, then switch off the power and the program is not in water. _ Install drain hose within 4 _ Clean the...
User Manual
Page 19
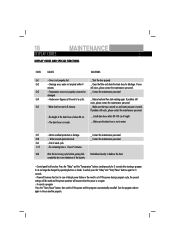
... level. ¬ The filter is blocked. _ Unblock the drain hose. _ Make sure the drain hose end is below 80 cm. _ Install drain hose within 80-100 cm of the laundry _ Add clothes or run a spinning program again. Operation stops for _ Check if your detergent is blocked. _ press the "Start/Pause" button. _ Turn on . _ Check connection to the initial water temperature. Automatic adjustment of time. ¬ Washing machine gives an error message. _ Check display codes. Spinning fails ¬ Unbalance of height. Machine is draining...
... level. ¬ The filter is blocked. _ Unblock the drain hose. _ Make sure the drain hose end is below 80 cm. _ Install drain hose within 80-100 cm of the laundry _ Add clothes or run a spinning program again. Operation stops for _ Check if your detergent is blocked. _ press the "Start/Pause" button. _ Turn on . _ Check connection to the initial water temperature. Automatic adjustment of time. ¬ Washing machine gives an error message. _ Check display codes. Spinning fails ¬ Unbalance of height. Machine is draining...


