User Manual
Page 2
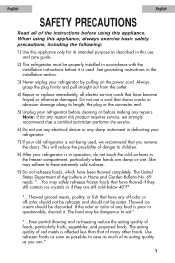
... the outlet. 4) Repair or replace immediately, all of any sharp instrument in defrosting your refrigerator. 7) If your refrigerator by pulling on the power cord. Note: If for its intended purpose as much of Agriculture in the installation section. 3) Never unplug your old refrigerator is in operation, do not touch the cold surfaces in accordance with the installation instructions before using this appliance, always...
... the outlet. 4) Repair or replace immediately, all of any sharp instrument in defrosting your refrigerator. 7) If your refrigerator by pulling on the power cord. Note: If for its intended purpose as much of Agriculture in the installation section. 3) Never unplug your old refrigerator is in operation, do not touch the cold surfaces in accordance with the installation instructions before using this appliance, always...
User Manual
Page 3
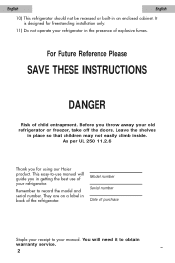
... 10) This refrigerator should not be recessed or built-in back of the refrigerator. You will guide you in place so that children may not easily climb inside. Leave the shelves in getting the best use manual will need it to record the model and serial number. It is designed for using our Haier product. Before you for freestanding installation only. 11) Do not operate your manual.
... 10) This refrigerator should not be recessed or built-in back of the refrigerator. You will guide you in place so that children may not easily climb inside. Leave the shelves in getting the best use manual will need it to record the model and serial number. It is designed for using our Haier product. Before you for freestanding installation only. 11) Do not operate your manual.
User Manual
Page 4
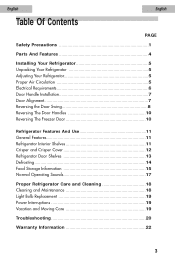
... Air Circulation 5 Electrical Requirements 6 Door Handle Installation 7 Door Alignment 7 Reversing the Door Swing 8 Reversing The Door Handles 10 Reversing The Freezer Door 10 Refrigerator Features And Use 11 General Features 11 Refrigerator Interior Shelves 11 Crisper and Crisper Cover 12 Refrigerator Door Shelves 13 Defrosting 14 Food Storage Information 15 Normal Operating Sounds 17 Proper Refrigerator Care and Cleaning 18 Cleaning and Maintenance 18 Light Bulb Replacement 19 Power Interruptions 19 Vacation and Moving Care 19 Troubleshooting 20 Warranty Information...
... Air Circulation 5 Electrical Requirements 6 Door Handle Installation 7 Door Alignment 7 Reversing the Door Swing 8 Reversing The Door Handles 10 Reversing The Freezer Door 10 Refrigerator Features And Use 11 General Features 11 Refrigerator Interior Shelves 11 Crisper and Crisper Cover 12 Refrigerator Door Shelves 13 Defrosting 14 Food Storage Information 15 Normal Operating Sounds 17 Proper Refrigerator Care and Cleaning 18 Cleaning and Maintenance 18 Light Bulb Replacement 19 Power Interruptions 19 Vacation and Moving Care 19 Troubleshooting 20 Warranty Information...

User Manual
Page 5
Wire Shelves 5. Two Rollers (not shown) 11. Dispense-A-Can 8. Thermostat Control 4. Plastic Crisper Cover NOTE: Not all features are on all models. 4 Egg Storage/ Dairy Compartment 7. English Parts And Features 1 2 3 4 English 6 7 8 5 11 10 9 1. Vegetable Crispers 6. Door Storage Shelves 9. Water-Collecting Tray 3. Two Leveling Legs (not shown) 10. Freezer Compartment 2.
Wire Shelves 5. Two Rollers (not shown) 11. Dispense-A-Can 8. Thermostat Control 4. Plastic Crisper Cover NOTE: Not all features are on all models. 4 Egg Storage/ Dairy Compartment 7. English Parts And Features 1 2 3 4 English 6 7 8 5 11 10 9 1. Vegetable Crispers 6. Door Storage Shelves 9. Water-Collecting Tray 3. Two Leveling Legs (not shown) 10. Freezer Compartment 2.

User Manual
Page 6
... electrical connections. • The following are raised. English English Installing Your Refrigerator Unpacking Your Refrigerator 1. Slide out and remove plastic or foam guard used to secure the compressor from shipping damage due to lower your refrigerator. Remove all adhesive tape holding the refrigerator accessories inside and outside. Proper Air Circulation • To assure your refrigerator. Adjusting Your Refrigerator Leveling Your Refrigerator: • Your refrigerator has two leveling legs which are located...
... electrical connections. • The following are raised. English English Installing Your Refrigerator Unpacking Your Refrigerator 1. Slide out and remove plastic or foam guard used to secure the compressor from shipping damage due to lower your refrigerator. Remove all adhesive tape holding the refrigerator accessories inside and outside. Proper Air Circulation • To assure your refrigerator. Adjusting Your Refrigerator Leveling Your Refrigerator: • Your refrigerator has two leveling legs which are located...
User Manual
Page 7
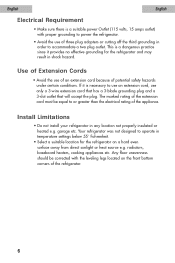
... power the refrigerator. • Avoid the use of an extension cord because of three plug adapters or cutting off the third grounding in temperature settings below 55˚ Fahrenheit. • Select a suitable location for the refrigerator and may result in any location not properly insulated or heated e.g. Your refrigerator was not designed to operate in order to or greater than the electrical rating...
... power the refrigerator. • Avoid the use of an extension cord because of three plug adapters or cutting off the third grounding in temperature settings below 55˚ Fahrenheit. • Select a suitable location for the refrigerator and may result in any location not properly insulated or heated e.g. Your refrigerator was not designed to operate in order to or greater than the electrical rating...
User Manual
Page 8
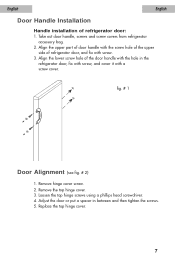
... part of door handle with the screw hole of the upper side of refrigerator door: 1. Take out door handle, screws and screw covers from refrigerator accessory bag. 2. Remove the top hinge cover. 3. Align the lower screw hole of the door handle with the hole in between and then tighten the screws. 5. Loosen the top hinge screws using a phillips head screwdriver. 4. Adjust the door or put a spacer in the refrigerator door, fix...
... part of door handle with the screw hole of the upper side of refrigerator door: 1. Take out door handle, screws and screw covers from refrigerator accessory bag. 2. Remove the top hinge cover. 3. Align the lower screw hole of the door handle with the hole in between and then tighten the screws. 5. Loosen the top hinge screws using a phillips head screwdriver. 4. Adjust the door or put a spacer in the refrigerator door, fix...

User Manual
Page 10
.... Install refrigerator door: make it with top hinge. fig. # 4 3. As shown in fig. 4, install the top hinge and pad to make the left bottom hole of the refrigerator compartment door fall over the lower hinge axle, move back and forward the door to the left side. Install the top hinge again, turn the hinge axle until it completely enters the door body, then fix it straight and in Fig. 4. 9 Replace the hinge cover...
.... Install refrigerator door: make it with top hinge. fig. # 4 3. As shown in fig. 4, install the top hinge and pad to make the left bottom hole of the refrigerator compartment door fall over the lower hinge axle, move back and forward the door to the left side. Install the top hinge again, turn the hinge axle until it completely enters the door body, then fix it straight and in Fig. 4. 9 Replace the hinge cover...
User Manual
Page 11
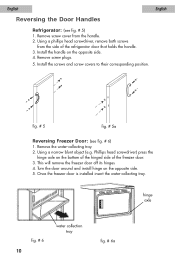
.... 5. fig. # 5 fig. # 5a Reversing Freezer Door: (see fig. # 5) 1. Using a narrow blunt object (e.g. Turn the door around and install hinge on the opposite side. 4. English English Reversing the Door Handles Refrigerator: (see fig. # 6) 1. Install the screws and screw covers to their corresponding position. Remove the water-collecting tray. 2. Remove screw cover from the side of the freezer door. 3. This will remove the freezer door off its hinges 4. Remove screw plugs. 5. hinge axle fig. # 6 10 water collection tray fig. # 6a Phillips head...
.... 5. fig. # 5 fig. # 5a Reversing Freezer Door: (see fig. # 5) 1. Using a narrow blunt object (e.g. Turn the door around and install hinge on the opposite side. 4. English English Reversing the Door Handles Refrigerator: (see fig. # 6) 1. Install the screws and screw covers to their corresponding position. Remove the water-collecting tray. 2. Remove screw cover from the side of the freezer door. 3. This will remove the freezer door off its hinges 4. Remove screw plugs. 5. hinge axle fig. # 6 10 water collection tray fig. # 6a Phillips head...
User Manual
Page 12
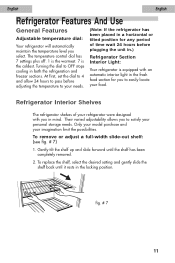
... OFF stops cooling in both the refrigeration and freezer sections. Turning the dial to satisfy your personal storage needs. Their varied adjustability allows you in mind. fig. # 7 11 Only your model purchase and your imagination limit the possibilities. Refrigerator Interior Shelves The refrigerator shelves of time wait 24 hours before plugging the unit in.) Refrigerator Section Interior Light: Your refrigerator is the coldest. English English Refrigerator Features And Use General Features Adjustable temperature...
... OFF stops cooling in both the refrigeration and freezer sections. Turning the dial to satisfy your personal storage needs. Their varied adjustability allows you in mind. fig. # 7 11 Only your model purchase and your imagination limit the possibilities. Refrigerator Interior Shelves The refrigerator shelves of time wait 24 hours before plugging the unit in.) Refrigerator Section Interior Light: Your refrigerator is the coldest. English English Refrigerator Features And Use General Features Adjustable temperature...
User Manual
Page 13
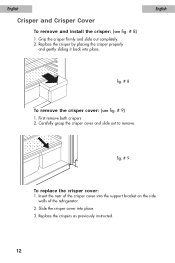
... completely. 2. Carefully grasp the crisper cover and slide out to remove. Insert the rear of the refrigerator. 2. Slide the crisper cover into the support bracket on the side walls of the crisper cover into place. 3. Replace the crisper by placing the crisper properly and gently sliding it back into place. fig. # 9 To replace the crisper cover: 1. Replace the crispers as previously instructed. 12 English Crisper and Crisper Cover To remove and install the crisper: (see...
... completely. 2. Carefully grasp the crisper cover and slide out to remove. Insert the rear of the refrigerator. 2. Slide the crisper cover into the support bracket on the side walls of the crisper cover into place. 3. Replace the crisper by placing the crisper properly and gently sliding it back into place. fig. # 9 To replace the crisper cover: 1. Replace the crispers as previously instructed. 12 English Crisper and Crisper Cover To remove and install the crisper: (see...
User Manual
Page 14
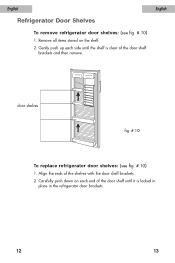
Align the ends of the door shelf brackets and then remove. Gently push up each end of the door shelf until the shelf is locked in place in the refrigerator door brackets. 12 13 door shelves fig. # 10 To replace refrigerator door shelves: (see fig. # 10) 1. Carefully push down on the shelf. 2. Remove all items stored on each side until it is clear of the shelves with the door shelf brackets. 2. English English Refrigerator Door Shelves To remove refrigerator door shelves: (see fig. # 10) 1.
Align the ends of the door shelf brackets and then remove. Gently push up each end of the door shelf until the shelf is locked in place in the refrigerator door brackets. 12 13 door shelves fig. # 10 To replace refrigerator door shelves: (see fig. # 10) 1. Carefully push down on the shelf. 2. Remove all items stored on each side until it is clear of the shelves with the door shelf brackets. 2. English English Refrigerator Door Shelves To remove refrigerator door shelves: (see fig. # 10) 1.
User Manual
Page 15
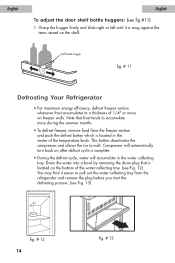
... the items stored on freezer walls. This button deactivates the compressor and allows the ice to a thickness of the temperature knob. Compressor will accumulate in the center of 1/4" or more during the summer months. • To defrost freezer, remove food from the refrigerator and remove the plug before you start the defrosting process. (see fig #11) 1. English English To adjust the door shelf bottle huggers: (see...
... the items stored on freezer walls. This button deactivates the compressor and allows the ice to a thickness of the temperature knob. Compressor will accumulate in the center of 1/4" or more during the summer months. • To defrost freezer, remove food from the refrigerator and remove the plug before you start the defrosting process. (see fig #11) 1. English English To adjust the door shelf bottle huggers: (see...
User Manual
Page 16
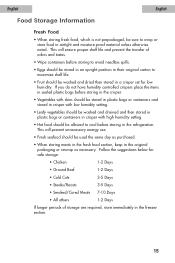
... then stored in a crisper set for safe storage: • Chicken 1-2 Days • Ground Beef 1-2 Days • Cold Cuts 3-5 Days • Steaks/Roasts 3-5 Days • Smoked/Cured Meats 7-10 Days • All others 1-2 Days If longer periods of storage are required, store immediately in the freezer section. 15 This will prevent unnecessary energy use. • Fresh seafood...
... then stored in a crisper set for safe storage: • Chicken 1-2 Days • Ground Beef 1-2 Days • Cold Cuts 3-5 Days • Steaks/Roasts 3-5 Days • Smoked/Cured Meats 7-10 Days • All others 1-2 Days If longer periods of storage are required, store immediately in the freezer section. 15 This will prevent unnecessary energy use. • Fresh seafood...

User Manual
Page 18
... fan circulating air inside the interior of your unit to maintain the temperature you have selected. • Boiling water, gurgling sounds or slight vibrations that are the result of the refrigerant circulating through the cooling coils. • Sizzling or popping sounds resulting from frost melting during the defrost cycle and dripping on the defrost heater. • The sound of dripping water as ice melts...
... fan circulating air inside the interior of your unit to maintain the temperature you have selected. • Boiling water, gurgling sounds or slight vibrations that are the result of the refrigerant circulating through the cooling coils. • Sizzling or popping sounds resulting from frost melting during the defrost cycle and dripping on the defrost heater. • The sound of dripping water as ice melts...

User Manual
Page 19
... damage. Caution: Before using cleaning products, always read and follow manufacturer's instructions and warnings to wipe down your refrigerator. • Rinse with clean warm water and dry with warm water. SOME of these chemicals may result in death or injury. Door Gaskets: • Clean door gaskets every three months according to assure a proper seal. • Petroleum jelly applied lightly on the hinge side of baking soda...
... damage. Caution: Before using cleaning products, always read and follow manufacturer's instructions and warnings to wipe down your refrigerator. • Rinse with clean warm water and dry with warm water. SOME of these chemicals may result in death or injury. Door Gaskets: • Clean door gaskets every three months according to assure a proper seal. • Petroleum jelly applied lightly on the hinge side of baking soda...

User Manual
Page 20
... exceed the 40 watts rating at 40 watts or lesser wattage. 5. Remove the power cord from refrigerator and freezer, move the refrigerator vertically. Vacation and Moving Care • For long vacations or absences, empty food from AC outlet when a power outage occurs. Do not move with appliance type light bulb rated at any time. Allow light bulb to "General cleaning" section. Clean refrigerator before removing. 3. Prop doors open, so air can circulate inside.When moving always...
... exceed the 40 watts rating at 40 watts or lesser wattage. 5. Remove the power cord from refrigerator and freezer, move the refrigerator vertically. Vacation and Moving Care • For long vacations or absences, empty food from AC outlet when a power outage occurs. Do not move with appliance type light bulb rated at any time. Allow light bulb to "General cleaning" section. Clean refrigerator before removing. 3. Prop doors open, so air can circulate inside.When moving always...

User Manual
Page 21
... adjust. Food temperature appears too warm • Frequent door openings. • Allow time for recently added warm food to reach fresh food or freezer temperature. • Check gaskets for proper seal. • Clean condenser coils (for models with exposed condenser coils). • Adjust temperature control to colder setting. • Check freezer compartment for temperature to a warmer setting and allow several hours for air duct blockage from frozen food packages. Refrigerator runs...
... adjust. Food temperature appears too warm • Frequent door openings. • Allow time for recently added warm food to reach fresh food or freezer temperature. • Check gaskets for proper seal. • Clean condenser coils (for models with exposed condenser coils). • Adjust temperature control to colder setting. • Check freezer compartment for temperature to a warmer setting and allow several hours for air duct blockage from frozen food packages. Refrigerator runs...

User Manual
Page 22
... refrigerator door. • Check for proper seal. English 21 Refrigerator light does not work: • Check power supply. • Tighten bulb in socket. • Replace burned out bulb. food containers, crisper cover, shelves, bins etc. English Moisture build up on interior or exterior of the refrigerator: • This is normal during high humidity periods. • Prolonged or frequent door openings. • Check door gaskets for blockages e.g. Refrigerator has an odor: • Interior needs cleaning...
... refrigerator door. • Check for proper seal. English 21 Refrigerator light does not work: • Check power supply. • Tighten bulb in socket. • Replace burned out bulb. food containers, crisper cover, shelves, bins etc. English Moisture build up on interior or exterior of the refrigerator: • This is normal during high humidity periods. • Prolonged or frequent door openings. • Check door gaskets for blockages e.g. Refrigerator has an odor: • Interior needs cleaning...

User Manual
Page 23
... from improper installation. Damage from manufacturing defects for a period of 12 months. Haier America New York, NY, NY10018. 22 EXCEPTIONS: Commercial or Rental Use warranty 90 days labor (carry-in the remaining warranty. What will repair or replace, at our discretion any covered items during the warranty period so specified. 2. Contact your nearest authorized service center. The mechanical and electrical parts, which serve...
... from improper installation. Damage from manufacturing defects for a period of 12 months. Haier America New York, NY, NY10018. 22 EXCEPTIONS: Commercial or Rental Use warranty 90 days labor (carry-in the remaining warranty. What will repair or replace, at our discretion any covered items during the warranty period so specified. 2. Contact your nearest authorized service center. The mechanical and electrical parts, which serve...


