
User Manual
Page 9
... paper the power cord. Always grip plug firmly and pull straight out from the outlet. All electrical repairs must be carried out in a major source of danger for the user of polyethylene and the polyethylene foam pads contain no fluorochloric hydrocarbon. Cautions Disposal of the old air conditioner Safety Instructions and Warnings Before disposing an old air conditioner that carry refrigerant by...
... paper the power cord. Always grip plug firmly and pull straight out from the outlet. All electrical repairs must be carried out in a major source of danger for the user of polyethylene and the polyethylene foam pads contain no fluorochloric hydrocarbon. Cautions Disposal of the old air conditioner Safety Instructions and Warnings Before disposing an old air conditioner that carry refrigerant by...

User Manual
Page 10
... the air conditioner.In no case should be in following situation 10 .The power plug and connecting cable must be easily reached. 6. The wiring method should children be disposed properly. 3 The appliance is broken,please change it with the applience. If the fuse of indoor unit on PC board is not intended for use grille of T.25A/250V 4. If the power supply cord is leak...
... the air conditioner.In no case should be in following situation 10 .The power plug and connecting cable must be easily reached. 6. The wiring method should children be disposed properly. 3 The appliance is broken,please change it with the applience. If the fuse of indoor unit on PC board is not intended for use grille of T.25A/250V 4. If the power supply cord is leak...

User Manual
Page 11
The instructions are strictly required for the Installation. Installation WARNING Please call Sales/Service Shop for safety use . Do not attempt to vapor any possibility of or oil steam. CAUTION Connect the earth cable. Do not install in the Do not get the unit place where there is exposed to install the air conditioner by yourself because improper works may cause accidents. Compliance...
The instructions are strictly required for the Installation. Installation WARNING Please call Sales/Service Shop for safety use . Do not attempt to vapor any possibility of or oil steam. CAUTION Connect the earth cable. Do not install in the Do not get the unit place where there is exposed to install the air conditioner by yourself because improper works may cause accidents. Compliance...

User Manual
Page 12
... to repair or reconstruct by disconnecting the power supply cord and so on. PROHIBITION Do not channel the air flow directly at people, especially at the wet hand. PROHIBITION Do not install the unit near a fireplace or other heating apparatus. Cautions When abnormality such as burnt-small found, immediately stop the operation by yourself. PROHIBITION Do not start or stop the operation button and...
... to repair or reconstruct by disconnecting the power supply cord and so on. PROHIBITION Do not channel the air flow directly at people, especially at the wet hand. PROHIBITION Do not install the unit near a fireplace or other heating apparatus. Cautions When abnormality such as burnt-small found, immediately stop the operation by yourself. PROHIBITION Do not start or stop the operation button and...

User Manual
Page 13
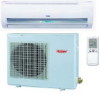
Don't adjust it manually) Horizontal louver (adjust left and right air flow) For 18k 22k unit, the power supply is on the outdoor unit Outdoor unit Outlet Air filter(inside) Anion generator (inside ) Inlet grille Vertical flap (adjust up and down air flow. Parts and Functions Indoor unit Display board Inlet Air Purifying Filter (inside ) Power plug HSU-07HV03/R2 HSU-09HV03/R2 HSU-12HV03/R2 HSU-18HV03/R2 HSU-12HVA03/R2 H2SM-18HV03/R2 H2SM-(9+12)HV03/R2 HSU-22HV03/R2 1 OUTLET 2 INLET 3 CONNECTING PIPING AND ELECTRICAL WIRING 4 DRAIN HOSE 6
Don't adjust it manually) Horizontal louver (adjust left and right air flow) For 18k 22k unit, the power supply is on the outdoor unit Outdoor unit Outlet Air filter(inside) Anion generator (inside ) Inlet grille Vertical flap (adjust up and down air flow. Parts and Functions Indoor unit Display board Inlet Air Purifying Filter (inside ) Power plug HSU-07HV03/R2 HSU-09HV03/R2 HSU-12HV03/R2 HSU-18HV03/R2 HSU-12HVA03/R2 H2SM-18HV03/R2 H2SM-(9+12)HV03/R2 HSU-22HV03/R2 1 OUTLET 2 INLET 3 CONNECTING PIPING AND ELECTRICAL WIRING 4 DRAIN HOSE 6

User Manual
Page 14
...LCD. SLEEP display 17. Press it once again, lock will be canceled and lock condition display disappears. 2.LIGHT button Control the lightening and extinguishing of the indoor LED display board. 3.CODE Used to select CODE A or B with heating. 7 TEMP display Remote controller: to set healthy operation. 11. TIMER ON display 13. Please select A without special explanation. 4. CLOCK button Used to set fresh air function. 31. MODE button AUTO COOL DRY FAN HEAT 8. POWER/SOFT display 22. HEALTH button Used to set clock and timer setting. 20.Singal sending display 21. FAN SPEED...
...LCD. SLEEP display 17. Press it once again, lock will be canceled and lock condition display disappears. 2.LIGHT button Control the lightening and extinguishing of the indoor LED display board. 3.CODE Used to select CODE A or B with heating. 7 TEMP display Remote controller: to set healthy operation. 11. TIMER ON display 13. Please select A without special explanation. 4. CLOCK button Used to set fresh air function. 31. MODE button AUTO COOL DRY FAN HEAT 8. POWER/SOFT display 22. HEALTH button Used to set clock and timer setting. 20.Singal sending display 21. FAN SPEED...

User Manual
Page 15
... starts working. Remote controller's operation When in line with the "+" / "-". Put on the indoor unit. Each press will change batteries. Used two new same-typed batteries when loading. Press or to the receiver hole on the cover again. Confirmation indicator: After pressing power ON/OFF, if no display, reload the batteries. Press CLOCK button,"AM" or "PM" flashes. 2. After time setting is in use, put the signal transmission head directly...
... starts working. Remote controller's operation When in line with the "+" / "-". Put on the indoor unit. Each press will change batteries. Used two new same-typed batteries when loading. Press or to the receiver hole on the cover again. Confirmation indicator: After pressing power ON/OFF, if no display, reload the batteries. Press CLOCK button,"AM" or "PM" flashes. 2. After time setting is in use, put the signal transmission head directly...

User Manual
Page 16
... of position and anion in the air and also to kill bacteria and speed up the dust sediment in the room and finally clean the air in the room. 9 Operation HEALTH operation Remote controller 1.Unit start Press on/off button (" ") on the remote controller, unit starts. For twice press, disappears,the operation stops. Air conditioner starts health anion function operation. TEMP HEALTH FAN MODE H.AIR. SWING SLEEP FRESH CLOCK SET TIMER LOCK LIGHT CODE RESET 2.Health anion function Press HEALTH button. When indoor fan motor is displayed.
... of position and anion in the air and also to kill bacteria and speed up the dust sediment in the room and finally clean the air in the room. 9 Operation HEALTH operation Remote controller 1.Unit start Press on/off button (" ") on the remote controller, unit starts. For twice press, disappears,the operation stops. Air conditioner starts health anion function operation. TEMP HEALTH FAN MODE H.AIR. SWING SLEEP FRESH CLOCK SET TIMER LOCK LIGHT CODE RESET 2.Health anion function Press HEALTH button. When indoor fan motor is displayed.
User Manual
Page 17
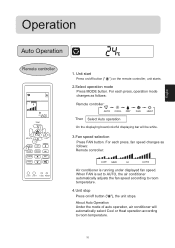
... under displayed fan speed. Operation Auto Operation Remote controller TEMP HEALTH FAN MODE H.AIR. For each press, fan speed changes as follows: Remote controller: AUTO COOL DRY FAN HEAT Then Select Auto operation On the displaying board,colorful displaying bar will automatically select Cool or Heat operation according to room temperature. 4.Unit stop Press on the remote controller, unit starts. 2.Select operation mode Press MODE button. SWING SLEEP FRESH CLOCK SET TIMER LOCK LIGHT CODE RESET 1. About Auto Operation Under the mode of auto operation, air conditioner...
... under displayed fan speed. Operation Auto Operation Remote controller TEMP HEALTH FAN MODE H.AIR. For each press, fan speed changes as follows: Remote controller: AUTO COOL DRY FAN HEAT Then Select Auto operation On the displaying board,colorful displaying bar will automatically select Cool or Heat operation according to room temperature. 4.Unit stop Press on the remote controller, unit starts. 2.Select operation mode Press MODE button. SWING SLEEP FRESH CLOCK SET TIMER LOCK LIGHT CODE RESET 1. About Auto Operation Under the mode of auto operation, air conditioner...

User Manual
Page 18
... button (" "), the unit stops. 11 When FAN is set to AUTO, the air conditioner automatically adjusts the fan speed according to room temperature. 5.Unit stop Press on the remote controller, unit starts. 2.Select operation mode Press MODE button. button Every time the button is pressed, temp.setting increase 1oC,if kept depressed, it will increase rapidly Every time the button is running under displayed fan speed. For each press, fan speed changes as follows: Remote controller: AUTO COOL DRY FAN HEAT Then Select COOL operation On the displaying board,colorful displaying bar...
... button (" "), the unit stops. 11 When FAN is set to AUTO, the air conditioner automatically adjusts the fan speed according to room temperature. 5.Unit stop Press on the remote controller, unit starts. 2.Select operation mode Press MODE button. button Every time the button is pressed, temp.setting increase 1oC,if kept depressed, it will increase rapidly Every time the button is running under displayed fan speed. For each press, fan speed changes as follows: Remote controller: AUTO COOL DRY FAN HEAT Then Select COOL operation On the displaying board,colorful displaying bar...

User Manual
Page 19
... HI AUTO Air conditioner is pressed, temp.setting decrease 1oC,if kept depressed, it will run in mild DRY mode. For each press, operation mode changes as follows: Remote controller: COOL operation starts when room temp.is higher than temp.setting+2oC,unit will decrease rapidly Select a desired temperature. 4.Fan speed selection Press FAN button. Unit start Press on the remote controller, unit starts. 2.Select operation mode Press MODE button. Ultra-low air flow Temp.setting+2oC Temp.setting On reaching temp.setting +2oC unit will be light blue 3.Select temp.setting Press TEMP...
... HI AUTO Air conditioner is pressed, temp.setting decrease 1oC,if kept depressed, it will run in mild DRY mode. For each press, operation mode changes as follows: Remote controller: COOL operation starts when room temp.is higher than temp.setting+2oC,unit will decrease rapidly Select a desired temperature. 4.Fan speed selection Press FAN button. Unit start Press on the remote controller, unit starts. 2.Select operation mode Press MODE button. Ultra-low air flow Temp.setting+2oC Temp.setting On reaching temp.setting +2oC unit will be light blue 3.Select temp.setting Press TEMP...

User Manual
Page 20
...SLEEP FRESH CLOCK SET TIMER LOCK LIGHT CODE RESET 1. For each press, fan speed changes as follows: Remote controller: AUTO COOL DRY FAN HEAT Then Select FAN operation On the displaying board,colorful displaying bar will not operate in COOL or HEAT mode but only in FAN mode ,AUTO is not available in FAN mode.And temp.setting is not available. 13 For each press, operation mode changes as follows: Remote controller: LOW MED HI 4.Unit stop Press on the remote controller, unit starts. 2.Select operation mode Press MODE button. About FAN operation In FAN operation mode, the unit...
...SLEEP FRESH CLOCK SET TIMER LOCK LIGHT CODE RESET 1. For each press, fan speed changes as follows: Remote controller: AUTO COOL DRY FAN HEAT Then Select FAN operation On the displaying board,colorful displaying bar will not operate in COOL or HEAT mode but only in FAN mode ,AUTO is not available in FAN mode.And temp.setting is not available. 13 For each press, operation mode changes as follows: Remote controller: LOW MED HI 4.Unit stop Press on the remote controller, unit starts. 2.Select operation mode Press MODE button. About FAN operation In FAN operation mode, the unit...

User Manual
Page 21
...operation mode changes as follows: Remote controller: LOW MED HI AUTO Air conditioner is set to AUTO, the air conditioner automatically adjusts the fan speed according to cold-draft prevention function. When FAN is running under displayed fan speed IN HEAT mode, warm air will blow out after a short period of the time due to room temperature. 5.Unit stop Press on/off button (" ") on /off button (" "), the unit stops. 14 Operation Heat Operation Remote controller TEMP HEALTH FAN MODE H.AIR. SWING SLEEP FRESH CLOCK SET TIMER LOCK LIGHT CODE RESET 1. Unit start...
...operation mode changes as follows: Remote controller: LOW MED HI AUTO Air conditioner is set to AUTO, the air conditioner automatically adjusts the fan speed according to cold-draft prevention function. When FAN is running under displayed fan speed IN HEAT mode, warm air will blow out after a short period of the time due to room temperature. 5.Unit stop Press on/off button (" ") on /off button (" "), the unit stops. 14 Operation Heat Operation Remote controller TEMP HEALTH FAN MODE H.AIR. SWING SLEEP FRESH CLOCK SET TIMER LOCK LIGHT CODE RESET 1. Unit start...

User Manual
Page 23
... sounds. setting. Temp. After more another 1 hours, temp. SWING SLEEP FRESH CLOCK SET TIMER LOCK LIGHT CODE RESET 1 hr Decreases 2OC 1 hr Decreases 2OC 3 hrs 3 hrs Rises 1OC SLEEP operation starts SLEEP operation stops In HEAT mode 3. And press the sleep button ten times within five seconds and leave this function after hearing four sounds. Remote Controller SLEEP operation starts SLEEP operation stops Approx.6hrs 1 hr Rises 1OC 1 hr Rises 1OC Temp.setting Unit stop TEMP HEALTH FAN MODE H.AIR. After another 1 hours, temp decrease by...
... sounds. setting. Temp. After more another 1 hours, temp. SWING SLEEP FRESH CLOCK SET TIMER LOCK LIGHT CODE RESET 1 hr Decreases 2OC 1 hr Decreases 2OC 3 hrs 3 hrs Rises 1OC SLEEP operation starts SLEEP operation stops In HEAT mode 3. And press the sleep button ten times within five seconds and leave this function after hearing four sounds. Remote Controller SLEEP operation starts SLEEP operation stops Approx.6hrs 1 hr Rises 1OC 1 hr Rises 1OC Temp.setting Unit stop TEMP HEALTH FAN MODE H.AIR. After another 1 hours, temp decrease by...

User Manual
Page 24
... flash. 3.Time setting Press HOUR button. Hints: After replacing batteries or a power failure happens, time setting should be adjusted within 24 hours. 4.Confirming your setting After setting correct time, press SET button to change TIMER mode. Operation Timer On/Off Operation Remote Controller Set clock correctly before starting TIMER operation. 1. Time displayed: Unit starts or stops at x hour x min. (TIMER ON or TIMER OFF). 5.Cancel TIMER mode Just press TIMER button several times until TIMER mode disappears. Remote controller possesses memory function, when use TIMER mode...
... flash. 3.Time setting Press HOUR button. Hints: After replacing batteries or a power failure happens, time setting should be adjusted within 24 hours. 4.Confirming your setting After setting correct time, press SET button to change TIMER mode. Operation Timer On/Off Operation Remote Controller Set clock correctly before starting TIMER operation. 1. Time displayed: Unit starts or stops at x hour x min. (TIMER ON or TIMER OFF). 5.Cancel TIMER mode Just press TIMER button several times until TIMER mode disappears. Remote controller possesses memory function, when use TIMER mode...

User Manual
Page 25
...if kept depressed, it will be displayed on the remote controller stops blinking. " " starts flashing. Operation Timer On-Off Operation Remote Controller TEMP HEALTH FAN MODE H.AIR. " "will increase rapidly. After unit starts, select your desired TIMER mode (TIMER ON - Timer mode selection Press TIMER button to confirm " " on the remote controller stops flashing. Every time the button is pressed, display changes as follows: Remote controller: BLANK TIMER ON TIMER OFF TIMER ON-OFF Then select your desired operation mode Operation mode will decrease rapidly. " " on LCD...
...if kept depressed, it will be displayed on the remote controller stops blinking. " " starts flashing. Operation Timer On-Off Operation Remote Controller TEMP HEALTH FAN MODE H.AIR. " "will increase rapidly. After unit starts, select your desired TIMER mode (TIMER ON - Timer mode selection Press TIMER button to confirm " " on the remote controller stops flashing. Every time the button is pressed, display changes as follows: Remote controller: BLANK TIMER ON TIMER OFF TIMER ON-OFF Then select your desired operation mode Operation mode will decrease rapidly. " " on LCD...

User Manual
Page 26
... conditions. 19 Operation Health airflow Operation Remote controller TEMP HEALTH 1 FAN MODE H.AIR. The above inlet and outlet grills. Note: 1 .After setting the health airflow function, the position of water occurs at the outlet grille . 5.Select the appropriate fan direction according to select the mode. 4.In cooling and dry, using the air conditioner for a minute and then start, adjusting by hand. Notice: Cannot pull direct the outlet grille by remote controller. Avoid the strong airflow blows direct to starting...
... conditions. 19 Operation Health airflow Operation Remote controller TEMP HEALTH 1 FAN MODE H.AIR. The above inlet and outlet grills. Note: 1 .After setting the health airflow function, the position of water occurs at the outlet grille . 5.Select the appropriate fan direction according to select the mode. 4.In cooling and dry, using the air conditioner for a minute and then start, adjusting by hand. Notice: Cannot pull direct the outlet grille by remote controller. Avoid the strong airflow blows direct to starting...

User Manual
Page 28
Maintenance For Smart Use of The Air Conditioner Setting of proper room Do not block the air inlet temperature or outlet Proper temperature Close doors and windows Use the timer effectively during operation During cooling operation prevent the penetration of direct sunlight with curtain or blind If the unit is not to be used Use the louvers effectively for a long time, turn off the power supply main switch. OFF 21
Maintenance For Smart Use of The Air Conditioner Setting of proper room Do not block the air inlet temperature or outlet Proper temperature Close doors and windows Use the timer effectively during operation During cooling operation prevent the penetration of direct sunlight with curtain or blind If the unit is not to be used Use the louvers effectively for a long time, turn off the power supply main switch. OFF 21

User Manual
Page 31
Maintenance To Keep Your Air conditioner in cooling mode for 2-3 hours. Operate in Good Condition after Season. Put off the power supply cord. Take out the batteries from the wireless remote controller. 24 To prevent breeding mold or bad smell, be sure to operate at the designated temperature or 30OC,cooling mode and High speed fan mode for 2-3 hours. Cleaning the body.
Maintenance To Keep Your Air conditioner in cooling mode for 2-3 hours. Operate in Good Condition after Season. Put off the power supply cord. Take out the batteries from the wireless remote controller. 24 To prevent breeding mold or bad smell, be sure to operate at the designated temperature or 30OC,cooling mode and High speed fan mode for 2-3 hours. Cleaning the body.
User Manual
Page 33
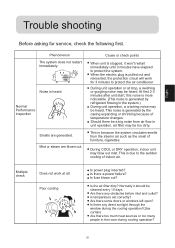
... is generated by refrigerant flowing in the room during the cooling operation?(Use curtain) Are there too much heat sources or too many people in the system.) During unit operation, a cracking noise may be a big noise from the interior air such as the smell of furniture, cigarettes. During COOL or DRY operation, indoor unit may be cleaned every 15 days. Is the air filter dirty? Is temperature set correctly? This is...
... is generated by refrigerant flowing in the room during the cooling operation?(Use curtain) Are there too much heat sources or too many people in the system.) During unit operation, a cracking noise may be a big noise from the interior air such as the smell of furniture, cigarettes. During COOL or DRY operation, indoor unit may be cleaned every 15 days. Is the air filter dirty? Is temperature set correctly? This is...


