
User Manual
Page 1
4 3 2 1 MIN COOL 5 6 FAN ONLY 7 8 9 10 MAX COOL SPEED HI LOW Wait 3 Minutes Before Restarting POWER ON OFF 0010551959
4 3 2 1 MIN COOL 5 6 FAN ONLY 7 8 9 10 MAX COOL SPEED HI LOW Wait 3 Minutes Before Restarting POWER ON OFF 0010551959
User Manual
Page 6
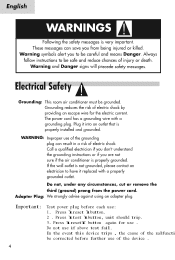
Important: Test power plug before further use of the device . 4 Press ìtest ìbutton, unit should trip. 3. In the event this device trips , the cause of the malfuncti be corrected before each use: 1. Press ìreset ìbutton. 2 . Do not use . Press ìresetî button again for use if above test fail.
Important: Test power plug before further use of the device . 4 Press ìtest ìbutton, unit should trip. 3. In the event this device trips , the cause of the malfuncti be corrected before each use: 1. Press ìreset ìbutton. 2 . Do not use . Press ìresetî button again for use if above test fail.

User Manual
Page 8
easy access filters 2-way airflow control panel 4 3 2 1 MIN COOL 5 6 FAN ONLY 7 8 9 10 MAX COOL SPEED HI LOW Wait 3 Minutes Before Restarting POWER ON OFF MODEL: HWF05XC5 2. MODE Set Switch 6
easy access filters 2-way airflow control panel 4 3 2 1 MIN COOL 5 6 FAN ONLY 7 8 9 10 MAX COOL SPEED HI LOW Wait 3 Minutes Before Restarting POWER ON OFF MODEL: HWF05XC5 2. MODE Set Switch 6

User Manual
Page 9
fan Speed Pressing the Fan Speed button of remote control between High and Low speed. 7 easy access filters 2-way airflow control panel TIME ON TIME OFF HI SPEED LOW SPEED FAN COOL POWER ON/OFF MODEL: HWR05XC5 2.
fan Speed Pressing the Fan Speed button of remote control between High and Low speed. 7 easy access filters 2-way airflow control panel TIME ON TIME OFF HI SPEED LOW SPEED FAN COOL POWER ON/OFF MODEL: HWR05XC5 2.

User Manual
Page 10
MODEL: HWF05XC5 5 4 6 7 3 8 2 1 MIN COOL 9 FAN ONLY 10 MAX COOL SPEED HI LOW Wait 3 Minutes Before Restarting POWER ON OFF 8
MODEL: HWF05XC5 5 4 6 7 3 8 2 1 MIN COOL 9 FAN ONLY 10 MAX COOL SPEED HI LOW Wait 3 Minutes Before Restarting POWER ON OFF 8
User Manual
Page 11
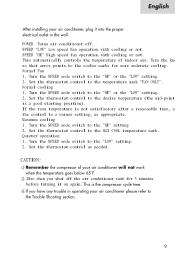
... speed fan operation with cooling or not. Turn the kno so that arrow points to a warmer setting, as needed. Set the thermostat control to the "LOW" setting. 2. Turn the SPEED mode switch to the "HI" or the "LOW" setting. 2. This automatically controls the temperature of indoor air. Normal cooling 1. POWER Turns air conditioner off the air conditioner wait for more moderate cooling. Normal Fan 1. Turn the SPEED mode switch to the "HI" or the "LOW" setting. 2. If the room temperature is a good starting position). Turn...
... speed fan operation with cooling or not. Turn the kno so that arrow points to a warmer setting, as needed. Set the thermostat control to the "LOW" setting. 2. Turn the SPEED mode switch to the "HI" or the "LOW" setting. 2. This automatically controls the temperature of indoor air. Normal cooling 1. POWER Turns air conditioner off the air conditioner wait for more moderate cooling. Normal Fan 1. Turn the SPEED mode switch to the "HI" or the "LOW" setting. 2. If the room temperature is a good starting position). Turn...

User Manual
Page 12
MODEL: HWR05XC5 1 ON/OFF 2 MODE SPEED TIMER 3 4 TEMP/TIME 5 Control Panel TIME ON TIME OFF HI SPEED LOW SPEED 1 FAN COOL POWER ON/OFF 10
MODEL: HWR05XC5 1 ON/OFF 2 MODE SPEED TIMER 3 4 TEMP/TIME 5 Control Panel TIME ON TIME OFF HI SPEED LOW SPEED 1 FAN COOL POWER ON/OFF 10

User Manual
Page 13
ON/OFF To turn set OFF, press the button again. 2. FAN Pressing the FAN button changes between COOL and FAN. 5. MODE Every time you press this button, it will changes as follows: TIMER ON TIMER OFF CANCEL 3. TEMP./TIME Used to set ON, press the button. To turn set temperature and time. 11 TIMER Press TIMER button, for each press, TIMER mode will change between LOW and HIGH SPEED. 4. 1.
ON/OFF To turn set OFF, press the button again. 2. FAN Pressing the FAN button changes between COOL and FAN. 5. MODE Every time you press this button, it will changes as follows: TIMER ON TIMER OFF CANCEL 3. TEMP./TIME Used to set ON, press the button. To turn set temperature and time. 11 TIMER Press TIMER button, for each press, TIMER mode will change between LOW and HIGH SPEED. 4. 1.

User Manual
Page 15
short screws 13/32" wood screws 31/32" window seal gasket Model: HWF05XC5 top rail short screws 13/32" wood screws 31/32" window seal gasket top rail ON/OFF MODE SPEED TIMER TEMP/TIME Remote ìCR2025ì battery control Model: HWR05XC5 13
short screws 13/32" wood screws 31/32" window seal gasket Model: HWF05XC5 top rail short screws 13/32" wood screws 31/32" window seal gasket top rail ON/OFF MODE SPEED TIMER TEMP/TIME Remote ìCR2025ì battery control Model: HWR05XC5 13

User Manual
Page 16
Fasten the curtains to the unit with 3 short screws13/32". HWF05XC5,HWR05XC5 1 31 32 11 5 8 11 13 16 34 7 16 20 15 32 11 7 16 17 5 16 13 13 32 14 Insert the side curtains into the top and bottom rails of the air conditioner. 4 3 2 1 MIN COOL 5 6 FAN ONLY 7 8 9 10 MAX COOL SPEED HI LOW Wait 3 Minutes Before Restarting POWER ON OFF ASSEMBLE CURTAINS/TOP RAIL Install top rail with 8 short screws 13/32".
Fasten the curtains to the unit with 3 short screws13/32". HWF05XC5,HWR05XC5 1 31 32 11 5 8 11 13 16 34 7 16 20 15 32 11 7 16 17 5 16 13 13 32 14 Insert the side curtains into the top and bottom rails of the air conditioner. 4 3 2 1 MIN COOL 5 6 FAN ONLY 7 8 9 10 MAX COOL SPEED HI LOW Wait 3 Minutes Before Restarting POWER ON OFF ASSEMBLE CURTAINS/TOP RAIL Install top rail with 8 short screws 13/32".

User Manual
Page 17
... window frame (STORM WINDOW FRAME) or wood strip WOOD STRIP MOUNTED ON (OUTDOORS) to help condensation to drain properly to raise the height of the sill. If the distance between STORM WINDOW FRAME and WOOD STRIP MOUNTED ON TOP OF INN,ERtwSoILoLf iwsoomdore than 1 strip are not necessary. INNER SILL I N 1. 2 INNER SILL I WOOD STRIP FOR BASEPAN N ANGLE D O O R S STORM WINDOW FRAME O U T OUTER D SILL O O R S LOCATING UNIT IN WINDOW Open the window...
... window frame (STORM WINDOW FRAME) or wood strip WOOD STRIP MOUNTED ON (OUTDOORS) to help condensation to drain properly to raise the height of the sill. If the distance between STORM WINDOW FRAME and WOOD STRIP MOUNTED ON TOP OF INN,ERtwSoILoLf iwsoomdore than 1 strip are not necessary. INNER SILL I N 1. 2 INNER SILL I WOOD STRIP FOR BASEPAN N ANGLE D O O R S STORM WINDOW FRAME O U T OUTER D SILL O O R S LOCATING UNIT IN WINDOW Open the window...

User Manual
Page 18
Fasten the basepan angle, using 4 wood screws 31/32" to the window width. Make sure the bottom guide of the air conditioner drops into the room. BOTTOM GUIDE BASEPAN ANGLE ABOUT 1/4 INSTALL THE SEAL GASKET AND SASH LOCK BASEPAN ANGLE SHORT SCREW13/32" Extend the side curtains to fill the window opening using a short screw13/32". WINDOW SEAL GASKET 16 Cut the seal...
Fasten the basepan angle, using 4 wood screws 31/32" to the window width. Make sure the bottom guide of the air conditioner drops into the room. BOTTOM GUIDE BASEPAN ANGLE ABOUT 1/4 INSTALL THE SEAL GASKET AND SASH LOCK BASEPAN ANGLE SHORT SCREW13/32" Extend the side curtains to fill the window opening using a short screw13/32". WINDOW SEAL GASKET 16 Cut the seal...

User Manual
Page 19
Open the inlet grille by pulling off excess water from the top for easy maintenance after inst 2. Pull the tab slightly to remove the air filter 1. Clean the filter with water or mild soap and water solution to maintain optimal performance of t on the installation). 3. DO NOT use your air conditioner before cleaning. To clean the front panels or the cabinet DO NOT use a soft cloth dampened with warm, soapy...
Open the inlet grille by pulling off excess water from the top for easy maintenance after inst 2. Pull the tab slightly to remove the air filter 1. Clean the filter with water or mild soap and water solution to maintain optimal performance of t on the installation). 3. DO NOT use your air conditioner before cleaning. To clean the front panels or the cabinet DO NOT use a soft cloth dampened with warm, soapy...


