Haier HWM105-987S Support and Manuals
Get Help and Manuals for this Haier item

View All Support Options Below
Free Haier HWM105-987S manuals!
Problems with Haier HWM105-987S?
Ask a Question
Free Haier HWM105-987S manuals!
Problems with Haier HWM105-987S?
Ask a Question
Popular Haier HWM105-987S Manual Pages
User Manual - Page 1
Twin-tub Washing Machine
User's manual
This manual is for future reference.
0030808394 Retain it for HWM105-987S
Please read this manual carefully before using.
User Manual - Page 2
Contents
Names of the parts 1 Safety precautions 2 Installation and adjustment 4 Preparation before washing 6 The musts in washing 7 Usage of the detergent 7 Washing sequence 8 Disposal after washing 12 Trouble-Shooting answer to question - - - - 14 Packing list & Specification 16
User Manual - Page 3
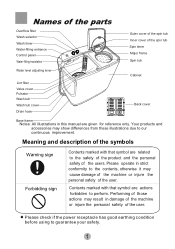
... that symbol are actions forbidden to our continuous improvement. Please operate in this manual are given for reference only. Please check if the power receptacle has good earthing...otherwise it may show differences from these illustrations due to perform.
Names of the parts
Overflow filter Wash selector Wash timer Water-filling entrance Control panel Water-filling translation
Water...
User Manual - Page 4
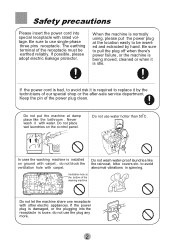
...Safety precautions
Please insert the power cord into the receptacle is installed on the control panel. If possible, please adopt electric leakage protector... cord is bad, to avoid risk it is required to replace it is normally using, please put the machine at the .... Keep the pin of our special shop or the after-sale service department.
to be earthed reliably. When the machine is idle.
...
User Manual - Page 6

It is very important to the requirement of the manual.
Install the lint filter
Put the underside of the drain hose shall be falled off when ...The height of the lint filter into overflow filter then push the upside into overflow filter
After installation,please refer that the lint filter installed to the right station,otherwise the lint filter may be
less than 10cm , or the drainage will...
User Manual - Page 7
...hose at spin tub side, and make it extend towards spin tub side.
Figure 5
Figure 6
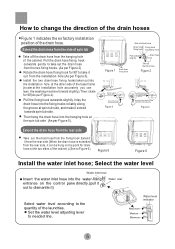
Install the water inlet hose;
Water level indicator
Max Maximum
Med Medium Minimum Min
5
Select the water ...side
Take out the drain hose from the fixing hook. Pull the fixing hook outwards slightly. Set the water level adjusting lever to fix it
Insert the fixing hook into the water-filling entrance ...
User Manual - Page 9

... It is more prone to pollute the laundries than 1.0kg, so as they are prone to the instruction of the whitener. Dilute the whitener with proper quantity. Avoid using . Please refer to lose color...avoid splashing of 30 C and a
container. 2.Add the powder while stirring to the user's manual for the usage and quantity of the washing powder for laundries less than the detergent. Refer to...
User Manual - Page 10

... washing time
Select the washing time according to 6 minute then turn it can increase the service life of the timer). OFF
Å Å ËD®RAIN
WASH TIMER
WASH SELECTOR
SPIN TIMER
Wash
1.Water-filling selector Set the water inlet selector at "DRAIN". (Figure 5).
Fill the water and add the dissolved washing...
User Manual - Page 11
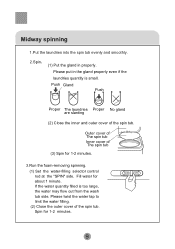
.... Outer cover of The spin tub Inner cover of The spin tub
(3) Spin for about 1 minute. Fill water for 1-2 minutes.
3.Run the foam-removing spinning.
(1) Set the water-filling selector control rod at the "SPIN" side. Push Gland
Push
Proper The laundries Proper No gland are slanting
(2) Close the inner and...
User Manual - Page 12

... "Standard" current. Put the laundries into the wash tub. Rinsing
Rinse with stored water
1. Select suitable current according to the laundries.
2.Adjust the water level Set the water level with water level adjusting lever according to the laundries.
2. Select suitable current according to the laundries quantity. Fill water to do rinsing...
User Manual - Page 14
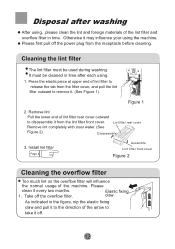
Otherwise it from the lint filter front cover.
Elastic fixing claw
As indicated in time after washing
After using the machine. Figure 1
2. Install lint filter
Page 4
Assemble Lint filter front cover
Figure 2
Cleaning the overflow filter
Too much lint on the overflow filter will influence
the normal usage ...
User Manual - Page 15
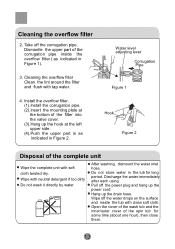
Install the overflow filter. (1).Install the corrugation pipe. (2).Insert the mounting plate at the bottom of the corrugation pipe inside the tub ... wash tub and the inner/outer cover of the complete unit
Wipe the complete unit with tap water.
4. Dismantle the upper part of the filter into the valve cover. (3).Hang up the power cord. Cleaning the overflow filter Clean the lint around the ...
User Manual - Page 16
Below 50 c 2~3L
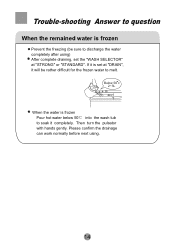
When the water is set the "WASH SELECTOR" at "DRAIN", it completely. If it is frozen Pour hot water...pulsator with hands gently. Please confirm the drainage can work normally before next using ) After complete draining, set at "STRONG" or "STANDARD".
Trouble-shooting Answer to question
When the remained water is frozen
Prevent the freezing (be rather difficult for the ...
User Manual - Page 17
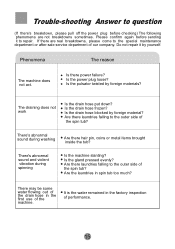
Do not repair it to the special maintenance department or after-sale service department of our company. Phenomena
The reason
The machine does not act. ... washing
Are there hair pin, coins or metal items brought inside the tub? Is the gland pressed evenly?
Trouble-shooting Answer to the outer side of the spin tub?
Are there laundries falling to question
(If there's breakdown...
User Manual - Page 18

Packing list
Name User's manual Water inlet hose
Gland Twin-tub washing machine
Quantity One piece One piece
One piece One set
Speciafication
Water level/Water quantity (L) (about) Injection pressure(MPa) Washing capacity(kg) Spinning capacity(kg)
Maximum/70 Medium/60 Minimum/50 0.02 0.2 10.5 7.5
16
Haier HWM105-987S Reviews
We have not received any reviews for Haier yet.