
User Manual
Page 1
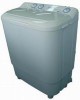
Twin-tub Washing Machine User's manual This manual is for future reference. 0030803015B Retain it for HWM45-187S Please read this manual carefully before using.
Twin-tub Washing Machine User's manual This manual is for future reference. 0030803015B Retain it for HWM45-187S Please read this manual carefully before using.
User Manual
Page 2
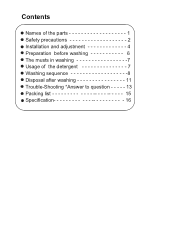
Contents Names of the parts 1 Safety precautions 2 Installation and adjustment 4 Preparation before washing 6 The musts in washing 7 Usage of the detergent 7 Washing sequence 8 Disposal after washing 11 Trouble-Shooting *Answer to question - - - - - 13 Packing list 15 Specification 16
Contents Names of the parts 1 Safety precautions 2 Installation and adjustment 4 Preparation before washing 6 The musts in washing 7 Usage of the detergent 7 Washing sequence 8 Disposal after washing 11 Trouble-Shooting *Answer to question - - - - - 13 Packing list 15 Specification 16
User Manual
Page 3
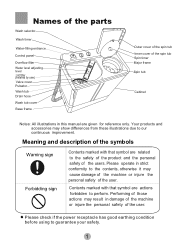
... safety of the user. Names of the parts Wash selector Wash timer Water-filling entrance Control panel Overflow filter Water level adjusting lever Lint filter (installed by user) Valve cover Pulsator Wash tub Drain hose Wash tub cover Base frame Outer cover of the spin tub Inner cover of the spin tub Spin timer Major frame Spin tub Cabinet Notes: All illustrations in damage of the machine or injure the personal safety of the user. Please operate in strict conformity...
... safety of the user. Names of the parts Wash selector Wash timer Water-filling entrance Control panel Overflow filter Water level adjusting lever Lint filter (installed by user) Valve cover Pulsator Wash tub Drain hose Wash tub cover Base frame Outer cover of the spin tub Inner cover of the spin tub Spin timer Major frame Spin tub Cabinet Notes: All illustrations in damage of the machine or injure the personal safety of the user. Please operate in strict conformity...
User Manual
Page 4
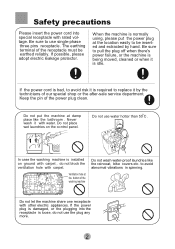
When the machine is installed on the control panel. Keep the pin of the washing machine Do not wash water-proof laundries like the bathroom . to replace it with rated voltage. In case the washing machine is normally using, please put the machine at the bottom of the power plug clean. If the power plug is damaged, or the plugging into special receptacle with water. Be sure to use water hotter than 50 C . The earthing terminal...
When the machine is installed on the control panel. Keep the pin of the washing machine Do not wash water-proof laundries like the bathroom . to replace it with rated voltage. In case the washing machine is normally using, please put the machine at the bottom of the power plug clean. If the power plug is damaged, or the plugging into special receptacle with water. Be sure to use water hotter than 50 C . The earthing terminal...

User Manual
Page 5
... washer s water inlet system and draining system will be sure to use the machine. Do not decompose, repair or alter the machine by yourself. Do not wash laundries with hot water ) on the washing machine. Petrol Thinner Handicapped or children without care shall not use foamless washing powder. It is dangerous even if the rotation is below 0 C. Safety precautions Do not stretch hands into the working machine. If the washer is...
... washer s water inlet system and draining system will be sure to use the machine. Do not decompose, repair or alter the machine by yourself. Do not wash laundries with hot water ) on the washing machine. Petrol Thinner Handicapped or children without care shall not use foamless washing powder. It is dangerous even if the rotation is below 0 C. Safety precautions Do not stretch hands into the working machine. If the washer is...
User Manual
Page 6
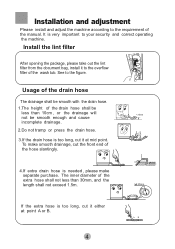
Install the lint filter After opening the package, please take out the lint filter from the document bag, install it to the requirement of the manual. Installation and adjustment Please install and adjust the machine according to the overflow filter of the wash tub. It is very important to the figure. See to your security and correct operating the machine. Usage of the drain hose The drainage shall be smooth with the drain hose. 1.The height of the drain hose shall be less than 10cm , or the drainage will 30mm
Install the lint filter After opening the package, please take out the lint filter from the document bag, install it to the requirement of the manual. Installation and adjustment Please install and adjust the machine according to the overflow filter of the wash tub. It is very important to the figure. See to your security and correct operating the machine. Usage of the drain hose The drainage shall be smooth with the drain hose. 1.The height of the drain hose shall be less than 10cm , or the drainage will 30mm

User Manual
Page 7
... drain hose. Take care not to damage the drain hose in turn Figure 3 Install the water inlet hose; Water inlet Water level indicator Max Maximum Med Medium Minimum Min 5 Extend to the spin tub side Embed into the water-filling entrance on the ground. Lean the machine down gently with hands. How to change the direction of the drain hoses Figure 1 indicates the ex factory installation position of the laundries. Select the water level Insert the water inlet hose...
... drain hose. Take care not to damage the drain hose in turn Figure 3 Install the water inlet hose; Water inlet Water level indicator Max Maximum Med Medium Minimum Min 5 Extend to the spin tub side Embed into the water-filling entrance on the ground. Lean the machine down gently with hands. How to change the direction of the drain hoses Figure 1 indicates the ex factory installation position of the laundries. Select the water level Insert the water inlet hose...
User Manual
Page 8
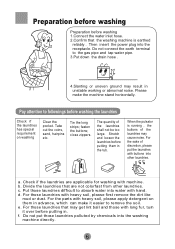
... water inlet hose. 2.Confirm that the washing machine is running , the buttons of the laundries may result in unstable working or abnormal noise. When the pulsator is earthed reliably . For the sake of the laundries shall not be too large. e. Do not put the laundries with long fur, turn it over before washing the laundries Check if the laundries has special requirement on them in the tub. For the parts...
... water inlet hose. 2.Confirm that the washing machine is running , the buttons of the laundries may result in unstable working or abnormal noise. When the pulsator is earthed reliably . For the sake of the laundries shall not be too large. e. Do not put the laundries with long fur, turn it over before washing the laundries Check if the laundries has special requirement on them in the tub. For the parts...
User Manual
Page 9
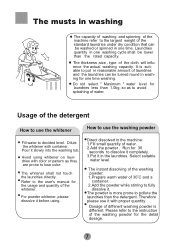
... one time washing. The thickness ,size , type of water. 2.Add the powder . Dilute the whitener with proper quantity. Direct dissolved in the machine: 1.Fill small quantity of the cloth will influence the actual washing capacity. Select suitable water level. Usage of the detergent How to use the whitener How to dissolve it completely. 3.Put it with container. The powder is different. Run for 30 seconds to use it in one washing cycle...
... one time washing. The thickness ,size , type of water. 2.Add the powder . Dilute the whitener with proper quantity. Direct dissolved in the machine: 1.Fill small quantity of the cloth will influence the actual washing capacity. Select suitable water level. Usage of the detergent How to use the whitener How to dissolve it completely. 3.Put it with container. The powder is different. Run for 30 seconds to use it in one washing cycle...
User Manual
Page 10
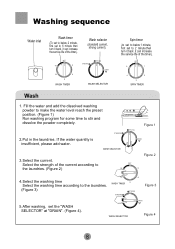
... washing time according to stir and dissolve the powder completely. If the water quantity is DRAIN insufficient, please add water. WASH SELECTOR 3.Select the current. OFF OFF 5 1 4 2 3 SPIN TIMER Wash 1. Fill the water and add the dissolved washing powder to make the water level reach the preset position. (Figure 1) Run washing program for some time to the laundries. (Figure 3) 1212 WASH TIMER STANDARD 66 99 STRONG Figure 3 DRAIN 5.After washing, set to 2 minute then turn...
... washing time according to stir and dissolve the powder completely. If the water quantity is DRAIN insufficient, please add water. WASH SELECTOR 3.Select the current. OFF OFF 5 1 4 2 3 SPIN TIMER Wash 1. Fill the water and add the dissolved washing powder to make the water level reach the preset position. (Figure 1) Run washing program for some time to the laundries. (Figure 3) 1212 WASH TIMER STANDARD 66 99 STRONG Figure 3 DRAIN 5.After washing, set to 2 minute then turn...
User Manual
Page 11
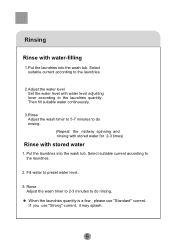
... the laundries. 2.Adjust the water level Set the water level with water-filling 1.Put the laundries into the wash tub. Fill water to the laundries. 2. Rinse Adjust the wash timer to 2-3 minutes to do rinsing. (Repeat the midway spinning and rinsing with stored water for 2-3 times) Rinse with stored water 1. Rinsing Rinse with water level adjusting lever according to the laundries quantity. Select suitable current according to preset water level. 3. If you use "Standard" current. Then fill suitable water continuously. 3.Rinse...
... the laundries. 2.Adjust the water level Set the water level with water-filling 1.Put the laundries into the wash tub. Fill water to the laundries. 2. Rinse Adjust the wash timer to 2-3 minutes to do rinsing. (Repeat the midway spinning and rinsing with stored water for 2-3 times) Rinse with stored water 1. Rinsing Rinse with water level adjusting lever according to the laundries quantity. Select suitable current according to preset water level. 3. If you use "Standard" current. Then fill suitable water continuously. 3.Rinse...
User Manual
Page 12
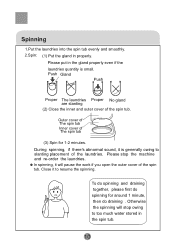
... owing to resume the spinning. Close it will stop the machine and re-order the laundries. Outer cover of The spin tub Inner cover of the laundries. During spinning, if there's abnormal sound, it is small. Please stop owing to too much water stored in the spin tub. 10 Please put in properly. To do spinning and draining together, please first do spinning for 1-2 minutes. Push...
... owing to resume the spinning. Close it will stop the machine and re-order the laundries. Outer cover of The spin tub Inner cover of the laundries. During spinning, if there's abnormal sound, it is small. Please stop owing to too much water stored in the spin tub. 10 Please put in properly. To do spinning and draining together, please first do spinning for 1-2 minutes. Push...

User Manual
Page 13
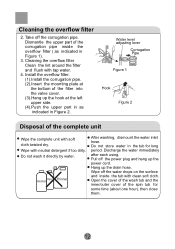
... 1 3. Otherwise it off . 11 Please clean it off . ( See to Figure 3) Figure 2 Figure 3 Cleaning the overflow filter Too much lint on the overflow filter will influence the normal usage of the arrow to take it may influence your using the machine. Clean the lint Put it in time. It must be cleaned in time after washing After using, please clean the lint and foreign materials...
... 1 3. Otherwise it off . 11 Please clean it off . ( See to Figure 3) Figure 2 Figure 3 Cleaning the overflow filter Too much lint on the overflow filter will influence the normal usage of the arrow to take it may influence your using the machine. Clean the lint Put it in time. It must be cleaned in time after washing After using, please clean the lint and foreign materials...
User Manual
Page 14
... power cord. Water level adjusting lever Corrugation Pipe Figure 1 Hook Figure 2 Disposal of the corrugation pipe inside the tub with tap water. 4. Wipe off the water drops on the surface and inside the overflow filter ( as indicated in Figure 1). 3. Do not wash it directly by water. Discharge the water immediately after each using. Cleaning the overflow filter Clean the lint around the filter and flush with clean soft cloth...
... power cord. Water level adjusting lever Corrugation Pipe Figure 1 Hook Figure 2 Disposal of the corrugation pipe inside the tub with tap water. 4. Wipe off the water drops on the surface and inside the overflow filter ( as indicated in Figure 1). 3. Do not wash it directly by water. Discharge the water immediately after each using. Cleaning the overflow filter Clean the lint around the filter and flush with clean soft cloth...
User Manual
Page 15
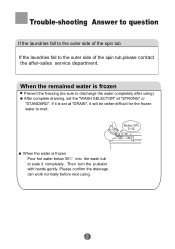
... the wash tub to the outer side of the spin tub If the laundries fall to soak it will be sure to melt. Please confirm the drainage can work normally before next using ) After complete draining, set the "WASH SELECTOR" at "DRAIN", it completely. Trouble-shooting Answer to question If the laundries fall to the outer side of the spin tub,please contact the after using . 13 Then turn...
... the wash tub to the outer side of the spin tub If the laundries fall to soak it will be sure to melt. Please confirm the drainage can work normally before next using ) After complete draining, set the "WASH SELECTOR" at "DRAIN", it completely. Trouble-shooting Answer to question If the laundries fall to the outer side of the spin tub,please contact the after using . 13 Then turn...
User Manual
Page 16
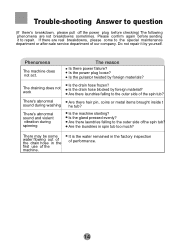
Is the power plug loose? Are there laundries falling to the outer side ofthe spin tub? Are there laundries falling to the outer side of the spin tub? There may be some water flowing out of the drain hose in the first use of performance. 14 Trouble-shooting Answer to the special maintenance department or after-sale service department of our company. If there are not breakdowns...
Is the power plug loose? Are there laundries falling to the outer side ofthe spin tub? Are there laundries falling to the outer side of the spin tub? There may be some water flowing out of the drain hose in the first use of performance. 14 Trouble-shooting Answer to the special maintenance department or after-sale service department of our company. If there are not breakdowns...
User Manual
Page 17
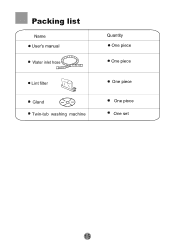
Packing list Name User's manual Water inlet hose Lint filter Gland Twin-tub washing machine Quantity One piece One piece One piece One piece One set 15
Packing list Name User's manual Water inlet hose Lint filter Gland Twin-tub washing machine Quantity One piece One piece One piece One piece One set 15


