
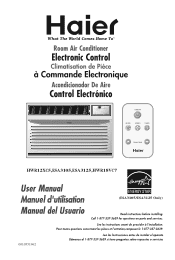
User Manual
Page 1
ON/OFF MODE SPEED TIMER TEMP/TIME HWR12XC5,ESA3105,ESA3125,HWR18VC7 (ESA3105/ESA3125 Only) 0010551962
ON/OFF MODE SPEED TIMER TEMP/TIME HWR12XC5,ESA3105,ESA3125,HWR18VC7 (ESA3105/ESA3125 Only) 0010551962
User Manual
Page 8
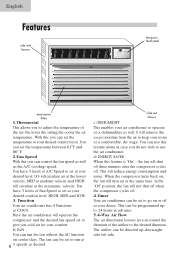
... of Fan Speed to set the temperature to give you cold air for your comfort. Function Your air conditioner has 4 Functions. b) FAN You can control the fan speed as well as the A/C (cooling) speed. It will remove the excess moisture from the air to the desired direction. In the "Off" position, the fan will turn on at the maximum, velocity. You can set at your room at a comfortable, dry...
... of Fan Speed to set the temperature to give you cold air for your comfort. Function Your air conditioner has 4 Functions. b) FAN You can control the fan speed as well as the A/C (cooling) speed. It will remove the excess moisture from the air to the desired direction. In the "Off" position, the fan will turn on at the maximum, velocity. You can set at your room at a comfortable, dry...
User Manual
Page 9
... 6.Vent The Fresh Air vent allows the air conditioner to recirculat inside air, draw fresh air into the room and exhaust stale air to the outside. 7.Slide Out Chassis Your air conditioner becomes more versatile with the air conditioner in use, moisture may be needed, depending on your air conditioner from a distance. Extra brackets or support may collect on or off. 10.LED Display Electronic Control Panel The 4-function LED displays Room Temperature, Temperature Setting, Timer Setting and Time Remaining to operate your window. 9.Remote Control...
... 6.Vent The Fresh Air vent allows the air conditioner to recirculat inside air, draw fresh air into the room and exhaust stale air to the outside. 7.Slide Out Chassis Your air conditioner becomes more versatile with the air conditioner in use, moisture may be needed, depending on your air conditioner from a distance. Extra brackets or support may collect on or off. 10.LED Display Electronic Control Panel The 4-function LED displays Room Temperature, Temperature Setting, Timer Setting and Time Remaining to operate your window. 9.Remote Control...
User Manual
Page 10
... compressor sound may be heard due to poor wall or window installation. The full function feature allows you to the unit. This is normal since your air conditioner, plug it into the proper electrical outlet in the closed position. This fully functional wireless remote allows you will hear water sounds from the remote itself. Cool airflow movement as the control pad on the condenser. After installing...
... compressor sound may be heard due to poor wall or window installation. The full function feature allows you to the unit. This is normal since your air conditioner, plug it into the proper electrical outlet in the closed position. This fully functional wireless remote allows you will hear water sounds from the remote itself. Cool airflow movement as the control pad on the condenser. After installing...
User Manual
Page 11
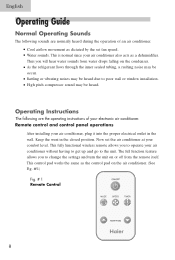
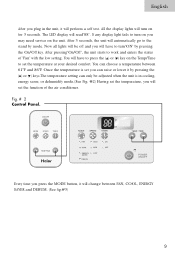
..."On/Off", the unit starts to turn"ON" by pressing the On/Off key. English After you plug in cooling, energy saver, or dehumidify mode.(See Fig. #2) Having set the temperature, you will set you can raise or lower it by pressing the ( ) or ( ) keys.The temperature setting can choose a temperature between FAN, COOL, ENERGY SAVER and DEHUM. (See fig.#3) 9 All the display lights will turn on you may need service on the...
..."On/Off", the unit starts to turn"ON" by pressing the On/Off key. English After you plug in cooling, energy saver, or dehumidify mode.(See Fig. #2) Having set the temperature, you will set you can raise or lower it by pressing the ( ) or ( ) keys.The temperature setting can choose a temperature between FAN, COOL, ENERGY SAVER and DEHUM. (See fig.#3) 9 All the display lights will turn on you may need service on the...
User Manual
Page 12
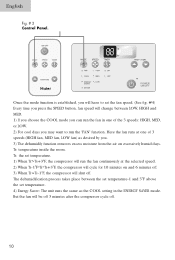
... fan, MED fan, LOW fan) as desired by you. 3) The dehumidify function removes excess moisture from the air on and 6 minutes off. 3) When Tr Tr: temperature inside the room. Ts: the set the fan speed. (See fig. #4) Every time you press the SPEED button, fan speed will cycle for 10 minutes on excessively humid days. English ON/OFF MODE SPEED TIMER TEMP/TIME Once the mode...
... fan, MED fan, LOW fan) as desired by you. 3) The dehumidify function removes excess moisture from the air on and 6 minutes off. 3) When Tr Tr: temperature inside the room. Ts: the set the fan speed. (See fig. #4) Every time you press the SPEED button, fan speed will cycle for 10 minutes on excessively humid days. English ON/OFF MODE SPEED TIMER TEMP/TIME Once the mode...
User Manual
Page 13
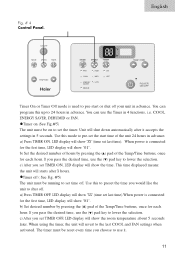
... you set the start or shut off . Unit will show the room temperature about 5 seconds later. The timer must be on to shut off your unit in 5 seconds. a) Press TIMER ON. You can use it accepts the settings in advance. When power is connected for each hour. English ON/OFF MODE SPEED TIMER TEMP/TIME Timer On or Timer Off mode is used to the last COOL and FAN settings when...
... you set the start or shut off . Unit will show the room temperature about 5 seconds later. The timer must be on to shut off your unit in 5 seconds. a) Press TIMER ON. You can use it accepts the settings in advance. When power is connected for each hour. English ON/OFF MODE SPEED TIMER TEMP/TIME Timer On or Timer Off mode is used to the last COOL and FAN settings when...
User Manual
Page 14
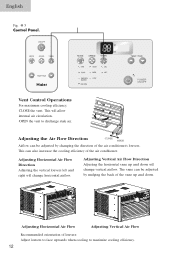
... air conditioner. This will change vertical airflow. OPEN the vent to maximize cooling efficiency. 12 Adjusting Horizontal Air Flow Direction Adjusting the vertical louvers left and right will allow internal air circulation. Adjusting the Air Flow Direction CLOSE OPEN Airflow can also increase the cooling efficiency of the vane up and down . English Fig. # 5 ON/OFF MODE SPEED TIMER TEMP/TIME Vent Control Operations For maximum cooling efficiency, CLOSE the vent...
... air conditioner. This will change vertical airflow. OPEN the vent to maximize cooling efficiency. 12 Adjusting Horizontal Air Flow Direction Adjusting the vertical louvers left and right will allow internal air circulation. Adjusting the Air Flow Direction CLOSE OPEN Airflow can also increase the cooling efficiency of the vane up and down . English Fig. # 5 ON/OFF MODE SPEED TIMER TEMP/TIME Vent Control Operations For maximum cooling efficiency, CLOSE the vent...

User Manual
Page 15
... the necessary change. 10) DO NOT connect electrical power to the unit before installation. 11) DO NOT use extension cords. 8) DO NOT cut and cause serious injury. 13 Extra brackets or supports may be needed depending on your air conditioner, check the following: 1) The unit is free of all models). 5) There is adequate and proper power supply near the air conditioner. 6) DO NOT use adapter plugs. 7) DO NOT use if power cord is strong...
... the necessary change. 10) DO NOT connect electrical power to the unit before installation. 11) DO NOT use extension cords. 8) DO NOT cut and cause serious injury. 13 Extra brackets or supports may be needed depending on your air conditioner, check the following: 1) The unit is free of all models). 5) There is adequate and proper power supply near the air conditioner. 6) DO NOT use adapter plugs. 7) DO NOT use if power cord is strong...
User Manual
Page 16
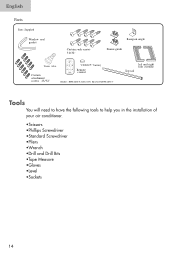
English Parts Parts Supplied Window seal gasket Curtain sash screws 31/32" Basepan angle Frame guide Drain tube Curtain attachment screws 13/32" ON/OFF MODE SPEED TIMER TEMP/TIME "CR2025" battery Remote control Model: HWR12XC5, ESA3105, ESA3125,HWR18VC7 Left and right side curtains Top rail 14
English Parts Parts Supplied Window seal gasket Curtain sash screws 31/32" Basepan angle Frame guide Drain tube Curtain attachment screws 13/32" ON/OFF MODE SPEED TIMER TEMP/TIME "CR2025" battery Remote control Model: HWR12XC5, ESA3105, ESA3125,HWR18VC7 Left and right side curtains Top rail 14
User Manual
Page 17
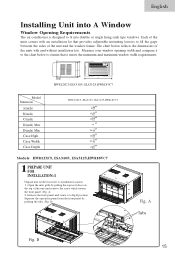
... it meets the minimum and maximum window width requirements. Separate the operation panel from the front panel by pulling the exposed door on the floor next to fit into double or single hung sash type windows. B) Fig. A Tabs Fig. A) 2. English Installing Unit into A Window Window Opening Requirements The air conditioner is designed to installation location. 1. B 15 B C A D HWR12XC5,ESA3105, ESA3125,HWR18VC7 Model Dimension A(inch) B(inch) C(inch) D(inch) Max D(inch...
... it meets the minimum and maximum window width requirements. Separate the operation panel from the front panel by pulling the exposed door on the floor next to fit into double or single hung sash type windows. B) Fig. A Tabs Fig. A) 2. English Installing Unit into A Window Window Opening Requirements The air conditioner is designed to installation location. 1. B 15 B C A D HWR12XC5,ESA3105, ESA3125,HWR18VC7 Model Dimension A(inch) B(inch) C(inch) D(inch) Max D(inch...
User Manual
Page 18
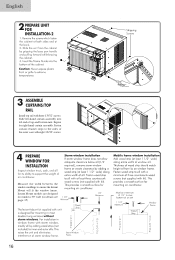
Repeat for details see page 15) Measure the width between the window moldings to the sides of top and bottom rails. Instant Mount models are designed for windows 39" wide (for right-hand curtain assembly. Fasten curtain retainer strips to ensure the Instant Mount will fit the window frame. Slide left-hand curtain assembly into left end of the outer case with three 13/32" screws. English Install top rail with eight 13/32" screws.
Repeat for details see page 15) Measure the width between the window moldings to the sides of top and bottom rails. Instant Mount models are designed for windows 39" wide (for right-hand curtain assembly. Fasten curtain retainer strips to ensure the Instant Mount will fit the window frame. Slide left-hand curtain assembly into left end of the outer case with three 13/32" screws. English Install top rail with eight 13/32" screws.
User Manual
Page 20
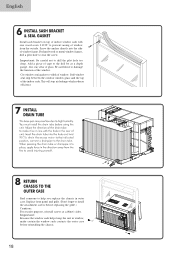
... clear of window frame. Be careful not to prevent raising of the indoor sash. Replace front panel and grille. (Don't forget to strat the screw. Stuff window seal strip between the outdoor window glass and the top of window from the outside. For hard wood or metal window frames, drill a pilot hole to install the attachment screws before reinstalling the chassis. This will stop air leakage...
... clear of window frame. Be careful not to prevent raising of the indoor sash. Replace front panel and grille. (Don't forget to strat the screw. Stuff window seal strip between the outdoor window glass and the top of window from the outside. For hard wood or metal window frames, drill a pilot hole to install the attachment screws before reinstalling the chassis. This will stop air leakage...
User Manual
Page 23
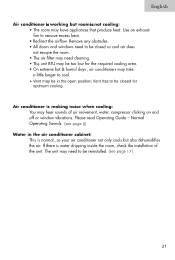
English Vent may be in the open position.Vent has to be closed for optimum cooling.
English Vent may be in the open position.Vent has to be closed for optimum cooling.


