
User Manual
Page 2
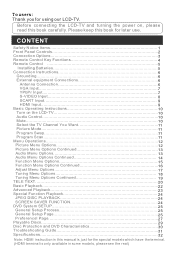
... 1 Front Panel Controls 2 Connection Options 3 Remote Control Key Functions 4 Remote Control 5 Installing Batteries 5 Connection Instructions 6 Grounding 6 External equipment Connections 6 Antenna Connection 6 VGA Input 7 YPbPr Input 7. Please keep this book carefully. Before connecting the LCD-TV and turning the power on the LCD-TV 10 Audio Control 10 Mute...10 Select the TV Channel You Want 11 Picture Mode 11 Program Swap 1. 1 Program Scan 11 Menu Operations 12 Picture Menu Options 12 Picture Menu Options Continued 13 Audio Menu Options 13 Audio Menu Options Continued...
... 1 Front Panel Controls 2 Connection Options 3 Remote Control Key Functions 4 Remote Control 5 Installing Batteries 5 Connection Instructions 6 Grounding 6 External equipment Connections 6 Antenna Connection 6 VGA Input 7 YPbPr Input 7. Please keep this book carefully. Before connecting the LCD-TV and turning the power on the LCD-TV 10 Audio Control 10 Mute...10 Select the TV Channel You Want 11 Picture Mode 11 Program Swap 1. 1 Program Scan 11 Menu Operations 12 Picture Menu Options 12 Picture Menu Options Continued 13 Audio Menu Options 13 Audio Menu Options Continued...

User Manual
Page 4
...-C,L20C11W 6 7 Control Panel Function 6 7 67 1. Power supply switch 2.TV/AV Select the input signals: PC/COMPONENT/DVD/TV/ SCART/SVIDEO/HDMI 3. VOL- Front Panel Controls L1510A-C, L15C10A, L1920A-C, L1910A-C, L19C10A 2 3 4 5 1 L1510B-C, L15C10B, L1910B-C, L19C10B, TV/AV MENU VOL- CH- VOL+ CH- MENU Press to enter 5. VOL+ CH- TV channel down / Left orientation to adjust the item in the OSD VOL+ Volume up / to select the item in standby mode, illuminates green...
...-C,L20C11W 6 7 Control Panel Function 6 7 67 1. Power supply switch 2.TV/AV Select the input signals: PC/COMPONENT/DVD/TV/ SCART/SVIDEO/HDMI 3. VOL- Front Panel Controls L1510A-C, L15C10A, L1920A-C, L1910A-C, L19C10A 2 3 4 5 1 L1510B-C, L15C10B, L1910B-C, L19C10B, TV/AV MENU VOL- CH- VOL+ CH- MENU Press to enter 5. VOL+ CH- TV channel down / Left orientation to adjust the item in the OSD VOL+ Volume up / to select the item in standby mode, illuminates green...

User Manual
Page 5
... Y S-VIDEO TV SCART VGA IN HDMI Earphone port Antenna Input Connect cable or antenna signals to the jacks. PC Input Connect to the VGA 15PIN analog output connector of the PC display card for reference, please see the real. Y Pb Pr PC AUDIO IN ANT IN Connection Options DVD STOP PLAY/PAUSE OPEN/CLOSE PREV NEXT S-VIDEO TV SCART VGA IN DVD insert HDMI The figure is on the back of the set) COMPONENT Input Connect a component video/audio VGA /COMPONENT/device to these jacks SVIDEO Audio Input Connect...
... Y S-VIDEO TV SCART VGA IN HDMI Earphone port Antenna Input Connect cable or antenna signals to the jacks. PC Input Connect to the VGA 15PIN analog output connector of the PC display card for reference, please see the real. Y Pb Pr PC AUDIO IN ANT IN Connection Options DVD STOP PLAY/PAUSE OPEN/CLOSE PREV NEXT S-VIDEO TV SCART VGA IN DVD insert HDMI The figure is on the back of the set) COMPONENT Input Connect a component video/audio VGA /COMPONENT/device to these jacks SVIDEO Audio Input Connect...

User Manual
Page 6
...CALL EXIT PICTURE SOUND TIME FUNCTION Stand By DVD Open/close DVD 10+ Scan Zoom Mute Swap Call Screen Display Program Number / TV and some other source Exchange Digital Selector TV/DVD Volume/Channel Selection MENU DVD Audio Picture Mode DVD STOP Tune Menu Button DVD SETUP DVD PAUSE/STEP DVD FAST REVERSE DVD FAST FORWARD DVD MENU DVD NEXT DVD PREVIOUS DVD REPEAT DVD PLAY/ENTER DVD A-B REPEAT UP DVD Cursor Move button LEFT DVD SLOW RIGHT DVD ANGLE DOWN DVD SEARCH DVD PROGRAM DVD TITLE/PBC DVD SUBTITLE DVD CALL TELETEXT BUTTONS Exit Screen Display Fast...
...CALL EXIT PICTURE SOUND TIME FUNCTION Stand By DVD Open/close DVD 10+ Scan Zoom Mute Swap Call Screen Display Program Number / TV and some other source Exchange Digital Selector TV/DVD Volume/Channel Selection MENU DVD Audio Picture Mode DVD STOP Tune Menu Button DVD SETUP DVD PAUSE/STEP DVD FAST REVERSE DVD FAST FORWARD DVD MENU DVD NEXT DVD PREVIOUS DVD REPEAT DVD PLAY/ENTER DVD A-B REPEAT UP DVD Cursor Move button LEFT DVD SLOW RIGHT DVD ANGLE DOWN DVD SEARCH DVD PROGRAM DVD TITLE/PBC DVD SUBTITLE DVD CALL TELETEXT BUTTONS Exit Screen Display Fast...
User Manual
Page 8
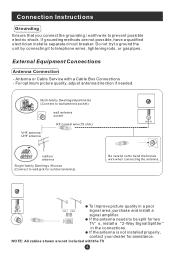
... /Houses (Connect to wall jack for outdoor antenna) Be careful not to telephone wires, lightening rods, or gas pipes. If the antenna is not installed properly, contact your dealer for assistance. For optimum picture quality, adjust antenna direction if needed. To improve picture quality in the connections. If the antenna needs to prevent possible electric shock. External Equipment Connections Antenna Connection - If grounding methods are not included with a Cable Box Connections - Do...
... /Houses (Connect to wall jack for outdoor antenna) Be careful not to telephone wires, lightening rods, or gas pipes. If the antenna is not installed properly, contact your dealer for assistance. For optimum picture quality, adjust antenna direction if needed. To improve picture quality in the connections. If the antenna needs to prevent possible electric shock. External Equipment Connections Antenna Connection - If grounding methods are not included with a Cable Box Connections - Do...

User Manual
Page 9
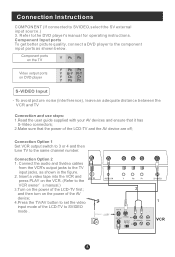
... the power of the PC; 5.Press the TV/AV button to set the video input mode of the LCD-TV.Tighten the screws on your DVD player does not have component video output,use 1. Connection and use steps: 1.Read the user guide supplied with the resolution, vertical pattern, contrast or brightness in the figure. Connection Instructions VGA Input You can not be noise associated with your personal computer using a VGA cable (not supplied). VGA IN 3.Connect a D type 15-pin VGAinterface cable ( not supplied...
... the power of the PC; 5.Press the TV/AV button to set the video input mode of the LCD-TV.Tighten the screws on your DVD player does not have component video output,use 1. Connection and use steps: 1.Read the user guide supplied with the resolution, vertical pattern, contrast or brightness in the figure. Connection Instructions VGA Input You can not be noise associated with your personal computer using a VGA cable (not supplied). VGA IN 3.Connect a D type 15-pin VGAinterface cable ( not supplied...
User Manual
Page 10
Component Input ports To get better picture quality, connect a DVD player to SVIDEO mode . 2 1 VCR Connection Option 2 1. put mode of the AV device; 4.Press the TV/AV button to set the video in the figure. 2. Connect the audio and Svideo cables from the VCR's output jacks to the same channel number. Insert a video tape into the VCR and press PLAY on the VCR. (Refer to the VCR owner s manual.) 3.Turn on the power of the LCD-TV to the component input ports as shown in . S-VIDEO Input - and...
Component Input ports To get better picture quality, connect a DVD player to SVIDEO mode . 2 1 VCR Connection Option 2 1. put mode of the AV device; 4.Press the TV/AV button to set the video in the figure. 2. Connect the audio and Svideo cables from the VCR's output jacks to the same channel number. Insert a video tape into the VCR and press PLAY on the VCR. (Refer to the VCR owner s manual.) 3.Turn on the power of the LCD-TV to the component input ports as shown in . S-VIDEO Input - and...

User Manual
Page 11
... operating guide. Select the input source by using the TV/AV button on external equipment for program play. Operate the corresponding external equipment. SCART External equipment HDMI HDMI Note: The audio cable included with the TV should be used when connected with the corresponding terminals of other equipment, such as shown in the figure. Refer to use 1. Press Play button on the remote control. 2. HDMI Input How to connect Connect the cables from the external equipment's output jacks to the TV input jacks...
... operating guide. Select the input source by using the TV/AV button on external equipment for program play. Operate the corresponding external equipment. SCART External equipment HDMI HDMI Note: The audio cable included with the TV should be used when connected with the corresponding terminals of other equipment, such as shown in the figure. Refer to use 1. Press Play button on the remote control. 2. HDMI Input How to connect Connect the cables from the external equipment's output jacks to the TV input jacks...
User Manual
Page 12
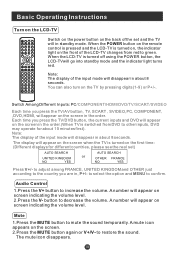
... mode and the indicator light turns red. Switch Among Different Inputs: PC/COMPONENT/HDMI/DVD/TV/SCART/SVIDEO Each time you are in the order. TV/DVD P+ V- to adjust among FRANCE, UNITED KINGDOM and OTHER just according to mute the sound temporarily. Mute 1.Press the MUTE button to the country you press the TV/AV button, TV, SCART , SVIDEO,PC, COMPONENT, ,DVD,HDMI, will appear on the screen in , P+/- MENU V+ AUDIO P- A number...
... mode and the indicator light turns red. Switch Among Different Inputs: PC/COMPONENT/HDMI/DVD/TV/SCART/SVIDEO Each time you are in the order. TV/DVD P+ V- to adjust among FRANCE, UNITED KINGDOM and OTHER just according to mute the sound temporarily. Mute 1.Press the MUTE button to the country you press the TV/AV button, TV, SCART , SVIDEO,PC, COMPONENT, ,DVD,HDMI, will appear on the screen in , P+/- MENU V+ AUDIO P- A number...

User Manual
Page 13
.... For desired mode as follows: PERSONAL STANDARD MILD FRESH Program Swap 1 Suppose the channel number you are using is indicated on the remote control. The LCD-TV can store up to 100 channels , and you can easily change between the channel you are using and the channel you used just now is 8 and the channel number you used last time. Program Scan 1 Press the SCAN button to directly select TV channels. The scan will pause for menu display .
.... For desired mode as follows: PERSONAL STANDARD MILD FRESH Program Swap 1 Suppose the channel number you are using is indicated on the remote control. The LCD-TV can store up to 100 channels , and you can easily change between the channel you are using and the channel you used just now is 8 and the channel number you used last time. Program Scan 1 Press the SCAN button to directly select TV channels. The scan will pause for menu display .

User Manual
Page 14
Press the EXIT button to exit the menu Picture Menu Options Picture quality can be adjusted as follows: 1. until the following menu appears on the screen can be adjusted for any input separately . Press P+/P- Press TV/AV or TV/DVD to help you with the TV operation. The picture quality on the screen. 2. Press P+/P- Press MENU button to display the main menu, and V+/V-to the parameters 4. PC MENU COMPONENT/HDMI MENU PICTURE BRIGHTNESS CONTRAST SHARPNESS...
Press the EXIT button to exit the menu Picture Menu Options Picture quality can be adjusted as follows: 1. until the following menu appears on the screen can be adjusted for any input separately . Press P+/P- Press TV/AV or TV/DVD to help you with the TV operation. The picture quality on the screen. 2. Press P+/P- Press MENU button to display the main menu, and V+/V-to the parameters 4. PC MENU COMPONENT/HDMI MENU PICTURE BRIGHTNESS CONTRAST SHARPNESS...

User Manual
Page 15
Function: BRIGHTNESS :Adjust the brightness of the picture . CONTRAST : Adjust the contrast of the picture . COLOUR : Press V+/V- Menu Operations Picture Menu Options continued 3.Press V+/V- Audio Menu Options Sound can be adjusted only under NTSC mode COLOUR TEMP. : Press to dark parts of the picture . Press MENU and V+/V- HUE : Adjust the tone of the picture and by selecting OFF,LOW,MID,HIGH. Appear and be adjusted for any input as follows: 1. button until desired...
Function: BRIGHTNESS :Adjust the brightness of the picture . CONTRAST : Adjust the contrast of the picture . COLOUR : Press V+/V- Menu Operations Picture Menu Options continued 3.Press V+/V- Audio Menu Options Sound can be adjusted only under NTSC mode COLOUR TEMP. : Press to dark parts of the picture . Press MENU and V+/V- HUE : Adjust the tone of the picture and by selecting OFF,LOW,MID,HIGH. Appear and be adjusted for any input as follows: 1. button until desired...

User Manual
Page 17
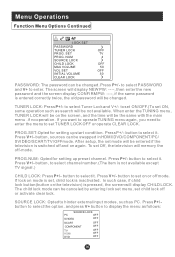
Menu Operations Function Menu Options 1. button to increase and decrease the level to adjust the selected option to the factory default . 8. INPUT SOURCE : Display current mode . TXT LANGUAGE: To switch the teletext languages. 4. RESET : Press V+ to reset some settings to your preference . 4. Lock set menu is as follows: (The initial password is canceled) button to enter the sound menu and to go up and down to select the OSD language. 3. If password is correctly entered...
Menu Operations Function Menu Options 1. button to increase and decrease the level to adjust the selected option to the factory default . 8. INPUT SOURCE : Display current mode . TXT LANGUAGE: To switch the teletext languages. 4. RESET : Press V+ to reset some settings to your preference . 4. Lock set menu is as follows: (The initial password is canceled) button to enter the sound menu and to go up and down to select the OSD language. 3. If password is correctly entered...
User Manual
Page 18
... set TUNER LOCK OFF or operate CLEAR LOCK. Press V+/- Press P+/- The child lock mode can be entered if the television is pressed, the screen will be the same with the main menu .if no operation. SET PROG. button to select it . If you want to operate TUNING menu again, you need to enter the menu to hinder external input modes, such as follows: SOURCE LOCK PC OFF SVIDEO OFF SCART COMPONENT TV HDMI DVD OFF...
... set TUNER LOCK OFF or operate CLEAR LOCK. Press V+/- Press P+/- The child lock mode can be entered if the television is pressed, the screen will be the same with the main menu .if no operation. SET PROG. button to select it . If you want to operate TUNING menu again, you need to enter the menu to hinder external input modes, such as follows: SOURCE LOCK PC OFF SVIDEO OFF SCART COMPONENT TV HDMI DVD OFF...

User Manual
Page 20
... mode . 2. Tuning Menu Options 1. Menu Operations PHASE : Removes any horizontal distortion and clears or sharpness the displayed characters . button to increase and decrease the level to adjust the selected option to select the desired option . 3.Press V+/V- to match the PC input source H.POSITION : Picture horizontal adjust V.POSITION : Picture vertical position adjust . to edit totally) COLOR SYSTEM : Select the TV color system from AUTO,PAL,SECAM. CLOCK : Adjust the TFT-LCD to change...
... mode . 2. Tuning Menu Options 1. Menu Operations PHASE : Removes any horizontal distortion and clears or sharpness the displayed characters . button to increase and decrease the level to adjust the selected option to select the desired option . 3.Press V+/V- to match the PC input source H.POSITION : Picture horizontal adjust V.POSITION : Picture vertical position adjust . to edit totally) COLOR SYSTEM : Select the TV color system from AUTO,PAL,SECAM. CLOCK : Adjust the TFT-LCD to change...

User Manual
Page 25
... number of language depends on screen. If you prefer. AUDIO Press this key to display root menu, select item according to cancel this button can change the audio mode. IF YOU PLAY OTHER FORMAT DISC, THE OPERATION AND DISPLAY ON SCREEN MAY DIFFERENT. D.MENU Press this key can cycle among Mono Left, Mono Right, Mix-Mono and Stereo. Note: When press this key will work with a DVD having...
... number of language depends on screen. If you prefer. AUDIO Press this key to display root menu, select item according to cancel this button can change the audio mode. IF YOU PLAY OTHER FORMAT DISC, THE OPERATION AND DISPLAY ON SCREEN MAY DIFFERENT. D.MENU Press this key can cycle among Mono Left, Mono Right, Mix-Mono and Stereo. Note: When press this key will work with a DVD having...
User Manual
Page 26
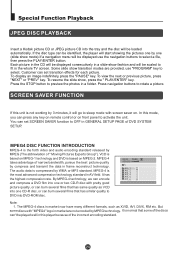
... press any key on remote control or on MPEG-2. Press navigation buttons to sleep mode with pretty good picture quality, or can burn several films that has same quality as XVID, AVI, DIVX, RM etc. VCD is based on . Some slide show fashion and will be scaled to select a file, then press the PLAY/ENTER button. To view the next or previous...
... press any key on remote control or on MPEG-2. Press navigation buttons to sleep mode with pretty good picture quality, or can burn several films that has same quality as XVID, AVI, DIVX, RM etc. VCD is based on . Some slide show fashion and will be scaled to select a file, then press the PLAY/ENTER button. To view the next or previous...
User Manual
Page 27
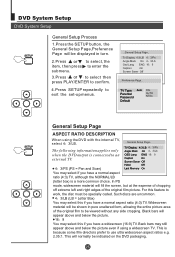
TV Type Auto Parental Password Default PAL AUTO NTSC SETUP PLAY/ENTER General Setup Page ASPECT RATIO DESCRIPTION When using a widescreen TV. TV Display 4:3 LB 4 3/.Ps Angle Mark On 4 3/.Lb when the DVD output is because some film directors prefer to use ultra widescreen aspect ratios e.g. 2.35:1. Such discs are uncommon. 4 3/LB (LB = Letter Box) You may select this if you have a widescreen (16:9) TV. This is connected to an OSD Lang...
TV Type Auto Parental Password Default PAL AUTO NTSC SETUP PLAY/ENTER General Setup Page ASPECT RATIO DESCRIPTION When using a widescreen TV. TV Display 4:3 LB 4 3/.Ps Angle Mark On 4 3/.Lb when the DVD output is because some film directors prefer to use ultra widescreen aspect ratios e.g. 2.35:1. Such discs are uncommon. 4 3/LB (LB = Letter Box) You may select this if you have a widescreen (16:9) TV. This is connected to an OSD Lang...
User Manual
Page 33
...-sales service for adjust. Television out of picture and sound systems. program (black and white) Refer to relative instructions in side that may cause a fatally or fire. Verify if the antenna is in some channel Verify if correct channel is interrupted. Note: 1.If the fault can be repaired by FINE TUNE and MANUAL SEARCH. No picture in good condition. Press TV/AV button to change signal input to remove...
...-sales service for adjust. Television out of picture and sound systems. program (black and white) Refer to relative instructions in side that may cause a fatally or fire. Verify if the antenna is in some channel Verify if correct channel is interrupted. Note: 1.If the fault can be repaired by FINE TUNE and MANUAL SEARCH. No picture in good condition. Press TV/AV button to change signal input to remove...
User Manual
Page 34
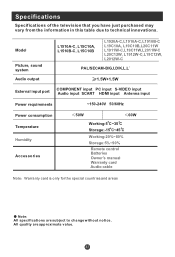
.... Model Picture, sound system Audio output L1510A-C, L15C10A, L1510B-C, L15C10B L1920A-C,L1910A-C,L1910B-C L19C10A, L19C10B,L20C11W L1911W-C,L19C11W,L2011W-C L20C12W, L1912W-C,L19C12W, L2012W-C PAL/SECAM-B/G,I,D/K,L,L 1.5W+1.5W COMPONENT input PC input S-VIDEO input External input port Audio input SCART HDMI input Antenna input Power requirements ~150-240V 50/60Hz Power consumption Temperature Humidity Accessories 50W 60W Working:5 C~35 C Storage:-15 C~45 C Working:20%~80% Storage:5%~90% Remote control Batteries Owner's manual Warranty card Audio cable Note Warranty card...
.... Model Picture, sound system Audio output L1510A-C, L15C10A, L1510B-C, L15C10B L1920A-C,L1910A-C,L1910B-C L19C10A, L19C10B,L20C11W L1911W-C,L19C11W,L2011W-C L20C12W, L1912W-C,L19C12W, L2012W-C PAL/SECAM-B/G,I,D/K,L,L 1.5W+1.5W COMPONENT input PC input S-VIDEO input External input port Audio input SCART HDMI input Antenna input Power requirements ~150-240V 50/60Hz Power consumption Temperature Humidity Accessories 50W 60W Working:5 C~35 C Storage:-15 C~45 C Working:20%~80% Storage:5%~90% Remote control Batteries Owner's manual Warranty card Audio cable Note Warranty card...


