User Manual
Page 1
LCD TV USER MANUAL Please read this manual carefully before using this TV set and keep it for future reference.
LCD TV USER MANUAL Please read this manual carefully before using this TV set and keep it for future reference.
User Manual
Page 2
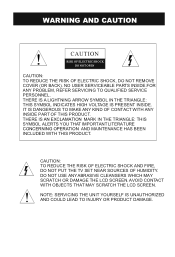
...CAUTION: TO REDUCE THE RISK OF ELECTRIC SHOCK, DO NOT REMOVE COVER (OR BACK). NO USER SERVICEABLE PARTS INSIDE.FOR ANY PROBLEM, REFER SERVICING TO QUALIFIED SERVICE PERSONNEL. IT IS DANGEROUS TO MAKE ANY KIND OF CONTACT WITH ANY INSIDE PART OF THIS PRODUCT. THERE IS AN EXCLAMATION MARK IN THE... LITERATURE CONCERNING OPERATION AND MAINTENANCE HAS BEEN INCLUDED WITH THIS PRODUCT. WARNING AND CAUTION CAUTION ! DO NOT USE ANY ABRASIVE CLEANSERS WHICH MAY SCRATCH OR DAMAGE THE LCD SCREEN. CAUTION: TO REDUCE THE RISK OF ELECTRIC SHOCK AND FIRE, DO NOT PUT THE TV SET NEAR SOURCES OF...
...CAUTION: TO REDUCE THE RISK OF ELECTRIC SHOCK, DO NOT REMOVE COVER (OR BACK). NO USER SERVICEABLE PARTS INSIDE.FOR ANY PROBLEM, REFER SERVICING TO QUALIFIED SERVICE PERSONNEL. IT IS DANGEROUS TO MAKE ANY KIND OF CONTACT WITH ANY INSIDE PART OF THIS PRODUCT. THERE IS AN EXCLAMATION MARK IN THE... LITERATURE CONCERNING OPERATION AND MAINTENANCE HAS BEEN INCLUDED WITH THIS PRODUCT. WARNING AND CAUTION CAUTION ! DO NOT USE ANY ABRASIVE CLEANSERS WHICH MAY SCRATCH OR DAMAGE THE LCD SCREEN. CAUTION: TO REDUCE THE RISK OF ELECTRIC SHOCK AND FIRE, DO NOT PUT THE TV SET NEAR SOURCES OF...
User Manual
Page 5
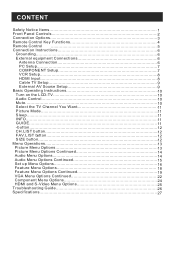
... Front Panel Controls 2 Connection Options 3 Remote Control Key Functions 4 Remote Control 5 Connection Instructions 6 Grounding 6 External equipment Connections 6 Antenna Connection 6 PC Setup 7 COMPONENT Setup 7 VCR Setup 8 HDMI Input 8 Cable TV Setup 9 External AV Source Setup 9 Basic Operating Instructions 10 Turn on the LCD-TV 10 Audio Control 10 Mute...10 Select the TV Channel You Want 11 Picture Mode 11 Sleep...1. 1 INFO...11 GUIDE 11 -button 12 CH.LIST button 1. 2 FAV.LIST button 12 SIZE button 12 Menu Operations 13 Picture Menu Options 13 Picture Menu Options...
... Front Panel Controls 2 Connection Options 3 Remote Control Key Functions 4 Remote Control 5 Connection Instructions 6 Grounding 6 External equipment Connections 6 Antenna Connection 6 PC Setup 7 COMPONENT Setup 7 VCR Setup 8 HDMI Input 8 Cable TV Setup 9 External AV Source Setup 9 Basic Operating Instructions 10 Turn on the LCD-TV 10 Audio Control 10 Mute...10 Select the TV Channel You Want 11 Picture Mode 11 Sleep...1. 1 INFO...11 GUIDE 11 -button 12 CH.LIST button 1. 2 FAV.LIST button 12 SIZE button 12 Menu Operations 13 Picture Menu Options 13 Picture Menu Options...
User Manual
Page 8
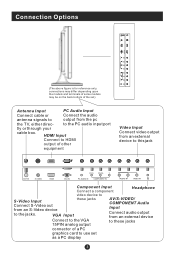
... use set ) Antenna Input PC Audio Input Connect cable or Connect the audio antenna signals to the PC audio input port tly or through your cable box. to output from the pc the TV, either direc- VGA Input Connect to the VGA 15PIN analog output AV/S-VIDEO/ COMPONENT Audio Input Connect audio output from an external device to these jacks Connect S-Video out from an external device to this jack ANT IN S-VIDEO HDMI VGA IN Pr/Cr Pb/Cb Y PC AUDIO IN COMPONENT IN R L AUDIO IN V VIDEO IN Component Input Connect a component Headphone video device to S-Video Input these...
... use set ) Antenna Input PC Audio Input Connect cable or Connect the audio antenna signals to the PC audio input port tly or through your cable box. to output from the pc the TV, either direc- VGA Input Connect to the VGA 15PIN analog output AV/S-VIDEO/ COMPONENT Audio Input Connect audio output from an external device to these jacks Connect S-Video out from an external device to this jack ANT IN S-VIDEO HDMI VGA IN Pr/Cr Pb/Cb Y PC AUDIO IN COMPONENT IN R L AUDIO IN V VIDEO IN Component Input Connect a component Headphone video device to S-Video Input these...
User Manual
Page 9
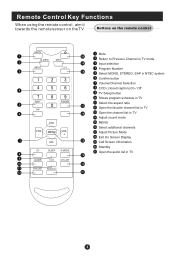
...SLEEP S.MODE GUIDE SIZE CH.LIST FAV.LIST AUDIOLIST Mute Return to Previous Channel in TV mode Input selection Program Number Select MONO, STEREO, SAP in NTSC system Confirm button Volume/Channel Selection CCD ( closed caption) On / Off TV Sleep button Shows program schedule in TV Select the aspect ratio Open the favorite channel list in TV Open the channel list in TV Adjust sound mode MENU Select additional channels Adjust Picture Mode Exit On Screen Display Call Screen Infromation Standby Open the audio list in TV MENU VOL + CH- Remote Control Key Functions When using the remote...
...SLEEP S.MODE GUIDE SIZE CH.LIST FAV.LIST AUDIOLIST Mute Return to Previous Channel in TV mode Input selection Program Number Select MONO, STEREO, SAP in NTSC system Confirm button Volume/Channel Selection CCD ( closed caption) On / Off TV Sleep button Shows program schedule in TV Select the aspect ratio Open the favorite channel list in TV Open the channel list in TV Adjust sound mode MENU Select additional channels Adjust Picture Mode Exit On Screen Display Call Screen Infromation Standby Open the audio list in TV MENU VOL + CH- Remote Control Key Functions When using the remote...

User Manual
Page 11
..., install a 2-Way Signal Splitter in a poor signal area, purchase and install a signal amplifier. Antenna or Cable Service with the TV If grounding methods are not included with a Cable Box Connections - External Equipment Connections Antenna Connection - Multi-family Dwellings/Apartments (Connect to wall antenna socket) VHF antenna UHF antenna wall antenna socket Bronze Wire RF coaxial wire (75 ohm) Turn clockwise to bend the bronze wire when connecting the antenna. To improve picture quality in the connections. NOTE: Cables...
..., install a 2-Way Signal Splitter in a poor signal area, purchase and install a signal amplifier. Antenna or Cable Service with the TV If grounding methods are not included with a Cable Box Connections - External Equipment Connections Antenna Connection - Multi-family Dwellings/Apartments (Connect to wall antenna socket) VHF antenna UHF antenna wall antenna socket Bronze Wire RF coaxial wire (75 ohm) Turn clockwise to bend the bronze wire when connecting the antenna. To improve picture quality in the connections. NOTE: Cables...

User Manual
Page 12
... VGA video interface connector on the PC. Connection and use steps: 1.Read the user guide supplied with the resolution, vertical pattern, contrast or brightness in the figure. Turn on the TV, as a monitor for your DVD player does not have component video output, use S-Video. Use the INPUT button on the remote control to VGA; 6.Check the image on your TV. Then connect the other end to the VGA video interface connector on the back of the LCD...
... VGA video interface connector on the PC. Connection and use steps: 1.Read the user guide supplied with the resolution, vertical pattern, contrast or brightness in the figure. Turn on the TV, as a monitor for your DVD player does not have component video output, use S-Video. Use the INPUT button on the remote control to VGA; 6.Check the image on your TV. Then connect the other end to the VGA video interface connector on the back of the LCD...
User Manual
Page 13
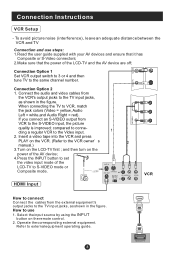
... you connect an S-VIDEO output from VCR to the TV input jacks, as shown in the figure. HDMI Connect the audio and video cables from the external equipment's HDMI output jacks to the VCR owner s 2 manual.) 3.Turn on the remote control. 2. Insert a video tape into the VCR and press PLAY on the power of the AV device; 4.Press the INPUT button to set the video input mode of the LCD-TV and the AV device are off; How to use steps: 1.Read the user guide supplied...
... you connect an S-VIDEO output from VCR to the TV input jacks, as shown in the figure. HDMI Connect the audio and video cables from the external equipment's HDMI output jacks to the VCR owner s 2 manual.) 3.Turn on the remote control. 2. Insert a video tape into the VCR and press PLAY on the power of the AV device; 4.Press the INPUT button to set the video input mode of the LCD-TV and the AV device are off; How to use steps: 1.Read the user guide supplied...

User Manual
Page 14
...1. How to external equipment, match the jack colors (Video = yellow, Audio Left = white, and Audio Right = red). pment. Connection Option 1 1. Select the input source by using the INPUT button on cable box. 3. Connection Instructions Cable TV Setup - After subscribing to the TV. - Select 3 or 4 with the cable box remote control. Select channels at the cable box or with channel switch on the remote control. 2. Select your local cable TV service provider(s). Select the input source by using the INPUT button on cable box. 2. The TV cannot display TV programming unless a TV...
...1. How to external equipment, match the jack colors (Video = yellow, Audio Left = white, and Audio Right = red). pment. Connection Option 1 1. Select the input source by using the INPUT button on cable box. 3. Connection Instructions Cable TV Setup - After subscribing to the TV. - Select 3 or 4 with the cable box remote control. Select channels at the cable box or with channel switch on the remote control. 2. Select your local cable TV service provider(s). Select the input source by using the INPUT button on cable box. 2. The TV cannot display TV programming unless a TV...

User Manual
Page 15
... the screen in order. A number will appear on the front of the LCD-TV changes from red to green or turn light. The mute icon disappears. Each time you press the INPUT button, TV, Composite, S-Video,VGA, Component and HDMI will go into standby mode and the indicator light turns red(or turns dark). button to increase the volume. Basic Operating Instructions Turn on the screen. 2.Press the MUTE button or VOL+ again to restore the sound...
... the screen in order. A number will appear on the front of the LCD-TV changes from red to green or turn light. The mute icon disappears. Each time you press the INPUT button, TV, Composite, S-Video,VGA, Component and HDMI will go into standby mode and the indicator light turns red(or turns dark). button to increase the volume. Basic Operating Instructions Turn on the screen. 2.Press the MUTE button or VOL+ again to restore the sound...
User Manual
Page 16
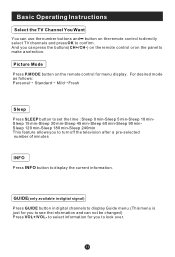
... the panel to see the information and can use the number buttons and button on the remote control for you to turn off the television after a pre-selected number of minutes INFO Press INFO button to confirm. Picture Mode Press P.MODE button on the remote control to directly select TV channels and press OK to display the current information. For desired mode as follows: Personal Standard Mild Fresh Sleep Press SLEEP button to set the time : Sleep 0 min-Sleep 5 min-Sleep...
... the panel to see the information and can use the number buttons and button on the remote control for you to turn off the television after a pre-selected number of minutes INFO Press INFO button to confirm. Picture Mode Press P.MODE button on the remote control to directly select TV channels and press OK to display the current information. For desired mode as follows: Personal Standard Mild Fresh Sleep Press SLEEP button to set the time : Sleep 0 min-Sleep 5 min-Sleep...
User Manual
Page 18
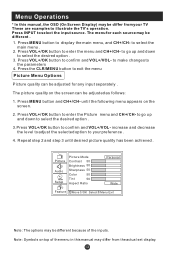
... the actual set display. until desired picture quality has been achieved . Press VOL+/OK button to select the main menu . 2. Picture Audio Setup Picture Mode Contrast 50 Brightness 50 Sharpness 50 Color 50 Tint 50 Aspect Ratio Personal Wide Feature Move /OK Select /Menu Exit Note: The options may be different because of the menu in this manual, the OSD (On Screen Display) may be different . 1. The menu for any input separately...
... the actual set display. until desired picture quality has been achieved . Press VOL+/OK button to select the main menu . 2. Picture Audio Setup Picture Mode Contrast 50 Brightness 50 Sharpness 50 Color 50 Tint 50 Aspect Ratio Personal Wide Feature Move /OK Select /Menu Exit Note: The options may be different because of the menu in this manual, the OSD (On Screen Display) may be different . 1. The menu for any input separately...
User Manual
Page 19
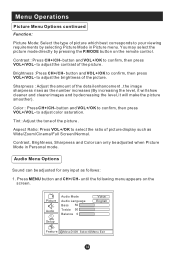
... make the picture smoother). Aspect Ratio: Press VOL+/OK to adjust the contrast of the picture. Press MENU button and CH+/CH- Menu Operations Picture Menu Options continued Function: Picture Mode: Select the type of picture which best corresponds to your viewing requirements by selecting Picture Mode in Personal mode. Contrast, Brightness, Sharpness and Color can be adjusted when Picture Mode in Picture menu. Sharpness : Adjust the amount of the picture . until the following menu appears on the remote control. Tint : Adjust the tone...
... make the picture smoother). Aspect Ratio: Press VOL+/OK to adjust the contrast of the picture. Press MENU button and CH+/CH- Menu Operations Picture Menu Options continued Function: Picture Mode: Select the type of picture which best corresponds to your viewing requirements by selecting Picture Mode in Personal mode. Contrast, Brightness, Sharpness and Color can be adjusted when Picture Mode in Picture menu. Sharpness : Adjust the amount of the picture . until the following menu appears on the remote control. Tint : Adjust the tone...

User Manual
Page 21
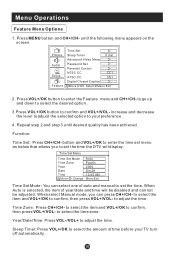
... digital signal . Picture Audio Setup Feature Tuning Band Air DTV Signal Auto Ch Search Add On Ch Search Manual Ch Set Channel Label Menu Language English Reset Move /OK Select /Menu Exit 2. to go up and down to select the desired option . 3.Press VOL+/OK button to the TV's memory. All channels now available will be automatically preset in order .After the search has finished, the first program number will display...
... digital signal . Picture Audio Setup Feature Tuning Band Air DTV Signal Auto Ch Search Add On Ch Search Manual Ch Set Channel Label Menu Language English Reset Move /OK Select /Menu Exit 2. to go up and down to select the desired option . 3.Press VOL+/OK button to the TV's memory. All channels now available will be automatically preset in order .After the search has finished, the first program number will display...
User Manual
Page 22
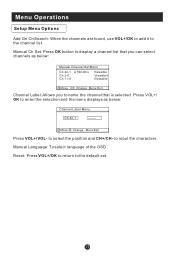
... the channel list. Reset: Press VOL+/OK to return to input the characters. Press VOL+/ OK to name the channel that you can select channels as below : Manual Channel Set Menu Ch 42-1 ATSCdmo Ch 2-0 Ch 11-0 Viewable Viewable Viewable Move OK Change Menu Exit Channel Label: Allows you to enter the selection and the menu displays as below : Channel Label Menu Ch 42-1 ------- to the default set. Manual Language: To select language...
... the channel list. Reset: Press VOL+/OK to return to input the characters. Press VOL+/ OK to name the channel that you can select channels as below : Manual Channel Set Menu Ch 42-1 ATSCdmo Ch 2-0 Ch 11-0 Viewable Viewable Viewable Move OK Change Menu Exit Channel Label: Allows you to enter the selection and the menu displays as below : Channel Label Menu Ch 42-1 ------- to the default set. Manual Language: To select language...
User Manual
Page 23
... adjust the time. Year/Date/Time: Press VOL-/VOL+ to confirm and VOL+/VOL- Picture Audio Setup Feature Time Set Sleep Timer 0 min Advanced Video Menu Password Set Parental Control NTSC CC CC1 ATSC CC CS1 Digital Closed Caption Move /OK Select /Menu Exit 2. button and VOL+/OK to enter the time set menu as below that allows you can not be disabled and can press CH+/CH- When select Manual mode, you to select the time zone. to set the time. Sleep Timer...
... adjust the time. Year/Date/Time: Press VOL-/VOL+ to confirm and VOL+/VOL- Picture Audio Setup Feature Time Set Sleep Timer 0 min Advanced Video Menu Password Set Parental Control NTSC CC CC1 ATSC CC CS1 Digital Closed Caption Move /OK Select /Menu Exit 2. button and VOL+/OK to enter the time set menu as below that allows you can not be disabled and can press CH+/CH- When select Manual mode, you to select the time zone. to set the time. Sleep Timer...
User Manual
Page 26
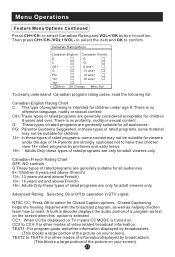
... DTV signal. CC2 to select he Closed Caption options. NTSC CC: Press OK to CC4: For other information displayed by pre-teens and early teens. 18+: Adults Only-these types of rated programs, some material may not be suitable for children. 14+: In these types of the picture on . Menu Operations Feature Menu Options Continued Press CH+/CH- Canadian Rating Menu Canadian English Canadian...
... DTV signal. CC2 to select he Closed Caption options. NTSC CC: Press OK to CC4: For other information displayed by pre-teens and early teens. 18+: Adults Only-these types of rated programs, some material may not be suitable for children. 14+: In these types of the picture on . Menu Operations Feature Menu Options Continued Press CH+/CH- Canadian Rating Menu Canadian English Canadian...

User Manual
Page 30
... enter Password Set menu and input or change old password. Repeat step 2 and step 3 until desired quality has been achieved . button and then VOL+/OK button to enter Parental Control menu. button and then VOL+/OK button to select Feature menu in HDMI or S-Video mode. 2. Menu Operations HDMI and S-Video Menu Options 1. Press MENU button and CH+/CH- button to enter NTSC CC menu and select the Closed Caption options. Advanced Video Menu: Press VOL+/OK button to set the time the TV will display. Sleep Timer...
... enter Password Set menu and input or change old password. Repeat step 2 and step 3 until desired quality has been achieved . button and then VOL+/OK button to enter Parental Control menu. button and then VOL+/OK button to select Feature menu in HDMI or S-Video mode. 2. Menu Operations HDMI and S-Video Menu Options 1. Press MENU button and CH+/CH- button to enter NTSC CC menu and select the Closed Caption options. Advanced Video Menu: Press VOL+/OK button to set the time the TV will display. Sleep Timer...

User Manual
Page 31
... fine adjustment of power supply is available. Verify if the television is selected. Press INPUT button to change signal input to relative instructions in good condition. Spots with some channel Verify if correct channel is properly supplied with your local authorized service center. 2.The TV set has dangerous voltages levels inside that electricity is interrupted. Adjust the antenna. Troubleshooting No picture, no sound Verify if the television is in the Manual for color adjust. No color...
... fine adjustment of power supply is available. Verify if the television is selected. Press INPUT button to change signal input to relative instructions in good condition. Spots with some channel Verify if correct channel is properly supplied with your local authorized service center. 2.The TV set has dangerous voltages levels inside that electricity is interrupted. Adjust the antenna. Troubleshooting No picture, no sound Verify if the television is in the Manual for color adjust. No color...

User Manual
Page 32
Dimensions quoted in this manual are subject to technical innovations. Model Picture, sound system Audio output 15"LCD 19"LCD NTSC, ATSC, Clear QAM 1.5W+1.5W External input port AV input PC input S-VIDEO input PC audio input Headphone output YPbPr input Antenna input Power requirements ~120V 60Hz Power consumption Temperature Humidity Accessories 50W Working:+5 ~+35 Storage:-15 ~+45 Working:20% ~ 80% Storage: 5% ~ 90% Remote control Batteries User manual 60W NOTE Design and specifications are approximate. Specifications Specifications of the television that you have just...
Dimensions quoted in this manual are subject to technical innovations. Model Picture, sound system Audio output 15"LCD 19"LCD NTSC, ATSC, Clear QAM 1.5W+1.5W External input port AV input PC input S-VIDEO input PC audio input Headphone output YPbPr input Antenna input Power requirements ~120V 60Hz Power consumption Temperature Humidity Accessories 50W Working:+5 ~+35 Storage:-15 ~+45 Working:20% ~ 80% Storage: 5% ~ 90% Remote control Batteries User manual 60W NOTE Design and specifications are approximate. Specifications Specifications of the television that you have just...


