
User Manual
Page 2
...6 Connection Instructions 7 Grounding 7 External equipment connections 7 Antenna Connection 7 VGA Input 8 YPbPr Input 8 S-VIDEO Input 9 SCART Input 10 HDMI Input 1. 0 Wall Mounting 10 Basic Operating Instructions 11 Turn on the LCD-TV 11 Audio Control 11 Mute 11 Select the TV Channel 12 Picture Mode 12 Program Swap 12 Program Scan 12 Menu Operations 13 Picture Menu Options 13 Audio Menu Options 14 Function Menu Options 16 Adjust Menu Options 18 Tuning Menu Options 19 DVB-T Main Menu Operations 21 Installation 21 Favourite Lists 22 Channel Edit 23 Timers 24 Settings...
...6 Connection Instructions 7 Grounding 7 External equipment connections 7 Antenna Connection 7 VGA Input 8 YPbPr Input 8 S-VIDEO Input 9 SCART Input 10 HDMI Input 1. 0 Wall Mounting 10 Basic Operating Instructions 11 Turn on the LCD-TV 11 Audio Control 11 Mute 11 Select the TV Channel 12 Picture Mode 12 Program Swap 12 Program Scan 12 Menu Operations 13 Picture Menu Options 13 Audio Menu Options 14 Function Menu Options 16 Adjust Menu Options 18 Tuning Menu Options 19 DVB-T Main Menu Operations 21 Installation 21 Favourite Lists 22 Channel Edit 23 Timers 24 Settings...
User Manual
Page 5
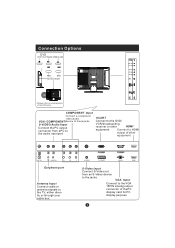
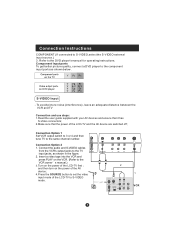
... Connection Options DVD STOP PLAY/PAUSE OPEN/CLOSE PREV NEXT DVD insert AUDIO IN Pr Pb Y S-VIDEO TV SCART VGA IN HDMI (Please refer to actualproduct of the DVD slot) COMPONENT Input Connect a component video/audio VGA /COMPONENT/device to these jacks S-VIDEO Audio Input Connect the PC output connector from an S-Video device to the VGA 15PIN analog output connector of other equipment ANT IN AUDIO IN Pr Pb Y S-VIDEO TV SCART VGA IN HDMI Earphone port Antenna Input Connect cable or antenna signals to the TV, either directly...
... Connection Options DVD STOP PLAY/PAUSE OPEN/CLOSE PREV NEXT DVD insert AUDIO IN Pr Pb Y S-VIDEO TV SCART VGA IN HDMI (Please refer to actualproduct of the DVD slot) COMPONENT Input Connect a component video/audio VGA /COMPONENT/device to these jacks S-VIDEO Audio Input Connect the PC output connector from an S-Video device to the VGA 15PIN analog output connector of other equipment ANT IN AUDIO IN Pr Pb Y S-VIDEO TV SCART VGA IN HDMI Earphone port Antenna Input Connect cable or antenna signals to the TV, either directly...
User Manual
Page 6
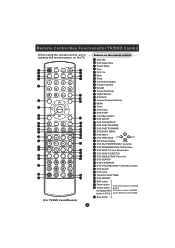
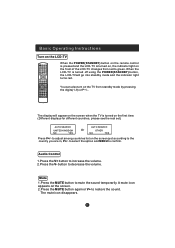
... TV/DVD Combi) When using the remote control, aim it towards the remote sensor on the remote control Stand By DVD Open/close Picture Mode Scan DVD 10+ Mute Swap Call Screen Display Program Number NICAM Source Exchange Digital Selector DTV/DVD Volume/Channel Selection MENU Zoom DVD Audio DVD STOP Tune Menu Button DVD SETUP DVD PAUSE/STEP DVD FAST REVERSE DVD FAST FORWARD DVD/DVB-T MENU UP DVD NEXT DVD PREVIOUS LEFT RIGHT Exit Screen Display DOWN DVD PLAY/ENTER/DVB-T ok button DVD PROGRAM/ DVB-T EPG button DVD /DVB-T Cursor Move button DVD /DVB-T SUBTITLE DVD...
... TV/DVD Combi) When using the remote control, aim it towards the remote sensor on the remote control Stand By DVD Open/close Picture Mode Scan DVD 10+ Mute Swap Call Screen Display Program Number NICAM Source Exchange Digital Selector DTV/DVD Volume/Channel Selection MENU Zoom DVD Audio DVD STOP Tune Menu Button DVD SETUP DVD PAUSE/STEP DVD FAST REVERSE DVD FAST FORWARD DVD/DVB-T MENU UP DVD NEXT DVD PREVIOUS LEFT RIGHT Exit Screen Display DOWN DVD PLAY/ENTER/DVB-T ok button DVD PROGRAM/ DVB-T EPG button DVD /DVB-T Cursor Move button DVD /DVB-T SUBTITLE DVD...

User Manual
Page 7
... LANG TIMER Stand By NICAM Sleep Switch to PC mode Return the last watched program channel Mute Automatically adjust in PC mode Call Screen Display Program Number Picture mode Source Exchange Digital Selector DTV/TV Volume/Channel Selection MENU Sound mode Zoom TELETEXT BUTTONS DVB-T MENU TEXT BUTTON DVB-T EPG button DVB-T ok button DVB-T SUBTITLE DVB-T Cursor Move button UP DVB-T favourite Exit Screen Display LEFT RIGHT DVB-T information button DOWN RED button Fast text button in analog Green button signal Blue button Function button in DVBT Yellow button (just...
... LANG TIMER Stand By NICAM Sleep Switch to PC mode Return the last watched program channel Mute Automatically adjust in PC mode Call Screen Display Program Number Picture mode Source Exchange Digital Selector DTV/TV Volume/Channel Selection MENU Sound mode Zoom TELETEXT BUTTONS DVB-T MENU TEXT BUTTON DVB-T EPG button DVB-T ok button DVB-T SUBTITLE DVB-T Cursor Move button UP DVB-T favourite Exit Screen Display LEFT RIGHT DVB-T information button DOWN RED button Fast text button in analog Green button signal Blue button Function button in DVBT Yellow button (just...
User Manual
Page 9
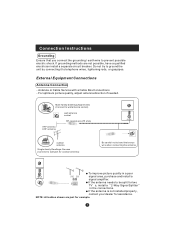
... not try to ground the unit by connecting it to prevent possible electric shock. NOTE: All cables shown are not possible, have a qualified electrician install a separate circuit breaker. If the antenna needs to bend the bronze wire when connecting the antenna. For optimum picture quality, adjust antenna direction if needed. Antenna or Cable Service with a Cable Box Connections - Connection Instructions Grounding Ensure that you connect the grounding / earth wire to telephone...
... not try to ground the unit by connecting it to prevent possible electric shock. NOTE: All cables shown are not possible, have a qualified electrician install a separate circuit breaker. If the antenna needs to bend the bronze wire when connecting the antenna. For optimum picture quality, adjust antenna direction if needed. Antenna or Cable Service with a Cable Box Connections - Connection Instructions Grounding Ensure that you connect the grounding / earth wire to telephone...

User Manual
Page 10
..., as a monitor for your LCD-TV as shown in PC mode. NOTE: If your DVD player does not have component video output, use your personal computer using a VGA cable (not supplied). Then connect the other end to the PC video interface connector on the back of the LCD-TV.Tighten the screws on the VGA connectors once they are off; 3.Connect a D type 15-pin VGAinterface cable ( not supplied ) to another resolution, change the PC...
..., as a monitor for your LCD-TV as shown in PC mode. NOTE: If your DVD player does not have component video output, use your personal computer using a VGA cable (not supplied). Then connect the other end to the PC video interface connector on the back of the LCD-TV.Tighten the screws on the VGA connectors once they are off; 3.Connect a D type 15-pin VGAinterface cable ( not supplied ) to another resolution, change the PC...
User Manual
Page 11
... set the video in the figure. 2. Connection Option 1 Set VCR output switch to 3 or 4 and then tune TV to the DVD player's manual for operating instructions. Connection Option 2 1. put mode of the LCD-TV and the AV device are switched off; Component Input ports To get better picture quality, connect a DVD player to S-VIDEO mode . 2 1 VCR Refer to the same channel number. To avoid picture noise (interference), leave an adequate distance between the VCR and TV Connection and use steps: 1.Read the user guide supplied...
... set the video in the figure. 2. Connection Option 1 Set VCR output switch to 3 or 4 and then tune TV to the DVD player's manual for operating instructions. Connection Option 2 1. put mode of the LCD-TV and the AV device are switched off; Component Input ports To get better picture quality, connect a DVD player to S-VIDEO mode . 2 1 VCR Refer to the same channel number. To avoid picture noise (interference), leave an adequate distance between the VCR and TV Connection and use steps: 1.Read the user guide supplied...

User Manual
Page 12
... HDMI Input External equipment HDMI Devices Connect the cable from the external device(DVD players, settop boxes or game consoles, to the TV SCART socket. 2.Press SOURCE to select SCART mode. 3. Select the HDMI source by using the SOURCE button on the Bracket(not included) For the Wall Bracket-Refer to the user instructions supplied with PC/ COMPONENT/S-VIDEO. HDMI TV HDMI HDMI Devices Note: The audio cable included with the TV should appear on the screen. Operate the corresponding external equipment. Wall Mounting Use 4 machine screws...
... HDMI Input External equipment HDMI Devices Connect the cable from the external device(DVD players, settop boxes or game consoles, to the TV SCART socket. 2.Press SOURCE to select SCART mode. 3. Select the HDMI source by using the SOURCE button on the Bracket(not included) For the Wall Bracket-Refer to the user instructions supplied with PC/ COMPONENT/S-VIDEO. HDMI TV HDMI HDMI Devices Note: The audio cable included with the TV should appear on the screen. Operate the corresponding external equipment. Wall Mounting Use 4 machine screws...
User Manual
Page 13
... screen. 2.Press the MUTE button again or V+ to confirm. You can also turn on the remote control is pressed and the LCD-TV is turned off using the POWER(STANDBY) button, the LCD-TVwill go into standby mode and the indicator light turns red. Audio Control 1.Press the V+ button to decrease the volume. The mute icon disappears. AUDIO STOP SETUP PAUSE/STEP TUNE REV FWD PREV NEXT D.MENU EXIT PROGRAM PLAY/ENTER OK EPG SUBTITLE...
... screen. 2.Press the MUTE button again or V+ to confirm. You can also turn on the remote control is pressed and the LCD-TV is turned off using the POWER(STANDBY) button, the LCD-TVwill go into standby mode and the indicator light turns red. Audio Control 1.Press the V+ button to decrease the volume. The mute icon disappears. AUDIO STOP SETUP PAUSE/STEP TUNE REV FWD PREV NEXT D.MENU EXIT PROGRAM PLAY/ENTER OK EPG SUBTITLE...

User Manual
Page 14
... on the remote control. Picture Mode Press P.STD button on the panel to make a selection. 1. For desired mode as follows: PERSONAL STANDARD MILD FRESH Program Swap 1 Suppose the channel number you used is 18 (as shown in this function, you can easily change between the channel you are using is now channel 8 and the channel number you are using and the channel you used last time. Enter the two digits of the channel number you...
... on the remote control. Picture Mode Press P.STD button on the panel to make a selection. 1. For desired mode as follows: PERSONAL STANDARD MILD FRESH Program Swap 1 Suppose the channel number you used is 18 (as shown in this function, you can easily change between the channel you are using is now channel 8 and the channel number you are using and the channel you used last time. Enter the two digits of the channel number you...
User Manual
Page 15
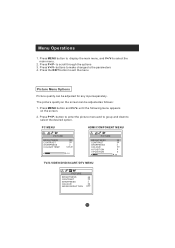
... TV/S-VIDEO/DVD/SCART/DTV MENU PICTURE BRIGHTNESS CONTRAST SHARPNESS COLOUR NOISE REDUCTION 50 50 2 50 OFF The picture quality on the screen. 2. Press MENU button and V+/V- Menu Operations 1. Press the EXIT button to the parameters 4. buttons to make changes to exit the menu Picture Menu Options Picture quality can be adjusted for any input separately . until the following menu appears on the screen can be adjusted as follows: 1. button to enter the picture menu...
... TV/S-VIDEO/DVD/SCART/DTV MENU PICTURE BRIGHTNESS CONTRAST SHARPNESS COLOUR NOISE REDUCTION 50 50 2 50 OFF The picture quality on the screen. 2. Press MENU button and V+/V- Menu Operations 1. Press the EXIT button to the parameters 4. buttons to make changes to exit the menu Picture Menu Options Picture quality can be adjusted for any input separately . until the following menu appears on the screen can be adjusted as follows: 1. button to enter the picture menu...

User Manual
Page 16
... . 4. Menu Operations Picture Menu Options Continued 3.Press V+/V- Functions: BRIGHTNESS :Adjust the brightness of the picture by selecting OFF,LOW, MID,HIGH. Audio Menu Options Sound can be adjusted as the number increase. COLOUR : Press V+/V- Press MENU and V+/V- By increasing the level, it will add more dark to light parts of the picture and by decreasing the level, it will make picture smoother. to dark parts of the picture. button to...
... . 4. Menu Operations Picture Menu Options Continued 3.Press V+/V- Functions: BRIGHTNESS :Adjust the brightness of the picture by selecting OFF,LOW, MID,HIGH. Audio Menu Options Sound can be adjusted as the number increase. COLOUR : Press V+/V- Press MENU and V+/V- By increasing the level, it will add more dark to light parts of the picture and by decreasing the level, it will make picture smoother. to dark parts of the picture. button to...

User Manual
Page 18
FUNCTION INPUT SOURCE LANGUAGE TV ENGLISH TXT LANGUAGE PAN EUROPEAN TXT EAST/WEST EAST BLUE SCREEN ON DISPLAY MODE 4:3 RESET HOTEL LOCK Only available for special series Only available for some settings to initialization and each lock is canceled) button to increase and decrease the level to adjust the selected option to display 2. There are PC , COMPONENT , DVD , HDMI, DTV, TV, SCART, S-VIDEO to your preference . 4. Press P+/P- Repeat...
FUNCTION INPUT SOURCE LANGUAGE TV ENGLISH TXT LANGUAGE PAN EUROPEAN TXT EAST/WEST EAST BLUE SCREEN ON DISPLAY MODE 4:3 RESET HOTEL LOCK Only available for special series Only available for some settings to initialization and each lock is canceled) button to increase and decrease the level to adjust the selected option to display 2. There are PC , COMPONENT , DVD , HDMI, DTV, TV, SCART, S-VIDEO to your preference . 4. Press P+/P- Repeat...

User Manual
Page 19
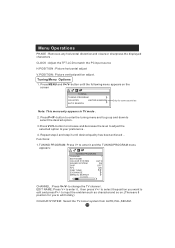
... lock set menu, set , child lock is not available except TV signal.) CHILD LOCK: Press P+/- Menu Operations Function Menu Options Continued LOCK SET PASSWORD TUNER LOCK PROG. Press P+/button to select the option, and press V+ button to hinder external input modes, such as follows: SOURCE LOCK PC OFF S-VIDEO OFF SCART COMPONENT TV HDMI DTV OFF OFF OFF OFF OFF SET INITIAL VOLUME CLEAR LOCK OFF TV 4 OFF 50 OFF 50 PASSWORD: The password can be changed . button to select Tuner Lock and V+/- Press P+/- SOURCE LOCK...
... lock set menu, set , child lock is not available except TV signal.) CHILD LOCK: Press P+/- Menu Operations Function Menu Options Continued LOCK SET PASSWORD TUNER LOCK PROG. Press P+/button to select the option, and press V+ button to hinder external input modes, such as follows: SOURCE LOCK PC OFF S-VIDEO OFF SCART COMPONENT TV HDMI DTV OFF OFF OFF OFF OFF SET INITIAL VOLUME CLEAR LOCK OFF TV 4 OFF 50 OFF 50 PASSWORD: The password can be changed . button to select Tuner Lock and V+/- Press P+/- SOURCE LOCK...
User Manual
Page 21
... it and the TUNING PROGRAM menu appears: TUNING PROGRAM CHANNEL 1 EDIT NAME COLOUR SYSTEM AUTO SOUND SYSTEM DK SKIP OFF AFC ON FINE TUNE EXCHANGE MANUAL SEARCH 143.65MHZ CHANNEL : Press V+/V- Functions: 1.TUNING PROGRAM: Press V+ to match the PC input source H.POSITION : Picture horizontal adjust V.POSITION : Picture vertical position adjust . button until desired quality has been achieved .. Tuning Menu Options 1. CLOCK : Adjust the TFT-LCD to enter it...
... it and the TUNING PROGRAM menu appears: TUNING PROGRAM CHANNEL 1 EDIT NAME COLOUR SYSTEM AUTO SOUND SYSTEM DK SKIP OFF AFC ON FINE TUNE EXCHANGE MANUAL SEARCH 143.65MHZ CHANNEL : Press V+/V- Functions: 1.TUNING PROGRAM: Press V+ to match the PC input source H.POSITION : Picture horizontal adjust V.POSITION : Picture vertical position adjust . button until desired quality has been achieved .. Tuning Menu Options 1. CLOCK : Adjust the TFT-LCD to enter it...
User Manual
Page 27
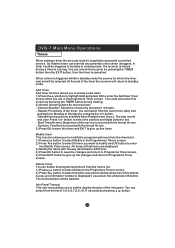
... up the changes and return to record with the format hh:mm. - the receiver is locked during viewing. 2) Set the following items for which the timer was set . - Channel Number: Select the channel by pressing the TIMER button then the EXIT button, then the timer is displayed if you to Sunday) by pressing / button. You can delete the programmed timers from Monday to modify the programmed timers from the list of 3,4,5,6,7,8,9,10...
... up the changes and return to record with the format hh:mm. - the receiver is locked during viewing. 2) Set the following items for which the timer was set . - Channel Number: Select the channel by pressing the TIMER button then the EXIT button, then the timer is displayed if you to Sunday) by pressing / button. You can delete the programmed timers from Monday to modify the programmed timers from the list of 3,4,5,6,7,8,9,10...
User Manual
Page 29
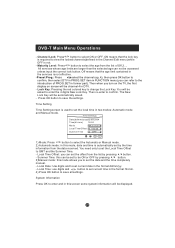
... be displayed. Local Time: use digits and / button to set the Local Time Offset to the introduction of Off,3.... Off means that the lock key is not. - You will be accessed unless input the correct lock button. Time Setting Time Setting screen is used to select the Automatic or Manual mode. 2) Automatic mode: in this mode allows you turn on the TV, the first display on screen will be asked to set the local time in the Channel Edit menu...
... be displayed. Local Time: use digits and / button to set the Local Time Offset to the introduction of Off,3.... Off means that the lock key is not. - You will be accessed unless input the correct lock button. Time Setting Time Setting screen is used to select the Automatic or Manual mode. 2) Automatic mode: in this mode allows you turn on the TV, the first display on screen will be asked to set the local time in the Channel Edit menu...

User Manual
Page 33
... and Stereo. If you want to select the program number that you want . Press PLAY/ENTER to confirm (CD press the search button several times to confirm. SLOW PLAY REPEAT A-B Press A-B to complete setting. AUDIO Press this function, press " STOP " , then press "PLAY/ENTER" . TITLE/PBC With some DVD discs pressing this language; You can view the scene from different angles, for...
... and Stereo. If you want to select the program number that you want . Press PLAY/ENTER to confirm (CD press the search button several times to confirm. SLOW PLAY REPEAT A-B Press A-B to complete setting. AUDIO Press this function, press " STOP " , then press "PLAY/ENTER" . TITLE/PBC With some DVD discs pressing this language; You can view the scene from different angles, for...
User Manual
Page 35
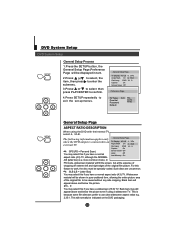
... Type Auto Parental Password Default PAL AUTO NTSC SETUP PLAY/ENTER General Setup Page ASPECT RATIO DESCRIPTION When using a widescreen TV. In PS mode, widescreen material will normally be displayed in pure unaltered form, allowing the entire picture area of the original film picture. Black bars will be indicated on the DVD packaging. b to select, the item, then press to exit the set-up menus. ..General Setup Page.. when the DVD output is...
... Type Auto Parental Password Default PAL AUTO NTSC SETUP PLAY/ENTER General Setup Page ASPECT RATIO DESCRIPTION When using a widescreen TV. In PS mode, widescreen material will normally be displayed in pure unaltered form, allowing the entire picture area of the original film picture. Black bars will be indicated on the DVD packaging. b to select, the item, then press to exit the set-up menus. ..General Setup Page.. when the DVD output is...
User Manual
Page 41
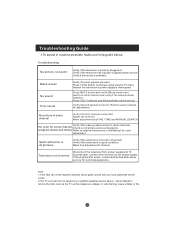
... to user's manual for color adjustment. Refer to remove the back cover as the TV set . Troubleshooting No picture, no sound Verify if the television is selected. Blank screen No sound Poor sound Verify if correct signals are input. No color for some channel Verify if correct channel is properly plugged in location possible faults use help guide below. Spots with your local authorized service center. 2.The TV set must only be solved. Switch to TV input...
... to user's manual for color adjustment. Refer to remove the back cover as the TV set . Troubleshooting No picture, no sound Verify if the television is selected. Blank screen No sound Poor sound Verify if correct signals are input. No color for some channel Verify if correct channel is properly plugged in location possible faults use help guide below. Spots with your local authorized service center. 2.The TV set must only be solved. Switch to TV input...


