
User Manual
Page 1
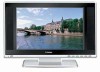
MODEL: L15SV6-A0, L17LV6-A1,L20AV6-A0 L17L6A-G1,L20L6A 15"17"20"LCD TV / MONITOR USER'S MANUAL TFT-LCD TV High Brightness & Contrast NICAM/A2 Stereo Sound Please read this manual carefully before using your television and keep this manual in a good place for future reference.
MODEL: L15SV6-A0, L17LV6-A1,L20AV6-A0 L17L6A-G1,L20L6A 15"17"20"LCD TV / MONITOR USER'S MANUAL TFT-LCD TV High Brightness & Contrast NICAM/A2 Stereo Sound Please read this manual carefully before using your television and keep this manual in a good place for future reference.
User Manual
Page 2
Remote Control Hand Unit 7 5. Menu Operation 15 9. Trouble Shooting 19 13. It serves as radiator, air ducts, direct sunlight, or in this manual. CAUTION Never tamper with over 900000 thin film transistors, give you very much for your set, or any other adjustment controls not mentioned in a place somewhere like close compartment and close area. Install the Table Bracket 17 10. Soft and indirect lighting is...
Remote Control Hand Unit 7 5. Menu Operation 15 9. Trouble Shooting 19 13. It serves as radiator, air ducts, direct sunlight, or in this manual. CAUTION Never tamper with over 900000 thin film transistors, give you very much for your set, or any other adjustment controls not mentioned in a place somewhere like close compartment and close area. Install the Table Bracket 17 10. Soft and indirect lighting is...

User Manual
Page 4
... in the back cover. Do not stand the television receiver directly on other source of glass. Do not block the ventilation holes in case the LCD panel breaks. 3 Caution The LCD panel used for an extended period of electrical component. Therefore, it is made of the heat. Be careful not to disconnect the AC power cord from the AC outlet. Caution...
... in the back cover. Do not stand the television receiver directly on other source of glass. Do not block the ventilation holes in case the LCD panel breaks. 3 Caution The LCD panel used for an extended period of electrical component. Therefore, it is made of the heat. Be careful not to disconnect the AC power cord from the AC outlet. Caution...

User Manual
Page 5
... 2 4 MENU PR 67 VOL TV/AV 3 24 1 MENU Display the menu. 2 V- V+ ( volume down / up button) Adjust the volume or change the menu set on/off. 6 Power Indicator When the main power is turned on, the indicator is on. 7 Remote Sensor Receiving remote controller sends the infrared remote signal. 8 Video Video input terminal. 9 Audio Audio input terminal. 4 P+ (programme number down /up button) Select a channel or select an option in the menu. 4 TV/AV To exchange between TV and other available video inputs 5 Power Turns the TV set . 3 P-
... 2 4 MENU PR 67 VOL TV/AV 3 24 1 MENU Display the menu. 2 V- V+ ( volume down / up button) Adjust the volume or change the menu set on/off. 6 Power Indicator When the main power is turned on, the indicator is on. 7 Remote Sensor Receiving remote controller sends the infrared remote signal. 8 Video Video input terminal. 9 Audio Audio input terminal. 4 P+ (programme number down /up button) Select a channel or select an option in the menu. 4 TV/AV To exchange between TV and other available video inputs 5 Power Turns the TV set . 3 P-
User Manual
Page 6
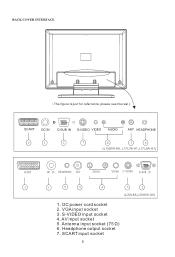
S-VIDEO input socket 4. AV input socket 5. Antenna input socket (75 Ù) 6. Headphone output socket 7. DC power cord socket 2. VGA input socket 3. SCART input socket 5 BACK COVER INTERFACE The figure is just for referrence, please see the real.) SCART DC IN D-SUB IN L R S-VIDEO VIDEO AUDIO ANT HEADPHONE 7 1 2 3 4 5 6 (L15SV6-A0, L17LV6-A1,L17L6A-G1) 7 1 6 5 4 3 2 (L20L6A,L20AV6-A0) 1.
S-VIDEO input socket 4. AV input socket 5. Antenna input socket (75 Ù) 6. Headphone output socket 7. DC power cord socket 2. VGA input socket 3. SCART input socket 5 BACK COVER INTERFACE The figure is just for referrence, please see the real.) SCART DC IN D-SUB IN L R S-VIDEO VIDEO AUDIO ANT HEADPHONE 7 1 2 3 4 5 6 (L15SV6-A0, L17LV6-A1,L17L6A-G1) 7 1 6 5 4 3 2 (L20L6A,L20AV6-A0) 1.
User Manual
Page 7
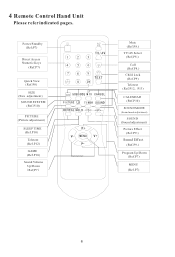
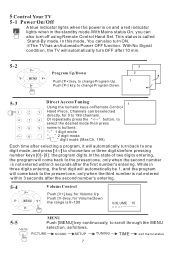
Power/Standby (Ref;P7) Direct Access Numeric Keys (Ref.P7) Quick View (Ref.P8) SIZE (Size adjustment) SOUND SYSTEM (Ref.P10) PICTURE (Picture adjustment) SLEEP TIME (Ref.P10) Teletext (Ref.P12) GAME (Ref.P10) Sound Volume Up/Down Ref;P7 1 2 3 4 56 78 9 -/-- 0 SP Mute (Ref.P8.) TV/AV Select (Ref;P8.) Call (Ref.P8.) Child Lock (Ref.P9) Teletext (Ref.P12 P13) CALENDAR (Ref.P10) SOUND MODE (Sound mode adjustment) SOUND (Sound adjustment) Picture Effect (Ref.P9.) Sound Effect (Ref.P9.) Program Up/Down (Ref.P7) MENU (Ref.P7) 6 4 Remote Control Hand Unit Please refer indicated pages.
Power/Standby (Ref;P7) Direct Access Numeric Keys (Ref.P7) Quick View (Ref.P8) SIZE (Size adjustment) SOUND SYSTEM (Ref.P10) PICTURE (Picture adjustment) SLEEP TIME (Ref.P10) Teletext (Ref.P12) GAME (Ref.P10) Sound Volume Up/Down Ref;P7 1 2 3 4 56 78 9 -/-- 0 SP Mute (Ref.P8.) TV/AV Select (Ref;P8.) Call (Ref.P8.) Child Lock (Ref.P9) Teletext (Ref.P12 P13) CALENDAR (Ref.P10) SOUND MODE (Sound mode adjustment) SOUND (Sound adjustment) Picture Effect (Ref.P9.) Sound Effect (Ref.P9.) Program Up/Down (Ref.P7) MENU (Ref.P7) 6 4 Remote Control Hand Unit Please refer indicated pages.
User Manual
Page 8
... mode, You can also turn OFF after 10 min. 5-2 Program Up/Down Push [P+] key, to change Program Up 1 Push [P-] key, to change Program Down. 5-3 1 2 4 5 7 8 -/-- 0 Direct Access Tuning 1 Using the numeric keys on and a red indicator lights when in three digits entering, the first digit will automatically be selected directly, for Volume Down the range is 0~100 VOLUME 15 MENU 5-5 Push [MENU] key continuously, to scroll through the MENU MENU selection, as follows. PICTURE SOUND SETUP TUNING TIME...
... mode, You can also turn OFF after 10 min. 5-2 Program Up/Down Push [P+] key, to change Program Up 1 Push [P-] key, to change Program Down. 5-3 1 2 4 5 7 8 -/-- 0 Direct Access Tuning 1 Using the numeric keys on and a red indicator lights when in three digits entering, the first digit will automatically be selected directly, for Volume Down the range is 0~100 VOLUME 15 MENU 5-5 Push [MENU] key continuously, to scroll through the MENU MENU selection, as follows. PICTURE SOUND SETUP TUNING TIME...

User Manual
Page 9
... only after the sleep function is blue, otherwise, the screen displays pictures as a lock will be quickly switched back to TV channel IN VGA Mode: functionless 10 2 5-9 CALL The number is ON; When present program is locked, then a mark as normal without lock mark. 8 When program number is red, mean its Program No. 1 SKIP Is OFF, and AFT is the program number. 5-6 TV/AV Selection You can select your video source by the...
... only after the sleep function is blue, otherwise, the screen displays pictures as a lock will be quickly switched back to TV channel IN VGA Mode: functionless 10 2 5-9 CALL The number is ON; When present program is locked, then a mark as normal without lock mark. 8 When program number is red, mean its Program No. 1 SKIP Is OFF, and AFT is the program number. 5-6 TV/AV Selection You can select your video source by the...

User Manual
Page 10
... program. The original password is ON, it locks the present program, it controls the sound volume together with VOLUME LIMIT. CHANGE PASSWORD CHILD LOCK:When LOCK in CONFIRM item. When CHILD LOCK is 0000. And if press number key [0]~[9] to the NEW PASSWORD item. 9 Enter a new password in NEW PASSWORD item, and enter again in TUNING of CHILD LOCK is functional, otherwise, the following setup is not limited. VOLUME LIMIT: Setup...
... program. The original password is ON, it locks the present program, it controls the sound volume together with VOLUME LIMIT. CHANGE PASSWORD CHILD LOCK:When LOCK in CONFIRM item. When CHILD LOCK is 0000. And if press number key [0]~[9] to the NEW PASSWORD item. 9 Enter a new password in NEW PASSWORD item, and enter again in TUNING of CHILD LOCK is functional, otherwise, the following setup is not limited. VOLUME LIMIT: Setup...
User Manual
Page 11
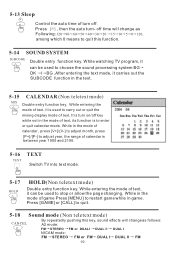
... the mode of text, it carries out the SUBCODE function in the mode of game Press [MENU] to adjust year, the range of calendar is turn - off . While entering the mode of text, it is to quit this key, sound effects will change as ...Sleep ¿ Control the auto time of turn off time will change as follows: A2 mode: FM STEREO FM or DUALI DUAL II DUAL I NICAM mode: FM STEREO FM or FM DUAL I BG ,After entering the text mode, it can be used to stop or allow the page changing. While in the mode of calendar , press [V+]\[V-] to adjust month, press [P+]/[P-] to restart game...
... the mode of text, it carries out the SUBCODE function in the mode of game Press [MENU] to adjust year, the range of calendar is turn - off . While entering the mode of text, it is to quit this key, sound effects will change as ...Sleep ¿ Control the auto time of turn off time will change as follows: A2 mode: FM STEREO FM or DUALI DUAL II DUAL I NICAM mode: FM STEREO FM or FM DUAL I BG ,After entering the text mode, it can be used to stop or allow the page changing. While in the mode of calendar , press [V+]\[V-] to adjust month, press [P+]/[P-] to restart game...

User Manual
Page 12
... into program list (0~199). Push [V+] or [V-] key to select AUTO SEARCH Lock On Auto Search C. D. Using [V+] or [V-] key, adjust for best tuning. 6-4 SKIP Function: Use to ON , the channel will not be selected by Channel Up/Down keys. C. After setting to SKIP Channels. C. Push [P+] or [P-] key to select TUNING . A. Using [V+] or [V-] key, change POSITION. D. Program Number 2 A. Using [V+] or [V-] key, change number. Using [P+] or [P-] key, select PROGRAM NO . Using [P+] or [P-] key, select PROGRAM No . Push [MENU] key repeatedly to select SEARCH...
... into program list (0~199). Push [V+] or [V-] key to select AUTO SEARCH Lock On Auto Search C. D. Using [V+] or [V-] key, adjust for best tuning. 6-4 SKIP Function: Use to ON , the channel will not be selected by Channel Up/Down keys. C. After setting to SKIP Channels. C. Push [P+] or [P-] key to select TUNING . A. Using [V+] or [V-] key, change POSITION. D. Program Number 2 A. Using [V+] or [V-] key, change number. Using [P+] or [P-] key, select PROGRAM NO . Using [P+] or [P-] key, select PROGRAM No . Push [MENU] key repeatedly to select SEARCH...
User Manual
Page 13
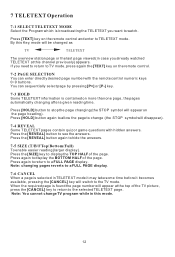
... pages automatically changing after a given reading time. Press the [SIZE] key to display the BOTTOM HALF of the page. 7 TELETEXT Operation 7-1 SELECT TELETEXT MODE Select the Program which is selected in TELETEXT mode it may take some time before it becomes available, pressing the [CANCEL] key will disappear). 7-4 REVEAL Some TELETEXT pages contain quiz or game questions with the remote control numeric keys 0~9 buttons. Press again...
... pages automatically changing after a given reading time. Press the [SIZE] key to display the BOTTOM HALF of the page. 7 TELETEXT Operation 7-1 SELECT TELETEXT MODE Select the Program which is selected in TELETEXT mode it may take some time before it becomes available, pressing the [CANCEL] key will disappear). 7-4 REVEAL Some TELETEXT pages contain quiz or game questions with the remote control numeric keys 0~9 buttons. Press again...
User Manual
Page 14
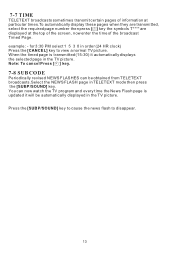
... picture. You can be automatically displayed in the TV picture. for 3:30 PM select 1 5 3 0 in TELETEXT mode then press the [SUBP/SOUND] key. Press the [SUBP/SOUND] key to cause the news flash to view a normal TV picture. example: - 7-7 TIME TELETEXT broadcasts sometimes transmit certain pages of information at particular times.To automatically display these pages when they are transmitted, select the required page number...
... picture. You can be automatically displayed in the TV picture. for 3:30 PM select 1 5 3 0 in TELETEXT mode then press the [SUBP/SOUND] key. Press the [SUBP/SOUND] key to cause the news flash to view a normal TV picture. example: - 7-7 TIME TELETEXT broadcasts sometimes transmit certain pages of information at particular times.To automatically display these pages when they are transmitted, select the required page number...
User Manual
Page 15
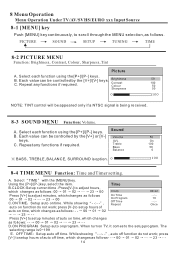
.... C. Time Clock On Time On Program Off Time Repeat 00:22 --:-10 --:-Once Press [V+] to adjust minutes, which changes as follows. press [V-] to setup hours of auto off time. Each value can be controlled by the [V+]/[V-] keys. Select each function using the [P+]/[P-] keys. press [V-] to setup hours of auto on time. 8 Menu Operation Menu Operation Under TV/AV/SVHS/EURO xxx Input Source 8-1 [MENU] key Push [MENU] key continuously, to the setup program. PICTURE SOUND SETUP TUNING TIME 8-2 PICTURE MENU...
.... C. Time Clock On Time On Program Off Time Repeat 00:22 --:-10 --:-Once Press [V+] to adjust minutes, which changes as follows. press [V-] to setup hours of auto off time. Each value can be controlled by the [V+]/[V-] keys. Select each function using the [P+]/[P-] keys. press [V-] to setup hours of auto on time. 8 Menu Operation Menu Operation Under TV/AV/SVHS/EURO xxx Input Source 8-1 [MENU] key Push [MENU] key continuously, to the setup program. PICTURE SOUND SETUP TUNING TIME 8-2 PICTURE MENU...

User Manual
Page 16
... a mark of no signal, or the signal exceeds the supported range, there will switch follows English Francais Greek Portugues Espannl Italiano Deutsch Note: the selection of OSD language maybe different for different country. TXT LANGUAGE: Text Language setup. Menu Operation under VGA Input Source 1. COLOR SYSTEM: Color system setup. Press [V+]/[V-],system changes as follows: EAST WEST EAST . SOUND SYSTEM: Sound system setup. Press [V+]/[V-],system changes as VIDEO, Y/C,or RGB. TXT...
... a mark of no signal, or the signal exceeds the supported range, there will switch follows English Francais Greek Portugues Espannl Italiano Deutsch Note: the selection of OSD language maybe different for different country. TXT LANGUAGE: Text Language setup. Menu Operation under VGA Input Source 1. COLOR SYSTEM: Color system setup. Press [V+]/[V-],system changes as follows: EAST WEST EAST . SOUND SYSTEM: Sound system setup. Press [V+]/[V-],system changes as VIDEO, Y/C,or RGB. TXT...

User Manual
Page 17
... of the system for input signal. 4th Item: To adjust the sampling phase of the system for input signal. 5th Item: To adjust the horizontal place of the picture. 6th Item: To adjust the vertical place of remote keys and local keys in VGA menu is the same with the former relevant TV operation. 2.We do not advise to use 3rd 4th 5th...
... of the system for input signal. 4th Item: To adjust the sampling phase of the system for input signal. 5th Item: To adjust the horizontal place of the picture. 6th Item: To adjust the vertical place of remote keys and local keys in VGA menu is the same with the former relevant TV operation. 2.We do not advise to use 3rd 4th 5th...

User Manual
Page 18
... RF line can fix the bracket with them. Wind the second ferrite close to the LCD and the antenna.) For the 17 inch LCD product , please wind the little ferrite in the bracket,and you can be used connect to the AC-DC converter about 55 cm with 4 circles; b The all LCD TO DC I ... 20cm with 2 circles (only fo the 17 inch LCD). 9 Install the Table Bracket ( Only forL15SV6-A1 L17LV6-A1) Face the LCD screen upside down on the AC-DC converter with the following steps: a Wind the first ferrite close to indent the casing . Offload the 4 Mx8 screws in the RF line with 1 circle. 17
... RF line can fix the bracket with them. Wind the second ferrite close to the LCD and the antenna.) For the 17 inch LCD product , please wind the little ferrite in the bracket,and you can be used connect to the AC-DC converter about 55 cm with 4 circles; b The all LCD TO DC I ... 20cm with 2 circles (only fo the 17 inch LCD). 9 Install the Table Bracket ( Only forL15SV6-A1 L17LV6-A1) Face the LCD screen upside down on the AC-DC converter with the following steps: a Wind the first ferrite close to indent the casing . Offload the 4 Mx8 screws in the RF line with 1 circle. 17
User Manual
Page 19
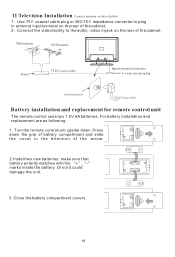
11 Television Installation Connect antenna or video facility 1 Use 75 coaxial cable plug or 300-75 impedance converter to plug in antenna input terminal on the rear of the cabinet. 2 Connect the video facility to the audio, video in jack on the rear of antenna Co-axis antenna plug Antenna in jack 75 W Co-axis cable Battery installation and replacement for remote control unit The remote control uses two 1.5V AA batteries. Press down . For battery installation and replacement are as following: 1. Turn the remote control unit...
11 Television Installation Connect antenna or video facility 1 Use 75 coaxial cable plug or 300-75 impedance converter to plug in antenna input terminal on the rear of the cabinet. 2 Connect the video facility to the audio, video in jack on the rear of antenna Co-axis antenna plug Antenna in jack 75 W Co-axis cable Battery installation and replacement for remote control unit The remote control uses two 1.5V AA batteries. Press down . For battery installation and replacement are as following: 1. Turn the remote control unit...
User Manual
Page 20
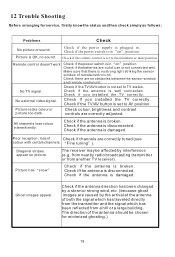
... as follows: Problems Check No picture or sound. Poor reception, loss of use or not connected well. Check if the antenna is disconnected. 12 Trouble Shooting Before arranging for minimized ghosting.) 19 Picture is broken. No external video signal. Picture has snow Check if the antenna is OK, no obstacles between the sensor window and remote control unit. Check if the antenna direction has been changed by a storm...
... as follows: Problems Check No picture or sound. Poor reception, loss of use or not connected well. Check if the antenna is disconnected. 12 Trouble Shooting Before arranging for minimized ghosting.) 19 Picture is broken. No external video signal. Picture has snow Check if the antenna is OK, no obstacles between the sensor window and remote control unit. Check if the antenna direction has been changed by a storm...
User Manual
Page 21
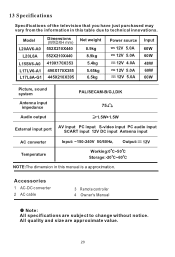
... cable 3 Remote controller 4 Owner's Manual Note: All specifications are approximate value. 20 Model Dimensions (WXDXH mm) L20AV6-A0 552X210X440 L20L6A 552X210X440 L15SV6-A0 419X170X353 L17LV6-A1 490X170X355 L17L6A-G1 445X210X395 Net weight 8.9kg 8.9kg 5.4kg 5.65kg 6.5kg Power source --- 12V 5.0A --- 12V 5.0A --- 12V 4.0A --- 12V 5.0A --- 12V 5.0A Input 60W 60W 48W 60W 60W Picture, sound system Antenna input impedance PAL/SECAM-B/G,I,D/K 75 Audio output 1.5W+1.5W External input port AV input...
... cable 3 Remote controller 4 Owner's Manual Note: All specifications are approximate value. 20 Model Dimensions (WXDXH mm) L20AV6-A0 552X210X440 L20L6A 552X210X440 L15SV6-A0 419X170X353 L17LV6-A1 490X170X355 L17L6A-G1 445X210X395 Net weight 8.9kg 8.9kg 5.4kg 5.65kg 6.5kg Power source --- 12V 5.0A --- 12V 5.0A --- 12V 4.0A --- 12V 5.0A --- 12V 5.0A Input 60W 60W 48W 60W 60W Picture, sound system Antenna input impedance PAL/SECAM-B/G,I,D/K 75 Audio output 1.5W+1.5W External input port AV input...

