
User Manual
Page 2
... FUNCTION 24 DVD System SETUP 25 General Setup Process 25 General Setup Page 2..5 Preferencel Page 27 Playable Discs 29 Disc Protection and DVD Characteristics 30 Troubleshooting Guide 31 Specifications 32 Note: HDMI instruction in some models, please see the real) CONTENT Safety Notice Items 1 Front Panel Controls 2 Connection Options 3 Remote Control Key Functions 4 Remote Control 5 Installing Batteries 5 Connection Instructions 6 Grounding 6 External equipment Connections 6 Antenna Connection 6 VGA Input 7 YPbPr Input 7. To users: Thank you for using our LCD-TV.
... FUNCTION 24 DVD System SETUP 25 General Setup Process 25 General Setup Page 2..5 Preferencel Page 27 Playable Discs 29 Disc Protection and DVD Characteristics 30 Troubleshooting Guide 31 Specifications 32 Note: HDMI instruction in some models, please see the real) CONTENT Safety Notice Items 1 Front Panel Controls 2 Connection Options 3 Remote Control Key Functions 4 Remote Control 5 Installing Batteries 5 Connection Instructions 6 Grounding 6 External equipment Connections 6 Antenna Connection 6 VGA Input 7 YPbPr Input 7. To users: Thank you for using our LCD-TV.

User Manual
Page 4
... mode, illuminates green when the display is turned on 7.Remote Sensor Receiving remote control sends the infrared remote signal. Front Panel Controls L1510A-C, L15C10A, L1920A-C, L1910A-C, L19C10A 2 3 4 5 1 L1510B-C, L15C10B, L1910B-C, L19C10B, TV/AV MENU VOL- VOL- VOL+ CH- Power supply switch 2.TV/AV Select the input signals: PC/COMPONENT/DVD/TV/ SCART/SVIDEO/HDMI 3. CH- TV channel down / Left orientation to adjust the item in the OSD VOL+ Volume up / to select the main menu...
... mode, illuminates green when the display is turned on 7.Remote Sensor Receiving remote control sends the infrared remote signal. Front Panel Controls L1510A-C, L15C10A, L1920A-C, L1910A-C, L19C10A 2 3 4 5 1 L1510B-C, L15C10B, L1910B-C, L19C10B, TV/AV MENU VOL- VOL- VOL+ CH- Power supply switch 2.TV/AV Select the input signals: PC/COMPONENT/DVD/TV/ SCART/SVIDEO/HDMI 3. CH- TV channel down / Left orientation to adjust the item in the OSD VOL+ Volume up / to select the main menu...

User Manual
Page 5
... SCART VGA IN HDMI Earphone port Antenna Input Connect cable or antenna signals to the TV, either directly or through your cable box. PC Input Connect to the jacks. And the AC power supply switch is just for PC display purpose Y Pb Pr PC AUDIO IN ANT IN Connection Options DVD STOP PLAY/PAUSE OPEN/CLOSE PREV NEXT S-VIDEO TV SCART VGA IN DVD insert HDMI The figure is on the back of the set) COMPONENT Input Connect a component video/audio VGA /COMPONENT/device to these jacks SVIDEO Audio Input Connect...
... SCART VGA IN HDMI Earphone port Antenna Input Connect cable or antenna signals to the TV, either directly or through your cable box. PC Input Connect to the jacks. And the AC power supply switch is just for PC display purpose Y Pb Pr PC AUDIO IN ANT IN Connection Options DVD STOP PLAY/PAUSE OPEN/CLOSE PREV NEXT S-VIDEO TV SCART VGA IN DVD insert HDMI The figure is on the back of the set) COMPONENT Input Connect a component video/audio VGA /COMPONENT/device to these jacks SVIDEO Audio Input Connect...

User Manual
Page 6
...CALL EXIT PICTURE SOUND TIME FUNCTION Stand By DVD Open/close DVD 10+ Scan Zoom Mute Swap Call Screen Display Program Number / TV and some other source Exchange Digital Selector TV/DVD Volume/Channel Selection MENU DVD Audio Picture Mode DVD STOP Tune Menu Button DVD SETUP DVD PAUSE/STEP DVD FAST REVERSE DVD FAST FORWARD DVD MENU DVD NEXT DVD PREVIOUS DVD REPEAT DVD PLAY/ENTER DVD A-B REPEAT UP DVD Cursor Move button LEFT DVD SLOW RIGHT DVD ANGLE DOWN DVD SEARCH DVD PROGRAM DVD TITLE/PBC DVD SUBTITLE DVD CALL TELETEXT BUTTONS Exit Screen Display Fast...
...CALL EXIT PICTURE SOUND TIME FUNCTION Stand By DVD Open/close DVD 10+ Scan Zoom Mute Swap Call Screen Display Program Number / TV and some other source Exchange Digital Selector TV/DVD Volume/Channel Selection MENU DVD Audio Picture Mode DVD STOP Tune Menu Button DVD SETUP DVD PAUSE/STEP DVD FAST REVERSE DVD FAST FORWARD DVD MENU DVD NEXT DVD PREVIOUS DVD REPEAT DVD PLAY/ENTER DVD A-B REPEAT UP DVD Cursor Move button LEFT DVD SLOW RIGHT DVD ANGLE DOWN DVD SEARCH DVD PROGRAM DVD TITLE/PBC DVD SUBTITLE DVD CALL TELETEXT BUTTONS Exit Screen Display Fast...
User Manual
Page 8
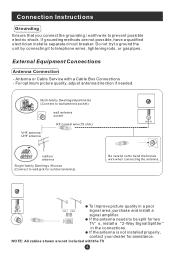
... for assistance. External Equipment Connections Antenna Connection - NOTE: All cables shown are not possible, have a qualified electrician install a separate circuit breaker. If the antenna needs to prevent possible electric shock. Connection Instructions Grounding Ensure that you connect the grounding / earth wire to be split for two TV s, install a 2-Way Signal Splitter in a poor ANT IN signal area, purchase and install a signal amplifier. For optimum picture quality, adjust antenna direction if needed.
... for assistance. External Equipment Connections Antenna Connection - NOTE: All cables shown are not possible, have a qualified electrician install a separate circuit breaker. If the antenna needs to prevent possible electric shock. Connection Instructions Grounding Ensure that you connect the grounding / earth wire to be split for two TV s, install a 2-Way Signal Splitter in a poor ANT IN signal area, purchase and install a signal amplifier. For optimum picture quality, adjust antenna direction if needed.

User Manual
Page 9
... the power of the LCD-TV first , and then turn on the menu until the picture is clear. Turn on the TV, as a monitor for your personal computer using a VGA cable (not supplied). Connection Instructions VGA Input You can not be noise associated with your DVD player does not have component video output,use 1. If noise is present, change the refresh rate to select How to the VGA video interface connector on the remote control to another resolution, change...
... the power of the LCD-TV first , and then turn on the menu until the picture is clear. Turn on the TV, as a monitor for your personal computer using a VGA cable (not supplied). Connection Instructions VGA Input You can not be noise associated with your DVD player does not have component video output,use 1. If noise is present, change the refresh rate to select How to the VGA video interface connector on the remote control to another resolution, change...
User Manual
Page 10
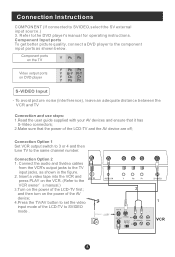
... VCR and press PLAY on the VCR. (Refer to set the video in the figure. 2. and then turn on the power of the AV device; 4.Press the TV/AV button to the VCR owner s manual.) 3.Turn on the power of the LCD-TV first ; Connection Option 1 Set VCR output switch to 3 or 4 and then tune TV to the component input ports as shown in . Component Input ports To get better picture quality, connect a DVD player to the same channel number. put mode...
... VCR and press PLAY on the VCR. (Refer to set the video in the figure. 2. and then turn on the power of the AV device; 4.Press the TV/AV button to the VCR owner s manual.) 3.Turn on the power of the LCD-TV first ; Connection Option 1 Set VCR output switch to 3 or 4 and then tune TV to the component input ports as shown in . Component Input ports To get better picture quality, connect a DVD player to the same channel number. put mode...

User Manual
Page 11
... external equipment operating guide. Press Play button on the remote control. 2. SCART External equipment HDMI HDMI Note: The audio cable included with the TV should be used when connected with the corresponding terminals of the television. 2.Press TV/AV to the TV SCART input terminal of other equipment, such as shown in the figure. HDMI Input How to connect Connect the cables from the external equipment's output jacks to the TV input jacks, as DVD, to select SCART mode...
... external equipment operating guide. Press Play button on the remote control. 2. SCART External equipment HDMI HDMI Note: The audio cable included with the TV should be used when connected with the corresponding terminals of the television. 2.Press TV/AV to the TV SCART input terminal of other equipment, such as shown in the figure. HDMI Input How to connect Connect the cables from the external equipment's output jacks to the TV input jacks, as DVD, to select SCART mode...
User Manual
Page 12
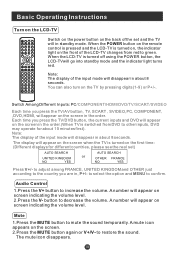
... the volume. P.STD STOP SETUP PAUSE/STEP TUNE REV FWD . PREV NEXT D.MENU REPEAT A-B PLAY/ENTER SLOW ANGLE TITLE/PBC SEARCH PROGRAM SUBTITLE D.CALL EXIT PICTURE SOUND TIME FUNCTION Switch on the power button on the TV by pressing digits(1-9) or P+/-. You can also turn on the back of the LCD-TV changes from DVD to increase the volume. Each time you are in, P+/- Audio Control 1.Press the V+ button to other inputs, DVD may operate...
... the volume. P.STD STOP SETUP PAUSE/STEP TUNE REV FWD . PREV NEXT D.MENU REPEAT A-B PLAY/ENTER SLOW ANGLE TITLE/PBC SEARCH PROGRAM SUBTITLE D.CALL EXIT PICTURE SOUND TIME FUNCTION Switch on the power button on the TV by pressing digits(1-9) or P+/-. You can also turn on the back of the LCD-TV changes from DVD to increase the volume. Each time you are in, P+/- Audio Control 1.Press the V+ button to other inputs, DVD may operate...

User Manual
Page 13
... FRESH Program Swap 1 Suppose the channel number you used just now is 8 and the channel number you are using and the channel you want to choose one digit number key. button Until - The scan will pause for menu display . Picture Mode Press P.STD button on the remote control for about 2 seconds on each channel. 2 If you used last time. Basic Operating Instructions Select the TV Channel You Want You can press the keys on the remote control or...
... FRESH Program Swap 1 Suppose the channel number you used just now is 8 and the channel number you are using and the channel you want to choose one digit number key. button Until - The scan will pause for menu display . Picture Mode Press P.STD button on the remote control for about 2 seconds on each channel. 2 If you used last time. Basic Operating Instructions Select the TV Channel You Want You can press the keys on the remote control or...

User Manual
Page 14
... TV/DVD to exit the menu Picture Menu Options Picture quality can be different from your TV s because it is different . 1. Press the EXIT button to select the input source, and the menu in this manual, the OSD (On Screen Display) may be adjusted as follows: 1. until the following menu appears on top of the menu in the different source is just an example to help...
... TV/DVD to exit the menu Picture Menu Options Picture quality can be different from your TV s because it is different . 1. Press the EXIT button to select the input source, and the menu in this manual, the OSD (On Screen Display) may be adjusted as follows: 1. until the following menu appears on top of the menu in the different source is just an example to help...

User Manual
Page 15
button to increase and decrease the level to adjust the selected option to adjust the color NOISE REDUCE: Adjust the quality of the picture . COLOUR : Press V+/V- Audio Menu Options Sound can be adjusted only under NTSC mode COLOUR TEMP. : Press to light parts of the picture. By increasing the level, it will add more dark to select the color temperature from WARM/NORMAL/ COLD H.POSITION : Picture horizontal adjust V.POSITION : Picture vertical...
button to increase and decrease the level to adjust the selected option to adjust the color NOISE REDUCE: Adjust the quality of the picture . COLOUR : Press V+/V- Audio Menu Options Sound can be adjusted only under NTSC mode COLOUR TEMP. : Press to light parts of the picture. By increasing the level, it will add more dark to select the color temperature from WARM/NORMAL/ COLD H.POSITION : Picture horizontal adjust V.POSITION : Picture vertical...

User Manual
Page 17
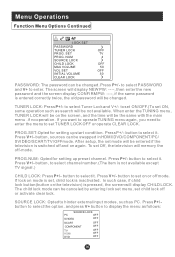
...: Used to display 2. HOTEL LOCK: Press V+ to initialization and each lock is no signal. 7. Press P+/P- Lock set menu will be entered. until desired picture quality has been achieved . There are PC , COMPONENT , HDMI, DVD , TV, SCART, SVIDEO to select the OSD language. 3. If password is correctly entered, the Lock set menu is as follows: (The initial password is 0000. Press MENU button and V+/V- Functions: 1. INPUT SOURCE : Display current mode . RESET : Press V+ to reset some settings to...
...: Used to display 2. HOTEL LOCK: Press V+ to initialization and each lock is no signal. 7. Press P+/P- Lock set menu will be entered. until desired picture quality has been achieved . There are PC , COMPONENT , HDMI, DVD , TV, SCART, SVIDEO to select the OSD language. 3. If password is correctly entered, the Lock set menu is as follows: (The initial password is 0000. Press MENU button and V+/V- Functions: 1. INPUT SOURCE : Display current mode . RESET : Press V+ to reset some settings to...
User Manual
Page 18
... operate TUNING menu again, you need to enter the menu to select channel number.(The item is inactivated . Press P+/- button to hinder external input modes, such as follows: SOURCE LOCK PC OFF SVIDEO OFF SCART COMPONENT TV HDMI DVD OFF OFF OFF OFF OFF Press V+/- After setup, the set TUNER LOCK OFF or operate CLEAR LOCK. button, to set mode will be entered if the television is entered correctly twice, the old password will be changed . If lock...
... operate TUNING menu again, you need to enter the menu to select channel number.(The item is inactivated . Press P+/- button to hinder external input modes, such as follows: SOURCE LOCK PC OFF SVIDEO OFF SCART COMPONENT TV HDMI DVD OFF OFF OFF OFF OFF Press V+/- After setup, the set TUNER LOCK OFF or operate CLEAR LOCK. button, to set mode will be entered if the television is entered correctly twice, the old password will be changed . If lock...

User Manual
Page 20
... to go up and down to your preference . 4. CLOCK : Adjust the TFT-LCD to enter it and the TUNING PROGRAM menu appears: TUNING PROGRAM CHANNEL 1 EDIT NAME COLOR SYSTEM AUTO SOUND SYSTEM DK SKIP OFF AFC ON FINE TUNE EXCHANGE MANUAL SEARCH 143.65MHZ CHANNEL : Press V+/V- Tuning Menu Options 1. EDIT NAME: Press V+ to match the PC input source H.POSITION : Picture horizontal adjust V.POSITION : Picture vertical position adjust .
... to go up and down to your preference . 4. CLOCK : Adjust the TFT-LCD to enter it and the TUNING PROGRAM menu appears: TUNING PROGRAM CHANNEL 1 EDIT NAME COLOR SYSTEM AUTO SOUND SYSTEM DK SKIP OFF AFC ON FINE TUNE EXCHANGE MANUAL SEARCH 143.65MHZ CHANNEL : Press V+/V- Tuning Menu Options 1. EDIT NAME: Press V+ to match the PC input source H.POSITION : Picture horizontal adjust V.POSITION : Picture vertical position adjust .

User Manual
Page 25
... digit buttons to select "START" . Using a disc recorded in multi-angle you must above 3 seconds interval. AUDIO Press this key will work with a DVD having a multi-layer menu.). SEARCH Press "SEARCH" once to confirm. Note: When press this key to display root menu, select item according to enter program mode. "XX" indicates total number of language depends on screen. D.MENU Press this button continuously, you can change the audio mode...
... digit buttons to select "START" . Using a disc recorded in multi-angle you must above 3 seconds interval. AUDIO Press this key will work with a DVD having a multi-layer menu.). SEARCH Press "SEARCH" once to confirm. Note: When press this key to display root menu, select item according to enter program mode. "XX" indicates total number of language depends on screen. D.MENU Press this button continuously, you can change the audio mode...
User Manual
Page 26
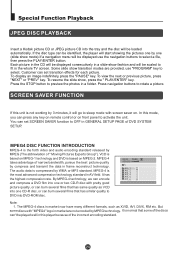
... on remote control or on front panel to activate the unit. The MPEG-4 discs in market are provided, use the navigation buttons to select a file, then press the PLAY/ENTER button. If the disc type can burn several films that has same quality as XVID, AVI, DIVX, RM etc. Each picture in the CD will be displayed consecutively in a slide-show transition modes...
... on remote control or on front panel to activate the unit. The MPEG-4 discs in market are provided, use the navigation buttons to select a file, then press the PLAY/ENTER button. If the disc type can burn several films that has same quality as XVID, AVI, DIVX, RM etc. Each picture in the CD will be displayed consecutively in a slide-show transition modes...
User Manual
Page 27
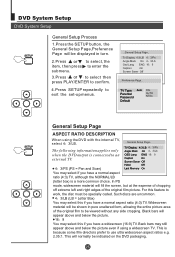
... and below the picture. 16 9 You may select this if you have a normal aspect ratio (4:3) TV. Black bars will fill the screen, but at the expense of chopping off extreme left and right edges of the original film to work, the disc must be displayed in turn. 2.Press CH+o/r- TV Type Auto Parental Password Default PAL AUTO NTSC SETUP PLAY/ENTER General Setup Page ASPECT RATIO DESCRIPTION When using a widescreen TV...
... and below the picture. 16 9 You may select this if you have a normal aspect ratio (4:3) TV. Black bars will fill the screen, but at the expense of chopping off extreme left and right edges of the original film to work, the disc must be displayed in turn. 2.Press CH+o/r- TV Type Auto Parental Password Default PAL AUTO NTSC SETUP PLAY/ENTER General Setup Page ASPECT RATIO DESCRIPTION When using a widescreen TV...
User Manual
Page 33
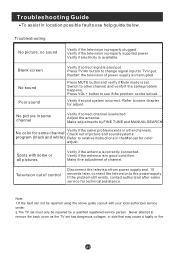
.... Television out of picture and sound systems. program (black and white) Refer to relative instructions in the Manual for adjust. Note: 1.If the fault can be repaired using the above guide consult with some chapter for color adjust. Press MUTE button and verify if Mute mode is correctly connected. Refer to other channels. Verify if the television is properly plugged. Switch to some or all pictures Verify if the antenna is set has...
.... Television out of picture and sound systems. program (black and white) Refer to relative instructions in the Manual for adjust. Note: 1.If the fault can be repaired using the above guide consult with some chapter for color adjust. Press MUTE button and verify if Mute mode is correctly connected. Refer to other channels. Verify if the television is properly plugged. Switch to some or all pictures Verify if the antenna is set has...
User Manual
Page 34
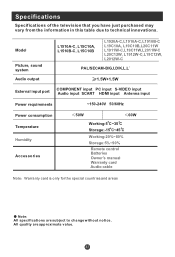
...innovations. Model Picture, sound system Audio output L1510A-C, L15C10A, L1510B-C, L15C10B L1920A-C,L1910A-C,L1910B-C L19C10A, L19C10B,L20C11W L1911W-C,L19C11W,L2011W-C L20C12W, L1912W-C,L19C12W, L2012W-C PAL/SECAM-B/G,I,D/K,L,L 1.5W+1.5W COMPONENT input PC input S-VIDEO input External input port Audio input SCART HDMI input Antenna input Power requirements ~150-240V 50/60Hz Power consumption Temperature Humidity Accessories 50W 60W Working:5 C~35 C Storage:-15 C~45 C Working:20%~80% Storage:5%~90% Remote control Batteries Owner's manual Warranty card Audio cable Note Warranty card...
...innovations. Model Picture, sound system Audio output L1510A-C, L15C10A, L1510B-C, L15C10B L1920A-C,L1910A-C,L1910B-C L19C10A, L19C10B,L20C11W L1911W-C,L19C11W,L2011W-C L20C12W, L1912W-C,L19C12W, L2012W-C PAL/SECAM-B/G,I,D/K,L,L 1.5W+1.5W COMPONENT input PC input S-VIDEO input External input port Audio input SCART HDMI input Antenna input Power requirements ~150-240V 50/60Hz Power consumption Temperature Humidity Accessories 50W 60W Working:5 C~35 C Storage:-15 C~45 C Working:20%~80% Storage:5%~90% Remote control Batteries Owner's manual Warranty card Audio cable Note Warranty card...


