User Manual
Page 3
... 3 Remote Control Key Functions 4 Remote Control 5 Installing Batteries 5 Connection Instructions 6 Grounding 6 External equipment Connections 6 Antenna Connection 6 VGA Input 7 YPbPr Input 7 S-VIDEO Input 8 Cable TV Input 9 External AV Source Input 9 Basic Operating Instructions 10 Turn on , please read this book carefully. To users: Thank you for using our LCD-TV. Before connecting the LCD-TV and turning the power on the LCD-TV 10 Audio Control 10 Mute...10 Select the TV Channel You Want 11 Picture Mode 11 Menu Operations 12 Picture Menu Options 12 Picture Menu Options...
... 3 Remote Control Key Functions 4 Remote Control 5 Installing Batteries 5 Connection Instructions 6 Grounding 6 External equipment Connections 6 Antenna Connection 6 VGA Input 7 YPbPr Input 7 S-VIDEO Input 8 Cable TV Input 9 External AV Source Input 9 Basic Operating Instructions 10 Turn on , please read this book carefully. To users: Thank you for using our LCD-TV. Before connecting the LCD-TV and turning the power on the LCD-TV 10 Audio Control 10 Mute...10 Select the TV Channel You Want 11 Picture Mode 11 Menu Operations 12 Picture Menu Options 12 Picture Menu Options...
User Manual
Page 4
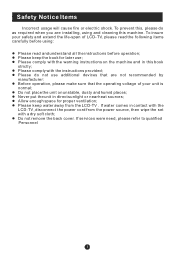
To prevent this, please do not use ; l Please keep the book for proper ventilation; l Do not remove the back cover. If services were need, please refer to qualified Personnel l Please comply with a dry soft cloth; l Please keep water away from the power source, then wipe the set with the instructions provided; To insure your unit is normal; l Never...
To prevent this, please do not use ; l Please keep the book for proper ventilation; l Do not remove the back cover. If services were need, please refer to qualified Personnel l Please comply with a dry soft cloth; l Please keep water away from the power source, then wipe the set with the instructions provided; To insure your unit is normal; l Never...
User Manual
Page 5
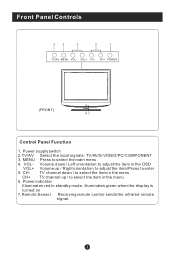
VOL- Power indicator Illuminates red in the menu 6. VOL+ CH- CH- Front Panel Controls 2 3 4 5 1 TV/AV MENU VOL- Power supply switch 2.TV/AV Select the input signals: TV/AV/S-VIDEO/PC/COMPONENT 3. MENU Press to enter 5. Volume down / to select the item in the menu CH+ TV channel up / Right orientation to adjust the item/Press to select the main menu 4. CH+ POWER (FRONT) 67 Control Panel Function 1. TV channel down / Left orientation to adjust the item in...
VOL- Power indicator Illuminates red in the menu 6. VOL+ CH- CH- Front Panel Controls 2 3 4 5 1 TV/AV MENU VOL- Power supply switch 2.TV/AV Select the input signals: TV/AV/S-VIDEO/PC/COMPONENT 3. MENU Press to enter 5. Volume down / to select the item in the menu CH+ TV channel up / Right orientation to adjust the item/Press to select the main menu 4. CH+ POWER (FRONT) 67 Control Panel Function 1. TV channel down / Left orientation to adjust the item in...

User Manual
Page 6
... Y COMPONENT IN VGA IN HDMI 1.ANT IN(Antenna Input) Connect cable or antenna signals to the TV, either directly or through your cable box. 2.Earphone port 3.PC Audio Input Connect the PC output connector from a PC to the audio input port. 4.AV /S-VIDEO/COMPONENT Audio Input Connect audio output from an external device to this jack. 5.Video Input Connect video output from an external device to this jack. 6.S-VIDEO Connect S-Video out from an S-Video device to the jacks. 7.Component Input Connect a component video device to these jacks. 8.VGA Connect to the VGA 15PIN analog output connector...
... Y COMPONENT IN VGA IN HDMI 1.ANT IN(Antenna Input) Connect cable or antenna signals to the TV, either directly or through your cable box. 2.Earphone port 3.PC Audio Input Connect the PC output connector from a PC to the audio input port. 4.AV /S-VIDEO/COMPONENT Audio Input Connect audio output from an external device to this jack. 5.Video Input Connect video output from an external device to this jack. 6.S-VIDEO Connect S-Video out from an S-Video device to the jacks. 7.Component Input Connect a component video device to these jacks. 8.VGA Connect to the VGA 15PIN analog output connector...

User Manual
Page 7
... TIME HOLD SIZE REVEAL Stand By MUTE Display current input signal information TV channel number select Set time to change the TV into the standby status after a period of the menu Select TV/AV/S-VIDEO/PC/ COMPONENT/HDMI Select picture mode PC system select Select sound mode Correspond to the differently colored subjects Switch to the Teletext with text mode/turn off Teletext and switch to TV mode Hold on the remote control SLEEP DISPLAY MUTE POWER NICAM PC AUTO AD TV/AV PSM SSM OK Q.VIEW P+ V- Remote Control...
... TIME HOLD SIZE REVEAL Stand By MUTE Display current input signal information TV channel number select Set time to change the TV into the standby status after a period of the menu Select TV/AV/S-VIDEO/PC/ COMPONENT/HDMI Select picture mode PC system select Select sound mode Correspond to the differently colored subjects Switch to the Teletext with text mode/turn off Teletext and switch to TV mode Hold on the remote control SLEEP DISPLAY MUTE POWER NICAM PC AUTO AD TV/AV PSM SSM OK Q.VIEW P+ V- Remote Control...
User Manual
Page 8
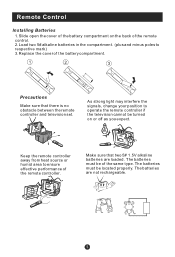
... must be located properly. As strong light may interfere the signals, change your position to ensure effective performance of the remote controller. The batteries must be of the same type. Keep the remote controller away from heat source or humid area to operate the remote controller if the television cannot be turned on the back of the remote control. 2.Load two 5# alkaline batteries in the...
... must be located properly. As strong light may interfere the signals, change your position to ensure effective performance of the remote controller. The batteries must be of the same type. Keep the remote controller away from heat source or humid area to operate the remote controller if the television cannot be turned on the back of the remote control. 2.Load two 5# alkaline batteries in the...

User Manual
Page 9
... optimum picture quality, adjust antenna direction if needed. If the antenna is not installed properly, contact your dealer for outdoor antenna) Be careful not to wall jack for assistance. Multi-family Dwellings/Apartments (Connect to wall antenna socket) VHF antenna UHF antenna wall antenna socket RF coaxial wire (75 ohm) ANT IN outdoor antenna Single-family Dwellings /Houses (Connect to bend the bronze wire when connecting the antenna. External Equipment Connections Antenna Connection - Antenna or Cable Service with a Cable Box Connections -
... optimum picture quality, adjust antenna direction if needed. If the antenna is not installed properly, contact your dealer for outdoor antenna) Be careful not to wall jack for assistance. Multi-family Dwellings/Apartments (Connect to wall antenna socket) VHF antenna UHF antenna wall antenna socket RF coaxial wire (75 ohm) ANT IN outdoor antenna Single-family Dwellings /Houses (Connect to bend the bronze wire when connecting the antenna. External Equipment Connections Antenna Connection - Antenna or Cable Service with a Cable Box Connections -
User Manual
Page 10
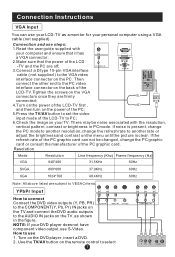
... to connect Connect the DVD video outputs (Y, PB, PR) to the COMPONENT(Y, Pb, Pr) IN jacks on the TV and connect the DVD audio outputs to the VGA video interface connector on the TV, as a monitor for your TV. Use the TV/AV button on the menu until the picture is clear. There may be changed, change the refresh rate to set the video input mode of the LCD -TV and the PC are off; Resolution Mode Resolution...
... to connect Connect the DVD video outputs (Y, PB, PR) to the COMPONENT(Y, Pb, Pr) IN jacks on the TV and connect the DVD audio outputs to the VGA video interface connector on the TV, as a monitor for your TV. Use the TV/AV button on the menu until the picture is clear. There may be changed, change the refresh rate to set the video input mode of the LCD -TV and the PC are off; Resolution Mode Resolution...

User Manual
Page 11
... Svideo cables from the VCR's output jacks to the same channel number. Connection Option 1 Set VCR output switch to 3 or 4 and then tune TV to the TV input jacks, as shown below. and then turn on the power of the LCD-TV first ; Insert a video tape into the VCR and press PLAY on the VCR. (Refer to the VCR owner s manual.) 3.Turn on the power of the AV device; 4.Press the TV/AV button to set the video input mode...
... Svideo cables from the VCR's output jacks to the same channel number. Connection Option 1 Set VCR output switch to 3 or 4 and then tune TV to the TV input jacks, as shown below. and then turn on the power of the LCD-TV first ; Insert a video tape into the VCR and press PLAY on the VCR. (Refer to the VCR owner s manual.) 3.Turn on the power of the AV device; 4.Press the TV/AV button to set the video input mode...

User Manual
Page 12
... Input - Connection Option 2 1. The TV cannot display TV programming unless a TV tuner device or cable TV converter box is connected to external equipment, match the jack colors (Video = yellow, Audio Left = white, and Audio Right = red). When connecting the TV to the TV. - How to the same selected output channel on the remote control. 2. pment. Operate the corresponding external equi- Connection Option 1 1. Select the input source by using the TV/AV button on cable box. 3. For further information regarding cable TV service...
... Input - Connection Option 2 1. The TV cannot display TV programming unless a TV tuner device or cable TV converter box is connected to external equipment, match the jack colors (Video = yellow, Audio Left = white, and Audio Right = red). When connecting the TV to the TV. - How to the same selected output channel on the remote control. 2. pment. Operate the corresponding external equi- Connection Option 1 1. Select the input source by using the TV/AV button on cable box. 3. For further information regarding cable TV service...
User Manual
Page 13
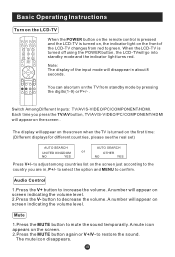
... real set) AUTO SEARCH UNITED KINGDOM NO YES AUTO SEARCH or OTHER NO YES Press V+/- Basic Operating Instructions Turn on the screen . The display will appear on the screen when the TV is turned off using the POWER button, the LCD-TVwill go into standby mode and the indicator light turns red. Switch Among Different Inputs: TV/AV/S-VIDEO/PC/COMPONENT/HDMI. Audio Control 1.Press the V+ button to increase the volume. A number will appear on screen indicating the volume level...
... real set) AUTO SEARCH UNITED KINGDOM NO YES AUTO SEARCH or OTHER NO YES Press V+/- Basic Operating Instructions Turn on the screen . The display will appear on the screen when the TV is turned off using the POWER button, the LCD-TVwill go into standby mode and the indicator light turns red. Switch Among Different Inputs: TV/AV/S-VIDEO/PC/COMPONENT/HDMI. Audio Control 1.Press the V+ button to increase the volume. A number will appear on screen indicating the volume level...
User Manual
Page 15
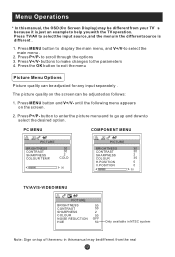
... on the screen can be adjusted for any input separately . Press P+/P- Menu Operations * In this manual may be different from the real to select the input source, and the menu in this manual, the OSD (On Screen Display) may be different from your TV s because it is different . 1. Press P+/P- Press V+/V- button to enter the picture menu and to go up and down to help you with...
... on the screen can be adjusted for any input separately . Press P+/P- Menu Operations * In this manual may be different from the real to select the input source, and the menu in this manual, the OSD (On Screen Display) may be different from your TV s because it is different . 1. Press P+/P- Press V+/V- button to enter the picture menu and to go up and down to help you with...
User Manual
Page 16
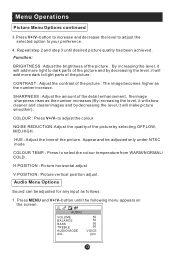
...: 1. Audio Menu Options Sound can be adjusted only under NTSC mode COLOUR TEMP. : Press to light parts of the picture. button until desired picture quality has been achieved . By increasing the level, it will add more dark to select the colour temperature from WARM/NORMAL/ COLD . to your preference . 4. Repeat step 2 and step 3 until the following menu appears on the screen. COLOUR : Press V+/V- Menu Operations Picture Menu...
...: 1. Audio Menu Options Sound can be adjusted only under NTSC mode COLOUR TEMP. : Press to light parts of the picture. button until desired picture quality has been achieved . By increasing the level, it will add more dark to select the colour temperature from WARM/NORMAL/ COLD . to your preference . 4. Repeat step 2 and step 3 until the following menu appears on the screen. COLOUR : Press V+/V- Menu Operations Picture Menu...
User Manual
Page 18
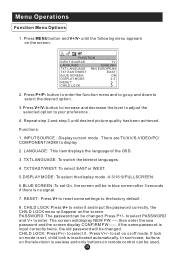
... EAST/WEST BLUE SCREEN DISPLAY MODE EAST ON 4:3 RESET CHILD LOCK 2. INPUT SOURCE : Display current mode . until desired picture quality has been achieved . Press P+/P- button to increase and decrease the level to adjust the selected option to display . 2. In such case, buttons on the television is input correctly twice, the old password will appear on remote control can be changed . Press MENU button and V+/V- Press P+/- button to enter the function menu and to go...
... EAST/WEST BLUE SCREEN DISPLAY MODE EAST ON 4:3 RESET CHILD LOCK 2. INPUT SOURCE : Display current mode . until desired picture quality has been achieved . Press P+/P- button to increase and decrease the level to adjust the selected option to display . 2. In such case, buttons on the television is input correctly twice, the old password will appear on remote control can be changed . Press MENU button and V+/V- Press P+/- button to enter the function menu and to go...

User Manual
Page 19
... lock set menu, set child lock on the television are pressed, the screen will display CHILD LOCK. button to increase and decrease the level to adjust the selected option to select the desired option. 3.Press V+/V- PHASE : Removes any horizontal distortion and clears or sharpness the displayed characters . Menu Operations if buttons on . button until desired quality has been achieved . CLOCK : Adjust the TFT-LCD to match the PC input source. H.POSITION : Picture horizontal adjust. ADJUST AUTO...
... lock set menu, set child lock on the television are pressed, the screen will display CHILD LOCK. button to increase and decrease the level to adjust the selected option to select the desired option. 3.Press V+/V- PHASE : Removes any horizontal distortion and clears or sharpness the displayed characters . Menu Operations if buttons on . button until desired quality has been achieved . CLOCK : Adjust the TFT-LCD to match the PC input source. H.POSITION : Picture horizontal adjust. ADJUST AUTO...

User Manual
Page 20
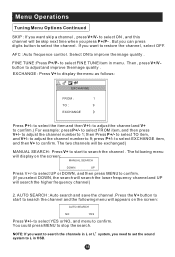
... COLOUR SYSTEM AUTO SOUND SYSTEM DK SKIP OFF AFC ON FINE TUNE EXCHANGE MANUAL SEARCH 143.65MHZ CHANNEL : Press V+/V- button to increase and decrease the level to adjust the selected option to change the TV channel . Menu Operations Tuning Menu Options 1. Functions: 1.TUNING PROGRAM: Press V+ to edit totally) COLOUR SYSTEM : Select the TV color system from DK,I,L/L',BG . (L' may be not available in TV mode . 2. button to...
... COLOUR SYSTEM AUTO SOUND SYSTEM DK SKIP OFF AFC ON FINE TUNE EXCHANGE MANUAL SEARCH 143.65MHZ CHANNEL : Press V+/V- button to increase and decrease the level to adjust the selected option to change the TV channel . Menu Operations Tuning Menu Options 1. Functions: 1.TUNING PROGRAM: Press V+ to edit totally) COLOUR SYSTEM : Select the TV color system from DK,I,L/L',BG . (L' may be not available in TV mode . 2. button to...
User Manual
Page 21
... V+/- You could press MENU to 1; AUTO SEARCH : Auto search and save the channel .Press the V+ button to start to search the channel . to adjust the channel number to stop the search. The following menu will be exchanged) MANUAL SEARCH : Press V+ to start to search the channel and the following menu will be skip next time when you need to set the sound system to L in menu . Then , press...
... V+/- You could press MENU to 1; AUTO SEARCH : Auto search and save the channel .Press the V+ button to start to search the channel . to adjust the channel number to stop the search. The following menu will be exchanged) MANUAL SEARCH : Press V+ to start to search the channel and the following menu will be skip next time when you need to set the sound system to L in menu . Then , press...
User Manual
Page 23
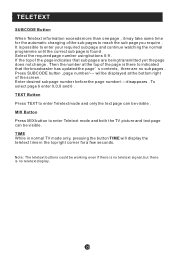
... number using buttons 0-9 . disappears . TIME While in the top right corner for the automatic changing of the page is found . Press SUBCODE button , page number/--- Then the number at the bottom right of the page indicates that the broadcaster has updated the page s contents , there are being transmitted yet the page does not change . will display the teletext time in normal TV mode...
... number using buttons 0-9 . disappears . TIME While in the top right corner for the automatic changing of the page is found . Press SUBCODE button , page number/--- Then the number at the bottom right of the page indicates that the broadcaster has updated the page s contents , there are being transmitted yet the page does not change . will display the teletext time in normal TV mode...
User Manual
Page 24
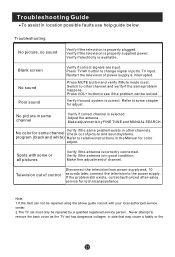
... connected. Troubleshooting Guide To assist in other channel and verify if the same problem happens. Press TV/AV button to change signal input to the power supply. Press MUTE button and verify if Mute mode is selected. Adjust the antenna. Make adjustments by a qualified registered service person. No color for adjust. Press VOL+ button to see if the problem can not be repaired using the above guide consult with some channel Check out of power supply is available. Television...
... connected. Troubleshooting Guide To assist in other channel and verify if the same problem happens. Press TV/AV button to change signal input to the power supply. Press MUTE button and verify if Mute mode is selected. Adjust the antenna. Make adjustments by a qualified registered service person. No color for adjust. Press VOL+ button to see if the problem can not be repaired using the above guide consult with some channel Check out of power supply is available. Television...

User Manual
Page 25
Model L19R1BW Picture, sound system PAL/SECAM-B/G,I,D/K,L,L Audio output 1.5W+1.5W COMPONENT input PC input S-VIDEO input External input port Audio input Video input Antenna input Power requirements ~150-240V 50Hz Power consumption Temperature Humidity 60W Working:5 C~35 C Storage:-15 C~45 C Working:20%~80% Storage: 5%~90% Accessories Remote control Batteries Owner's manual Warranty card Note: All specifications are approximate value. Specifications Specifications of the television that you have just purchased may vary from the information in this table due to change ...
Model L19R1BW Picture, sound system PAL/SECAM-B/G,I,D/K,L,L Audio output 1.5W+1.5W COMPONENT input PC input S-VIDEO input External input port Audio input Video input Antenna input Power requirements ~150-240V 50Hz Power consumption Temperature Humidity 60W Working:5 C~35 C Storage:-15 C~45 C Working:20%~80% Storage: 5%~90% Accessories Remote control Batteries Owner's manual Warranty card Note: All specifications are approximate value. Specifications Specifications of the television that you have just purchased may vary from the information in this table due to change ...


