
User Manual
Page 2
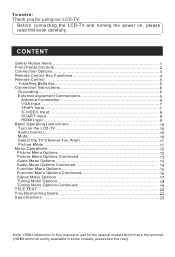
... 3 Remote Control Key Functions 4 Remote Control 5 Installing Batteries 5 Connection Instructions 6 Grounding 6 External equipment Connections 6 Antenna Connection 6 VGA Input 7 YPbPr Input 7 S-VIDEO Input 8 SCART Input 9 HDMI Input 9 Basic Operating Instructions 10 Turn on , please read this manual is just for using our LCD-TV. To users: Thank you for the special models which have the terminal. (HDMI terminal is only available in this book carefully. Before connecting the LCD-TV and turning the power on the LCD-TV 10 Audio Control 10 Mute...10 Select the TV Channel...
... 3 Remote Control Key Functions 4 Remote Control 5 Installing Batteries 5 Connection Instructions 6 Grounding 6 External equipment Connections 6 Antenna Connection 6 VGA Input 7 YPbPr Input 7 S-VIDEO Input 8 SCART Input 9 HDMI Input 9 Basic Operating Instructions 10 Turn on , please read this manual is just for using our LCD-TV. To users: Thank you for the special models which have the terminal. (HDMI terminal is only available in this book carefully. Before connecting the LCD-TV and turning the power on the LCD-TV 10 Audio Control 10 Mute...10 Select the TV Channel...

User Manual
Page 3
... contact with the LCD-TV, disconnect the power cord from the LCD-TV . l Please keep water away from the power source, then wipe the set with the instructions provided; If water comes in this , please do not use ; l Please keep the book for proper ventilation; l Do not remove the back cover. l Never put the unit in direct sunlight or near...
... contact with the LCD-TV, disconnect the power cord from the LCD-TV . l Please keep water away from the power source, then wipe the set with the instructions provided; If water comes in this , please do not use ; l Please keep the book for proper ventilation; l Do not remove the back cover. l Never put the unit in direct sunlight or near...

User Manual
Page 4
VOL+ CH(SOURCE) CH+ POWER (STANDBY) 12W 11W 6 6 7 7 Control Panel Function 1. CH- Power supply switch 2.TV/AV Select the input signals: PC/COMPONENT/HDMI/TV/SCART/ SVIDEO 3. MENU Press to select the item in the OSD VOL+ Volume up / to select the main menu 4. TV channel down / Left orientation to adjust the item in the menu 6. VOL- Power indicator Illuminates red in the menu CH+ TV channel up / Right orientation to adjust the item/Press...
VOL+ CH(SOURCE) CH+ POWER (STANDBY) 12W 11W 6 6 7 7 Control Panel Function 1. CH- Power supply switch 2.TV/AV Select the input signals: PC/COMPONENT/HDMI/TV/SCART/ SVIDEO 3. MENU Press to select the item in the OSD VOL+ Volume up / to select the main menu 4. TV channel down / Left orientation to adjust the item in the menu 6. VOL- Power indicator Illuminates red in the menu CH+ TV channel up / Right orientation to adjust the item/Press...

User Manual
Page 5
... jacks. Connection Options ANT IN AUDIO IN Pr Pb Y S-VIDEO TV SCART VGA IN HDMI The figure is just for reference, please see the real.) COMPONENT Input Connect a component COMPONENT/ SVIDEO /VGA video/audio device to these jacks Audio Input Connect the PC output connector from an S-Video device to the VGA 15PIN analog output connector of other equipment ANT IN AUDIO IN Pr Pb Y S-VIDEO TV SCART VGA IN HDMI Earphone port Antenna Input Connect cable or antenna signals to the TV, either directly...
... jacks. Connection Options ANT IN AUDIO IN Pr Pb Y S-VIDEO TV SCART VGA IN HDMI The figure is just for reference, please see the real.) COMPONENT Input Connect a component COMPONENT/ SVIDEO /VGA video/audio device to these jacks Audio Input Connect the PC output connector from an S-Video device to the VGA 15PIN analog output connector of other equipment ANT IN AUDIO IN Pr Pb Y S-VIDEO TV SCART VGA IN HDMI Earphone port Antenna Input Connect cable or antenna signals to the TV, either directly...
User Manual
Page 6
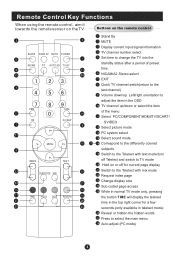
... mode Hold on the remote control SLEEP DISPLAY MUTE POWER NICAM PC AUTO AD TV/AV PSM SSM OK Q.VIEW P+ V- MENU V+ INDEX PTEXT SUBCODE MIX TIME HOLD SIZE REVEAL Stand By MUTE Display current input signal information TV channel number select Set time to change the TV into the standby status after a period of the menu Select PC/COMPONENT/HDMI/TV/SCART/ SVIDEO Select picture mode PC system select Select sound mode Correspond to the differently colored subjects Switch to the Teletext with text mode/turn...
... mode Hold on the remote control SLEEP DISPLAY MUTE POWER NICAM PC AUTO AD TV/AV PSM SSM OK Q.VIEW P+ V- MENU V+ INDEX PTEXT SUBCODE MIX TIME HOLD SIZE REVEAL Stand By MUTE Display current input signal information TV channel number select Set time to change the TV into the standby status after a period of the menu Select PC/COMPONENT/HDMI/TV/SCART/ SVIDEO Select picture mode PC system select Select sound mode Correspond to the differently colored subjects Switch to the Teletext with text mode/turn...
User Manual
Page 7
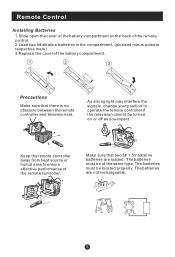
... the same type. The batteries must be located properly. Make sure that there is no obstacle between the remote controller and television set. The batteries are loaded. As strong light may interfere the signals, change your position to respective mark) 3.Replace the cover of the battery compartment. 1 2 3 Precautions Make sure that two 5# 1.5V alkaline batteries are not rechargeable. Remote Control Installing Batteries...
... the same type. The batteries must be located properly. Make sure that there is no obstacle between the remote controller and television set. The batteries are loaded. As strong light may interfere the signals, change your position to respective mark) 3.Replace the cover of the battery compartment. 1 2 3 Precautions Make sure that two 5# 1.5V alkaline batteries are not rechargeable. Remote Control Installing Batteries...
User Manual
Page 8
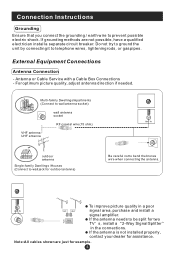
... for two TV s, install a 2-Way Signal Splitter in a poor ANT IN signal area, purchase and install a signal amplifier. Antenna or Cable Service with a Cable Box Connections - To improve picture quality in the connections. If the antenna is not installed properly, contact your dealer for outdoor antenna) Be careful not to bend the bronze wire when connecting the antenna. If the antenna needs to wall jack for assistance. Note:All cables shown are not...
... for two TV s, install a 2-Way Signal Splitter in a poor ANT IN signal area, purchase and install a signal amplifier. Antenna or Cable Service with a Cable Box Connections - To improve picture quality in the connections. If the antenna is not installed properly, contact your dealer for outdoor antenna) Be careful not to bend the bronze wire when connecting the antenna. If the antenna needs to wall jack for assistance. Note:All cables shown are not...
User Manual
Page 9
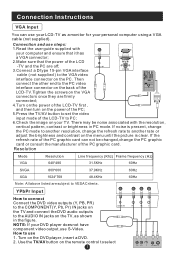
... turn on the power of the PC; 5.Press the TV/AV button to set the video input mode of the LCD -TV and the PC are subject to VESACriteria. 60Hz YPbPr Input How to connect Connect the DVD video outputs (Y, PB, PR) to the COMPONENT(Y, Pb, Pr) IN jacks on the TV and connect the DVD audio outputs to the AUDIO IN jacks on the TV, as a monitor for your personal computer using a VGA cable (not supplied). Connection Instructions VGA Input...
... turn on the power of the PC; 5.Press the TV/AV button to set the video input mode of the LCD -TV and the PC are subject to VESACriteria. 60Hz YPbPr Input How to connect Connect the DVD video outputs (Y, PB, PR) to the COMPONENT(Y, Pb, Pr) IN jacks on the TV and connect the DVD audio outputs to the AUDIO IN jacks on the TV, as a monitor for your personal computer using a VGA cable (not supplied). Connection Instructions VGA Input...
User Manual
Page 10
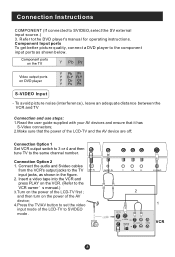
... are off; Connection Instructions COMPONENT (If connected to the same channel number. Connection Option 1 Set VCR output switch to 3 or 4 and then tune TV to SVIDEO,select the SV external input source.) 3. Insert a video tape into the VCR and press PLAY on the VCR. (Refer to SVIDEO mode . 2 1 VCR put mode of the LCD-TV first ; Refer to the component input ports as shown in . Y Pb Pr S-VIDEO Input - Connection Option 2 1. Component Input ports To get better picture quality, connect a DVD player to the DVD player's manual for operating instructions.
... are off; Connection Instructions COMPONENT (If connected to the same channel number. Connection Option 1 Set VCR output switch to 3 or 4 and then tune TV to SVIDEO,select the SV external input source.) 3. Insert a video tape into the VCR and press PLAY on the VCR. (Refer to SVIDEO mode . 2 1 VCR put mode of the LCD-TV first ; Refer to the component input ports as shown in . Y Pb Pr S-VIDEO Input - Connection Option 2 1. Component Input ports To get better picture quality, connect a DVD player to the DVD player's manual for operating instructions.

User Manual
Page 11
.... Operate the corresponding external equipment. Connection Instructions SCART Input 1.Link the scart terminal of some other equipment, such as shown in the figure. HDMI Input How to connect Connect the cables from the external equipment's output jacks to the TV input jacks, as DVD, to select SCART mode. 3. Press Play button on the remote control. 2. SCART External equipment HDMI HDMI Note: The audio cable included with the TV should be used when connected with the corresponding terminals of the television...
.... Operate the corresponding external equipment. Connection Instructions SCART Input 1.Link the scart terminal of some other equipment, such as shown in the figure. HDMI Input How to connect Connect the cables from the external equipment's output jacks to the TV input jacks, as DVD, to select SCART mode. 3. Press Play button on the remote control. 2. SCART External equipment HDMI HDMI Note: The audio cable included with the TV should be used when connected with the corresponding terminals of the television...
User Manual
Page 12
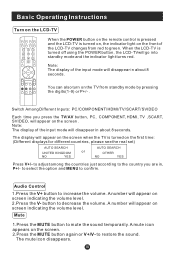
... MIX TIME HOLD SIZE REVEAL When the POWER button on the remote control is pressed and the LCD-TV is turned on, the indicator light on the LCD-TV SLEEP DISPLAY MUTE POWER NICAM PC AUTO AD TV/AV PSM .SSM OK Q.VIEW P+ V- Note: The display of the input mode will disappear in , P+/- A number will appear on the TV from red to restore the sound. A mute icon appears on screen indicating the volume...
... MIX TIME HOLD SIZE REVEAL When the POWER button on the remote control is pressed and the LCD-TV is turned on, the indicator light on the LCD-TV SLEEP DISPLAY MUTE POWER NICAM PC AUTO AD TV/AV PSM .SSM OK Q.VIEW P+ V- Note: The display of the input mode will disappear in , P+/- A number will appear on the TV from red to restore the sound. A mute icon appears on screen indicating the volume...
User Manual
Page 14
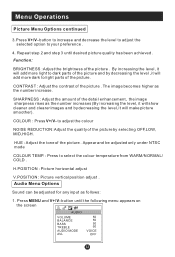
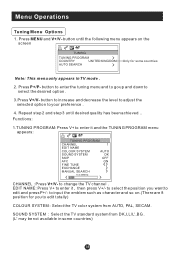
... is different . 1. Press MENU button and V+/V- Press P+/P- button to enter the picture menu and to go up and down to the parameters 4. Press V+/V- until the following menu appears on top of the menu in NTSC system Note: Sign on the screen. 2. Press P+/P- Menu Operations * In this manual may be adjusted for any input separately . Press MENU button to display the main menu, and V+/V-to help you with the...
... is different . 1. Press MENU button and V+/V- Press P+/P- button to enter the picture menu and to go up and down to the parameters 4. Press V+/V- until the following menu appears on top of the menu in NTSC system Note: Sign on the screen. 2. Press P+/P- Menu Operations * In this manual may be adjusted for any input separately . Press MENU button to display the main menu, and V+/V-to help you with the...
User Manual
Page 15
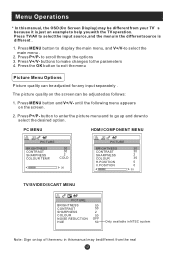
... input as the number increase. SHARPNESS : Adjust the amount of the picture. CONTRAST : Adjust the contrast of the picture . COLOUR : Press V+/V- Repeat step 2 and step 3 until the following menu appears on the screen AUDIO VOLUME BALANCE BASS TREBLE AUDIO MODE AVL 50 50 50 50 VOICE OFF The image becomes higher as follows: 1. Menu Operations Picture Menu Options continued 3.Press V+/V- HUE : Adjust the tone of the picture . Function: BRIGHTNESS :Adjust...
... input as the number increase. SHARPNESS : Adjust the amount of the picture. CONTRAST : Adjust the contrast of the picture . COLOUR : Press V+/V- Repeat step 2 and step 3 until the following menu appears on the screen AUDIO VOLUME BALANCE BASS TREBLE AUDIO MODE AVL 50 50 50 50 VOICE OFF The image becomes higher as follows: 1. Menu Operations Picture Menu Options continued 3.Press V+/V- HUE : Adjust the tone of the picture . Function: BRIGHTNESS :Adjust...
User Manual
Page 17
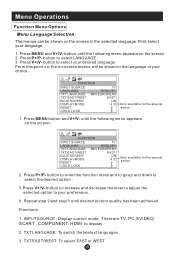
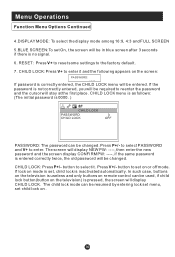
... MENU and V+/V- Press P+/P- Press MENU button and V+/V- INPUT SOURCE : Display current mode . TXT LANGUAGE: To switch the teletext languages. 3. From this point on, the on the screen 2. FUNCTION INPUT SOURCE TV LANGUAGE ENGLISH TXT LANGUAGE PAN EUROPEAN TXT EAST/WEST EAST BLUE SCREEN ON DISPLAY MODE 4:3 RESET CHILD LOCK Only available for the special series 1. button to select your language. 1. There are TV, PC,SVIDEO, SCART , COMPONENT, HDMI to select...
... MENU and V+/V- Press P+/P- Press MENU button and V+/V- INPUT SOURCE : Display current mode . TXT LANGUAGE: To switch the teletext languages. 3. From this point on, the on the screen 2. FUNCTION INPUT SOURCE TV LANGUAGE ENGLISH TXT LANGUAGE PAN EUROPEAN TXT EAST/WEST EAST BLUE SCREEN ON DISPLAY MODE 4:3 RESET CHILD LOCK Only available for the special series 1. button to select your language. 1. There are TV, PC,SVIDEO, SCART , COMPONENT, HDMI to select...
User Manual
Page 18
... password is no signal. 6. The child lock mode can be resumed by entering lock set menu, set , child lock is pressed, the screen will display CHILD LOCK. CHILD LOCK: Press V+ to reenter the password and the cursor will be in blue screen after 3 seconds if there is correctly entered, the CHILD LOCK menu will be used, if child lock button(button on remote control can be changed . Press P+/- In such case, buttons on the television is...
... password is no signal. 6. The child lock mode can be resumed by entering lock set menu, set , child lock is pressed, the screen will display CHILD LOCK. CHILD LOCK: Press V+ to reenter the password and the cursor will be in blue screen after 3 seconds if there is correctly entered, the CHILD LOCK menu will be used, if child lock button(button on remote control can be changed . Press P+/- In such case, buttons on the television is...
User Manual
Page 19
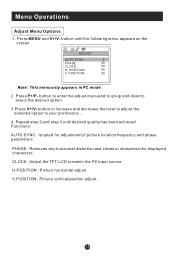
... following menu appears on the screen ADJUST AUTO SYNC. CLOCK : Adjust the TFT-LCD to select the desired option 3.Press V+/V- PHASE : Removes any horizontal distortion and clears or sharpness the displayed characters . PHASE 50 CLOCK 50 H. POSITION 50 V. button to enter the adjust menu and to go up and down to match the PC input source H.POSITION : Picture horizontal adjust V.POSITION : Picture vertical position adjust . Menu Operations Adjust Menu Options 1. button to...
... following menu appears on the screen ADJUST AUTO SYNC. CLOCK : Adjust the TFT-LCD to select the desired option 3.Press V+/V- PHASE : Removes any horizontal distortion and clears or sharpness the displayed characters . PHASE 50 CLOCK 50 H. POSITION 50 V. button to enter the adjust menu and to go up and down to match the PC input source H.POSITION : Picture horizontal adjust V.POSITION : Picture vertical position adjust . Menu Operations Adjust Menu Options 1. button to...
User Manual
Page 20
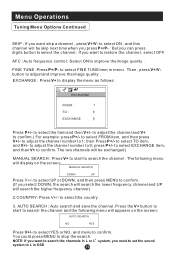
... increase and decrease the level to adjust the selected option to enter it and the TUNING PROGRAM menu appears: TUNING PROGRAM CHANNEL 1 EDIT NAME COLOUR SYSTEM AUTO SOUND SYSTEM DK SKIP OFF AFC ON FINE TUNE EXCHANGE MANUAL SEARCH 143.65MHZ CHANNEL : Press V+/V- EDIT NAME: Press V+ to your preference . 4. Menu Operations Tuning Menu Options 1. button to enter the tuning menu and to go up and...
... increase and decrease the level to adjust the selected option to enter it and the TUNING PROGRAM menu appears: TUNING PROGRAM CHANNEL 1 EDIT NAME COLOUR SYSTEM AUTO SOUND SYSTEM DK SKIP OFF AFC ON FINE TUNE EXCHANGE MANUAL SEARCH 143.65MHZ CHANNEL : Press V+/V- EDIT NAME: Press V+ to your preference . 4. Menu Operations Tuning Menu Options 1. button to enter the tuning menu and to go up and...
User Manual
Page 21
... start to search the channel . to select YES or NO, and menu to search the channel and the following menu will be skip next time when you can press digits button to restore the channel , select OFF. to confirm.( For example: press P+/- to adjust the channel and V+ to select FINE TUNE item in menu . The following menu will appears on the screen: MANUAL SEARCH DOWN UP Press...
... start to search the channel . to select YES or NO, and menu to search the channel and the following menu will be skip next time when you can press digits button to restore the channel , select OFF. to confirm.( For example: press P+/- to adjust the channel and V+ to select FINE TUNE item in menu . The following menu will appears on the screen: MANUAL SEARCH DOWN UP Press...
User Manual
Page 24
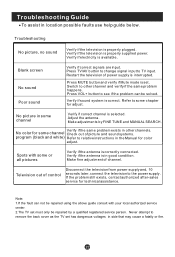
... problem happens. Spots with your local authorized service center. 2.The TV set has dangerous voltages in location possible faults use help guide below. Note: 1.If the fault can be repaired using the above guide consult with some channel Verify if correct channel is correctly connected. Press TV/AV button to change signal input to relative instructions in good condition. Adjust the antenna. Make adjustments by a qualified registered service person. Television out of power supply...
... problem happens. Spots with your local authorized service center. 2.The TV set has dangerous voltages in location possible faults use help guide below. Note: 1.If the fault can be repaired using the above guide consult with some channel Verify if correct channel is correctly connected. Press TV/AV button to change signal input to relative instructions in good condition. Adjust the antenna. Make adjustments by a qualified registered service person. Television out of power supply...
User Manual
Page 25
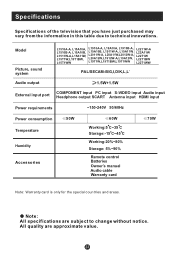
...,L19T1BW,L19T1WW L22T1WW PAL/SECAM-B/G,I,D/K,L,L 1.5W+1.5W COMPONENT input PC input S-VIDEO input Audio input External input port Headphone output SCART Antenna input HDMI input Power requirements ~150-240V 50/60Hz Power consumption Temperature Humidity Accessories 50W 60W Working:5 C~35 C Storage:-15 C~45 C Working:20%~80% Storage: 5%~90% Remote control Batteries Owner's manual Audio cable Warranty card 70W Note: Warranty card is only for the special countries and areas. All quality are subject to technical innovations. Specifications Specifications of the television that...
...,L19T1BW,L19T1WW L22T1WW PAL/SECAM-B/G,I,D/K,L,L 1.5W+1.5W COMPONENT input PC input S-VIDEO input Audio input External input port Headphone output SCART Antenna input HDMI input Power requirements ~150-240V 50/60Hz Power consumption Temperature Humidity Accessories 50W 60W Working:5 C~35 C Storage:-15 C~45 C Working:20%~80% Storage: 5%~90% Remote control Batteries Owner's manual Audio cable Warranty card 70W Note: Warranty card is only for the special countries and areas. All quality are subject to technical innovations. Specifications Specifications of the television that...


