
User Manual
Page 2
...6 Connection Instructions 7 Grounding 7 External equipment connections 7 Antenna Connection 7 VGA Input 8 YPbPr Input 8 S-VIDEO Input 9 SCART Input 10 HDMI Input 1. 0 Wall Mounting 10 Basic Operating Instructions 11 Turn on the LCD-TV 11 Audio Control 11 Mute 11 Select the TV Channel 12 Picture Mode 12 Program Swap 12 Program Scan 12 Menu Operations 13 Picture Menu Options 13 Audio Menu Options 14 Function Menu Options 16 Adjust Menu Options 18 Tuning Menu Options 19 DVB-T Main Menu Operations 21 Installation 21 Favourite Lists 22 Channel Edit 23 Timers 24 Settings...
...6 Connection Instructions 7 Grounding 7 External equipment connections 7 Antenna Connection 7 VGA Input 8 YPbPr Input 8 S-VIDEO Input 9 SCART Input 10 HDMI Input 1. 0 Wall Mounting 10 Basic Operating Instructions 11 Turn on the LCD-TV 11 Audio Control 11 Mute 11 Select the TV Channel 12 Picture Mode 12 Program Swap 12 Program Scan 12 Menu Operations 13 Picture Menu Options 13 Audio Menu Options 14 Function Menu Options 16 Adjust Menu Options 18 Tuning Menu Options 19 DVB-T Main Menu Operations 21 Installation 21 Favourite Lists 22 Channel Edit 23 Timers 24 Settings...
User Manual
Page 4
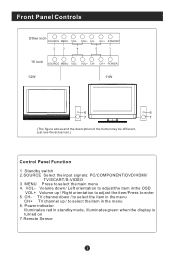
... display is turned on 7.Remote Sensor VOL+ CH- VOL- VOL+ CH- Power indicator Illuminates red in the menu 6. CH+ POWER 12W 11W 6 6 7 7 (The figure above and the description of the button may be different, just see the actual set.) Control Panel Function 1. Standby switch 2.SOURCE Select the input signals: PC/COMPONENT/DVD/HDMI/ TV/SCART/S-VIDEO 3. CH- Volume down / to select the item in the menu CH+ TV channel up / Right orientation to adjust...
... display is turned on 7.Remote Sensor VOL+ CH- VOL- VOL+ CH- Power indicator Illuminates red in the menu 6. CH+ POWER 12W 11W 6 6 7 7 (The figure above and the description of the button may be different, just see the actual set.) Control Panel Function 1. Standby switch 2.SOURCE Select the input signals: PC/COMPONENT/DVD/HDMI/ TV/SCART/S-VIDEO 3. CH- Volume down / to select the item in the menu CH+ TV channel up / Right orientation to adjust...

User Manual
Page 6
... TV/DVD Combi) When using the remote control, aim it towards the remote sensor on the remote control Stand By DVD Open/close Picture Mode Scan DVD 10+ Mute Swap Call Screen Display Program Number NICAM Source Exchange Digital Selector DTV/DVD Volume/Channel Selection MENU Zoom DVD Audio DVD STOP Tune Menu Button DVD SETUP DVD PAUSE/STEP DVD FAST REVERSE DVD FAST FORWARD DVD/DVB-T MENU UP DVD NEXT DVD PREVIOUS LEFT RIGHT Exit Screen Display DOWN DVD PLAY/ENTER/DVB-T ok button DVD PROGRAM/ DVB-T EPG button DVD /DVB-T Cursor Move button DVD /DVB-T SUBTITLE DVD...
... TV/DVD Combi) When using the remote control, aim it towards the remote sensor on the remote control Stand By DVD Open/close Picture Mode Scan DVD 10+ Mute Swap Call Screen Display Program Number NICAM Source Exchange Digital Selector DTV/DVD Volume/Channel Selection MENU Zoom DVD Audio DVD STOP Tune Menu Button DVD SETUP DVD PAUSE/STEP DVD FAST REVERSE DVD FAST FORWARD DVD/DVB-T MENU UP DVD NEXT DVD PREVIOUS LEFT RIGHT Exit Screen Display DOWN DVD PLAY/ENTER/DVB-T ok button DVD PROGRAM/ DVB-T EPG button DVD /DVB-T Cursor Move button DVD /DVB-T SUBTITLE DVD...

User Manual
Page 7
... DTV/RADIO LANG TIMER Stand By NICAM Sleep Switch to PC mode Return the last watched program channel Mute Automatically adjust in PC mode Call Screen Display Program Number Picture mode Source Exchange Digital Selector DTV/TV Volume/Channel Selection MENU Sound mode Zoom TELETEXT BUTTONS DVB-T MENU TEXT BUTTON DVB-T EPG button DVB-T ok button DVB-T SUBTITLE DVB-T Cursor Move button UP DVB-T favourite Exit Screen Display LEFT RIGHT DVB-T information button DOWN RED button Fast text button in analog Green button signal Blue button Function button in DVBT...
... DTV/RADIO LANG TIMER Stand By NICAM Sleep Switch to PC mode Return the last watched program channel Mute Automatically adjust in PC mode Call Screen Display Program Number Picture mode Source Exchange Digital Selector DTV/TV Volume/Channel Selection MENU Sound mode Zoom TELETEXT BUTTONS DVB-T MENU TEXT BUTTON DVB-T EPG button DVB-T ok button DVB-T SUBTITLE DVB-T Cursor Move button UP DVB-T favourite Exit Screen Display LEFT RIGHT DVB-T information button DOWN RED button Fast text button in analog Green button signal Blue button Function button in DVBT...
User Manual
Page 9
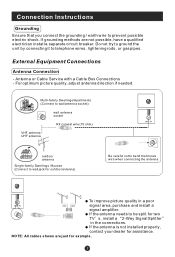
... ANT IN signal area, purchase and install a signal amplifier. NOTE: All cables shown are not possible, have a qualified electrician install a separate circuit breaker. For optimum picture quality, adjust antenna direction if needed. External Equipment Connections Antenna Connection - Multi-family Dwellings/Apartments (Connect to wall antenna socket) VHF antenna UHF antenna wall antenna socket RF coaxial wire (75 ohm) ANT IN outdoor antenna Single-family Dwellings /Houses (Connect to wall jack for example. If the antenna needs to...
... ANT IN signal area, purchase and install a signal amplifier. NOTE: All cables shown are not possible, have a qualified electrician install a separate circuit breaker. For optimum picture quality, adjust antenna direction if needed. External Equipment Connections Antenna Connection - Multi-family Dwellings/Apartments (Connect to wall antenna socket) VHF antenna UHF antenna wall antenna socket RF coaxial wire (75 ohm) ANT IN outdoor antenna Single-family Dwellings /Houses (Connect to wall jack for example. If the antenna needs to...
User Manual
Page 10
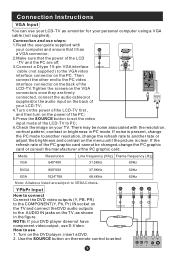
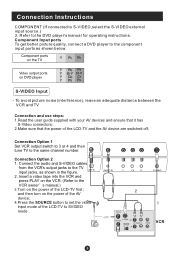
... card cannot be noise associated with your DVD player does not have component video output, use S-Video. How to the VGA video interface connector on the TV, as a monitor for your TV. If noise is present, change the PC mode to PC; 6.Check the image on the menu until the picture is clear. Connection and use steps: 1.Read the user guide supplied with the resolution, vertical pattern, contrast or brightness in...
... card cannot be noise associated with your DVD player does not have component video output, use S-Video. How to the VGA video interface connector on the TV, as a monitor for your TV. If noise is present, change the PC mode to PC; 6.Check the image on the menu until the picture is clear. Connection and use steps: 1.Read the user guide supplied with the resolution, vertical pattern, contrast or brightness in...
User Manual
Page 11
... Connection and use steps: 1.Read the user guide supplied with your AV devices and ensure that it has S-Video connectors; 2.Make sure that the power of the LCD-TV to the TV input jacks, as shown below. Connect the audio and S-VIDEO cables from the VCR's output jacks to SVIDEO mode . 2 1 VCR and then turn on the power of the AV device; 4.Press the SOURCE button to the component input ports as shown in . Connection Option 1 Set VCR output switch...
... Connection and use steps: 1.Read the user guide supplied with your AV devices and ensure that it has S-Video connectors; 2.Make sure that the power of the LCD-TV to the TV input jacks, as shown below. Connect the audio and S-VIDEO cables from the VCR's output jacks to SVIDEO mode . 2 1 VCR and then turn on the power of the AV device; 4.Press the SOURCE button to the component input ports as shown in . Connection Option 1 Set VCR output switch...
User Manual
Page 12
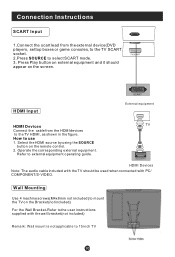
...: Wall mount is not applicable to select SCART mode. 3. Select the HDMI source by using the SOURCE button on the screen. SCART HDMI Input External equipment HDMI Devices Connect the cable from the external device(DVD players, settop boxes or game consoles, to the TV SCART socket. 2.Press SOURCE to 15 inch TV How to external equipment operating guide. Refer to use 1. Press Play button on the Bracket(not included) For the Wall Bracket-Refer to the user instructions supplied with PC/ COMPONENT/S-VIDEO. HDMI TV HDMI HDMI...
...: Wall mount is not applicable to select SCART mode. 3. Select the HDMI source by using the SOURCE button on the screen. SCART HDMI Input External equipment HDMI Devices Connect the cable from the external device(DVD players, settop boxes or game consoles, to the TV SCART socket. 2.Press SOURCE to 15 inch TV How to external equipment operating guide. Refer to use 1. Press Play button on the Bracket(not included) For the Wall Bracket-Refer to the user instructions supplied with PC/ COMPONENT/S-VIDEO. HDMI TV HDMI HDMI...
User Manual
Page 13
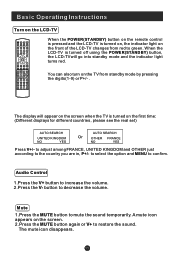
... AUDIO P- to select the option and MENU to mute the sound temporarily. Mute 1.Press the MUTE button to confirm. PREV NEXT D.MENU EXIT PROGRAM PLAY/ENTER OK EPG SUBTITLE ANGLE FAV A-B TITLE/PBC SEARCH i SLOW D.CALL REPEAT SUBCODE MIX TEXT HOLD REVEAL SIZE TIME MODE DTV/RADIO LANG TIMER When the POWER(STANDBY) button on the remote control is pressed and the LCD-TV is turned on, the indicator light...
... AUDIO P- to select the option and MENU to mute the sound temporarily. Mute 1.Press the MUTE button to confirm. PREV NEXT D.MENU EXIT PROGRAM PLAY/ENTER OK EPG SUBTITLE ANGLE FAV A-B TITLE/PBC SEARCH i SLOW D.CALL REPEAT SUBCODE MIX TEXT HOLD REVEAL SIZE TIME MODE DTV/RADIO LANG TIMER When the POWER(STANDBY) button on the remote control is pressed and the LCD-TV is turned on, the indicator light...
User Manual
Page 14
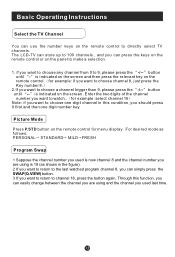
... any channel from 0 to watch.. Picture Mode Press P.STD button on the screen. Through this condition, you want to 9, please press the -/-- is now channel 8 and the channel number you are using is 18 (as follows: PERSONAL STANDARD MILD FRESH Program Swap 1 Suppose the channel number you used last time. for menu display . Basic Operating Instructions Select the TV Channel You can press the keys on the remote control or on the remote control. button...
... any channel from 0 to watch.. Picture Mode Press P.STD button on the screen. Through this condition, you want to 9, please press the -/-- is now channel 8 and the channel number you are using is 18 (as follows: PERSONAL STANDARD MILD FRESH Program Swap 1 Suppose the channel number you used last time. for menu display . Basic Operating Instructions Select the TV Channel You can press the keys on the remote control or on the remote control. button...
User Manual
Page 15
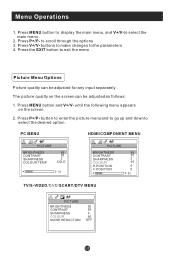
... 2 50 OFF Press P+/P- Press MENU button to display the main menu, and V+/V-to scroll through the options 3. Press V+/V- Press MENU button and V+/V- Press P+/P- Press the EXIT button to select the desired option . button to enter the picture menu and to go up and down to exit the menu Picture Menu Options Picture quality can be adjusted for any input separately . Menu Operations 1. buttons to make changes to the parameters 4. until the...
... 2 50 OFF Press P+/P- Press MENU button to display the main menu, and V+/V-to scroll through the options 3. Press V+/V- Press MENU button and V+/V- Press P+/P- Press the EXIT button to select the desired option . button to enter the picture menu and to go up and down to exit the menu Picture Menu Options Picture quality can be adjusted for any input separately . Menu Operations 1. buttons to make changes to the parameters 4. until the...
User Manual
Page 18
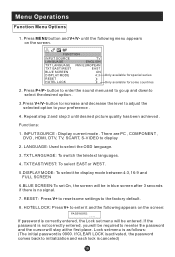
... . Functions: 1. Press MENU button and V+/V- Press P+/P- INPUT SOURCE : Display current mode . Repeat step 2 and step 3 until the following appears on the screen. There are PC , COMPONENT , DVD , HDMI, DTV, TV, SCART, S-VIDEO to your preference . 4. If password is correctly entered, the Lock set menu will stay at the first place. button to increase and decrease the level to adjust the selected option to display 2. LANGUAGE: Used to the factory default . 8. TXT...
... . Functions: 1. Press MENU button and V+/V- Press P+/P- INPUT SOURCE : Display current mode . Repeat step 2 and step 3 until the following appears on the screen. There are PC , COMPONENT , DVD , HDMI, DTV, TV, SCART, S-VIDEO to your preference . 4. If password is correctly entered, the Lock set menu will stay at the first place. button to increase and decrease the level to adjust the selected option to display 2. LANGUAGE: Used to the factory default . 8. TXT...
User Manual
Page 19
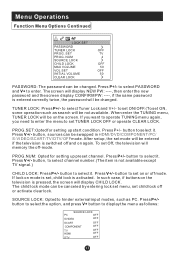
... in HDMI/DVD/COMPONENT/PC/ S-VIDEO/SCART/TV/DTV/OFFmode. If you want to operate TUNING menu again, you need to enter the menu to select it. Press P+/- Press P+/button to select the option, and press V+ button to set mode will memory the off and on the television is activated . SOURCE LOCK: Opted to select channel number.(The item is switched off -mode. Menu Operations Function Menu Options Continued LOCK SET PASSWORD TUNER LOCK PROG. button to set TUNER LOCK OFF or operate CLEAR LOCK. button...
... in HDMI/DVD/COMPONENT/PC/ S-VIDEO/SCART/TV/DTV/OFFmode. If you want to operate TUNING menu again, you need to enter the menu to select it. Press P+/- Press P+/button to select the option, and press V+ button to set mode will memory the off and on the television is activated . SOURCE LOCK: Opted to select channel number.(The item is switched off -mode. Menu Operations Function Menu Options Continued LOCK SET PASSWORD TUNER LOCK PROG. button to set TUNER LOCK OFF or operate CLEAR LOCK. button...
User Manual
Page 21
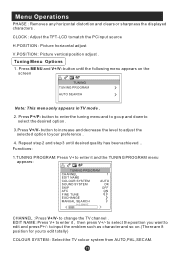
... and so on the screen TUNING TUNING PROGRAM AUTO SEARCH Note: This menu only appears in TV mode . 2. Tuning Menu Options 1. to match the PC input source H.POSITION : Picture horizontal adjust V.POSITION : Picture vertical position adjust . to edit totally) COLOUR SYSTEM : Select the TV colour system from AUTO,PAL,SECAM. CLOCK : Adjust the TFT-LCD to change the TV channel . button to enter the tuning menu and to go...
... and so on the screen TUNING TUNING PROGRAM AUTO SEARCH Note: This menu only appears in TV mode . 2. Tuning Menu Options 1. to match the PC input source H.POSITION : Picture horizontal adjust V.POSITION : Picture vertical position adjust . to edit totally) COLOUR SYSTEM : Select the TV colour system from AUTO,PAL,SECAM. CLOCK : Adjust the TFT-LCD to change the TV channel . button to enter the tuning menu and to go...
User Manual
Page 27
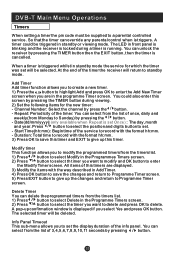
...-T Main Menu Operations Timers When setting a timer the pin code must be supplied to standby mode. The LED in standby mode the service for the new timer: - At the end of 3,4,5,6,7,8,9,10,11 seconds by press the / button. - Channel Number: Select the channel by pressing / button. You can select from the timers list. 1) Press / button to select Modify in Add Timer. 4) Press OK button to save this screen by pressing the TIMER button during a timer is running. Modify timer This...
...-T Main Menu Operations Timers When setting a timer the pin code must be supplied to standby mode. The LED in standby mode the service for the new timer: - At the end of 3,4,5,6,7,8,9,10,11 seconds by press the / button. - Channel Number: Select the channel by pressing / button. You can select from the timers list. 1) Press / button to select Modify in Add Timer. 4) Press OK button to save this screen by pressing the TIMER button during a timer is running. Modify timer This...
User Manual
Page 28
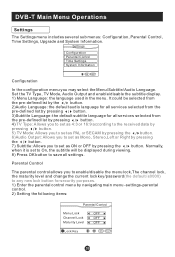
... may select the Menu/Subtitle/Audio Language. Set the TV Type, TV Mode, Audio Output and enable/disable the subtitle display. 1) Menu Language: the language used in the menu. Settings Configuration Parental Control Time Settings System Information Configuration OK EXIT In the configuration menu you to enable/disable the menu lock,The channel lock, the maturity level and change the current lock key/password(the default is0000) to set as ON or OFF by navigating main menu -settings-parental control. 2) Setting the following items: Parental Control Menu Lock Channel Lock...
... may select the Menu/Subtitle/Audio Language. Set the TV Type, TV Mode, Audio Output and enable/disable the subtitle display. 1) Menu Language: the language used in the menu. Settings Configuration Parental Control Time Settings System Information Configuration OK EXIT In the configuration menu you to enable/disable the menu lock,The channel lock, the maturity level and change the current lock key/password(the default is0000) to set as ON or OFF by navigating main menu -settings-parental control. 2) Setting the following items: Parental Control Menu Lock Channel Lock...

User Manual
Page 29
... Time: use digits and / button to set the local time in the services is required to select ON or OFF. Menu Lock: Press / button to view the locked channels(defined in the format hh:mm. 4) Press OK button to be ON or OFF by the time information from the list by pressing / button. - ON means that the age limit contained in two modes: Automatic mode and Manual mode. Local Time Offset: you to change the Lock...
... Time: use digits and / button to set the local time in the services is required to select ON or OFF. Menu Lock: Press / button to view the locked channels(defined in the format hh:mm. 4) Press OK button to be ON or OFF by the time information from the list by pressing / button. - ON means that the age limit contained in two modes: Automatic mode and Manual mode. Local Time Offset: you to change the Lock...
User Manual
Page 33
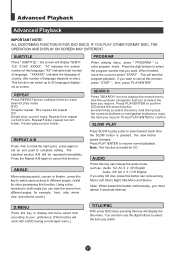
... change the audio mode. Press PLAY/ENTER to confirm (CD press the search button several times to 32 languages displayed on disc). Press PLAY/ENTER to display the search menu. Each time the SLOW button is invalid for discs possessing this button continuously, you require. TITLE/PBC With some DVD discs pressing this key can select up /down navigation buttons to select the program number that you require. SUBTITLE Press " SUBTITLE...
... change the audio mode. Press PLAY/ENTER to confirm (CD press the search button several times to 32 languages displayed on disc). Press PLAY/ENTER to display the search menu. Each time the SLOW button is invalid for discs possessing this button continuously, you require. TITLE/PBC With some DVD discs pressing this key can select up /down navigation buttons to select the program number that you require. SUBTITLE Press " SUBTITLE...

User Manual
Page 35
.... 4.Press SETUP repeatedly to an external TV. ..General Setup Page.. TV Type Auto Parental Password Default PAL AUTO NTSC SETUP PLAY/ENTER General Setup Page ASPECT RATIO DESCRIPTION When using a widescreen TV. The following information applies only when the DVD output is connected to exit the set-up menus. ..General Setup Page.. For this if you have a normal aspect ratio (4:3) TV. DVD System Setup DVD System Setup SETUP PLAY/ENTER General Setup Process 1.Press the SETUP button, the General Setup Page,Preference...
.... 4.Press SETUP repeatedly to an external TV. ..General Setup Page.. TV Type Auto Parental Password Default PAL AUTO NTSC SETUP PLAY/ENTER General Setup Page ASPECT RATIO DESCRIPTION When using a widescreen TV. The following information applies only when the DVD output is connected to exit the set-up menus. ..General Setup Page.. For this if you have a normal aspect ratio (4:3) TV. DVD System Setup DVD System Setup SETUP PLAY/ENTER General Setup Process 1.Press the SETUP button, the General Setup Page,Preference...
User Manual
Page 41
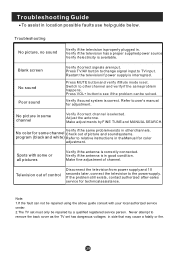
.... Never attempt to see if the problem can not be repaired using the above guide consult with some channel Check out of picture and sound systems. program (black and white) Refer to the power supply. Verify if the television has a proper supplied power source. Blank screen No sound Poor sound Verify if correct signals are input. Press VOL+ button to remove the back cover as the TV set must only be solved.
.... Never attempt to see if the problem can not be repaired using the above guide consult with some channel Check out of picture and sound systems. program (black and white) Refer to the power supply. Verify if the television has a proper supplied power source. Blank screen No sound Poor sound Verify if correct signals are input. Press VOL+ button to remove the back cover as the TV set must only be solved.


