
User Manual
Page 2
... that contained in the operating instructions unless you are provided for replacement of important operating and maintenance (servicing) instructions in accordance with the manufacturer's instructions. 8) Do not install near water. 6) Clean only with a protective earthing connection. 2 TV LCD-TFT Install in the literature accompanying the appliance. CAUTION: TO PREVENT ELECTRIC SHOCK DO NOT USE THIS POLARIZED PLUG WITH AN EXTENSION CORD, RECEPTACLE OR OTHER...
... that contained in the operating instructions unless you are provided for replacement of important operating and maintenance (servicing) instructions in accordance with the manufacturer's instructions. 8) Do not install near water. 6) Clean only with a protective earthing connection. 2 TV LCD-TFT Install in the literature accompanying the appliance. CAUTION: TO PREVENT ELECTRIC SHOCK DO NOT USE THIS POLARIZED PLUG WITH AN EXTENSION CORD, RECEPTACLE OR OTHER...

User Manual
Page 5
... Time zone setting 25 Sleep Timer setting 25 Timer on setting 26 Timer off setting 26 Function Menu Menu Language 26 DTV Caption Style 27 OSD Timeout 28 OSD Transparency 28 DNR 28 Adjust Menu Screen Setup for Component or PC mode 28 Lock Menu Parental Control rating and categories 29 Lock setup 30 Other Functions Br ie f In fo 32 Quick program view 32 Aspect Ratio Control 33 CC (Closed Caption Display 33 Remote Control Setting up your remote control 34 Remote Control Codes 36 Maintenance 40 Product Specifications 41 Troubleshooting 42 Owner s Manual...
... Time zone setting 25 Sleep Timer setting 25 Timer on setting 26 Timer off setting 26 Function Menu Menu Language 26 DTV Caption Style 27 OSD Timeout 28 OSD Transparency 28 DNR 28 Adjust Menu Screen Setup for Component or PC mode 28 Lock Menu Parental Control rating and categories 29 Lock setup 30 Other Functions Br ie f In fo 32 Quick program view 32 Aspect Ratio Control 33 CC (Closed Caption Display 33 Remote Control Setting up your remote control 34 Remote Control Codes 36 Maintenance 40 Product Specifications 41 Troubleshooting 42 Owner s Manual...
User Manual
Page 6
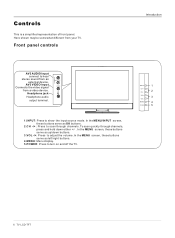
... +/- . INPUT 1 CH+ 2 CH- Controls This is a simplified representation of front panel. Headphone jack Headphone audio output terminal. MENU 4 POWER 5 6 TV LCD-TFT Here shown may be somewhat different from a video device. In the MENU screen, these buttons serve as OK buttons. 2.CH -/+ : Press to turn on and off the TV. To scan quickly through channels. R AUDIO L VIDEO 1.INPUT: Press to hear stereo sound from an external device. Front panel controls Introduction AV3 AUDIO Input connect to show the input source mode. VOL...
... +/- . INPUT 1 CH+ 2 CH- Controls This is a simplified representation of front panel. Headphone jack Headphone audio output terminal. MENU 4 POWER 5 6 TV LCD-TFT Here shown may be somewhat different from a video device. In the MENU screen, these buttons serve as OK buttons. 2.CH -/+ : Press to turn on and off the TV. To scan quickly through channels. R AUDIO L VIDEO 1.INPUT: Press to hear stereo sound from an external device. Front panel controls Introduction AV3 AUDIO Input connect to show the input source mode. VOL...

User Manual
Page 7
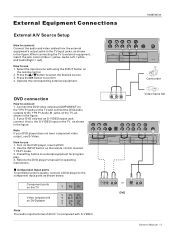
... mode, these ports will not work. 3 S-Video Input Connect S-Video out from an S-VIDEO device to theS-VIDEO input. 4 Antenna Input Connect cable or antenna signals to the TV, either directly or through your cable box. 5 HDMI Connect a signal to HDMI/DVI. 6 PC VIDEO Input Connect the monitor output connector from a PC to the jack 7 DVD/DTV Input (Component ) Connect a component video device to these jacks. 8 PC/DVI Audio Input Connect the audio out from the external device, used while linking PC audio frequency output terminalsor using a DVI to HDMI connector. 9 COMPONENT AUDIO Input Connect...
... mode, these ports will not work. 3 S-Video Input Connect S-Video out from an S-VIDEO device to theS-VIDEO input. 4 Antenna Input Connect cable or antenna signals to the TV, either directly or through your cable box. 5 HDMI Connect a signal to HDMI/DVI. 6 PC VIDEO Input Connect the monitor output connector from a PC to the jack 7 DVD/DTV Input (Component ) Connect a component video device to these jacks. 8 PC/DVI Audio Input Connect the audio out from the external device, used while linking PC audio frequency output terminalsor using a DVI to HDMI connector. 9 COMPONENT AUDIO Input Connect...
User Manual
Page 8
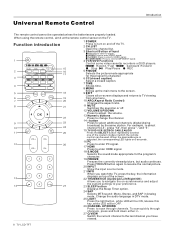
... enter HDMI signal. 18 S.MODE Selects the sound mode appropriate for the program's character. 6 CC(closed caption) Select a closed caption. 7 TIME Shows time. 8 MENU Brings up the main menu to the screen. 9 EXIT Clears all on-screen displays and returns to TV viewing from any menu. 10 ARC(Aspect Ratio Control) Changes the aspect ratio. 11 MUTE Switches the sound on -screen menus and adjust the system settings to select one of Input TV:Press to change the channel. 14 - When the desired device is selected, the corresponding LED lights...
... enter HDMI signal. 18 S.MODE Selects the sound mode appropriate for the program's character. 6 CC(closed caption) Select a closed caption. 7 TIME Shows time. 8 MENU Brings up the main menu to the screen. 9 EXIT Clears all on-screen displays and returns to TV viewing from any menu. 10 ARC(Aspect Ratio Control) Changes the aspect ratio. 11 MUTE Switches the sound on -screen menus and adjust the system settings to select one of Input TV:Press to change the channel. 14 - When the desired device is selected, the corresponding LED lights...
User Manual
Page 10
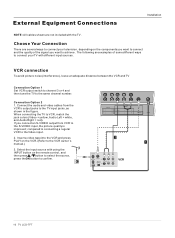
... to connect your television, depending on the remote control, and then press / button to select the source, press theOK button to the same channel number. Connect the audio and video cables from VCR to achieve. If you want to connect and the quality of the signal you connect an S-VIDEO output from the VCR's output jacks to the Video input. 2. Connection Option 2 1. When connecting the TV to the VCR owner`s manual.) 3. AUDIO L R L R Video Video AV IN L R L R S-VIDEO ANT IN 10 TV LCD-TFT Insert a video...
... to connect your television, depending on the remote control, and then press / button to select the source, press theOK button to the same channel number. Connect the audio and video cables from VCR to achieve. If you want to connect and the quality of the signal you connect an S-VIDEO output from the VCR's output jacks to the Video input. 2. Connection Option 2 1. When connecting the TV to the VCR owner`s manual.) 3. AUDIO L R L R Video Video AV IN L R L R S-VIDEO ANT IN 10 TV LCD-TFT Insert a video...
User Manual
Page 11
... the OK button to external equipment, match the jack colors (Video = yellow, Audio Left = white, and Audio Right = red). If your DVD player does not have component video output, use S-Video. Component Input ports To get better picture quality, connect a DVD player to the S-VIDEO input on the TV. AUDIO L R L R Video Video AV IN L R L R S-VIDEO ANT IN Camcorder DVD connection How to use 1. How to connect 1. Refer to use 1. Video Game Set COMPONENT IN Pr PC/DVI AUDIO IN OPTICAL Pr AUDIO L R L R Video Video AV IN L R L R S-VIDEO or DVD Owner s Manual 11...
... the OK button to external equipment, match the jack colors (Video = yellow, Audio Left = white, and Audio Right = red). If your DVD player does not have component video output, use S-Video. Component Input ports To get better picture quality, connect a DVD player to the S-VIDEO input on the TV. AUDIO L R L R Video Video AV IN L R L R S-VIDEO ANT IN Camcorder DVD connection How to use 1. How to connect 1. Refer to use 1. Video Game Set COMPONENT IN Pr PC/DVI AUDIO IN OPTICAL Pr AUDIO L R L R Video Video AV IN L R L R S-VIDEO or DVD Owner s Manual 11...

User Manual
Page 12
... TV supports HDCP (High-bandwidth Digital Contents Protection) protocol for operation. How to the TV Digital Audio (Optical) Output port. 2. Connect one end of the optical cable to the digital audio (optical) input on the remote control to select COMPONENT , PC or HDMI/DVI source. Note When connecting with external audio equipments, such as shown below. External Equipment Connections Installation DTV connection This TV can receive Digital Over-the-air/Cable signals without an external digital set -top box or other end of an optical cable to connect 1. HDMI/DVI...
... TV supports HDCP (High-bandwidth Digital Contents Protection) protocol for operation. How to the TV Digital Audio (Optical) Output port. 2. Connect one end of the optical cable to the digital audio (optical) input on the remote control to select COMPONENT , PC or HDMI/DVI source. Note When connecting with external audio equipments, such as shown below. External Equipment Connections Installation DTV connection This TV can receive Digital Over-the-air/Cable signals without an external digital set -top box or other end of an optical cable to connect 1. HDMI/DVI...
User Manual
Page 13
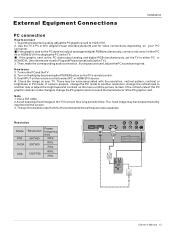
... mode to another resolution, change thePC graphiccard orconsult themanufacturer ofthe PCgraphic card. Note 1.Use a DVI cable. 2.Avoid keepinga fixed imageon theTV's screen fora long periodof time.The fixed image may be noise associated with the resolution, vertical pattern, contrast or brightness in PC mode. If the graphic card onthe PC doesnot output analogand digital RGBsimultaneously,connect only oneof either PC or HDMI/DVI; (the othermode is clear. Thesynchronization input...
... mode to another resolution, change thePC graphiccard orconsult themanufacturer ofthe PCgraphic card. Note 1.Use a DVI cable. 2.Avoid keepinga fixed imageon theTV's screen fora long periodof time.The fixed image may be noise associated with the resolution, vertical pattern, contrast or brightness in PC mode. If the graphic card onthe PC doesnot output analogand digital RGBsimultaneously,connect only oneof either PC or HDMI/DVI; (the othermode is clear. Thesynchronization input...

User Manual
Page 14
...(DVD player or Set Top Box) supports DVI How To Connect 1. Connect the source device to HDMI port of the source device will be automatically set to -DVI cable(not supplied with this product). 2. How To Use If the source device supports Auto DVI function, the output resolution of this TV with this product). 2. HDMI Installation When the source device(DVD player or Set Top Box) supports HDMI How To Connect 1. No separated audio connection is necessary. 3. Press the INPUT button to DVI Audio In port...
...(DVD player or Set Top Box) supports DVI How To Connect 1. Connect the source device to HDMI port of the source device will be automatically set to -DVI cable(not supplied with this product). 2. How To Use If the source device supports Auto DVI function, the output resolution of this TV with this product). 2. HDMI Installation When the source device(DVD player or Set Top Box) supports HDMI How To Connect 1. No separated audio connection is necessary. 3. Press the INPUT button to DVI Audio In port...
User Manual
Page 18
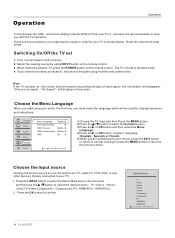
... to help you intend to be used for the first time, you might need to work properly. Choose the Menu Language When you start using INPUT button on the screen. the information will be away on , the screen show information according the type of input signal . First, connect power cord correctly. 2. Select the viewing source by using your TV to set 1. English Spanish or French 5 When you can watch your TV, cable TV, VCR, DVD...
... to help you intend to be used for the first time, you might need to work properly. Choose the Menu Language When you start using INPUT button on the screen. the information will be away on , the screen show information according the type of input signal . First, connect power cord correctly. 2. Select the viewing source by using your TV to set 1. English Spanish or French 5 When you can watch your TV, cable TV, VCR, DVD...

User Manual
Page 19
... EXIT /MENU button. Channel Video Audio Time Function Lock Tuner Antenna Auto Scan Add Channel Scan Rename Move /OK: Select /EXIT/ MENU: Exit Auto Scan NTSC Channel 55 Analog channels 19 Digital Channels 0 Progress(%)64 Note When Antenna is explained. Owner s Manual 19 You can also use buttons on the All Channel List. Automatic Scan Automatically finds all channels available through antenna or cable inputs, and stores them in your local area. In this section, how to use / button to select Tuner. 3 Press the or OK button Select Cable or Antenna mode. 4 Press...
... EXIT /MENU button. Channel Video Audio Time Function Lock Tuner Antenna Auto Scan Add Channel Scan Rename Move /OK: Select /EXIT/ MENU: Exit Auto Scan NTSC Channel 55 Analog channels 19 Digital Channels 0 Progress(%)64 Note When Antenna is explained. Owner s Manual 19 You can also use buttons on the All Channel List. Automatic Scan Automatically finds all channels available through antenna or cable inputs, and stores them in your local area. In this section, how to use / button to select Tuner. 3 Press the or OK button Select Cable or Antenna mode. 4 Press...
User Manual
Page 22
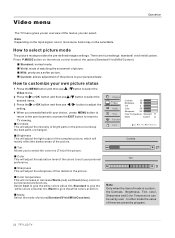
... keep the dark parts unchanged. Channel Video Audio Time Function Contrast 50 Brightness 50 Tint 0 Color 50 Sharpness 50 Color Temperature Standard Mode Custom Lock Move /OK: Select /EXIT/ MENU: Exit Brightness This will adjust the light output of the complete picture, which will adjust the intensity of the picture. Press P.MODE button on the input signal, one or more menu items may not be set by program . 22 TFT-LCD TV Contrast This will...
... keep the dark parts unchanged. Channel Video Audio Time Function Contrast 50 Brightness 50 Tint 0 Color 50 Sharpness 50 Color Temperature Standard Mode Custom Lock Move /OK: Select /EXIT/ MENU: Exit Brightness This will adjust the light output of the complete picture, which will adjust the intensity of the picture. Press P.MODE button on the input signal, one or more menu items may not be set by program . 22 TFT-LCD TV Contrast This will...

User Manual
Page 23
... setting that can output Digital audio via the optical connector to select the Audio Mode (Standard/Music/Theater/Custom). Channel Video Audio Time Function Volume 50 Bass 50 Treble 50 Balance 0 Digital Audio Mode TV Speaker RAW Standard Off Lock Move /OK: Select /EXIT/ MENU: Exit Owner s Manual 23 Treble This will adjust the sound output level. How to Customize your own audio status 1 Press the MENU button and then use / button to select the Audio menu. 2 Press the or OK button and then use / button...
... setting that can output Digital audio via the optical connector to select the Audio Mode (Standard/Music/Theater/Custom). Channel Video Audio Time Function Volume 50 Bass 50 Treble 50 Balance 0 Digital Audio Mode TV Speaker RAW Standard Off Lock Move /OK: Select /EXIT/ MENU: Exit Owner s Manual 23 Treble This will adjust the sound output level. How to Customize your own audio status 1 Press the MENU button and then use / button to select the Audio menu. 2 Press the or OK button and then use / button...

User Manual
Page 28
... menu. 2. Phase : Adjust the phase of input signal. Function menu Operation OSD Timeout 1. Clock : Adjust the clock of Pixel clock. Setting:Change to the default value. 1 Press the MENU button and then select the Adjust menu. 2 Press the or OK button and then use / button to TV viewing. 28 TV LCD-TFT Channel Video Audio Time Function Lock Menu Language English DTV Caption Style OSD Timeout Middle OSD Transparency Middle DNR Off Move /OK: Select /EXIT/ MENU: Exit Channel Video Audio Time Function Lock Menu Language English...
... menu. 2. Phase : Adjust the phase of input signal. Function menu Operation OSD Timeout 1. Clock : Adjust the clock of Pixel clock. Setting:Change to the default value. 1 Press the MENU button and then select the Adjust menu. 2 Press the or OK button and then use / button to TV viewing. 28 TV LCD-TFT Channel Video Audio Time Function Lock Menu Language English DTV Caption Style OSD Timeout Middle OSD Transparency Middle DNR Off Move /OK: Select /EXIT/ MENU: Exit Channel Video Audio Time Function Lock Menu Language English...

User Manual
Page 30
... selected, change of the MPAARating, Parental Guide ,CA Eng Rating and CAFren Rating will be no useful. Parental Lock 1. Press the MENU button and then use / button to select the rating. 3 Press the OK button to set up blocking schemes to TV viewing. Then, press the or OK button. Password: Change the password by blocking out all the movies with your preference. Press / button to select On or Off. Operation Enter Password Channel Video Audio Time Function Lock Password Parental Lock...
... selected, change of the MPAARating, Parental Guide ,CA Eng Rating and CAFren Rating will be no useful. Parental Lock 1. Press the MENU button and then use / button to select the rating. 3 Press the OK button to set up blocking schemes to TV viewing. Then, press the or OK button. Password: Change the password by blocking out all the movies with your preference. Press / button to select On or Off. Operation Enter Password Channel Video Audio Time Function Lock Password Parental Lock...
User Manual
Page 33
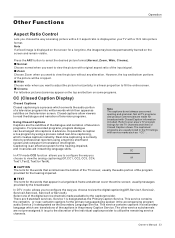
... accompanying program audio.Service 2 is a process which converts the audio portion of the TV screen; The captioned programs are the subtitles of the dialogue and narration of the digital service channels made for broadcast with a 16:9 ratio picture format. usually messages provided by the captionprovider. Select one of television programs. For prerecorded programs, program dialogue can also aid in teaching language skills. Other Functions Operation Aspect Ratio Control Lets you want to adjust the picture...
... accompanying program audio.Service 2 is a process which converts the audio portion of the TV screen; The captioned programs are the subtitles of the dialogue and narration of the digital service channels made for broadcast with a 16:9 ratio picture format. usually messages provided by the captionprovider. Select one of television programs. For prerecorded programs, program dialogue can also aid in teaching language skills. Other Functions Operation Aspect Ratio Control Lets you want to adjust the picture...

User Manual
Page 34
... 3 digits are programmed successfully, device LED will be ON. Fast Programming default TV code set database). 34 TV LCD-TFT Manually scan mode With manually scan programming, the control tests all DVD Players, VCRs and Cable boxes. key. CH- Bulb key to find device codes automatically. Using the Power Scan feature to control the flash light. Led will blink once when you enter a digit key, indicating the digit key is incorrect, LED will be done, press OK to your device. If user's input is programmed...
... 3 digits are programmed successfully, device LED will be ON. Fast Programming default TV code set database). 34 TV LCD-TFT Manually scan mode With manually scan programming, the control tests all DVD Players, VCRs and Cable boxes. key. CH- Bulb key to find device codes automatically. Using the Power Scan feature to control the flash light. Led will blink once when you enter a digit key, indicating the digit key is incorrect, LED will be done, press OK to your device. If user's input is programmed...

User Manual
Page 35
... code set . 6. Remote Control Operation CH.LIST HDMI SELECT PC TV VIDEO S-VIDEO COMPONENT P.MODE CC TIME ENU S.MODE FREEZE NPUT INFO OK ARC SAP SLEEP EXIT VOL+ CH+ VOL- CH- When the device turns ON, press and release the OK key to enter display mode. To exit without programming, press any key other than digit 1, 2, 3 is pressed display mode is in 30 seconds, manually scan mode will be automatically exited and led will start from current code set . LED will blink...
... code set . 6. Remote Control Operation CH.LIST HDMI SELECT PC TV VIDEO S-VIDEO COMPONENT P.MODE CC TIME ENU S.MODE FREEZE NPUT INFO OK ARC SAP SLEEP EXIT VOL+ CH+ VOL- CH- When the device turns ON, press and release the OK key to enter display mode. To exit without programming, press any key other than digit 1, 2, 3 is pressed display mode is in 30 seconds, manually scan mode will be automatically exited and led will start from current code set . LED will blink...

User Manual
Page 42
... the antenna is in an extended period as an electrical appliance or power tool. Press Mute button and verify if Mute mode is selected. Note: Do not leave the television with some anomalistic stripes or spots. Switch to other channels. Check out of picture and sound systems. Refer to relative instructions in the Manual for some channel program (black and white) Spots with static picture in...
... the antenna is in an extended period as an electrical appliance or power tool. Press Mute button and verify if Mute mode is selected. Note: Do not leave the television with some anomalistic stripes or spots. Switch to other channels. Check out of picture and sound systems. Refer to relative instructions in the Manual for some channel program (black and white) Spots with static picture in...


