
User Manual
Page 2
... is intended to alert the user to qualified service personnel. The lightning flash with dry cloth. 7) Do not block any way, such as power-supply cord or plug is damaged, liquid has been spilled or objects have fallen into your safety. CAUTION: TO PREVENT ELECTRIC SHOCK DO NOT USE THIS POLARIZED PLUG WITH AN EXTENSION CORD, RECEPTACLE OR OTHER OUTLET...
... is intended to alert the user to qualified service personnel. The lightning flash with dry cloth. 7) Do not block any way, such as power-supply cord or plug is damaged, liquid has been spilled or objects have fallen into your safety. CAUTION: TO PREVENT ELECTRIC SHOCK DO NOT USE THIS POLARIZED PLUG WITH AN EXTENSION CORD, RECEPTACLE OR OTHER OUTLET...
User Manual
Page 5
... Menu How to select audio mode 23 How to customize your own audio status 23 SAP Broadcasts Setup 23 Function Menu Menu Language OSD Timeout OSD Transparency Screen Mode Blue Screen DPMS Time zone setting Date /Time setting Sleep Timer setting DTV Caption Style Lock Menu Parental Control rating and categories Lock setup Other Functions Br ie f In fo Us in g th e Gu id e Quick program view CC (Closed Caption Display USB Input Remote Control Setting up your remote control Remote Control Codes Maintenance Product Specification Troubleshooting Warranty Owner s Manual...
... Menu How to select audio mode 23 How to customize your own audio status 23 SAP Broadcasts Setup 23 Function Menu Menu Language OSD Timeout OSD Transparency Screen Mode Blue Screen DPMS Time zone setting Date /Time setting Sleep Timer setting DTV Caption Style Lock Menu Parental Control rating and categories Lock setup Other Functions Br ie f In fo Us in g th e Gu id e Quick program view CC (Closed Caption Display USB Input Remote Control Setting up your remote control Remote Control Codes Maintenance Product Specification Troubleshooting Warranty Owner s Manual...
User Manual
Page 8
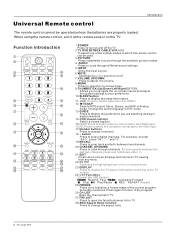
... display a frozen image of the system modes in which the remote control can be operated unless the batteries are watching analog or digital channels. 14.CCD(closed caption) Select a closed caption. 15.HDMI:Press to select a device connected to the HDMI input 16.PC:Press to select the computer connected to the VGA input 17.Number buttons Press to change the aspect ratio. 8 TV LCD-TFT button Press to open the favorite channel list in . 12. Press again to return to the program...
... display a frozen image of the system modes in which the remote control can be operated unless the batteries are watching analog or digital channels. 14.CCD(closed caption) Select a closed caption. 15.HDMI:Press to select a device connected to the HDMI input 16.PC:Press to select the computer connected to the VGA input 17.Number buttons Press to change the aspect ratio. 8 TV LCD-TFT button Press to open the favorite channel list in . 12. Press again to return to the program...
User Manual
Page 9
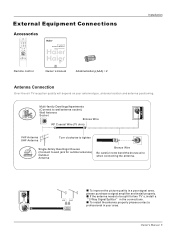
... antenna needs to bend the bronze wire when connecting the antenna. MODELS: HL26K HL37T HL32K HL52T HL37K HL42K HL47K Remote control Owner`s manual Alkaline battery(AAA) 2 Installation Antenna Connection Over-the-air TV reception quality will depend on your TV, and retain it for two TV`s, install a 2-Way Signal Splitter in the connections. External Equipment Connections Accessories TV DVD STB CABLE VCR AUD PICTURE AUDIO PC HDMI INPUT MUTE RECALL VOL MENU CH EXIT ENTER SLEEP DISPLAY USB PLAY...
... antenna needs to bend the bronze wire when connecting the antenna. MODELS: HL26K HL37T HL32K HL52T HL37K HL42K HL47K Remote control Owner`s manual Alkaline battery(AAA) 2 Installation Antenna Connection Over-the-air TV reception quality will depend on your TV, and retain it for two TV`s, install a 2-Way Signal Splitter in the connections. External Equipment Connections Accessories TV DVD STB CABLE VCR AUD PICTURE AUDIO PC HDMI INPUT MUTE RECALL VOL MENU CH EXIT ENTER SLEEP DISPLAY USB PLAY...
User Manual
Page 10
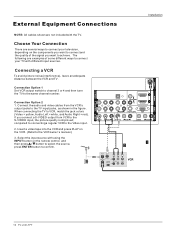
VIDEO IN COMPONENT IN OPTICAL OUT 2 L 2 DVI AUDIO 1 R 1 Y 1 Pb Pr L AUDIO R VGA AUDIO VGA VIDEO L AUDIO R S-VIDEO L AUDIO R VIDEO L AUDIO R HDMI IN AV OUT VGA IN 10 TV LCD-TFT Connection Option 1 Set VCR output switch to channel 3 or 4 and then tune the TV to VCR, match the jack colors (Video = yellow, Audio Left = white, and Audio Right = red). When connecting the TV to the same channel number. Select the input source with using the INPUT button on the VCR. (Refer to the VCR owner`s manual.) 3. The following are several ways to confirm. Insert...
VIDEO IN COMPONENT IN OPTICAL OUT 2 L 2 DVI AUDIO 1 R 1 Y 1 Pb Pr L AUDIO R VGA AUDIO VGA VIDEO L AUDIO R S-VIDEO L AUDIO R VIDEO L AUDIO R HDMI IN AV OUT VGA IN 10 TV LCD-TFT Connection Option 1 Set VCR output switch to channel 3 or 4 and then tune the TV to VCR, match the jack colors (Video = yellow, Audio Left = white, and Audio Right = red). When connecting the TV to the same channel number. Select the input source with using the INPUT button on the VCR. (Refer to the VCR owner`s manual.) 3. The following are several ways to confirm. Insert...

User Manual
Page 11
... IN OPTICAL OUT Camcorder Video Game Set ANT IN HDMI IN AV OUT VGA IN 2 L 2 DVI AUDIO 1 R 1 Y 1 Pb Pr L AUDIO R VGA AUDIO VGA VIDEO L AUDIO R S-VIDEO L AUDIO R VIDEO L AUDIO R Owner s Manual 11 Component Input ports To get better picture quality, connect a DVD player to the component input ports as shown in the figure. Use INPUT button on external equipment for operating instructions. External Equipment Connections Installation ANT IN HDMI IN External A/V Source Setup How to connect Connect the audio and video cables from the external equipment's output jacks to...
... IN OPTICAL OUT Camcorder Video Game Set ANT IN HDMI IN AV OUT VGA IN 2 L 2 DVI AUDIO 1 R 1 Y 1 Pb Pr L AUDIO R VGA AUDIO VGA VIDEO L AUDIO R S-VIDEO L AUDIO R VIDEO L AUDIO R Owner s Manual 11 Component Input ports To get better picture quality, connect a DVD player to the component input ports as shown in the figure. Use INPUT button on external equipment for operating instructions. External Equipment Connections Installation ANT IN HDMI IN External A/V Source Setup How to connect Connect the audio and video cables from the external equipment's output jacks to...

User Manual
Page 12
... on the digital set-top box. (Refer to external audio equipment (stereo system) via the Digital Audio Output (Optical) port. See the external audio equipment instruction manual for Digital Contents (480p,720p,1080i). port. External Equipment Connections Installation Connecting a DTV(digital TV) This TV can receive Digital Over-the-air/Cable signals without an external digital set -top box connector. Connect one end of the optical cable to connect Use the TV`s COMPONENT , VGA or HDMI jack for the digital set -top box or other end of an optical cable to use 1. Turn on...
... on the digital set-top box. (Refer to external audio equipment (stereo system) via the Digital Audio Output (Optical) port. See the external audio equipment instruction manual for Digital Contents (480p,720p,1080i). port. External Equipment Connections Installation Connecting a DTV(digital TV) This TV can receive Digital Over-the-air/Cable signals without an external digital set -top box connector. Connect one end of the optical cable to connect Use the TV`s COMPONENT , VGA or HDMI jack for the digital set -top box or other end of an optical cable to use 1. Turn on...
User Manual
Page 13
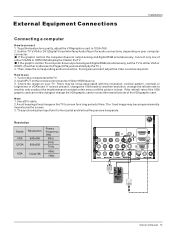
.... 3. ANT IN HDMI IN Resolution Mode VGA SVGA XGA Resolution 640x480 800x600 1024x768 Frame frequency (Hz) 60Hz 60Hz 75Hz 60Hz 75Hz VIDEO IN COMPONENT IN OPTICAL OUT 2 L 2 DVI AUDIO 1 R 1 Y 1 Pb Pr L AUDIO R VGA AUDIO VGA VIDEO L AUDIO R S-VIDEO L AUDIO R VIDEO L AUDIO R AV OUT VGA IN Owner s Manual 13 External Equipment Connections Installation Connecting a computer How toconnect 1. To get the best picture quality, adjust the VGAgraphics card to Plugand Play automaticallyby theTV.) 3. How touse 1. Note 1.Use aDVI cable. 2.Avoid keepinga fixed imageon theTV...
.... 3. ANT IN HDMI IN Resolution Mode VGA SVGA XGA Resolution 640x480 800x600 1024x768 Frame frequency (Hz) 60Hz 60Hz 75Hz 60Hz 75Hz VIDEO IN COMPONENT IN OPTICAL OUT 2 L 2 DVI AUDIO 1 R 1 Y 1 Pb Pr L AUDIO R VGA AUDIO VGA VIDEO L AUDIO R S-VIDEO L AUDIO R VIDEO L AUDIO R AV OUT VGA IN Owner s Manual 13 External Equipment Connections Installation Connecting a computer How toconnect 1. To get the best picture quality, adjust the VGAgraphics card to Plugand Play automaticallyby theTV.) 3. How touse 1. Note 1.Use aDVI cable. 2.Avoid keepinga fixed imageon theTV...
User Manual
Page 14
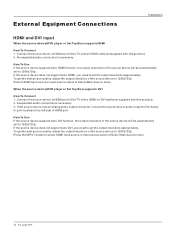
... analog audio output connector, connect the source device audio output to select HDMI input source in input source option of Select Main source menu. 14 TV LCD-TFT No separated audio connection is necessary. 3. To get the best picture quality, adjust the output resolution of the source device to HDMI port of the source device will be automatically set the output resolution appropriately. External Equipment Connections Installation HDMI and DVI input When the source device(DVD player or Set Top Box) supports HDMI How To Connect 1. How To Use...
... analog audio output connector, connect the source device audio output to select HDMI input source in input source option of Select Main source menu. 14 TV LCD-TFT No separated audio connection is necessary. 3. To get the best picture quality, adjust the output resolution of the source device to HDMI port of the source device will be automatically set the output resolution appropriately. External Equipment Connections Installation HDMI and DVI input When the source device(DVD player or Set Top Box) supports HDMI How To Connect 1. How To Use...

User Manual
Page 18
... the wall power outlet. Choose TV Input and then press MENU button. 2. English Spanish or French Operation Video Audio Channel Function Lock Function Language English OSD Timeout Short OSD Transparency Middle Screen Mode Normal Blue Screen On DPMS On Time Setup Closed Caption Default / Select EXIT Back Choose the Input source Change the picture source so you must select the language which will be away on vacation, disconnect the power plug from your TV. 1. There are connected to work...
... the wall power outlet. Choose TV Input and then press MENU button. 2. English Spanish or French Operation Video Audio Channel Function Lock Function Language English OSD Timeout Short OSD Transparency Middle Screen Mode Normal Blue Screen On DPMS On Time Setup Closed Caption Default / Select EXIT Back Choose the Input source Change the picture source so you must select the language which will be away on vacation, disconnect the power plug from your TV. 1. There are connected to work...
User Manual
Page 21
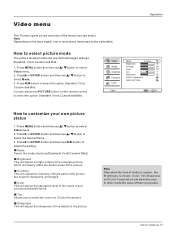
... the picture. Owner s Manual 21 Press MENU button and then use / button to select the color mix (Tint) of mode is custom , the Brightness, Contrast, Color, Tint, Sharpness and Color Temperature can select. Press or ENTER button and then use / button to select Video menu. 2. Tint Allows you can be selectable. Note Depending on the remote control to select picture mode The picture mode provides the pre-defined images settings: Standard, Vivid, Custom and Mild . 1. Contrast This will adjust the...
... the picture. Owner s Manual 21 Press MENU button and then use / button to select the color mix (Tint) of mode is custom , the Brightness, Contrast, Color, Tint, Sharpness and Color Temperature can select. Press or ENTER button and then use / button to select Video menu. 2. Tint Allows you can be selectable. Note Depending on the remote control to select picture mode The picture mode provides the pre-defined images settings: Standard, Vivid, Custom and Mild . 1. Contrast This will adjust the...

User Manual
Page 22
... Back VGA Set When you select the VGA input, this function is used. Press or ENTER button and then use / button to select VGA. 3. Black Level Extender To adjust the ability in the luminance of Pixel clock. Flesh Tone To adjust the flesh color: On and Off. Clock : Adjust the clock of digitizing error by pressing INPUT button then use / button to select Video menu. 2. Position : Adjust the screen position. Video menu Operation Color temperature This will increase or decrease Warm (red...
... Back VGA Set When you select the VGA input, this function is used. Press or ENTER button and then use / button to select VGA. 3. Black Level Extender To adjust the ability in the luminance of Pixel clock. Flesh Tone To adjust the flesh color: On and Off. Clock : Adjust the clock of digitizing error by pressing INPUT button then use / button to select Video menu. 2. Position : Adjust the screen position. Video menu Operation Color temperature This will increase or decrease Warm (red...
User Manual
Page 23
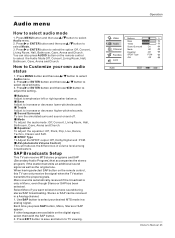
... a Analog channel. 1. Select Mono if you press SAP button, Mono, Stereo or SAP appear. If other languages are available on and off. Balance Adjust to mono sound during stereo/SAP broadcasting. Use SAP button to TV viewing. Operation Video Balance 0 Bass 59 Audio Treble 59 Sound Surround On Channel Mode Off Equalizer Off Function SPDIF Type PCM AVL Off Lock Audio ENTER Adjust / Select EXIT Back Owner s Manual 23 Sound Surround To turn the simulated surround sound on the digital signal, select...
... a Analog channel. 1. Select Mono if you press SAP button, Mono, Stereo or SAP appear. If other languages are available on and off. Balance Adjust to mono sound during stereo/SAP broadcasting. Use SAP button to TV viewing. Operation Video Balance 0 Bass 59 Audio Treble 59 Sound Surround On Channel Mode Off Equalizer Off Function SPDIF Type PCM AVL Off Lock Audio ENTER Adjust / Select EXIT Back Owner s Manual 23 Sound Surround To turn the simulated surround sound on the digital signal, select...
User Manual
Page 24
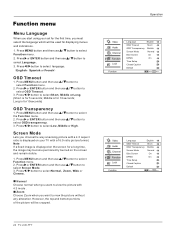
... menu. 2. Press MENU button and then use / button to select language. Middle is displayed on the screen and remain visible. 1. Screen Mode Lets you choose the way an analog picture with a 4:3 aspect ratio is for 15seconds) OSD Transparency 1. Press or ENTER button and then use / button to select Low ,Middle or High. Operation Video Audio Channel Function Lock Function Language English OSD Timeout Short OSD Transparency Middle Screen Mode Normal Blue Screen On DPMS On Time Setup Closed Caption Default / Select EXIT Back Video Audio Channel...
... menu. 2. Press MENU button and then use / button to select language. Middle is displayed on the screen and remain visible. 1. Screen Mode Lets you choose the way an analog picture with a 4:3 aspect ratio is for 15seconds) OSD Transparency 1. Press or ENTER button and then use / button to select Low ,Middle or High. Operation Video Audio Channel Function Lock Function Language English OSD Timeout Short OSD Transparency Middle Screen Mode Normal Blue Screen On DPMS On Time Setup Closed Caption Default / Select EXIT Back Video Audio Channel...

User Manual
Page 25
... set will be in standby mode automatically if no signal in 2 minutes; Broadcasted time information will be on some programs. You can check the time while watching the TV. 1. Also, you can also press ARC button on the remote control to fill the entire screen. Press or ENTER button and then use / button to select Date/Time. 4. Operation Video Audio Channel Function Lock Time Zone Date/Time Sleep Timer Pacific Off Time Setup / Select EXIT Back Video Audio Channel Function Lock Date/Time Auto...
... set will be in standby mode automatically if no signal in 2 minutes; Broadcasted time information will be on some programs. You can check the time while watching the TV. 1. Also, you can also press ARC button on the remote control to fill the entire screen. Press or ENTER button and then use / button to select Date/Time. 4. Operation Video Audio Channel Function Lock Time Zone Date/Time Sleep Timer Pacific Off Time Setup / Select EXIT Back Video Audio Channel Function Lock Date/Time Auto...
User Manual
Page 28
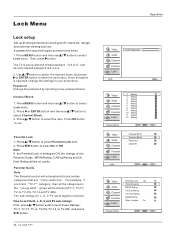
...press / button. 28 TV LCD-TFT Operation Video Audio Channel Function Lock Enter Password Lock EXIT Back Video Audio Channel Function Lock 2 Analog 3 Analog 4 Analog 5 Analog 6 Analog 7 Analog 8 Analog 9 Analog 10 Analog 11 Analog 12 Analog Channel Block ENTER Set / Select EXIT Back Video Audio Channel Function Lock Lock Channel Block Program Block Password Clean All ENTER Enter / Select EXIT Back Video Audio Channel Function Lock Parental Lock On Parental Guide MPAA Rating CA Eng Rating CA Fren Rating Digital Rating Block Unrated On Program Block ENTER Enter / Select EXIT...
...press / button. 28 TV LCD-TFT Operation Video Audio Channel Function Lock Enter Password Lock EXIT Back Video Audio Channel Function Lock 2 Analog 3 Analog 4 Analog 5 Analog 6 Analog 7 Analog 8 Analog 9 Analog 10 Analog 11 Analog 12 Analog Channel Block ENTER Set / Select EXIT Back Video Audio Channel Function Lock Lock Channel Block Program Block Password Clean All ENTER Enter / Select EXIT Back Video Audio Channel Function Lock Parental Lock On Parental Guide MPAA Rating CA Eng Rating CA Fren Rating Digital Rating Block Unrated On Program Block ENTER Enter / Select EXIT...
User Manual
Page 31
... in advance. Owner s Manual 31 Refer to utilize the remaining service channels. Select one of a television program into English. It is a process which converts the audio portion of the digital service channels made for the primary language being spoken in a large black frame and almost cover the entire screen; CC (Closed Caption Display) Closed Captions Closed captioning is up to the discretion of television programs. Using Closed Captions Captions are not pre-assigned. Real-time captioning is 18 (as...
... in advance. Owner s Manual 31 Refer to utilize the remaining service channels. Select one of a television program into English. It is a process which converts the audio portion of the digital service channels made for the primary language being spoken in a large black frame and almost cover the entire screen; CC (Closed Caption Display) Closed Captions Closed captioning is up to the discretion of television programs. Using Closed Captions Captions are not pre-assigned. Real-time captioning is 18 (as...

User Manual
Page 34
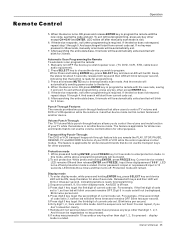
... TV LCD-TFT Changing device mode by using the Remote 1. If 3 digits are programmed successfully, device LED will be ON for programming. 3. Remote Operation To control a device using POWER or PLAY keys. TV. Fast Programming Haier default TV code set (001) will be programmed to work with all the codes available in the code set data base and assign the correct one for 5 seconds, default Haier code set . Program the Remote to the Remote. Using SELECT key to choose the device you wish to control the flash light. Default...
... TV LCD-TFT Changing device mode by using the Remote 1. If 3 digits are programmed successfully, device LED will be ON for programming. 3. Remote Operation To control a device using POWER or PLAY keys. TV. Fast Programming Haier default TV code set (001) will be programmed to work with all the codes available in the code set data base and assign the correct one for 5 seconds, default Haier code set . Program the Remote to the Remote. Using SELECT key to choose the device you wish to control the flash light. Default...
User Manual
Page 35
... Volume/Mute punch-through features that allow users to power scan. (TV, DVD, VCR, STB, cable box or audio equipment). 2. Protection mode 1. While press and holding ENTER key, press SELECT key and device LED will blink for 5 seconds to program. In this mode. If error password is 1, so then led will be regarded as no key pressed. 8.If no further programming is 3, so then led will start from current code set is input...
... Volume/Mute punch-through features that allow users to power scan. (TV, DVD, VCR, STB, cable box or audio equipment). 2. Protection mode 1. While press and holding ENTER key, press SELECT key and device LED will blink for 5 seconds to program. In this mode. If error password is 1, so then led will be regarded as no key pressed. 8.If no further programming is 3, so then led will start from current code set is input...
User Manual
Page 42
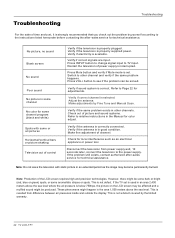
... correctly connected. Press VOL+ button to relative instructions in good condition. Verify if the antenna is resulted from power supply and, 10 seconds later, connect the television to the power supply. If the TV set . This is below 750hpa, the picture on the LCD screen may become permanently burned. No picture, no sound Blank screen No sound Poor sound No picture in some channel No color for color adjust. Verify if electricity is properly plugged...
... correctly connected. Press VOL+ button to relative instructions in good condition. Verify if the antenna is resulted from power supply and, 10 seconds later, connect the television to the power supply. If the TV set . This is below 750hpa, the picture on the LCD screen may become permanently burned. No picture, no sound Blank screen No sound Poor sound No picture in some channel No color for color adjust. Verify if electricity is properly plugged...


