User Manual
Page 2
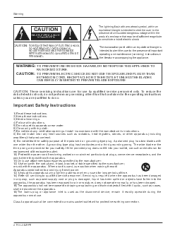
... block any heat sources such as power-supply cord or plug is used , use this apparatus during the apparatus normal use by the manufacturer, or sold with one wider than that contained in the operating instructions unless you are for replacement of electric shock, do so. REFER SERVICING TO QUALIFIED SERVICE PERSONNEL. Class I apparatus shall be connected to avoid injury from the apparatus...
... block any heat sources such as power-supply cord or plug is used , use this apparatus during the apparatus normal use by the manufacturer, or sold with one wider than that contained in the operating instructions unless you are for replacement of electric shock, do so. REFER SERVICING TO QUALIFIED SERVICE PERSONNEL. Class I apparatus shall be connected to avoid injury from the apparatus...
User Manual
Page 5
... p la ye r ...11 Connecting a DTV(digital TV) ...12 Connecting digital audio output ...12 Co nn ec ti ng a c om pu te r...13 Monitor Out Setup...14 HD MI a nd D VI i np ut ...14 Cable sample...15 Connecting Headphones ...16 Power source...16 Removing the table stand and installing a wall mount bracket...17 Operation Switching On/Off the TV set ...18 Choose the Menu Language ...18 Choose the input source...18 Channel Menu Channel Scan...19 Ch an...
... p la ye r ...11 Connecting a DTV(digital TV) ...12 Connecting digital audio output ...12 Co nn ec ti ng a c om pu te r...13 Monitor Out Setup...14 HD MI a nd D VI i np ut ...14 Cable sample...15 Connecting Headphones ...16 Power source...16 Removing the table stand and installing a wall mount bracket...17 Operation Switching On/Off the TV set ...18 Choose the Menu Language ...18 Choose the input source...18 Channel Menu Channel Scan...19 Ch an...
User Manual
Page 6
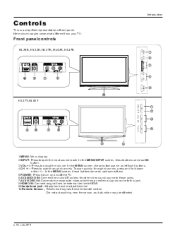
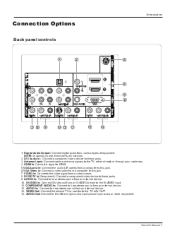
... LCD-TFT AUDIO - AUDIO - To scan quickly through channels, press and hold down buttons. 5.POWER: Press to turn on and off the TV. 6.AV2 AUDIO IN: Connect the audio L/R cables from the video signal source to these buttons serve as OK button. 3.VOL +/-: Press to scan through channels. In the MENU screen, these jacks. 7.AV2 VIDEO IN: Connects the composite video cable from an external signal source to this jack. 8.HDMI3 IN: Connect a signal from an external device to open the input source mode...
... LCD-TFT AUDIO - AUDIO - To scan quickly through channels, press and hold down buttons. 5.POWER: Press to turn on and off the TV. 6.AV2 AUDIO IN: Connect the audio L/R cables from the video signal source to these buttons serve as OK button. 3.VOL +/-: Press to scan through channels. In the MENU screen, these jacks. 7.AV2 VIDEO IN: Connects the composite video cable from an external signal source to this jack. 8.HDMI3 IN: Connect a signal from an external device to open the input source mode...
User Manual
Page 7
... Owner s Manual 7 Digital Audio Output: Connect digital audio from an external device. 13. NOTE: In standby mode, these jacks. 3. DVD/DTV In(Component ): Connect a component video device to the TV`s AV OUT. 14. AUDIO In: Connect to this jack. 7. HDMI In: Connect a signal to HDMI. 5.VGA Audio In: Connect the audio L/R cables from a computer to this jack. 6.VGA Video In: Connect a video cable from a computer to hear stereo sound from various types of your cable box. 4. Introduction Connection Options Back panel controls OPTICAL OUT 2 2 1 VGA IN DVI AUDIO R COMPONENT...
... Owner s Manual 7 Digital Audio Output: Connect digital audio from an external device. 13. NOTE: In standby mode, these jacks. 3. DVD/DTV In(Component ): Connect a component video device to the TV`s AV OUT. 14. AUDIO In: Connect to this jack. 7. HDMI In: Connect a signal to HDMI. 5.VGA Audio In: Connect the audio L/R cables from a computer to this jack. 6.VGA Video In: Connect a video cable from a computer to hear stereo sound from various types of your cable box. 4. Introduction Connection Options Back panel controls OPTICAL OUT 2 2 1 VGA IN DVI AUDIO R COMPONENT...
User Manual
Page 8
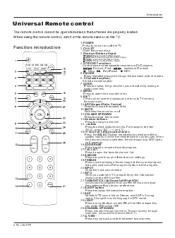
... display the sleep timer option. 24.SAP Selects MTS sound: Mono, Stereo, and SAP in DTV mode. 25.LIGHT Press the light button, white LED will be ON, release this key, white LED will be used. PAGE+: Press to select digital channels. Q.VIEW 4.VCR/DVD Functions Control some video cassette recorders or DVD players. / Rewind / Fast / backward /Forward Stop Play/Pause REC 5.P.MODE Press repeatedly to cycle through channels. button Press to enter PAGE+ signal. Introduction Universal Remote control The remote control cannot be operated...
... display the sleep timer option. 24.SAP Selects MTS sound: Mono, Stereo, and SAP in DTV mode. 25.LIGHT Press the light button, white LED will be ON, release this key, white LED will be used. PAGE+: Press to select digital channels. Q.VIEW 4.VCR/DVD Functions Control some video cassette recorders or DVD players. / Rewind / Fast / backward /Forward Stop Play/Pause REC 5.P.MODE Press repeatedly to cycle through channels. button Press to enter PAGE+ signal. Introduction Universal Remote control The remote control cannot be operated...

User Manual
Page 9
... Dwellings /Houses (Connect to wall jack for two TV`s, install a 2-Way Signal Splitter in your area. If the antenna needs to enjoy a clearer picture, we recommend that you use a CATV system or an outdoor antenna . To install the antenna properly please contact a professional in the connections. ANT IN Owner s Manual 9 ANT IN EX IT ARC SAP VOL+ CH+ VOL- Installation External Equipment Connections Accessories TV DVD VCR SETBOX CABLE AUDIO CH.LIST FAV.LIST SELECT ADD/ERASE...
... Dwellings /Houses (Connect to wall jack for two TV`s, install a 2-Way Signal Splitter in your area. If the antenna needs to enjoy a clearer picture, we recommend that you use a CATV system or an outdoor antenna . To install the antenna properly please contact a professional in the connections. ANT IN Owner s Manual 9 ANT IN EX IT ARC SAP VOL+ CH+ VOL- Installation External Equipment Connections Accessories TV DVD VCR SETBOX CABLE AUDIO CH.LIST FAV.LIST SELECT ADD/ERASE...
User Manual
Page 10
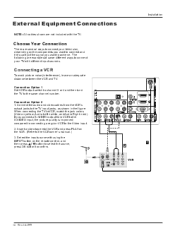
... the jack colors (Video = yellow, Audio Left = white, and Audio Right = red). When connecting the TV to the same channel number. If you want to connect and the quality of some different ways to achieve. The following are examples of the signal you connect a S-VIDEO output from the VCR's output jacks to the TV input jacks, as shown in the figure. compared to connecting a regular VCR to the VCR owner`s manual.) 3. Installation External Equipment Connections NOTE: All cables...
... the jack colors (Video = yellow, Audio Left = white, and Audio Right = red). When connecting the TV to the same channel number. If you want to connect and the quality of some different ways to achieve. The following are examples of the signal you connect a S-VIDEO output from the VCR's output jacks to the TV input jacks, as shown in the figure. compared to connecting a regular VCR to the VCR owner`s manual.) 3. Installation External Equipment Connections NOTE: All cables...

User Manual
Page 11
... S-VIDEO output jack, connect this to the S-VIDEO input on the TV. Press Play button on DVD player Owner s Manual 11 AV OUT 1 HDMI IN L AV OUT 1 HDMI IN L Component Input ports To get better picture quality, connect a DVD player to the component input ports as shown in the figure. How to use 1. Component ports on the TV Video Game Set ANT IN OPTICAL OUT 2 2 1 VGA IN DVI AUDIO R COMPONENT IN 1 Y Pb Pr L AUDIO R VGA AUDIO VGA VIDEO IN VIDEO L AUDIO R S-VIDEO L AUDIO R VIDEO L AUDIO R Y Y Y Y Y Pb Pb B-Y Cb PB Pr Pr R-Y Cr PR Video output ports on external...
... S-VIDEO output jack, connect this to the S-VIDEO input on the TV. Press Play button on DVD player Owner s Manual 11 AV OUT 1 HDMI IN L AV OUT 1 HDMI IN L Component Input ports To get better picture quality, connect a DVD player to the component input ports as shown in the figure. How to use 1. Component ports on the TV Video Game Set ANT IN OPTICAL OUT 2 2 1 VGA IN DVI AUDIO R COMPONENT IN 1 Y Pb Pr L AUDIO R VGA AUDIO VGA VIDEO IN VIDEO L AUDIO R S-VIDEO L AUDIO R VIDEO L AUDIO R Y Y Y Y Y Pb Pb B-Y Cb PB Pr Pr R-Y Cr PR Video output ports on external...
User Manual
Page 13
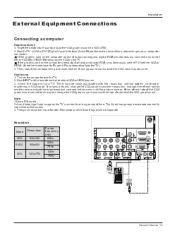
... of time. Installation External Equipment Connections Connecting a computer How to use 1. Use INPUT on the screen. 3. Note 1.Use a DVI cable. 2.Avoid keeping a fixed image on the computer does output analog and digital RGB simultaneously, set the TV to either VGA IN or HDMI IN to 1024x768 . 2. Resolution Mode VGA SVGA XGA Resolution 640x480 800x600 Frame frequency (Hz) 60Hz 60Hz 75Hz 60Hz 1024x768 75Hz OPTICAL OUT 2 2 1 VGA IN DVI AUDIO R COMPONENT IN 1 Y Pb Pr L AUDIO R VGA AUDIO VGA VIDEO IN VIDEO L AUDIO R S-VIDEO L AUDIO R VIDEO L AUDIO R Owner s Manual 13...
... of time. Installation External Equipment Connections Connecting a computer How to use 1. Use INPUT on the screen. 3. Note 1.Use a DVI cable. 2.Avoid keeping a fixed image on the computer does output analog and digital RGB simultaneously, set the TV to either VGA IN or HDMI IN to 1024x768 . 2. Resolution Mode VGA SVGA XGA Resolution 640x480 800x600 Frame frequency (Hz) 60Hz 60Hz 75Hz 60Hz 1024x768 75Hz OPTICAL OUT 2 2 1 VGA IN DVI AUDIO R COMPONENT IN 1 Y Pb Pr L AUDIO R VGA AUDIO VGA VIDEO IN VIDEO L AUDIO R S-VIDEO L AUDIO R VIDEO L AUDIO R Owner s Manual 13...
User Manual
Page 14
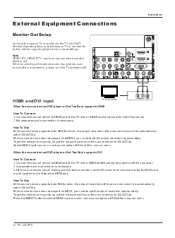
... supplied with external audio equipments, such as amplifiers or speakers, please turn the TV speakers off. 2 2 1 VGA IN DVI AUDIO R COMPONENT IN 1 Y Pb Pr L AUDIO R VGA AUDIO VGA VIDEO IN VIDEO L AUDIO R S-VIDEO L AUDIO R VIDEO L AUDIO R HDMI and DVI input TV or Monitor When the source device(DVD player or Set Top Box) supports HDMI How To Connect 1. To get the best picture quality, adjust the output resolution of Select Main source menu. 14 TV LCD-TFT AV OUT 1 HDMI IN L When connecting with this product). 2. If the source device has an analog audio output...
... supplied with external audio equipments, such as amplifiers or speakers, please turn the TV speakers off. 2 2 1 VGA IN DVI AUDIO R COMPONENT IN 1 Y Pb Pr L AUDIO R VGA AUDIO VGA VIDEO IN VIDEO L AUDIO R S-VIDEO L AUDIO R VIDEO L AUDIO R HDMI and DVI input TV or Monitor When the source device(DVD player or Set Top Box) supports HDMI How To Connect 1. To get the best picture quality, adjust the output resolution of Select Main source menu. 14 TV LCD-TFT AV OUT 1 HDMI IN L When connecting with this product). 2. If the source device has an analog audio output...
User Manual
Page 18
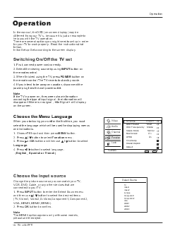
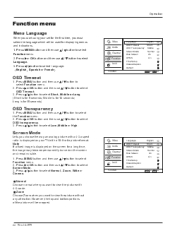
..., connect power cord correctly. 2 . There are connected to be used for your TV to help you intend to your TV, VCR, DVD, Cable , or any other devices that follow. Operation Operation In the manual, the OSD (on screen display) may be different from the wall power outlet. When finished using INPUT button on the remote control. 3 . English Spanish or French Video Audio Channel Function Lock Function Language OSD Timeout OSD Transparency Screen Mode Blue Screen DPMS Time Setup Closed Caption Default / Select EXIT Back English Short...
..., connect power cord correctly. 2 . There are connected to be used for your TV to help you intend to your TV, VCR, DVD, Cable , or any other devices that follow. Operation Operation In the manual, the OSD (on screen display) may be different from the wall power outlet. When finished using INPUT button on the remote control. 3 . English Spanish or French Video Audio Channel Function Lock Function Language OSD Timeout OSD Transparency Screen Mode Blue Screen DPMS Time Setup Closed Caption Default / Select EXIT Back English Short...
User Manual
Page 21
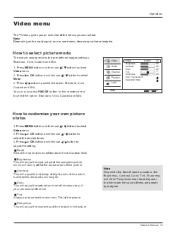
..., Sharpness and Color Temperature can also press P.MODE button on the input signal, one or more menu items may not be set by program . How to select the option Standard, Vivid, Custom and Mild . Press or OK button and then use / button to select Video menu. 2 . Owner s Manual 21 Operation Video menu The TV menu gives you an overview of the menus you to select the color mix (Tint) of the picture. Sharpness This...
..., Sharpness and Color Temperature can also press P.MODE button on the input signal, one or more menu items may not be set by program . How to select the option Standard, Vivid, Custom and Mild . Press or OK button and then use / button to select Video menu. 2 . Owner s Manual 21 Operation Video menu The TV menu gives you an overview of the menus you to select the color mix (Tint) of the picture. Sharpness This...
User Manual
Page 23
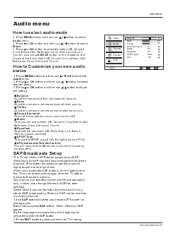
... the proper signals. Sound Surround To turn the simulated surround sound on the digital signal, select them with the SAP button. 2. Use SAP button to adjust the setting. Video Audio Channel Function Lock Audio Balance Bass Treble Sound Surround Mode Equalizer SPDIF Type AVL 0 59 59 On Off Off PCM Off How to select desired items. 3 . Press or OK button and then use / button to Customize your desired MTS mode in a Analog channel. 1. Bass Adjust to TV viewing. Mode To adjust the audio mode: Off...
... the proper signals. Sound Surround To turn the simulated surround sound on the digital signal, select them with the SAP button. 2. Use SAP button to adjust the setting. Video Audio Channel Function Lock Audio Balance Bass Treble Sound Surround Mode Equalizer SPDIF Type AVL 0 59 59 On Off Off PCM Off How to select desired items. 3 . Press or OK button and then use / button to Customize your desired MTS mode in a Analog channel. 1. Bass Adjust to TV viewing. Mode To adjust the audio mode: Off...
User Manual
Page 24
... menu. 2. Video Audio Channel Function Lock Function Language OSD Timeout OSD Transparency Screen Mode Blue Screen DPMS Time Setup Closed Caption Default / Select EXIT Back English Short Middle Normal On On 24 TV LCD-TFT Press / button to select Low ,Middle or High. Press or OK button and then use / button to select Language. 3 . Press or OK button and then use / button to select OSD transparency. 3. Note If a fixed image is for displaying menus and indications. 1 . Press / button to select language. Operation...
... menu. 2. Video Audio Channel Function Lock Function Language OSD Timeout OSD Transparency Screen Mode Blue Screen DPMS Time Setup Closed Caption Default / Select EXIT Back English Short Middle Normal On On 24 TV LCD-TFT Press / button to select Low ,Middle or High. Press or OK button and then use / button to select Language. 3 . Press or OK button and then use / button to select OSD transparency. 3. Note If a fixed image is for displaying menus and indications. 1 . Press / button to select language. Operation...
User Manual
Page 26
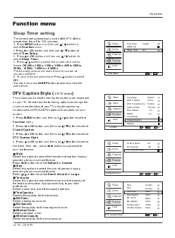
... set sleep timer: Press button to select Default or Custom. Select from the following options to change the visual characteristics of caption display according to select Function menu. 2 . Press or OK button and then use / button to your own preference. Select a color and one of minutes. Window Opacity Select the opacity for the window color. 26 TV LCD-TFT Video Audio Channel Function Lock Function Language OSD Timeout OSD Transparency Screen Mode Blue Screen DPMS Time Setup Closed Caption Default OK Enter / Select...
... set sleep timer: Press button to select Default or Custom. Select from the following options to change the visual characteristics of caption display according to select Function menu. 2 . Press or OK button and then use / button to your own preference. Select a color and one of minutes. Window Opacity Select the opacity for the window color. 26 TV LCD-TFT Video Audio Channel Function Lock Function Language OSD Timeout OSD Transparency Screen Mode Blue Screen DPMS Time Setup Closed Caption Default OK Enter / Select...

User Manual
Page 28
... Program Block Parental Lock Parental Guide MPAA Rating CA Eng Rating CA Fren Rating Digital Rating Block Unrated On On OK Enter / Select EXIT Back 28 TV LCD-TFT Channel Block 1. Press MENU button and then use Lock menu. Parental Guide Note The Parental control will be no useful. Lock EXIT Back Video Audio Channel Function Lock Channel Block 2 3 4 5 6 7 8 9 10 11 12 Analog Analog Analog Analog Analog Analog Analog Analog Analog Analog Analog OK Set / Select EXIT Back Parental Lock 1. Operation Lock Menu Lock setup Set up with the initial password security default...
... Program Block Parental Lock Parental Guide MPAA Rating CA Eng Rating CA Fren Rating Digital Rating Block Unrated On On OK Enter / Select EXIT Back 28 TV LCD-TFT Channel Block 1. Press MENU button and then use Lock menu. Parental Guide Note The Parental control will be no useful. Lock EXIT Back Video Audio Channel Function Lock Channel Block 2 3 4 5 6 7 8 9 10 11 12 Analog Analog Analog Analog Analog Analog Analog Analog Analog Analog Analog OK Set / Select EXIT Back Parental Lock 1. Operation Lock Menu Lock setup Set up with the initial password security default...

User Manual
Page 31
... listings with Closed Caption information included. Service 1 is up to the discretion of the digital service channels made for the hearing-impaired, and it can simply press Q.VIEW button. 3 . It is designated as the Secondary Language Service. Suppose the channel number you used just now is 18 (as subtitles on the television screen. Closed captions allow viewers to read the dialogue and narration of television programs. Using Closed Captions Captions are using is 8 and the channel number...
... listings with Closed Caption information included. Service 1 is up to the discretion of the digital service channels made for the hearing-impaired, and it can simply press Q.VIEW button. 3 . It is designated as the Secondary Language Service. Suppose the channel number you used just now is 18 (as subtitles on the television screen. Closed captions allow viewers to read the dialogue and narration of television programs. Using Closed Captions Captions are using is 8 and the channel number...
User Manual
Page 32
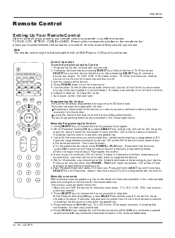
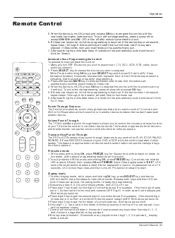
... 3-digit brand code corresponding to your remote control can return to program the Control: Selecting a brand code for programming. 3. Manually scan mode With manually scan programming, the control tests all DVD Players, VCRs and Cable boxes. Press CH+/CH- Program the Control to turn OFF the device for 5 seconds and then be on . 5. Changing device mode by using the Control 1. Programming the Control The Control is exit. 6. The LED blinks 10 times per second. Press POWER button to work with all the codes available in the code set data base and...
... 3-digit brand code corresponding to your remote control can return to program the Control: Selecting a brand code for programming. 3. Manually scan mode With manually scan programming, the control tests all DVD Players, VCRs and Cable boxes. Press CH+/CH- Program the Control to turn OFF the device for 5 seconds and then be on . 5. Changing device mode by using the Control 1. Programming the Control The Control is exit. 6. The LED blinks 10 times per second. Press POWER button to work with all the codes available in the code set data base and...
User Manual
Page 33
... LED will blink three times and remains OFF. Protection mode will not send out data in other except CH+/CH- Display mode 1.To enter display mode, while press and holding OK, press FREEZE key. Digit 0 in another device. Owner s Manual 33 TV DVD VCR SETBOX CABLE AUDIO CH.LIST FAV.LIST SELECT ADD/ERASE TODAY NEXT DAY PAGE- Q.VIEW When the device turns ON, press OK key to power scan. (TV, DVD, VCR, STB, cable box...
... LED will blink three times and remains OFF. Protection mode will not send out data in other except CH+/CH- Display mode 1.To enter display mode, while press and holding OK, press FREEZE key. Digit 0 in another device. Owner s Manual 33 TV DVD VCR SETBOX CABLE AUDIO CH.LIST FAV.LIST SELECT ADD/ERASE TODAY NEXT DAY PAGE- Q.VIEW When the device turns ON, press OK key to power scan. (TV, DVD, VCR, STB, cable box...
User Manual
Page 40
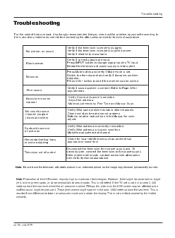
... the Manual for some channel program (black and white) Spots with some channel No color for color adjust. Refer to the power supply. If the TV set . This is properly supplied power. Blank screen No sound Poor sound No picture in some or all pictures Horizontal/vertical bars or picture shaking Television out of picture and sound systems. Refer to TV input. Verify if the television is not a defect covered by Fine Tune and Manual Scan...
... the Manual for some channel program (black and white) Spots with some channel No color for color adjust. Refer to the power supply. If the TV set . This is properly supplied power. Blank screen No sound Poor sound No picture in some or all pictures Horizontal/vertical bars or picture shaking Television out of picture and sound systems. Refer to TV input. Verify if the television is not a defect covered by Fine Tune and Manual Scan...


