

User Manual
Page 2
... perform any servicing other than that your Haier model is intended to alert the user to the presence of Energy promoting energy efficiency. 2 TV LCD-TFT Environmental Protection Agency and the U.S. Department of important operating and maintenance (servicing) instructions in the operating instructions unless you money. Energy Star compliant(models - Warning CAUTION RISK ELECTRIC SHOCK DO NOT OPEN ! NO USER SERVICEABLE PARTS INSIDE. CAUTION: These servicing instructions are qualified...
... perform any servicing other than that your Haier model is intended to alert the user to the presence of Energy promoting energy efficiency. 2 TV LCD-TFT Environmental Protection Agency and the U.S. Department of important operating and maintenance (servicing) instructions in the operating instructions unless you money. Energy Star compliant(models - Warning CAUTION RISK ELECTRIC SHOCK DO NOT OPEN ! NO USER SERVICEABLE PARTS INSIDE. CAUTION: These servicing instructions are qualified...
User Manual
Page 4
...21 Audio Menu How to select audio mode 22 How to customize your own audio status 22 SAP Broadcasts Setup 22 Function Menu Menu Language OSD Timeout OSD Transparency Screen Mode Blue Screen DPMS Time zone setting Date /Time setting Sleep Timer setting DTV Caption Style Lock Menu Parental Control rating and categories Lock setup Other Functions Br ie f In fo Us in g th e Gu id e Quick program view CC (Closed Caption Display USB Input Universal Remote Control Setting up your remote control Remote Control Codes Maintenance Product Specification Troubleshooting 4 TV LCD...
...21 Audio Menu How to select audio mode 22 How to customize your own audio status 22 SAP Broadcasts Setup 22 Function Menu Menu Language OSD Timeout OSD Transparency Screen Mode Blue Screen DPMS Time zone setting Date /Time setting Sleep Timer setting DTV Caption Style Lock Menu Parental Control rating and categories Lock setup Other Functions Br ie f In fo Us in g th e Gu id e Quick program view CC (Closed Caption Display USB Input Universal Remote Control Setting up your remote control Remote Control Codes Maintenance Product Specification Troubleshooting 4 TV LCD...
User Manual
Page 5
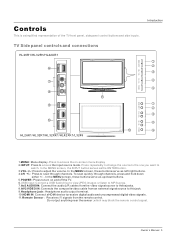
... to change the source to the one you want to scan through channels, press and hold down buttons. 5.POWER: Press to turn on -screen menu display 2.INPUT: Press to adjust the volume. CH+ CH- In the MENU screen, these buttons serve as left/right buttons. 4.CH +/- : Press to watch. Remote Sensor Receives IR signals from an external signal source to this jack. 9.Headphone jack : Headphone audio output terminal. 10.HDMI IN: Connect a HDMI device to receive digital audio and uncompressed digital video signals. 11...
... to change the source to the one you want to scan through channels, press and hold down buttons. 5.POWER: Press to turn on -screen menu display 2.INPUT: Press to adjust the volume. CH+ CH- In the MENU screen, these buttons serve as left/right buttons. 4.CH +/- : Press to watch. Remote Sensor Receives IR signals from an external signal source to this jack. 9.Headphone jack : Headphone audio output terminal. 10.HDMI IN: Connect a HDMI device to receive digital audio and uncompressed digital video signals. 11...
User Manual
Page 7
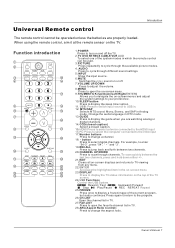
...(closed caption) Select a closed caption. 15.HDMI:Press to select a device connected to the HDMI input 16.PC:Press to select the computer connected to the VGA input 17.Number buttons Press to select digital channels. AUDIO Press to cycle through channels. button Press to change the aspect ratio. Press again to return to the program. 26.CH.LIST Open the channel list in TV. 28.ARC(Aspect Ratio Control) Press to display the sleep timer option. 11. Owner s Manual 7 To scan quickly between two channels. 20.CHANNEL UP/DOWN Press to USB...
...(closed caption) Select a closed caption. 15.HDMI:Press to select a device connected to the HDMI input 16.PC:Press to select the computer connected to the VGA input 17.Number buttons Press to select digital channels. AUDIO Press to cycle through channels. button Press to change the aspect ratio. Press again to return to the program. 26.CH.LIST Open the channel list in TV. 28.ARC(Aspect Ratio Control) Press to display the sleep timer option. 11. Owner s Manual 7 To scan quickly between two channels. 20.CHANNEL UP/DOWN Press to USB...
User Manual
Page 8
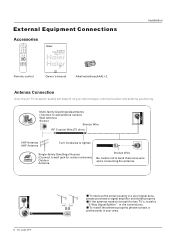
... for future reference. External Equipment Connections Accessories TV DVD STB CABLE VCR AUD PICTURE AUDIO PC HDMI INPUT MUTE RECALL VOL MENU CH EXIT ENTER SLEEP DISPLAY USB PLAY/PAUSE STOP REC REV PREV NEXT REPEAT MTS/SAP FREEZE CH.LIST GUIDE CCD ARC FAVORITE Remote control R TFT-LCD TV OWNER'S MANUAL Please READ this manual carefully before operating your area. MODELS: HL26K HL37T HL32K HL52T HL37K HL42K HL47K Owner`s manual Alkaline battery(AAA) 2 Installation Antenna Connection Over-the-air TV...
... for future reference. External Equipment Connections Accessories TV DVD STB CABLE VCR AUD PICTURE AUDIO PC HDMI INPUT MUTE RECALL VOL MENU CH EXIT ENTER SLEEP DISPLAY USB PLAY/PAUSE STOP REC REV PREV NEXT REPEAT MTS/SAP FREEZE CH.LIST GUIDE CCD ARC FAVORITE Remote control R TFT-LCD TV OWNER'S MANUAL Please READ this manual carefully before operating your area. MODELS: HL26K HL37T HL32K HL52T HL37K HL42K HL47K Owner`s manual Alkaline battery(AAA) 2 Installation Antenna Connection Over-the-air TV...
User Manual
Page 9
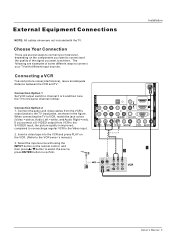
..., press ENTER button to confirm. When connecting the TV to the same channel number. compared to connecting a regular VCR to the VCR owner`s manual.) 3. VIDEO IN COMPONENT IN OPTICAL OUT 2 L 2 DVI AUDIO 1 R 1 Y 1 Pb Pr L AUDIO R VGA AUDIO VGA VIDEO L AUDIO R S-VIDEO L AUDIO R VIDEO L AUDIO R HDMI IN AV OUT VGA IN Owner s Manual 9 Select the input source with the TV. Connection Option 2 1. Insert a video tape into the VCR and press PLAY on the VCR. (Refer to the Video input. 2. External Equipment Connections Installation ANT IN NOTE: All cables shown are...
..., press ENTER button to confirm. When connecting the TV to the same channel number. compared to connecting a regular VCR to the VCR owner`s manual.) 3. VIDEO IN COMPONENT IN OPTICAL OUT 2 L 2 DVI AUDIO 1 R 1 Y 1 Pb Pr L AUDIO R VGA AUDIO VGA VIDEO L AUDIO R S-VIDEO L AUDIO R VIDEO L AUDIO R HDMI IN AV OUT VGA IN Owner s Manual 9 Select the input source with the TV. Connection Option 2 1. Insert a video tape into the VCR and press PLAY on the VCR. (Refer to the Video input. 2. External Equipment Connections Installation ANT IN NOTE: All cables shown are...

User Manual
Page 10
... IN HDMI IN External A/V Source Setup How to connect Connect the audio and video cables from the external equipment's output jacks to the TV input jacks, as shown in the figure. Press / button to external equipment, match the jack colors (Video = yellow, Audio Left = white, and Audio Right = red). Operate the corresponding external equipment. as shown in the figure. Turn on the remote control. 2. Refer to the DVD player's manual for program play. 4. Component Input ports To get better picture quality, connect a DVD player to use S-Video. How to the component input ports...
... IN HDMI IN External A/V Source Setup How to connect Connect the audio and video cables from the external equipment's output jacks to the TV input jacks, as shown in the figure. Press / button to external equipment, match the jack colors (Video = yellow, Audio Left = white, and Audio Right = red). Operate the corresponding external equipment. as shown in the figure. Turn on the remote control. 2. Refer to the DVD player's manual for program play. 4. Component Input ports To get better picture quality, connect a DVD player to use S-Video. How to the component input ports...
User Manual
Page 11
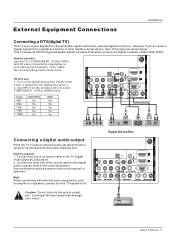
... port. 2. Connect the other digital external device, refer to the digital audio (optical) input on your vision. How to connect Use the TV`s COMPONENT , VGA or HDMI jack for the digital set -top box or other end of an optical cable to connect 1. ANT IN HDMI IN VIDEO IN COMPONENT IN OPTICAL OUT How to use 1. VIDEO IN COMPONENT IN OPTICAL OUT HDMI Digital Set-top Box 2 L 2 DVI AUDIO 1 R 1 Y 1 Pb Pr L AUDIO R VGA AUDIO VGA VIDEO L AUDIO R S-VIDEO L AUDIO R VIDEO L AUDIO R AV OUT VGA IN Owner s Manual 11 External Equipment Connections Installation Connecting...
... port. 2. Connect the other digital external device, refer to the digital audio (optical) input on your vision. How to connect Use the TV`s COMPONENT , VGA or HDMI jack for the digital set -top box or other end of an optical cable to connect 1. ANT IN HDMI IN VIDEO IN COMPONENT IN OPTICAL OUT How to use 1. VIDEO IN COMPONENT IN OPTICAL OUT HDMI Digital Set-top Box 2 L 2 DVI AUDIO 1 R 1 Y 1 Pb Pr L AUDIO R VGA AUDIO VGA VIDEO L AUDIO R S-VIDEO L AUDIO R VIDEO L AUDIO R AV OUT VGA IN Owner s Manual 11 External Equipment Connections Installation Connecting...
User Manual
Page 12
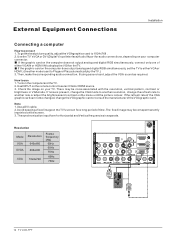
...,adjust the VGA sound as required. Thesynchronization inputform forHorizontal andVerticalfrequencies isseparate. Use the TV`sVGA or DVI (Digital VisualInterface)Audio IN port for audio connections, depending on the computer does output analog and digital RGB simultaneously, set the TV to Plugand Play automaticallyby theTV.) 3. If the refresh rate of either VGA or HDMI ; (theother mode isset to either VGAIN or HDMI IN todisplay the VGAon theTV. ANT IN HDMI IN Resolution Mode VGA...
...,adjust the VGA sound as required. Thesynchronization inputform forHorizontal andVerticalfrequencies isseparate. Use the TV`sVGA or DVI (Digital VisualInterface)Audio IN port for audio connections, depending on the computer does output analog and digital RGB simultaneously, set the TV to Plugand Play automaticallyby theTV.) 3. If the refresh rate of either VGA or HDMI ; (theother mode isset to either VGAIN or HDMI IN todisplay the VGAon theTV. ANT IN HDMI IN Resolution Mode VGA...

User Manual
Page 13
External Equipment Connections Installation HDMI and DVI input When the source device(DVD player or Set Top Box) supports HDMI How To Connect 1. Connect the source device to 1280x720p. When the source device(DVD player or Set Top Box) supports DVI How To Connect 1. If the source device does not support Auto HDMI, you need to set the output resolution appropriately. If the source device does not support Auto DVI, you need to set the output resolution appropriately. Owner s Manual 13 Select HDMI input source in input source option of HDMI port. Connect the source...
External Equipment Connections Installation HDMI and DVI input When the source device(DVD player or Set Top Box) supports HDMI How To Connect 1. Connect the source device to 1280x720p. When the source device(DVD player or Set Top Box) supports DVI How To Connect 1. If the source device does not support Auto HDMI, you need to set the output resolution appropriately. If the source device does not support Auto DVI, you need to set the output resolution appropriately. Owner s Manual 13 Select HDMI input source in input source option of HDMI port. Connect the source...
User Manual
Page 15
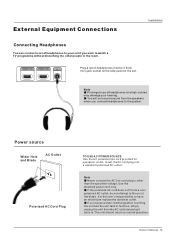
... an electrician replace the obsolete outlet. It is the user`s responsibility to normal operation. Note Prolonged use of headphones at a high volume may damage your set if you wish to watch a TV programme without disturbing the other than the specified voltage. Insert the AC cord plug into the 3.5mm mini-jack socket on AC. External Equipment Connections Installation Connecting Headphones You can connect a set of headphones to your...
... an electrician replace the obsolete outlet. It is the user`s responsibility to normal operation. Note Prolonged use of headphones at a high volume may damage your set if you wish to watch a TV programme without disturbing the other than the specified voltage. Insert the AC cord plug into the 3.5mm mini-jack socket on AC. External Equipment Connections Installation Connecting Headphones You can connect a set of headphones to your...

User Manual
Page 17
... French Operation Video Audio Channel Function Lock Function Language OSD Timeout OSD Transparency Screen Mode Blue Screen DPMS Time Setup Closed Caption Default English Short Middle Normal On On / Select EXIT Back Choose the Input source Change the picture source so you with the TV operation. Read the instructions that are several options you might need to set up in power on vacation, disconnect the power plug from your TV. 1. When finished using INPUT button on the remote control. The...
... French Operation Video Audio Channel Function Lock Function Language OSD Timeout OSD Transparency Screen Mode Blue Screen DPMS Time Setup Closed Caption Default English Short Middle Normal On On / Select EXIT Back Choose the Input source Change the picture source so you with the TV operation. Read the instructions that are several options you might need to set up in power on vacation, disconnect the power plug from your TV. 1. When finished using INPUT button on the remote control. The...
User Manual
Page 21
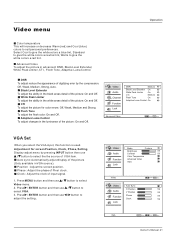
... of digitizing error by pressing INPUT button then use adjust the setting. Press MENU button and then use select VGA. 3. Press / ENTER button and then use / Video menu. 2. Press / ENTER button and then use / button to Video Mode Custom Brightness 59 Audio Contrast 59 Color Temperature Function Advanced Video VGA Lock Video Video Audio Function Lock Auto Sync H Position V Position Phase Clock / Select EXIT Back 59 59 59 59 VGA ENTER Enter / Select EXIT Back Owner s Manual 21 button to select / button to / button to select the the source of the picture...
... of digitizing error by pressing INPUT button then use adjust the setting. Press MENU button and then use select VGA. 3. Press / ENTER button and then use / Video menu. 2. Press / ENTER button and then use / button to Video Mode Custom Brightness 59 Audio Contrast 59 Color Temperature Function Advanced Video VGA Lock Video Video Audio Function Lock Auto Sync H Position V Position Phase Clock / Select EXIT Back 59 59 59 59 VGA ENTER Enter / Select EXIT Back Owner s Manual 21 button to select / button to / button to select the the source of the picture...
User Manual
Page 22
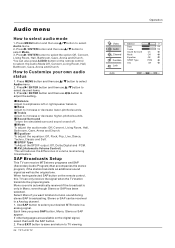
... To turn the simulated surround sound on the digital signal, select them with the SAP button. 2. SPDIF Type To Adjust the SPDIF output: Off, Dolby Digital and PCM. Use SAP button to TV viewing. 22 TFT-LCD TV Operation Video Balance 0 Bass 59 Audio Treble 59 Sound Surround On Channel Mode Off Equalizer Off Function SPDIF Type PCM AVL Off Lock Audio ENTER Adjust / Select EXIT Back If other languages are available on and off. Mode To adjust the audio mode...
... To turn the simulated surround sound on the digital signal, select them with the SAP button. 2. SPDIF Type To Adjust the SPDIF output: Off, Dolby Digital and PCM. Use SAP button to TV viewing. 22 TFT-LCD TV Operation Video Balance 0 Bass 59 Audio Treble 59 Sound Surround On Channel Mode Off Equalizer Off Function SPDIF Type PCM AVL Off Lock Audio ENTER Adjust / Select EXIT Back If other languages are available on and off. Mode To adjust the audio mode...

User Manual
Page 23
... Screen Mode. 3. Operation Video Audio Channel Function Lock Function Language OSD Timeout OSD Transparency Screen Mode Blue Screen DPMS Time Setup Closed Caption Default English Short Middle Normal On On / Select EXIT Back Video Audio Channel Function Lock Function Language OSD Timeout OSD Transparency Screen Mode Blue Screen DPMS Time Setup Closed Caption Default English Short Middle Normal On On / Select EXIT Back Owner s Manual 23 Press / button to select Language. 3. Press / ENTER button and then use / button to view the picture with a 4:3 aspect ratio is displayed...
... Screen Mode. 3. Operation Video Audio Channel Function Lock Function Language OSD Timeout OSD Transparency Screen Mode Blue Screen DPMS Time Setup Closed Caption Default English Short Middle Normal On On / Select EXIT Back Video Audio Channel Function Lock Function Language OSD Timeout OSD Transparency Screen Mode Blue Screen DPMS Time Setup Closed Caption Default English Short Middle Normal On On / Select EXIT Back Owner s Manual 23 Press / button to select Language. 3. Press / ENTER button and then use / button to view the picture with a 4:3 aspect ratio is displayed...
User Manual
Page 25
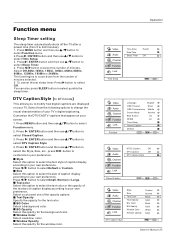
...the text box of caption display according to select Function menu. 2. Window Opacity Select the opacity for the window color. Operation Video Audio Channel Function Lock Time Zone Date/Time Sleep Timer Pacific Off Time Setup / Select EXIT Back Video Audio Channel Function Lock Function Language OSD Timeout OSD Transparency Screen Mode Blue Screen DPMS Time Setup Closed Caption Default English Short Middle Normal On On ENTER Enter / Select EXIT Back Video Audio Channel Function Lock NTSC Caption Off DTV Caption Off DTV Caption Style Closed Caption ENTER Enter / Select EXIT...
...the text box of caption display according to select Function menu. 2. Window Opacity Select the opacity for the window color. Operation Video Audio Channel Function Lock Time Zone Date/Time Sleep Timer Pacific Off Time Setup / Select EXIT Back Video Audio Channel Function Lock Function Language OSD Timeout OSD Transparency Screen Mode Blue Screen DPMS Time Setup Closed Caption Default English Short Middle Normal On On ENTER Enter / Select EXIT Back Video Audio Channel Function Lock NTSC Caption Off DTV Caption Off DTV Caption Style Closed Caption ENTER Enter / Select EXIT...

User Manual
Page 27
...button. Then, press button. Password Change the password by inputting a new password twice. Operation Video Audio Channel Function Lock Enter Password Lock EXIT Back Video Audio Channel Function Lock 2 Analog 3 Analog 4 Analog 5 Analog 6 Analog 7 Analog 8 Analog 9 Analog 10 Analog 11 Analog 12 Analog Channel Block ENTER Set / Select EXIT Back Video Audio Channel Function Lock Lock Channel Block Program Block Password Clean All ENTER Enter / Select EXIT Back Video Audio Channel Function Lock Parental Lock On Parental Guide MPAA Rating CA Eng Rating CA Fren Rating Digital...
...button. Then, press button. Password Change the password by inputting a new password twice. Operation Video Audio Channel Function Lock Enter Password Lock EXIT Back Video Audio Channel Function Lock 2 Analog 3 Analog 4 Analog 5 Analog 6 Analog 7 Analog 8 Analog 9 Analog 10 Analog 11 Analog 12 Analog Channel Block ENTER Set / Select EXIT Back Video Audio Channel Function Lock Lock Channel Block Program Block Password Clean All ENTER Enter / Select EXIT Back Video Audio Channel Function Lock Parental Lock On Parental Guide MPAA Rating CA Eng Rating CA Fren Rating Digital...
User Manual
Page 33
... is set, related device LED will be off and manually programming process is more time consuming, it saves you want to work with the new code, saving the code to beginning of looking up properly, your device. Owner s Manual 33 If 3 digits are programmed successfully, device LED will blink 6 times in six different modes: TV, DVD, VCR, SETBOX , CABLE or AUDIO. And then keep 2HZ blink, user now can return to your remote control...
... is set, related device LED will be off and manually programming process is more time consuming, it saves you want to work with the new code, saving the code to beginning of looking up properly, your device. Owner s Manual 33 If 3 digits are programmed successfully, device LED will blink 6 times in six different modes: TV, DVD, VCR, SETBOX , CABLE or AUDIO. And then keep 2HZ blink, user now can return to your remote control...
User Manual
Page 34
.... Sequence press 9, 8, 0 to enter display mode. 4.Press digit 1 key to the control. 34 TV LCD-TFT Operation Transport Key Punch-Through The DVD or VCR transport key punch through features that the Controller is in codeset will be programmed to get the first digit of your TV while the Controller is ready for 3 seconds, the LED will blink 3 times and turn off, default Haier codeset (001) will not...
.... Sequence press 9, 8, 0 to enter display mode. 4.Press digit 1 key to the control. 34 TV LCD-TFT Operation Transport Key Punch-Through The DVD or VCR transport key punch through features that the Controller is in codeset will be programmed to get the first digit of your TV while the Controller is ready for 3 seconds, the LED will blink 3 times and turn off, default Haier codeset (001) will not...
User Manual
Page 43
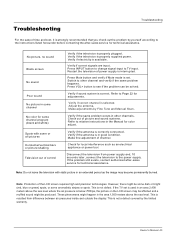
... electrical appliance or power tool. Owner s Manual 43 Disconnect the television from difference between air pressures inside and outside the display. Press INPUT button to change signal input to TV input. However, there might happen in the Manual for color adjust. This is not a defect covered by Fine Tune and Manual Scan. Switch to other channels. Verify if the television is properly supplied power. Troubleshooting Troubleshooting For the sake of time and cost, it...
... electrical appliance or power tool. Owner s Manual 43 Disconnect the television from difference between air pressures inside and outside the display. Press INPUT button to change signal input to TV input. However, there might happen in the Manual for color adjust. This is not a defect covered by Fine Tune and Manual Scan. Switch to other channels. Verify if the television is properly supplied power. Troubleshooting Troubleshooting For the sake of time and cost, it...


