
User Manual
Page 2
The User Manual uses the following rules should be observedfor the installation,use and maintenanceof th product. It is present inside refer service to protection by one of the Haier "family," you happy with any inside part of operators has beentaken into considerationat the design and manufacture phase, butinappropriate operation maycause electric shock or fire. Dear Haier product owner: Thank you for your...
The User Manual uses the following rules should be observedfor the installation,use and maintenanceof th product. It is present inside refer service to protection by one of the Haier "family," you happy with any inside part of operators has beentaken into considerationat the design and manufacture phase, butinappropriate operation maycause electric shock or fire. Dear Haier product owner: Thank you for your...

User Manual
Page 3
... prevent damage to the product due to your home, consult your safety. Servicing ---do not use attachments not recommended by yourself, as they are provided for Future reference. 2. Use only with a cart, stand, tripod, bracket, or table recommend by items placed upon or against them for replacement of power supply to lighting and power line surges. 12. Ventilation ---Slots and openings...
... prevent damage to the product due to your home, consult your safety. Servicing ---do not use attachments not recommended by yourself, as they are provided for Future reference. 2. Use only with a cart, stand, tripod, bracket, or table recommend by items placed upon or against them for replacement of power supply to lighting and power line surges. 12. Ventilation ---Slots and openings...

User Manual
Page 4
... wall outlets and extension cord as improper adjustment of other controls may result in damage and will often require extensive work by following the operating instructions. f. this can result in wire to its normal operation. When the power supply cord or plug is grounded to provide some protection against voltage surges and built-up static charges, Section 810 of the National Electrical Code...
... wall outlets and extension cord as improper adjustment of other controls may result in damage and will often require extensive work by following the operating instructions. f. this can result in wire to its normal operation. When the power supply cord or plug is grounded to provide some protection against voltage surges and built-up static charges, Section 810 of the National Electrical Code...
User Manual
Page 5
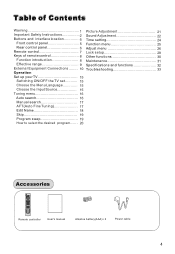
...SHUTTLE CH- Remote controller User's manual Alkaline battery(AAA) 2 Power cable Table of Contents Warning 1 Picture Adjustment 21 Important Safety Instructions 2 Sound Adjustment 22 Buttons and interface location 5 Time setting 24 Front control panel 5 Function menu 25 Rear control panel 6 Adjust menu 26 Remote control 7 Lock setup 28 Keys of remote control 8 Other functions 30 Function introduction 8 Maintenance 31 Effective range 9 Specifications and functions 32 External Equipment Connections ........ 10 Troubleshooting 33 Operation Set up your TV 15 Switching ON/OFF...
...SHUTTLE CH- Remote controller User's manual Alkaline battery(AAA) 2 Power cable Table of Contents Warning 1 Picture Adjustment 21 Important Safety Instructions 2 Sound Adjustment 22 Buttons and interface location 5 Time setting 24 Front control panel 5 Function menu 25 Rear control panel 6 Adjust menu 26 Remote control 7 Lock setup 28 Keys of remote control 8 Other functions 30 Function introduction 8 Maintenance 31 Effective range 9 Specifications and functions 32 External Equipment Connections ........ 10 Troubleshooting 33 Operation Set up your TV 15 Switching ON/OFF...
User Manual
Page 7
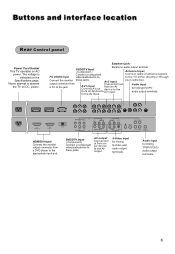
...cable box. DVD/DTV Input (Component ) Connect a component video/audiodevice to the TV, either directly or through Connect the monitor these jacks. Buttons and interface location Rear Control panel Power Cord Socket This TV operates on the Specifications page. Never attempt to the AV input. S-Video input for linking DVI/PC audio output terminals. DVD/DTV Input (Component ) Antenna Input Connect a component Connect cable or antenna signals PC VIDEO Input video/audiodevice to to these jacks. to operate the TV on DC power. Earphone jack: Earphone audio output...
...cable box. DVD/DTV Input (Component ) Connect a component video/audiodevice to the TV, either directly or through Connect the monitor these jacks. Buttons and interface location Rear Control panel Power Cord Socket This TV operates on the Specifications page. Never attempt to the AV input. S-Video input for linking DVI/PC audio output terminals. DVD/DTV Input (Component ) Antenna Input Connect a component Connect cable or antenna signals PC VIDEO Input video/audiodevice to to these jacks. to operate the TV on DC power. Earphone jack: Earphone audio output...
User Manual
Page 9
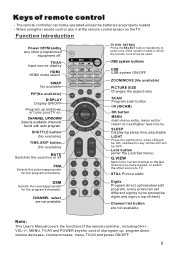
... button (No available) TIME.SKIP button (No available) MUTE Switches the sound on . SLEEP Displaying sleep time, adjustable LIGHT Press the light button, white LED will be ON, release this key, white LED will be used. CHANNEL UP/DOWN Selects available channels found with auto program. MENU VOL+ SHUTTLE CH- TV DVD SETBOX Press the SELECT button repeatedly to select one of program up and down , volume decrease, volume increase, menu, TV/AV and power ON/OFF. TV/AV Input source display HDMI HDMI mode select SWAP...
... button (No available) TIME.SKIP button (No available) MUTE Switches the sound on . SLEEP Displaying sleep time, adjustable LIGHT Press the light button, white LED will be ON, release this key, white LED will be used. CHANNEL UP/DOWN Selects available channels found with auto program. MENU VOL+ SHUTTLE CH- TV DVD SETBOX Press the SELECT button repeatedly to select one of program up and down , volume decrease, volume increase, menu, TV/AV and power ON/OFF. TV/AV Input source display HDMI HDMI mode select SWAP...
User Manual
Page 12
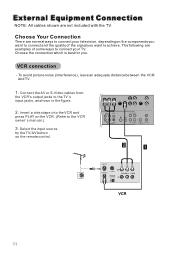
... HD-AUDIO IN L HD-AUDIO IN R PC/DVI Audio Out AUDIO IN S-VIDEO OUT R AUDEO L VIDEO IN Select the input source by the TV/AV button on the components you want to achieve. Choose Your Connection There are several ways to connect your television, depending on the remote control. External Equipment Connection NOTE: All cables shown are examples of the signal you . Connect the AV or S-Video cables from the VCR's output jacks to the VCR owner`s manual.) 3. Insert a video...
... HD-AUDIO IN L HD-AUDIO IN R PC/DVI Audio Out AUDIO IN S-VIDEO OUT R AUDEO L VIDEO IN Select the input source by the TV/AV button on the components you want to achieve. Choose Your Connection There are several ways to connect your television, depending on the remote control. External Equipment Connection NOTE: All cables shown are examples of the signal you . Connect the AV or S-Video cables from the VCR's output jacks to the VCR owner`s manual.) 3. Insert a video...

User Manual
Page 13
Turnon the DVDplayer, inserta DVD. 2. Refer tothe DVD player'smanual for the digital set-top box.) 2. External Equipment Connections DVD connection How to select HDMI mode. 3.Press Play button on external equipment for program play . 4. Press Play buttonon external equipment for video connections, depending on your set -top box. Use TV/AV on the TV. Use theTV/AV and VOL+/- How to connect Use the TV`s YPbPr IN and AUDIO IN jacks, PC or HDMI/DVI VIDEO port for program play . Then, make the corresponding audio connections. IN2 Y Pb...
Turnon the DVDplayer, inserta DVD. 2. Refer tothe DVD player'smanual for the digital set-top box.) 2. External Equipment Connections DVD connection How to select HDMI mode. 3.Press Play button on external equipment for program play . 4. Press Play buttonon external equipment for video connections, depending on your set -top box. Use TV/AV on the TV. Use theTV/AV and VOL+/- How to connect Use the TV`s YPbPr IN and AUDIO IN jacks, PC or HDMI/DVI VIDEO port for program play . Then, make the corresponding audio connections. IN2 Y Pb...
User Manual
Page 14
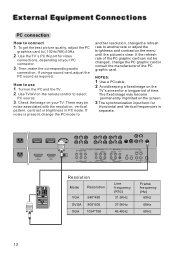
... the best picture quality, adjust the PC graphics card to use 1. Then, make the corresponding audio connection. If noise is present, change the PC mode to select PC source. 3. The fixed image may be changed, change the refresh rate to connect 1. There may become permanently imprinted on the menu until the picture is separate. NOTES: 1 Use a PC cable. 2 Avoid keeping a fixed image on your TV. Use the TV`s PC IN port for video connections...
... the best picture quality, adjust the PC graphics card to use 1. Then, make the corresponding audio connection. If noise is present, change the PC mode to select PC source. 3. The fixed image may be changed, change the refresh rate to connect 1. There may become permanently imprinted on the menu until the picture is separate. NOTES: 1 Use a PC cable. 2 Avoid keeping a fixed image on your TV. Use the TV`s PC IN port for video connections...
User Manual
Page 15
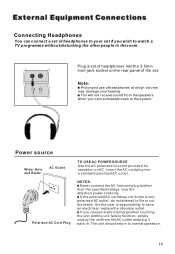
... rear panel of headphones at a high volume may damage your set if you wish to watch a TV programme without disturbing the other than the specified voltage. If you connect headphones to file or cut the blade. The unit should return to have an electrician replace the obsolete outlet. It is the user`s responsibility to normal operation. Use the attached power cord only. Note Prolonged use...
... rear panel of headphones at a high volume may damage your set if you wish to watch a TV programme without disturbing the other than the specified voltage. If you connect headphones to file or cut the blade. The unit should return to have an electrician replace the obsolete outlet. It is the user`s responsibility to normal operation. Use the attached power cord only. Note Prolonged use...

User Manual
Page 16
... language which will be different from the external input source, before to select the source, you need to standing by status, please press down button on the screen. Switching ON/OFF the TV set 1 first, connect power cord correctly and the power indicator will appears on the remote controller. 4 Disconnect the power supply or unplug the television if it . button to select the desired option, and press VOL+/- Then press...
... language which will be different from the external input source, before to select the source, you need to standing by status, please press down button on the screen. Switching ON/OFF the TV set 1 first, connect power cord correctly and the power indicator will appears on the remote controller. 4 Disconnect the power supply or unplug the television if it . button to select the desired option, and press VOL+/- Then press...
User Manual
Page 17
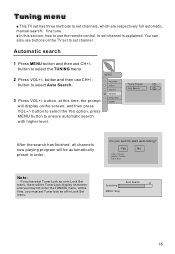
... also use the remote control to set channel is explained. PICTURE AUDIO ADJUST TUNING FUNCTION TIMER Tuning Program Auto Search After the search has finished, all channels now playing program will be automatically preset in order. button to select the Yes option, press MENU button to start auto tuning? Do you may not enter the TUNING menu, at this time, the prompt will display on the screen, and then press VOL+/- button to set channels, which...
... also use the remote control to set channel is explained. PICTURE AUDIO ADJUST TUNING FUNCTION TIMER Tuning Program Auto Search After the search has finished, all channels now playing program will be automatically preset in order. button to select the Yes option, press MENU button to start auto tuning? Do you may not enter the TUNING menu, at this time, the prompt will display on the screen, and then press VOL+/- button to set channels, which...

User Manual
Page 19
... system. 1 Press MENU button and then use CH+/- button to select Tuning Program. 3 Press VOL+/- Press VOL+/- PICTURE AUDIO ADJUST TUNING FUNCTION TIMER Tuning Program Auto Search Program Number Edit Name Color System Sound System Skip AFT Manual Search 18 C 28 AUTO D/K OFF OFF 62.25MHz Edit Name 1 Press MENU button and then use CH+/- button and then use CH+/- button to select Color System. button to select D/K, I, B/G,M/N in turn. Tuning menu If the colour of some channel is abnormal Press...
... system. 1 Press MENU button and then use CH+/- button to select Tuning Program. 3 Press VOL+/- Press VOL+/- PICTURE AUDIO ADJUST TUNING FUNCTION TIMER Tuning Program Auto Search Program Number Edit Name Color System Sound System Skip AFT Manual Search 18 C 28 AUTO D/K OFF OFF 62.25MHz Edit Name 1 Press MENU button and then use CH+/- button and then use CH+/- button to select Color System. button to select D/K, I, B/G,M/N in turn. Tuning menu If the colour of some channel is abnormal Press...
User Manual
Page 22
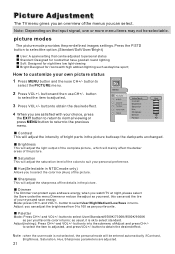
... picture status 1 Press MENU button and then use CH+/- as per your eyes and save energy. button to into the submenu of bright parts in the picture but keep the dark parts unchanged. button to adjusted. 3 Press VOL+/- picture modes The picture mode provides the pre-defined images settings. button and then use CH+/- and VOL+/- Note: Depending on the input signal, one or more menu items may not be selectable. MENU PICTURE AUDIO ADJUST TUNING FUNCTION TIMER Video Mode...
... picture status 1 Press MENU button and then use CH+/- as per your eyes and save energy. button to into the submenu of bright parts in the picture but keep the dark parts unchanged. button to adjusted. 3 Press VOL+/- picture modes The picture mode provides the pre-defined images settings. button and then use CH+/- and VOL+/- Note: Depending on the input signal, one or more menu items may not be selectable. MENU PICTURE AUDIO ADJUST TUNING FUNCTION TIMER Video Mode...
User Manual
Page 23
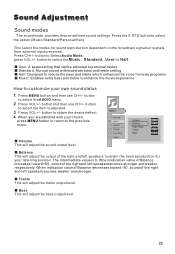
... select the modes for sound reproduction dependent on the broadcast signals or signals from external inputs received. button and then use CH+/- Sound Adjustment Sound modes The sound mode provides the pre-defined sound settings. Press the S.STD button to select the Music Standard User or Hall. Press CH+/- MENU PICTURE AUDIO ADJUST TUNING FUNCTION TIMER Volume Balance Audio Mode Treble Bass 0 0 Music 0 0 Balance This will adjust the treble output level. Treble This will adjust the output of the right and left speakers...
... select the modes for sound reproduction dependent on the broadcast signals or signals from external inputs received. button and then use CH+/- Sound Adjustment Sound modes The sound mode provides the pre-defined sound settings. Press the S.STD button to select the Music Standard User or Hall. Press CH+/- MENU PICTURE AUDIO ADJUST TUNING FUNCTION TIMER Volume Balance Audio Mode Treble Bass 0 0 Music 0 0 Balance This will adjust the treble output level. Treble This will adjust the output of the right and left speakers...
User Manual
Page 25
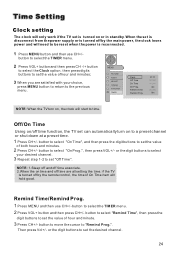
... press digits buttons to be reset when the power is turned on or in standby. MENU PICTURE AUDIO ADJUST TUNING FUNCTION TIMER Clock Off Time On Time On Prog. Off/On Time Using on , the clock will start to set "Off Time". button to move the cursor to select the TIMER menu. 2 Press VOL+ button and then press CH+/- or the digit buttons to set can automatically turn on /off time are satisfied with your desired channel...
... press digits buttons to be reset when the power is turned on or in standby. MENU PICTURE AUDIO ADJUST TUNING FUNCTION TIMER Clock Off Time On Time On Prog. Off/On Time Using on , the clock will start to set "Off Time". button to move the cursor to select the TIMER menu. 2 Press VOL+ button and then press CH+/- or the digit buttons to set can automatically turn on /off time are satisfied with your desired channel...
User Manual
Page 27
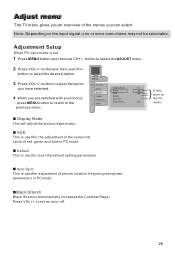
... reset the default setting parameters It only work on or off. Display Mode 4:3 AUDIO Adjust ADJUST RGB TUNING Default 4 When you are satisfied with your choice, Auto Sync FUNCTION press MENU button to return to select the desired option. Display Mode This will adjust the picture aspect ratio. RGB This is used to set 1 Press MENU button and then use CH+/- Note: Depending on the input signal, one or more menu items may not be selectable. button to the TIMER Black Stretch...
... reset the default setting parameters It only work on or off. Display Mode 4:3 AUDIO Adjust ADJUST RGB TUNING Default 4 When you are satisfied with your choice, Auto Sync FUNCTION press MENU button to return to select the desired option. Display Mode This will adjust the picture aspect ratio. RGB This is used to set 1 Press MENU button and then use CH+/- Note: Depending on the input signal, one or more menu items may not be selectable. button to the TIMER Black Stretch...
User Manual
Page 29
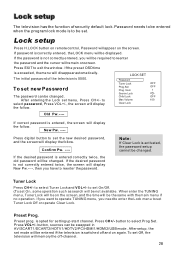
.../PC/HDMI1/HDMI2/USB mode. Preset prog. Press VOL+/- After setup, the set . If the desired password is switched off -channel. Press EXIT to be entered when the program lock mode is 0000. Preset Prog. Lock setup The television has the function of the television is to exit the window. Lock setup Press H.LOCK button on remote control, Password will memory the off and on the screen, and the time will display New Pw...
.../PC/HDMI1/HDMI2/USB mode. Preset prog. Press VOL+/- After setup, the set . If the desired password is switched off -channel. Press EXIT to be entered when the program lock mode is 0000. Preset Prog. Lock setup The television has the function of the television is to exit the window. Lock setup Press H.LOCK button on remote control, Password will memory the off and on the screen, and the time will display New Pw...
User Manual
Page 31
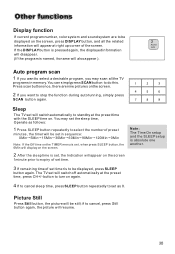
... may set , when press SLEEP button, the 0Min will switch off automatically at the preset time, press CH+/- Note: The Time On setup and the SLEEP setup is absolute one another. 2 After the sleep time is named, its name will appear at the preset time with the SLEEP time on. Other functions Display function If current program number, color system and sound system are to be displayed on the screen, press DISPLAY button...
... may set , when press SLEEP button, the 0Min will switch off automatically at the preset time, press CH+/- Note: The Time On setup and the SLEEP setup is absolute one another. 2 After the sleep time is named, its name will appear at the preset time with the SLEEP time on. Other functions Display function If current program number, color system and sound system are to be displayed on the screen, press DISPLAY button...

User Manual
Page 34
... appliance or power tool. Press VOL+ button to other channels. No color for local interference such as it is strongly recommended that you check out the problem by yourself according to TV input. Note: Production of power supply is selected. Check out of picture and sound systems. Refer to change signal input to the instructions listed hereunder before contacting the after -sales service for color adjust. If the problem still...
... appliance or power tool. Press VOL+ button to other channels. No color for local interference such as it is strongly recommended that you check out the problem by yourself according to TV input. Note: Production of power supply is selected. Check out of picture and sound systems. Refer to change signal input to the instructions listed hereunder before contacting the after -sales service for color adjust. If the problem still...


