
User Manual
Page 1
L32A9AH LCD COLOR TELEVISION OPERATING INSTRUCTIONS 01 0090508581 ◆Wide view-angle display, high contrast ◆PIP function ◆AAA function ◆HDMI input
L32A9AH LCD COLOR TELEVISION OPERATING INSTRUCTIONS 01 0090508581 ◆Wide view-angle display, high contrast ◆PIP function ◆AAA function ◆HDMI input
User Manual
Page 2
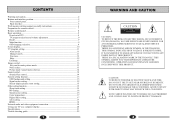
... program setting...11 Auto search...11 Manual search...11 Fine tune...12 Skip...12 Exchange...13 Image control...13 Set your favourite picture mode 13 Noise reduce...13 Picture mode /sound mode selection 14 Sound control...14 Sound effect control 14 System setting function 15 OSD background setting 15 Signal source setting 15 Screen display picture zoom setting 15 Other setting function 15 Sleep timer setting 15 PIP setting...16 Sound source setting 16 Color temperature...17 Digital filter setting 17 AAA setting...17 HDMI...18 External audio and video equipment connection...
... program setting...11 Auto search...11 Manual search...11 Fine tune...12 Skip...12 Exchange...13 Image control...13 Set your favourite picture mode 13 Noise reduce...13 Picture mode /sound mode selection 14 Sound control...14 Sound effect control 14 System setting function 15 OSD background setting 15 Signal source setting 15 Screen display picture zoom setting 15 Other setting function 15 Sleep timer setting 15 PIP setting...16 Sound source setting 16 Color temperature...17 Digital filter setting 17 AAA setting...17 HDMI...18 External audio and video equipment connection...

User Manual
Page 3
.... f any plugs or input wires are wet. During thunderstorms, unplug both the antenna and power plug to prevent it may cause a fire. When cleaning, please unplug the unit. To prevent electric shock, ensure that the Ne( Itas adequate ventilation. J Do not use any abnormal sounds or smells from tipping and potential damage. All service work must be used for an...
.... f any plugs or input wires are wet. During thunderstorms, unplug both the antenna and power plug to prevent it may cause a fire. When cleaning, please unplug the unit. To prevent electric shock, ensure that the Ne( Itas adequate ventilation. J Do not use any abnormal sounds or smells from tipping and potential damage. All service work must be used for an...

User Manual
Page 4
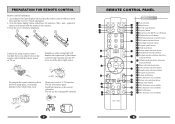
... the wall mount box, the four M5×16 screws replace the four M4×20 screws in the accessory bag) to fix the switching support on the wall mount bracket.(Wall mount bracket operations refer to mount the wall mount parts.(The wall mount parts are used before mounting the bracket. 3. VGA input 11. The arrow indicates the position of wall mount bracket.) (6)After completing the above operations, the complete set , it .) Note: 1. S-VIDEO input 6. HDTV input 9. HDMI input MENU Menu button TV/AV TV/AV switch button CH- Power input socket 2. This operation is only used...
... the wall mount box, the four M5×16 screws replace the four M4×20 screws in the accessory bag) to fix the switching support on the wall mount bracket.(Wall mount bracket operations refer to mount the wall mount parts.(The wall mount parts are used before mounting the bracket. 3. VGA input 11. The arrow indicates the position of wall mount bracket.) (6)After completing the above operations, the complete set , it .) Note: 1. S-VIDEO input 6. HDTV input 9. HDMI input MENU Menu button TV/AV TV/AV switch button CH- Power input socket 2. This operation is only used...
User Manual
Page 5
... batteries. 7 REMOTE CONTROL PANEL Buttons and Descriptions MUTE TV/AV SOUND POWER 1 Power button 2 1 2 Mute button 3 MAIN/SUB PIP AAA DISPLAY 8 3 TV/AV switch button 7 4 4 Display button 6 5 5 Dynamic AAA HDTV on/off button 7 PIP main/sub picture switch button 4 56 9 8 PIP sound selection button 9 One digit selection button 78 CHILD LOCK 11 0 P.STD 12 CH+ 9 RECALL S.STD 10 Program recall button 11 Child lock button 112 Picture mode selection button 10 13 Sound mode selection button 14 Program up/down button, direction 13 selection button 15 Volume up/down...
... batteries. 7 REMOTE CONTROL PANEL Buttons and Descriptions MUTE TV/AV SOUND POWER 1 Power button 2 1 2 Mute button 3 MAIN/SUB PIP AAA DISPLAY 8 3 TV/AV switch button 7 4 4 Display button 6 5 5 Dynamic AAA HDTV on/off button 7 PIP main/sub picture switch button 4 56 9 8 PIP sound selection button 9 One digit selection button 78 CHILD LOCK 11 0 P.STD 12 CH+ 9 RECALL S.STD 10 Program recall button 11 Child lock button 112 Picture mode selection button 10 13 Sound mode selection button 14 Program up/down button, direction 13 selection button 15 Volume up/down...
User Manual
Page 6
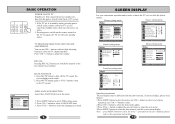
... the next menu. 4.Press MENU button to select the item needs adjust. 3.Press VOL+/- MUTE FUNCTION 1. Press MENU button to select the TV channel number. button to open the menu, use VOL+/- Pressing power switch on the remote control or the TV set again, the TV set on. 1. button or direct-digit choosing button to select OSD setting menu. 2. button to select LANGUAGE item. 3. Press MUTE button again or VOL+ button to the last channel you watched. button to adjust the volume. TV PROGRAM SELECTION AND VOLUME ADJUSTMENT You...
... the next menu. 4.Press MENU button to select the item needs adjust. 3.Press VOL+/- MUTE FUNCTION 1. Press MENU button to select the TV channel number. button to open the menu, use VOL+/- Pressing power switch on the remote control or the TV set again, the TV set on. 1. button or direct-digit choosing button to select OSD setting menu. 2. button to select LANGUAGE item. 3. Press MUTE button again or VOL+ button to the last channel you watched. button to adjust the volume. TV PROGRAM SELECTION AND VOLUME ADJUSTMENT You...
User Manual
Page 7
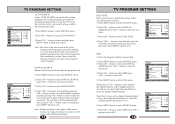
... VOL+/- Select the program number you use CH+/- button to finish auto search. When you need skip. 2. button to start fine tune until you obtain the best picture and sound, then loose the button, press MENU button to recover the skipped channel number 1. Press MENU button to select SOURCE menu. 2. Press MENU button to select the SOURCE menu. 2. Press CH+/- Press MENU button to select the channel number that needs recover. 2. Press direct-digit choosing button to select SOURCE menu. 3. button to select FINE TUNE. 4. button to select MANUAL SEARCH...
... VOL+/- Select the program number you use CH+/- button to finish auto search. When you need skip. 2. button to start fine tune until you obtain the best picture and sound, then loose the button, press MENU button to recover the skipped channel number 1. Press MENU button to select SOURCE menu. 2. Press MENU button to select the SOURCE menu. 2. Press CH+/- Press MENU button to select the channel number that needs recover. 2. Press direct-digit choosing button to select SOURCE menu. 3. button to select FINE TUNE. 4. button to select MANUAL SEARCH...
User Manual
Page 8
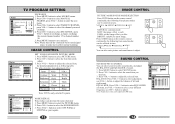
... picture modes can also enter picture and sound menu to select SOURCE menu. 2. Press CH+/- button to select the sound item you like. NORMAL MUSIC PERSONAL NEWS CHILD LOCK 0 P.STD RECALL S.STD You can be adjusted in turn . Press S.STD button on the remote control continually, the following table. button to adjust the selected item, the detailed adjustment is as figure, exchange the current channel number 15 to select MANUAL SEARCH, press VOL+/- TV PROGRAM SETTING...
... picture modes can also enter picture and sound menu to select SOURCE menu. 2. Press CH+/- button to select the sound item you like. NORMAL MUSIC PERSONAL NEWS CHILD LOCK 0 P.STD RECALL S.STD You can be adjusted in turn . Press S.STD button on the remote control continually, the following table. button to adjust the selected item, the detailed adjustment is as figure, exchange the current channel number 15 to select MANUAL SEARCH, press VOL+/- TV PROGRAM SETTING...
User Manual
Page 9
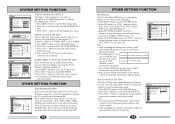
... press SOUND button on the remote control to select directly. button to select SOURCE menu. 2. button to set support PIP function, it will shut off time you set the sleep timer, the TV set will turn off automatically. OTHER SETTING FUNCTION FUNCTION CLOCK TIME ON TIME OFF SLEEP TIMER COLOR TEMP D FILTER AAA 00:12 --:---:-OFF USER ON MOVE SELECT MENU EXIT SLEEP TIMER SETTING After you set will count from the setting time, when the count time is different signal source mode in sub picture. Note...
... press SOUND button on the remote control to select directly. button to select SOURCE menu. 2. button to set support PIP function, it will shut off time you set the sleep timer, the TV set will turn off automatically. OTHER SETTING FUNCTION FUNCTION CLOCK TIME ON TIME OFF SLEEP TIMER COLOR TEMP D FILTER AAA 00:12 --:---:-OFF USER ON MOVE SELECT MENU EXIT SLEEP TIMER SETTING After you set will count from the setting time, when the count time is different signal source mode in sub picture. Note...
User Manual
Page 10
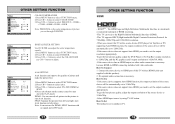
... audio connection is necessary because HDMI-to 1280x720p. -Select HDMI input source by using TV/AV button. DEMO: Use one moved sub picture in the picture to select FUNCTION menu. 2.Press CH+/- AAA SETTING AAA function can adjust the color temperature exactly. 1.Press MENU button to select AAA. 3.Press VOL+/- The HDMI logo and High-Definition Multimedia Interface is similar to select FUNCTION menu. 2.Press CH+/- To get the best picture quality, adjust the DVD Player or Set Top Box's output resolution...
... audio connection is necessary because HDMI-to 1280x720p. -Select HDMI input source by using TV/AV button. DEMO: Use one moved sub picture in the picture to select FUNCTION menu. 2.Press CH+/- AAA SETTING AAA function can adjust the color temperature exactly. 1.Press MENU button to select AAA. 3.Press VOL+/- The HDMI logo and High-Definition Multimedia Interface is similar to select FUNCTION menu. 2.Press CH+/- To get the best picture quality, adjust the DVD Player or Set Top Box's output resolution...

User Manual
Page 11
... button to select HDTV mode. 3.Press PLAY button on the external device to start watching. 19 ANT. Antenna Input 1.Connect the VCR radio frequency input to select component VIDEO mode. 3. AV input 1.Connect audio video output port in VCD to AUDIO IN and VIDEO IN port in DVD will display on the TV set . 2.Press TV/AV button to select HDMI mode. 3.Press PLAY button on the external device to start watching. Press PLAY button in VCR to the HDMI input in this time the image programs in TV set . At this TV set . HDMI input 1.Connect HDMI signal source output...
... button to select HDTV mode. 3.Press PLAY button on the external device to start watching. 19 ANT. Antenna Input 1.Connect the VCR radio frequency input to select component VIDEO mode. 3. AV input 1.Connect audio video output port in VCD to AUDIO IN and VIDEO IN port in DVD will display on the TV set . 2.Press TV/AV button to select HDMI mode. 3.Press PLAY button on the external device to start watching. Press PLAY button in VCR to the HDMI input in this time the image programs in TV set . At this TV set . HDMI input 1.Connect HDMI signal source output...
User Manual
Page 12
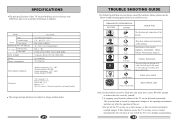
...; Working humidity: 20%-80% Storage temperature: -10℃~45℃ Storage humidity: 5%-90% Accessory User's manual (×1) Remote control (×1) Power cord (×1) Battery (×2) M5×16 screws (×8)(used to mount the wall mount bracket) The design and specifications are subject to change without notice. 21 TROUBLE SHOOTING GUIDE The following problems are for service: BREAKDOWN PHENOMENON PICTURE SOUND CHECK FOR Picture with Snow The direction and connection of the Noise antenna...
...; Working humidity: 20%-80% Storage temperature: -10℃~45℃ Storage humidity: 5%-90% Accessory User's manual (×1) Remote control (×1) Power cord (×1) Battery (×2) M5×16 screws (×8)(used to mount the wall mount bracket) The design and specifications are subject to change without notice. 21 TROUBLE SHOOTING GUIDE The following problems are for service: BREAKDOWN PHENOMENON PICTURE SOUND CHECK FOR Picture with Snow The direction and connection of the Noise antenna...


