
User Manual
Page 2
... MAINTENANCE HAS BEEN INCLUDED WITH THIS PRODUCT. CONTENTS Warning and caution 2 Buttons and interface position 5 Preparation for remote control 6 Remote control panel 7 Basic operation 8 Screen display 9 TV program setting 10 Image control 13 Audio control 14 Function setting 15 Time setting...17 Signal source setting 18 Child lock setting 19 DTV menu...20 Teletext function...25 Other setting function 27 External audio and video equipment connection 28 Using your TV as a computer display 29 Specifications 30 Troubleshooting guide 31 1 WARNING AND CAUTION CAUTION !
... MAINTENANCE HAS BEEN INCLUDED WITH THIS PRODUCT. CONTENTS Warning and caution 2 Buttons and interface position 5 Preparation for remote control 6 Remote control panel 7 Basic operation 8 Screen display 9 TV program setting 10 Image control 13 Audio control 14 Function setting 15 Time setting...17 Signal source setting 18 Child lock setting 19 DTV menu...20 Teletext function...25 Other setting function 27 External audio and video equipment connection 28 Using your TV as a computer display 29 Specifications 30 Troubleshooting guide 31 1 WARNING AND CAUTION CAUTION !

User Manual
Page 3
... unplug the unit. Do not remove the cover of electric shock or fire. f any abnormal sounds or smells from tipping and potential damage. All service work must be used for an extended period, unplug the unit from entering the set or try to service. Yl f the set is clear of contact with any external antenna connected to avoid shock and potential...
... unplug the unit. Do not remove the cover of electric shock or fire. f any abnormal sounds or smells from tipping and potential damage. All service work must be used for an extended period, unplug the unit from entering the set or try to service. Yl f the set is clear of contact with any external antenna connected to avoid shock and potential...

User Manual
Page 4
... the direct light source. Do not mix battery types. BUTTONS AND INTERFACE POSITION Front control panel L26TA5A/L32TA5A/L37TA5A VIDEO R AUDIO L MENU Menu button TV/AV TV/AV switch button CH- VOL+ Volume down /up button Power indicator Remote sensor L26TA6A/L32TA6A/L37TA6A Power button VIDEO R AUDIO L POWER Remote sensor Power indicator HDMI - When SCART1 and SCART2 is input at the same time. 2. In this situation turn the TV set . CH+ Program down /up button VOL- According to the remote may occur. VGA input 9. HDMI input 10.Power input...
... the direct light source. Do not mix battery types. BUTTONS AND INTERFACE POSITION Front control panel L26TA5A/L32TA5A/L37TA5A VIDEO R AUDIO L MENU Menu button TV/AV TV/AV switch button CH- VOL+ Volume down /up button Power indicator Remote sensor L26TA6A/L32TA6A/L37TA6A Power button VIDEO R AUDIO L POWER Remote sensor Power indicator HDMI - When SCART1 and SCART2 is input at the same time. 2. In this situation turn the TV set . CH+ Program down /up button VOL- According to the remote may occur. VGA input 9. HDMI input 10.Power input...

User Manual
Page 5
... use CH+/- Press MUTE button again or VOL+ button to select the TV channel number. OSD LANGUAGE SELECTION Select the LANGUAGE item in red, press the digit buttons or CH+/- Press VOL+/- button to adjust the volume. MUTE FUNCTION 1. button on the TV set.( with the exception 0 digit) 3.If you need. 8 REMOTE CONTROL PANEL STANDBY 1 3 2 6 7 8 10 11 9 15 16 19 17 18 20 25 27 29 30 Buttons and Descriptions 1 Standby button 2 Mute button 4 3 Picture mode button 5 4 Sound mode button 5 Light button...
... use CH+/- Press MUTE button again or VOL+ button to select the TV channel number. OSD LANGUAGE SELECTION Select the LANGUAGE item in red, press the digit buttons or CH+/- Press VOL+/- button to adjust the volume. MUTE FUNCTION 1. button on the TV set.( with the exception 0 digit) 3.If you need. 8 REMOTE CONTROL PANEL STANDBY 1 3 2 6 7 8 10 11 9 15 16 19 17 18 20 25 27 29 30 Buttons and Descriptions 1 Standby button 2 Mute button 4 3 Picture mode button 5 4 Sound mode button 5 Light button...

User Manual
Page 6
.... 2.Press button to select the item needs adjust. 3.Press button to adjust the selected item, or enter the next menu. 4.Press MENU button to enter. 3. SOUND SYS. ZOOM SOFT 45 45 45 50 NORMAL FULL PROGRAM NUMB. COLOUR SYS. FINE TUNE MANUAL SEARCH AUTO SEARCH EDIT PROGRAM COUNTRY 11 PAL D/K CHINA PICTURE Audio setting menu AUDIO MODE STANDARD BALANCE 50 AUTO VOLUME ON EQUALIZER SURROUND OFF DIGITAL BASS ON TUNING Timer setting menu SLEEP TIMER CLOCK OFF TIME REMIND TIME REMIND...
.... 2.Press button to select the item needs adjust. 3.Press button to adjust the selected item, or enter the next menu. 4.Press MENU button to enter. 3. SOUND SYS. ZOOM SOFT 45 45 45 50 NORMAL FULL PROGRAM NUMB. COLOUR SYS. FINE TUNE MANUAL SEARCH AUTO SEARCH EDIT PROGRAM COUNTRY 11 PAL D/K CHINA PICTURE Audio setting menu AUDIO MODE STANDARD BALANCE 50 AUTO VOLUME ON EQUALIZER SURROUND OFF DIGITAL BASS ON TUNING Timer setting menu SLEEP TIMER CLOCK OFF TIME REMIND TIME REMIND...

User Manual
Page 7
... channel and do above steps. 11 PROGRAM NUMB. DELETE 1.Press button to select the channel you need operate, press red button to enter rename mode. 2.Press button to select the number position of screen. PROGRAM NUMB. SOUND SYS. During operating, press green button to cancel copy. 3.The copied channel may have same setting as you need . EDIT PROGRAM Using this function, you use one digit selection button to select this function can 't use CH+/- button or one digit selection button to select the skipped channel number...
... channel and do above steps. 11 PROGRAM NUMB. DELETE 1.Press button to select the channel you need operate, press red button to enter rename mode. 2.Press button to select the number position of screen. PROGRAM NUMB. SOUND SYS. During operating, press green button to cancel copy. 3.The copied channel may have same setting as you need . EDIT PROGRAM Using this function, you use one digit selection button to select this function can 't use CH+/- button or one digit selection button to select the skipped channel number...
User Manual
Page 8
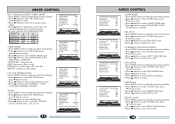
... 13 PICTURE AUDIO CONTROL AUDIO MODE STANDARD BALANCE 50 AUTO VOLUME ON EQUALIZER SURROUND OFF DIGITAL BASS ON AUDIO MODE 1.Press MENU button to make the main menu display. 2.Press button to select PICTURE menu, press button to enter. 3.Press button to select COLOUR TEM. SURROUND 1.Press MENU button to make the main menu display. 2.Press button to select AUDIO menu, press button to enter. 3.Press button to select BALANCE item. 4.Press button to adjust the value. VIDEO MODE CONTRAST BRIGHTNESS SATURATION SHARPNESS COLOUR TEM . AUDIO AUDIO MODE STANDARD...
... 13 PICTURE AUDIO CONTROL AUDIO MODE STANDARD BALANCE 50 AUTO VOLUME ON EQUALIZER SURROUND OFF DIGITAL BASS ON AUDIO MODE 1.Press MENU button to make the main menu display. 2.Press button to select PICTURE menu, press button to enter. 3.Press button to select COLOUR TEM. SURROUND 1.Press MENU button to make the main menu display. 2.Press button to select AUDIO menu, press button to enter. 3.Press button to select BALANCE item. 4.Press button to adjust the value. VIDEO MODE CONTRAST BRIGHTNESS SATURATION SHARPNESS COLOUR TEM . AUDIO AUDIO MODE STANDARD...

User Manual
Page 9
..., MOVE and ZOOM four modes. DNR: use digital mode to restrain the image noise, in horizontal or vertical direction. 5.Press button to adjust the image properly. TXT LANGUAGE 1.Press MENU button to make the main menu display. 2.Press button to select FUNCTION menu, press button to enter. 3.Press button to select OSD SETTING item, press button to enter the sub-menu. 4.Press button to select DURATION item. 5.Press button to adjust the pause time, and you can...
..., MOVE and ZOOM four modes. DNR: use digital mode to restrain the image noise, in horizontal or vertical direction. 5.Press button to adjust the image properly. TXT LANGUAGE 1.Press MENU button to make the main menu display. 2.Press button to select FUNCTION menu, press button to enter. 3.Press button to select OSD SETTING item, press button to enter the sub-menu. 4.Press button to select DURATION item. 5.Press button to adjust the pause time, and you can...

User Manual
Page 10
... button to select SLEEP TIMER item. 4.Press button to adjust the value. You can select according to your require: TV, AV, S-VIDEO, YPbPr, VGA, SCART1, SCART2, HDMI or DTV. 1.Press TV/AV button on channel is off time is set the sleep timer you need. Press button to select hour or minute position, press button to select the sleep timer you need . OFF OFF TIMER SLEEP TIMER CLOCK OFF TIME REMIND TIME REMIND PROG. OFF OFF TIMER REMIND PROGRAM 1.Press MENU button to...
... button to select SLEEP TIMER item. 4.Press button to adjust the value. You can select according to your require: TV, AV, S-VIDEO, YPbPr, VGA, SCART1, SCART2, HDMI or DTV. 1.Press TV/AV button on channel is off time is set the sleep timer you need. Press button to select hour or minute position, press button to select the sleep timer you need . OFF OFF TIMER SLEEP TIMER CLOCK OFF TIME REMIND TIME REMIND PROG. OFF OFF TIMER REMIND PROGRAM 1.Press MENU button to...

User Manual
Page 11
... work except INPUT NEW PASSWORD H.LOCK and power switch. 6.Press button to select CLEAR ALL item, press button to unlock all the locked items. 7.Press button to select CHANGE PASSWORD item, INPUT NEW PASSWORD * * * * AGAIN * * * * press button to your selected current channel. After setting the locked item, it will enter the locked item, for example, the AV doesn't display the image, it will display LOCKED, pressing H.LOCK button and input the password can watch normally. Main Menu Channel List Favourites Gudies Settings Common Interface Channel List 1.Press button...
... work except INPUT NEW PASSWORD H.LOCK and power switch. 6.Press button to select CLEAR ALL item, press button to unlock all the locked items. 7.Press button to select CHANGE PASSWORD item, INPUT NEW PASSWORD * * * * AGAIN * * * * press button to your selected current channel. After setting the locked item, it will enter the locked item, for example, the AV doesn't display the image, it will display LOCKED, pressing H.LOCK button and input the password can watch normally. Main Menu Channel List Favourites Gudies Settings Common Interface Channel List 1.Press button...

User Manual
Page 12
... SUB button on the remote control to adjust the status when you need , press to operate as figure 4. The other people. 22 BBCi 800. Barnkanalen 801. Favorite Mode List 1 Channel List Show all 7 Installation Moving Picture (For UK) MENU Exit i More Time Zone: In general, select Off status. Banner: select the caption duration time after you need . BBC TWO 7. BBC NEWS 24 51. Colour Bar 1 2. Monoscope 1026. Navigate Change Time Advance...
... SUB button on the remote control to adjust the status when you need , press to operate as figure 4. The other people. 22 BBCi 800. Barnkanalen 801. Favorite Mode List 1 Channel List Show all 7 Installation Moving Picture (For UK) MENU Exit i More Time Zone: In general, select Off status. Banner: select the caption duration time after you need . BBC TWO 7. BBC NEWS 24 51. Colour Bar 1 2. Monoscope 1026. Navigate Change Time Advance...

User Manual
Page 13
... will be replaced. Do you select. 3.After selecting the channel number as figure 7. Language Settings System English Preferred -Audio French -Subtitle French Current Change 1026 Moving Picture Language Settings System English Preferred -Audio English -Subtitle English Current Change 1026 Moving Picture Select Change Default System Language i More Select Change Default System Language i More (For Europe) (For UK) 3.Press button to select System item, press button to adjust the language you need. 4.Press button to select Audio item, press button to adjust the...
... will be replaced. Do you select. 3.After selecting the channel number as figure 7. Language Settings System English Preferred -Audio French -Subtitle French Current Change 1026 Moving Picture Language Settings System English Preferred -Audio English -Subtitle English Current Change 1026 Moving Picture Select Change Default System Language i More Select Change Default System Language i More (For Europe) (For UK) 3.Press button to select System item, press button to adjust the language you need. 4.Press button to select Audio item, press button to adjust the...

User Manual
Page 14
... buttons to turn teletext On/Off. This feature is very useful where there are not available in Teletext mode". Subtitle Pressing the SUBTITLE button will stop the teletext page automatically updating. Page number entering To select a Teletext page, enter the page number using the numeric key pad on the remote control to browse next or previous page. 1 23 4 56 7 89 0 - - - - Mix mode To view the TV picture...
... buttons to turn teletext On/Off. This feature is very useful where there are not available in Teletext mode". Subtitle Pressing the SUBTITLE button will stop the teletext page automatically updating. Page number entering To select a Teletext page, enter the page number using the numeric key pad on the remote control to browse next or previous page. 1 23 4 56 7 89 0 - - - - Mix mode To view the TV picture...

User Manual
Page 15
... separated audio connection is S-VIDEO. 4.Press PLAY button in this TV with an HDMI cable (not supplied with a source device (DVD player, Set Top Box or PC) supporting Auto HDMI function, the output resolution of this TV set . Antenna Input 1.Connect the VCR radio frequency input to select TV mode. 4. Component terminal (Y/PbCb/PrCr) connect to the component output of picture output device (such as signal input source, the image quality will be automatically set to 1280x720p. -If the source device does not support Auto HDMI, you need to HDMI port...
... separated audio connection is S-VIDEO. 4.Press PLAY button in this TV with an HDMI cable (not supplied with a source device (DVD player, Set Top Box or PC) supporting Auto HDMI function, the output resolution of this TV set . Antenna Input 1.Connect the VCR radio frequency input to select TV mode. 4. Component terminal (Y/PbCb/PrCr) connect to the component output of picture output device (such as signal input source, the image quality will be automatically set to 1280x720p. -If the source device does not support Auto HDMI, you need to HDMI port...

User Manual
Page 16
Connect the audio cable in the computer to select VGA mode. 4. Note: 1. If the temperature of the TV set is rather low, it is normal if there is first turned on the screen. 29 SPECIFICATIONS The part specifications of the display. 3. Model Screen Type Viewable angle Sound system Video input TV/VIDEO Colour system DTV Y/Pb/Pr Power Power consumption Dimension (W×D×H)(cm) L26TA5A/L32TA5A/L37TA5A/L26TA6A/L32TA6A/L37TA6A A-si TFT active matrix 176°...
Connect the audio cable in the computer to select VGA mode. 4. Note: 1. If the temperature of the TV set is rather low, it is normal if there is first turned on the screen. 29 SPECIFICATIONS The part specifications of the display. 3. Model Screen Type Viewable angle Sound system Video input TV/VIDEO Colour system DTV Y/Pb/Pr Power Power consumption Dimension (W×D×H)(cm) L26TA5A/L32TA5A/L37TA5A/L26TA6A/L32TA6A/L37TA6A A-si TFT active matrix 176°...

User Manual
Page 17
... use the follow troubleshooting guide before you call for service: BREAKDOWN PHENOMENON PICTURE SOUND CHECKING Picture with Snow The direction and connection of the Noise antenna Double or Triple Image Normal Disturb Noise Direction, station and connection of the antenna Interference from the cabinet of contrast, brightness and volume. No Picture No Colour Scramble No Sound No Sound Volume, Sound mute The power plug isn't plugged in AC outlet. The main power isn't turned on...
... use the follow troubleshooting guide before you call for service: BREAKDOWN PHENOMENON PICTURE SOUND CHECKING Picture with Snow The direction and connection of the Noise antenna Double or Triple Image Normal Disturb Noise Direction, station and connection of the antenna Interference from the cabinet of contrast, brightness and volume. No Picture No Colour Scramble No Sound No Sound Volume, Sound mute The power plug isn't plugged in AC outlet. The main power isn't turned on...


