

User Manual
Page 2
The lightning flash with arrowhead symbol, within an equilateral triangle is helping the environment by qualified service personnel only. CAUTION: These servicing instructions are for use by using less energy while saving you money. HL26R1, HL32R1, HL26K1, HL32K1, HL32XK1) By being Energy Star compliant you are assured that your Haier model is intended to alert the user to do not perform any servicing other...
The lightning flash with arrowhead symbol, within an equilateral triangle is helping the environment by qualified service personnel only. CAUTION: These servicing instructions are for use by using less energy while saving you money. HL26R1, HL32R1, HL26K1, HL32K1, HL32XK1) By being Energy Star compliant you are assured that your Haier model is intended to alert the user to do not perform any servicing other...

User Manual
Page 4
...21 Audio Menu How to select audio mode 22 How to customize your own audio status 22 SAP Broadcasts Setup 22 Function Menu Menu Language OSD Timeout OSD Transparency Screen Mode Blue Screen DPMS Time zone setting Date /Time setting Sleep Timer setting DTV Caption Style Lock Menu Parental Control rating and categories Lock setup Other Functions Br ie f In fo Us in g th e Gu id e Quick program view CC (Closed Caption Display USB Input Universal Remote Control Setting up your remote control Remote Control Codes Maintenance Product Specification Troubleshooting 4 TV LCD...
...21 Audio Menu How to select audio mode 22 How to customize your own audio status 22 SAP Broadcasts Setup 22 Function Menu Menu Language OSD Timeout OSD Transparency Screen Mode Blue Screen DPMS Time zone setting Date /Time setting Sleep Timer setting DTV Caption Style Lock Menu Parental Control rating and categories Lock setup Other Functions Br ie f In fo Us in g th e Gu id e Quick program view CC (Closed Caption Display USB Input Universal Remote Control Setting up your remote control Remote Control Codes Maintenance Product Specification Troubleshooting 4 TV LCD...
User Manual
Page 5
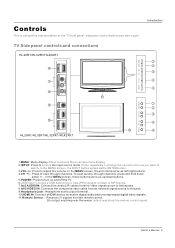
... IN MENU INPUT VOL+ VOL- Remote Sensor Receives IR signals from an external signal source to this jack. 9.Headphone jack : Headphone audio output terminal. 10.HDMI IN: Connect a HDMI device to access the input source mode. POWER L - Owner s Manual 5 CH+ CH- AUDIO - Press to access the on and off the TV. 6.USB input: Connect a USB flash drive to view JPEG images or listen to MP3 songs. 7.Av2 AUDIO IN: Connect the audio L/R cables from the video signal source to these jacks. 8.AV2 VIDEO IN: Connects the composite video cable from the remote control...
... IN MENU INPUT VOL+ VOL- Remote Sensor Receives IR signals from an external signal source to this jack. 9.Headphone jack : Headphone audio output terminal. 10.HDMI IN: Connect a HDMI device to access the input source mode. POWER L - Owner s Manual 5 CH+ CH- AUDIO - Press to access the on and off the TV. 6.USB input: Connect a USB flash drive to view JPEG images or listen to MP3 songs. 7.Av2 AUDIO IN: Connect the audio L/R cables from the video signal source to these jacks. 8.AV2 VIDEO IN: Connects the composite video cable from the remote control...
User Manual
Page 7
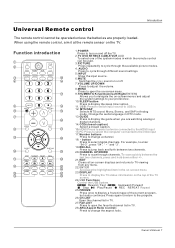
... settings to your preference. 10.SLEEP button Press to select digital channels. USB: Press to switch input source to cycle through the available picture modes. 4. Change the audio language in DTV mode. 13.GUIDE Press to display the guide when you to navigate the on and off . 7.VOLUME UP/DOWN Press to adjust the volume. 8.MENU Press to open the favorite channel list in TV. 28.ARC(Aspect Ratio Control) Press to display a frozen image of the current program, but audio...
... settings to your preference. 10.SLEEP button Press to select digital channels. USB: Press to switch input source to cycle through the available picture modes. 4. Change the audio language in DTV mode. 13.GUIDE Press to display the guide when you to navigate the on and off . 7.VOLUME UP/DOWN Press to adjust the volume. 8.MENU Press to open the favorite channel list in TV. 28.ARC(Aspect Ratio Control) Press to display a frozen image of the current program, but audio...

User Manual
Page 8
... CABLE VCR AUD PICTURE AUDIO PC HDMI INPUT MUTE RECALL VOL MENU CH EXIT ENTER SLEEP DISPLAY USB PLAY/PAUSE STOP REC REV PREV NEXT REPEAT MTS/SAP FREEZE CH.LIST GUIDE CCD ARC FAVORITE Remote control R TFT-LCD TV OWNER'S MANUAL Please READ this manual carefully before operating your TV, and retain it for outdoor antenna) Outdoor Antenna Bronze Wire Be careful not to bend the bronze wire when connecting the antenna. If the antenna needs to wall jack...
... CABLE VCR AUD PICTURE AUDIO PC HDMI INPUT MUTE RECALL VOL MENU CH EXIT ENTER SLEEP DISPLAY USB PLAY/PAUSE STOP REC REV PREV NEXT REPEAT MTS/SAP FREEZE CH.LIST GUIDE CCD ARC FAVORITE Remote control R TFT-LCD TV OWNER'S MANUAL Please READ this manual carefully before operating your TV, and retain it for outdoor antenna) Outdoor Antenna Bronze Wire Be careful not to bend the bronze wire when connecting the antenna. If the antenna needs to wall jack...
User Manual
Page 9
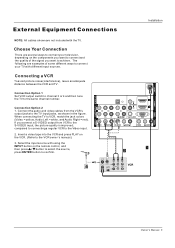
... included with using the INPUT button on the remote control, and then press / button to select the source, press ENTER button to confirm. compared to connecting a regular VCR to the same channel number. When connecting the TV to the VCR owner`s manual.) 3. Insert a video tape into the VCR and press PLAY on the VCR. (Refer to VCR, match the jack colors (Video = yellow, Audio Left = white, and Audio Right = red). Connect the audio and video cables from VCR to the S-VIDEO input, the picture quality...
... included with using the INPUT button on the remote control, and then press / button to select the source, press ENTER button to confirm. compared to connecting a regular VCR to the same channel number. When connecting the TV to the VCR owner`s manual.) 3. Insert a video tape into the VCR and press PLAY on the VCR. (Refer to VCR, match the jack colors (Video = yellow, Audio Left = white, and Audio Right = red). Connect the audio and video cables from VCR to the S-VIDEO input, the picture quality...

User Manual
Page 10
...with using the INPUT button on the DVD player, insert a DVD. 2. Press Play button on DVD player Y Pb Pr Y B-Y R-Y Y Cb Cr Y PB PR VIDEO IN COMPONENT IN OPTICAL OUT Camcorder Video Game Set ANT IN HDMI IN AV OUT VGA IN 2 L 2 DVI AUDIO 1 R 1 Y 1 Pb Pr L AUDIO R VGA AUDIO VGA VIDEO L AUDIO R S-VIDEO L AUDIO R VIDEO L AUDIO R 10 TV LCD-TFT Component ports on the TV Y Pb Pr Video output ports on external equipment for operating instructions. Press ENTER button to use 1. External Equipment Connections Installation ANT IN HDMI IN External A/V Source Setup How to connect...
...with using the INPUT button on the DVD player, insert a DVD. 2. Press Play button on DVD player Y Pb Pr Y B-Y R-Y Y Cb Cr Y PB PR VIDEO IN COMPONENT IN OPTICAL OUT Camcorder Video Game Set ANT IN HDMI IN AV OUT VGA IN 2 L 2 DVI AUDIO 1 R 1 Y 1 Pb Pr L AUDIO R VGA AUDIO VGA VIDEO L AUDIO R S-VIDEO L AUDIO R VIDEO L AUDIO R 10 TV LCD-TFT Component ports on the TV Y Pb Pr Video output ports on external equipment for operating instructions. Press ENTER button to use 1. External Equipment Connections Installation ANT IN HDMI IN External A/V Source Setup How to connect...

User Manual
Page 11
... turn the TV speakers off. ! Use INPUT on your vision. Note When connecting with external audio equipments, such as shown below. VIDEO IN COMPONENT IN OPTICAL OUT HDMI Digital Set-top Box 2 L 2 DVI AUDIO 1 R 1 Y 1 Pb Pr L AUDIO R VGA AUDIO VGA VIDEO L AUDIO R S-VIDEO L AUDIO R VIDEO L AUDIO R AV OUT VGA IN Owner s Manual 11 However, if you do receive Digital signals from a digital set -top box. Caution: Do not look into the optical output port. See the external audio equipment instruction manual for video connections, depending on the remote control to select...
... turn the TV speakers off. ! Use INPUT on your vision. Note When connecting with external audio equipments, such as shown below. VIDEO IN COMPONENT IN OPTICAL OUT HDMI Digital Set-top Box 2 L 2 DVI AUDIO 1 R 1 Y 1 Pb Pr L AUDIO R VGA AUDIO VGA VIDEO L AUDIO R S-VIDEO L AUDIO R VIDEO L AUDIO R AV OUT VGA IN Owner s Manual 11 However, if you do receive Digital signals from a digital set -top box. Caution: Do not look into the optical output port. See the external audio equipment instruction manual for video connections, depending on the remote control to select...
User Manual
Page 12
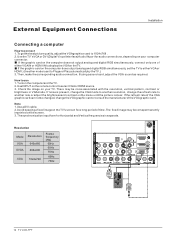
... fixed image may be noise associated with the resolution, vertical pattern, contrast or brightness in VGAmode. Use the TV`sVGA or DVI (Digital VisualInterface)Audio IN port for audio connections, depending on the computer does output analog and digital RGB simultaneously, set the TV to Plugand Play automaticallyby theTV.) 3. If noiseis present, changethe VGAmode to anotherresolution, change theVGAgraphic cardor consultthe manufacturerof theVGAgraphic card. ANT IN HDMI IN Resolution Mode VGA...
... fixed image may be noise associated with the resolution, vertical pattern, contrast or brightness in VGAmode. Use the TV`sVGA or DVI (Digital VisualInterface)Audio IN port for audio connections, depending on the computer does output analog and digital RGB simultaneously, set the TV to Plugand Play automaticallyby theTV.) 3. If noiseis present, changethe VGAmode to anotherresolution, change theVGAgraphic cardor consultthe manufacturerof theVGAgraphic card. ANT IN HDMI IN Resolution Mode VGA...
User Manual
Page 13
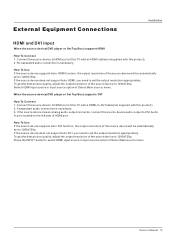
External Equipment Connections Installation HDMI and DVI input When the source device(DVD player or Set Top Box) supports HDMI How To Connect 1. If the source device does not support Auto HDMI, you need to set to 1280x720p. Press the INPUT button to select HDMI input source in input source option of the source device to 1280x720p. To get the best picture quality, adjust the output resolution of Select Main source menu. A separated audio connection is necessary. To get the best picture quality, adjust the output resolution of Select Main...
External Equipment Connections Installation HDMI and DVI input When the source device(DVD player or Set Top Box) supports HDMI How To Connect 1. If the source device does not support Auto HDMI, you need to set to 1280x720p. Press the INPUT button to select HDMI input source in input source option of the source device to 1280x720p. To get the best picture quality, adjust the output resolution of Select Main source menu. A separated audio connection is necessary. To get the best picture quality, adjust the output resolution of Select Main...

User Manual
Page 15
... an electrician replace the obsolete outlet. HDMI3 IN HDMI4 IN Plug a set of headphones into the 3.5mm mini-jack socket on AC. External Equipment Connections Installation Connecting Headphones You can connect a set of headphones to your hearing. Power source Wider Hole and Blade AC Outlet Polarized AC Cord Plug TO USE AC POWER SOURCE Use the AC polarized line cord provided for operation on the side panel of the set if you connect headphones to...
... an electrician replace the obsolete outlet. HDMI3 IN HDMI4 IN Plug a set of headphones into the 3.5mm mini-jack socket on AC. External Equipment Connections Installation Connecting Headphones You can connect a set of headphones to your hearing. Power source Wider Hole and Blade AC Outlet Polarized AC Cord Plug TO USE AC POWER SOURCE Use the AC polarized line cord provided for operation on the side panel of the set if you connect headphones to...
User Manual
Page 17
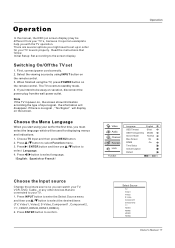
...). 2. Operation In the manual, the OSD (on screen display) may be different from the wall power outlet. Initial Setup: Set according to standby mode. 4. Choose the Menu Language When you start using the TV, press POWER button on the remote control. 3. Press / button to set 1. English Spanish or French Operation Video Audio Channel Function Lock Function Language OSD Timeout OSD Transparency Screen Mode Blue Screen DPMS Time Setup Closed Caption Default English Short Middle Normal On On / Select EXIT Back Choose the Input source Change...
...). 2. Operation In the manual, the OSD (on screen display) may be different from the wall power outlet. Initial Setup: Set according to standby mode. 4. Choose the Menu Language When you start using the TV, press POWER button on the remote control. 3. Press / button to set 1. English Spanish or French Operation Video Audio Channel Function Lock Function Language OSD Timeout OSD Transparency Screen Mode Blue Screen DPMS Time Setup Closed Caption Default English Short Middle Normal On On / Select EXIT Back Choose the Input source Change...
User Manual
Page 21
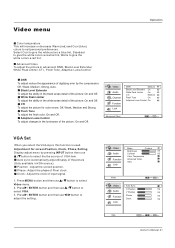
.... Position : Adjust the screen position. button to select / button to / button to give the white colors a red tint. Video Audio Channel Function Lock DNR Medium Black Level Extender On White Peak Limiter On CTI Medium Flesh Tone On Adaptive Luma Control On Advanced Video / Select EXIT Back VGA Set When you select the VGA input, this function is used. Adaptive Luma Control To adjust changes in VGA source). CTI To adjust the picture for screen Position, Clock, Phase, Setting Display adjust menu by...
.... Position : Adjust the screen position. button to select / button to / button to give the white colors a red tint. Video Audio Channel Function Lock DNR Medium Black Level Extender On White Peak Limiter On CTI Medium Flesh Tone On Adaptive Luma Control On Advanced Video / Select EXIT Back VGA Set When you select the VGA input, this function is used. Adaptive Luma Control To adjust changes in VGA source). CTI To adjust the picture for screen Position, Clock, Phase, Setting Display adjust menu by...
User Manual
Page 22
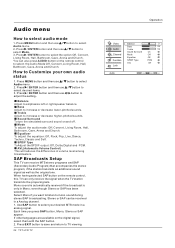
... On Channel Mode Off Equalizer Off Function SPDIF Type PCM AVL Off Lock Audio ENTER Adjust / Select EXIT Back How to select Audio menu. 2. Press / ENTER button and then use / button to Customize your desired MTS mode in a Analog channel. 1. AVL(Automatic Volume Control) This will reduces the differences in Mono; Press MENU button and then use select desired items. 3. Sound Surround To turn the simulated surround sound on the digital signal, select them with the SAP button. 2. Mode To adjust the audio mode...
... On Channel Mode Off Equalizer Off Function SPDIF Type PCM AVL Off Lock Audio ENTER Adjust / Select EXIT Back How to select Audio menu. 2. Press / ENTER button and then use / button to Customize your desired MTS mode in a Analog channel. 1. AVL(Automatic Volume Control) This will reduces the differences in Mono; Press MENU button and then use select desired items. 3. Sound Surround To turn the simulated surround sound on the digital signal, select them with the SAP button. 2. Mode To adjust the audio mode...
User Manual
Page 23
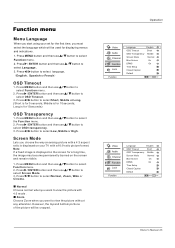
... displayed on the screen and remain visible. 1. Normal Choose normal when you choose the way an analog picture with 4:3 mode . Operation Video Audio Channel Function Lock Function Language OSD Timeout OSD Transparency Screen Mode Blue Screen DPMS Time Setup Closed Caption Default English Short Middle Normal On On / Select EXIT Back Video Audio Channel Function Lock Function Language OSD Timeout OSD Transparency Screen Mode Blue Screen DPMS Time Setup Closed Caption Default English Short Middle Normal On On / Select EXIT Back Owner s Manual 23 Press / ENTER button...
... displayed on the screen and remain visible. 1. Normal Choose normal when you choose the way an analog picture with 4:3 mode . Operation Video Audio Channel Function Lock Function Language OSD Timeout OSD Transparency Screen Mode Blue Screen DPMS Time Setup Closed Caption Default English Short Middle Normal On On / Select EXIT Back Video Audio Channel Function Lock Function Language OSD Timeout OSD Transparency Screen Mode Blue Screen DPMS Time Setup Closed Caption Default English Short Middle Normal On On / Select EXIT Back Owner s Manual 23 Press / ENTER button...

User Manual
Page 25
...window color. BG Color Select a background color. Press MENU button and then use / button to select Function menu. 2. Press / ENTER button and then use / button to your own preference. To cancel the set sleep timer: Press button to select Closed Caption . 3. Size Select this option to your TV. Operation Video Audio Channel Function Lock Time Zone Date/Time Sleep Timer Pacific Off Time Setup / Select EXIT Back Video Audio Channel Function Lock Function Language OSD Timeout OSD Transparency Screen Mode Blue Screen DPMS Time Setup Closed Caption Default English Short...
...window color. BG Color Select a background color. Press MENU button and then use / button to select Function menu. 2. Press / ENTER button and then use / button to your own preference. To cancel the set sleep timer: Press button to select Closed Caption . 3. Size Select this option to your TV. Operation Video Audio Channel Function Lock Time Zone Date/Time Sleep Timer Pacific Off Time Setup / Select EXIT Back Video Audio Channel Function Lock Function Language OSD Timeout OSD Transparency Screen Mode Blue Screen DPMS Time Setup Closed Caption Default English Short...

User Manual
Page 27
...Lock EXIT Back Video Audio Channel Function Lock 2 Analog 3 Analog 4 Analog 5 Analog 6 Analog 7 Analog 8 Analog 9 Analog 10 Analog 11 Analog 12 Analog Channel Block ENTER Set / Select EXIT Back Video Audio Channel Function Lock Lock Channel Block Program Block Password Clean All ENTER Enter / Select EXIT Back Video Audio Channel Function Lock Parental Lock On Parental Guide MPAA Rating CA Eng Rating CA Fren Rating Digital Rating Block Unrated On Program Block ENTER Enter / Select EXIT Back Owner s Manual 27 Press MENU button and then use / button to select Lock menu...
...Lock EXIT Back Video Audio Channel Function Lock 2 Analog 3 Analog 4 Analog 5 Analog 6 Analog 7 Analog 8 Analog 9 Analog 10 Analog 11 Analog 12 Analog Channel Block ENTER Set / Select EXIT Back Video Audio Channel Function Lock Lock Channel Block Program Block Password Clean All ENTER Enter / Select EXIT Back Video Audio Channel Function Lock Parental Lock On Parental Guide MPAA Rating CA Eng Rating CA Fren Rating Digital Rating Block Unrated On Program Block ENTER Enter / Select EXIT Back Owner s Manual 27 Press MENU button and then use / button to select Lock menu...
User Manual
Page 33
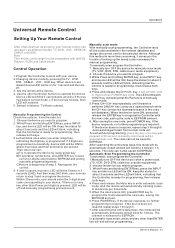
... 3 times in the code set . choose the device you the trouble of step 3. While Press and holding ENTER key, press INPUT key, and device LED will be ON. Keep the status for manually scan mode. (TV, VCR, DVD, STB, cable box or audio equipment). 2. When device is required. Use the other than ENTER key will blink, indicating that the Controller is programmed. Within 30 seconds, user should enter the 3-digit...
... 3 times in the code set . choose the device you the trouble of step 3. While Press and holding ENTER key, press INPUT key, and device LED will be ON. Keep the status for manually scan mode. (TV, VCR, DVD, STB, cable box or audio equipment). 2. When device is required. Use the other than ENTER key will blink, indicating that the Controller is programmed. Within 30 seconds, user should enter the 3-digit...

User Manual
Page 34
... program. 2.To enter display mode, while press and holding the ENTER key and then press POWER key for 3 seconds, the LED will blink 3 times and turn off, default Haier codeset (001) will blink, indicating that do not use the volume control buttons for about 3 seconds and the LED will be displayed. Sequence press 9, 8, 0 to enter display mode. 4.Press digit 1 key to get the second digit of codeset is 1, so then led will blink...
... program. 2.To enter display mode, while press and holding the ENTER key and then press POWER key for 3 seconds, the LED will blink 3 times and turn off, default Haier codeset (001) will blink, indicating that do not use the volume control buttons for about 3 seconds and the LED will be displayed. Sequence press 9, 8, 0 to enter display mode. 4.Press digit 1 key to get the second digit of codeset is 1, so then led will blink...

User Manual
Page 43
... the LCD screen may become permanently burned. Make fine adjustment of power supply is interrupted. This is properly supplied power. No picture, no sound Blank screen No sound Poor sound No picture in some channel No color for some channel program (black and white) Spots with static picture in an area 2,400 meters above the sea level. Press INPUT button to change signal input to other channels. Make adjustments by Fine Tune and Manual Scan. Verify if the antenna...
... the LCD screen may become permanently burned. Make fine adjustment of power supply is interrupted. This is properly supplied power. No picture, no sound Blank screen No sound Poor sound No picture in some channel No color for some channel program (black and white) Spots with static picture in an area 2,400 meters above the sea level. Press INPUT button to change signal input to other channels. Make adjustments by Fine Tune and Manual Scan. Verify if the antenna...


