User Manual
Page 1
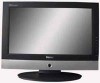
L26A9A-A1 L32A9A-A1 L37A9A-A1 L40A9A-A1 L42A9A-A1 LCD COLOUR TELEVISION OPERATING INSTRUCTIONS 01 0090504740 ◆Wide view-angle display, high contrast ◆Nicam ◆Teletext ◆HDMI
L26A9A-A1 L32A9A-A1 L37A9A-A1 L40A9A-A1 L42A9A-A1 LCD COLOUR TELEVISION OPERATING INSTRUCTIONS 01 0090504740 ◆Wide view-angle display, high contrast ◆Nicam ◆Teletext ◆HDMI

User Manual
Page 3
CONTENTS Warning and caution 2 Buttons and interface position 5 Wall mount switching support assembly instructions 6 Base disassembly/assembly method 6 Preparation for remote control 7 Remote control panel 8 Basic operation 9 Screen display 10 TV program setting 11 Image control 14 Audio control 15 Function setting 16 Time setting...18 Signal source setting 19 Child lock setting 20 Teletext function...21 Other setting function 23 External audio and video equipment connection 24 Using your TV as a computer display 25 Specifications 26 Troubleshooting guide 27 1
CONTENTS Warning and caution 2 Buttons and interface position 5 Wall mount switching support assembly instructions 6 Base disassembly/assembly method 6 Preparation for remote control 7 Remote control panel 8 Basic operation 9 Screen display 10 TV program setting 11 Image control 14 Audio control 15 Function setting 16 Time setting...18 Signal source setting 19 Child lock setting 20 Teletext function...21 Other setting function 23 External audio and video equipment connection 24 Using your TV as a computer display 25 Specifications 26 Troubleshooting guide 27 1

User Manual
Page 4
... SCRATCH THE LCD SCREEN. ! Normal ? The main power isn't turned on a static images, as this situation occurs, the TV set may recover automatically after you call for service: BREAKDOWN PHENOMENON PICTURE SOUND CHECK FOR Picture with Snow Noise Double or Triple Image Normal Disturb Noise The direction and connection of the antenna Direction, station and connection of contrast, brightness and volume. Normal Volume Adjust colour control Normal or Weak Volume Adjust channel again...
... SCRATCH THE LCD SCREEN. ! Normal ? The main power isn't turned on a static images, as this situation occurs, the TV set may recover automatically after you call for service: BREAKDOWN PHENOMENON PICTURE SOUND CHECK FOR Picture with Snow Noise Double or Triple Image Normal Disturb Noise The direction and connection of the antenna Direction, station and connection of contrast, brightness and volume. Normal Volume Adjust colour control Normal or Weak Volume Adjust channel again...
User Manual
Page 5
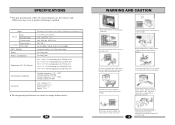
...×75.4(including base) (L40A9A-A1) 106×31.5×80.4(including base) (L42A9A-A1) Working temperature: +5℃~+35℃ Working humidity: 20%-80% Storage temperature: -15℃~+45℃ Storage humidity: 5%-90% User's manual (×1) Remote control (×1) Power cord (×1) Battery (×2) The design and specifications are subject to prevent it may result in direct sunlight. Do not use a damaged power plug or put...
...×75.4(including base) (L40A9A-A1) 106×31.5×80.4(including base) (L42A9A-A1) Working temperature: +5℃~+35℃ Working humidity: 20%-80% Storage temperature: -15℃~+45℃ Storage humidity: 5%-90% User's manual (×1) Remote control (×1) Power cord (×1) Battery (×2) The design and specifications are subject to prevent it may result in direct sunlight. Do not use a damaged power plug or put...
User Manual
Page 6
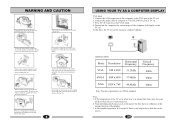
... display. 3. If any plugs or input wires are VESA standard. Nonconforming pixels may cause an electric shock. Please ensure a solid connection with any power lines. Use a soft cotton cloth. Do not use or store any flammable materials near a damp wall. Connect the VGA output port in the computer to the VGA port in order to VGA AUDIO IN port in TV set . 2. Press TV/AV button to the outside antenna. VGA VGA-AUDIO IN RESOLUTION: Mode Resolution...
... display. 3. If any plugs or input wires are VESA standard. Nonconforming pixels may cause an electric shock. Please ensure a solid connection with any power lines. Use a soft cotton cloth. Do not use or store any flammable materials near a damp wall. Connect the VGA output port in the computer to the VGA port in order to VGA AUDIO IN port in TV set . 2. Press TV/AV button to the outside antenna. VGA VGA-AUDIO IN RESOLUTION: Mode Resolution...
User Manual
Page 7
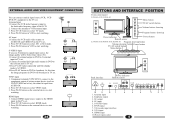
...3. HDMI input 10.Power input socket 6 5 4 5 3 21 ANT. AV output 4. AV input 5. AV input 1.Connect the VCD audio video output to the HDMI input in the TV set . 2. HDMI input 1. Volume button down /up CH - Connect the antenna to select AV1 or AV2 mode. 3. Press TV/AV button to VCR antenna input. 3. Component terminal (Y/PbCb/PrCr) connect to the TV set . CH+ VO L+ CH- EXTERNAL AUDIO AND VIDEO EQUIPMENT CONNECTION You can connect outside signal source VCR, VCD DVD, PC equipment to the component output of the LCD. 2. Antenna Input 1.Connect...
...3. HDMI input 10.Power input socket 6 5 4 5 3 21 ANT. AV output 4. AV input 5. AV input 1.Connect the VCD audio video output to the HDMI input in the TV set . 2. HDMI input 1. Volume button down /up CH - Connect the antenna to select AV1 or AV2 mode. 3. Press TV/AV button to VCR antenna input. 3. Component terminal (Y/PbCb/PrCr) connect to the TV set . CH+ VO L+ CH- EXTERNAL AUDIO AND VIDEO EQUIPMENT CONNECTION You can connect outside signal source VCR, VCD DVD, PC equipment to the component output of the LCD. 2. Antenna Input 1.Connect...
User Manual
Page 8
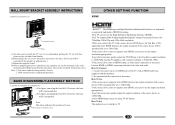
... device (DVD player, Set Top Box or PC) supporting Auto HDMI function, the output resolution of the source device will be cancelled if the product is a trademark or registered trademark of the source device to 1280x720p. -Select HDMI input source by using TV/AV button. BASE DISASSEMBLY/ASSEMBLY METHOD L37A9A-A1/L40A9A-A1/L42A9A-A1 (1)As figure, removing the four M4×20 screws, the base will be disassembled. (2)As figure, mounting the...
... device (DVD player, Set Top Box or PC) supporting Auto HDMI function, the output resolution of the source device will be cancelled if the product is a trademark or registered trademark of the source device to 1280x720p. -Select HDMI input source by using TV/AV button. BASE DISASSEMBLY/ASSEMBLY METHOD L37A9A-A1/L40A9A-A1/L42A9A-A1 (1)As figure, removing the four M4×20 screws, the base will be disassembled. (2)As figure, mounting the...
User Manual
Page 9
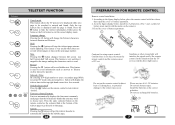
... FOR REMOTE CONTROL Remote control installation 1. Please use rechargeable batteries. 7 Install the batteries as answers to automatically2s0earch for a few seconds. Subcode / Time By entering its 4-digit number to enter a secondary page;While in the figure display below , place the remote control with the marks on the remote). 3.Close the cover of battery apartment. 2. Sunshine or other strong light will reveal hidden text. In this situation turn teletext...
... FOR REMOTE CONTROL Remote control installation 1. Please use rechargeable batteries. 7 Install the batteries as answers to automatically2s0earch for a few seconds. Subcode / Time By entering its 4-digit number to enter a secondary page;While in the figure display below , place the remote control with the marks on the remote). 3.Close the cover of battery apartment. 2. Sunshine or other strong light will reveal hidden text. In this situation turn teletext...
User Manual
Page 10
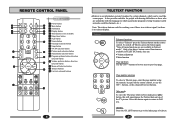
... page number using the numeric key pad on the remote control, or use the CH+/- REMOTE CONTROL PANEL MUTE STILL I/II 2 3 SCAN SLEEP PIP DISPLAY 7 6 1 23 4 56 7 TV/AV 11 89 SWAP 0 P.STD 12 S.STD CH+ 14 VOL- Buttons and Descriptions 1 Power button 1 2 Mute button 8 3 Still button 4 4 Display button 5 5 This function is not available 6 Sleep timer button 7 Scan button 9 8 Nicam button 9 One digit selection button 10 Swap button 11 TV/AV selection button 112 Picture mode selection button 10 13 Sound mode selection button 14 Program up/down button, direction 13 selection...
... page number using the numeric key pad on the remote control, or use the CH+/- REMOTE CONTROL PANEL MUTE STILL I/II 2 3 SCAN SLEEP PIP DISPLAY 7 6 1 23 4 56 7 TV/AV 11 89 SWAP 0 P.STD 12 S.STD CH+ 14 VOL- Buttons and Descriptions 1 Power button 1 2 Mute button 8 3 Still button 4 4 Display button 5 5 This function is not available 6 Sleep timer button 7 Scan button 9 8 Nicam button 9 One digit selection button 10 Swap button 11 TV/AV selection button 112 Picture mode selection button 10 13 Sound mode selection button 14 Program up/down button, direction 13 selection...
User Manual
Page 11
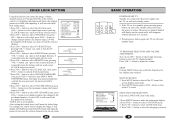
... standby status, pressing power button can control the image, volume, channel and so on. button to make the main menu display. 2.Press VOL+/- button to adjust the volume. Press VOL+/- button to select REMOTE item, pressing VOL+/- button to select signal input source, pressing H.LOCK button can open or lock keypad function, if locked this item, the buttons will not work . 5.Press CH+/- button to select VOLUME-LIM item, press VOL+/- button to select digit, press VOL+/- button to select TV SEARCH item...
... standby status, pressing power button can control the image, volume, channel and so on. button to make the main menu display. 2.Press VOL+/- button to adjust the volume. Press VOL+/- button to select REMOTE item, pressing VOL+/- button to select signal input source, pressing H.LOCK button can open or lock keypad function, if locked this item, the buttons will not work . 5.Press CH+/- button to select VOLUME-LIM item, press VOL+/- button to select digit, press VOL+/- button to select TV SEARCH item...
User Manual
Page 12
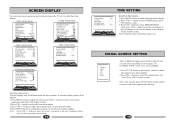
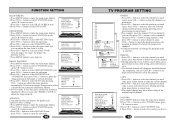
... select according to your convenient operation and in order to set . button to select TIMER menu, press CH- SCREEN DISPLAY For your require: TV, S-VIDEO, YPbPr, VGA, AV1, AV2 or HDMI. 1.Press TV/AV button on the remote control to make the main menu display. 2.Press VOL+/- D/K FINE TUNE MANUAL SEARCH AUTO SEARCH EDIT PROGRAM COUNTRY CHINA PICTURE Audio setting menu AUDIO MODE STANDARD BALANCE 50 AUTO VOLUME ON EQUALIZER SURROUND OFF DIGITAL BASS ON TUNING Timer setting menu SLEEP TIMER CLOCK OFF TIME REMIND TIME...
... select according to your convenient operation and in order to set . button to select TIMER menu, press CH- SCREEN DISPLAY For your require: TV, S-VIDEO, YPbPr, VGA, AV1, AV2 or HDMI. 1.Press TV/AV button on the remote control to make the main menu display. 2.Press VOL+/- D/K FINE TUNE MANUAL SEARCH AUTO SEARCH EDIT PROGRAM COUNTRY CHINA PICTURE Audio setting menu AUDIO MODE STANDARD BALANCE 50 AUTO VOLUME ON EQUALIZER SURROUND OFF DIGITAL BASS ON TUNING Timer setting menu SLEEP TIMER CLOCK OFF TIME REMIND TIME...
User Manual
Page 13
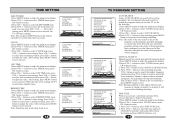
... the program when you don't have searched a program, the searching will be changed. button to select TIMER menu, press CH- Press VOL+/- PAL SOUND SYS. Press CH+/- button to adjust the value. D/K FINE TUNE MANUAL SEARCH AUTO SEARCH EDIT PROGRAM COUNTRY CHINA TUNING FINE TUNE 55.25 AUTO SEARCH Using AUTO SEARCH can 't get a satisfactory picture effect, you obtain the best picture and sound, then release the button and press MENU button to...
... the program when you don't have searched a program, the searching will be changed. button to select TIMER menu, press CH- Press VOL+/- PAL SOUND SYS. Press CH+/- button to adjust the value. D/K FINE TUNE MANUAL SEARCH AUTO SEARCH EDIT PROGRAM COUNTRY CHINA TUNING FINE TUNE 55.25 AUTO SEARCH Using AUTO SEARCH can 't get a satisfactory picture effect, you obtain the best picture and sound, then release the button and press MENU button to...
User Manual
Page 14
... adjust. DLC: opening this function can dynamically optimize the brightness of picture. DNR: use one direct-digit choosing button to select the skipped channel number. 4.If you need . button to select SOUND SYS. item. 4.Press VOL+/- button select TUNING menu, then press CH- button to select TXT LANGUAGE item. 4.Press VOL+/- button to enter rename mode. 2.Press VOL+/- button to select the channel you want to select different item, press VOL+/- But you need operate, press red button...
... adjust. DLC: opening this function can dynamically optimize the brightness of picture. DNR: use one direct-digit choosing button to select the skipped channel number. 4.If you need . button to select SOUND SYS. item. 4.Press VOL+/- button select TUNING menu, then press CH- button to select TXT LANGUAGE item. 4.Press VOL+/- button to enter rename mode. 2.Press VOL+/- button to select the channel you want to select different item, press VOL+/- But you need operate, press red button...
User Manual
Page 15
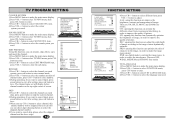
... red button to save and exit. PROGRAM NUMB. 11 COLOUR SYS. D/K FINE TUNE MANUAL SEARCH AUTO SEARCH EDIT PROGRAM COUNTRY CHINA TUNING COPY 1.Press CH+/- button to cancel copy. 3.The copied channel may have same setting as you can adjust the image position automatically. During operating press green button to select the channel you live in horizontal or vertical direction. 5.Press CH+/- button to select the country you need...
... red button to save and exit. PROGRAM NUMB. 11 COLOUR SYS. D/K FINE TUNE MANUAL SEARCH AUTO SEARCH EDIT PROGRAM COUNTRY CHINA TUNING COPY 1.Press CH+/- button to cancel copy. 3.The copied channel may have same setting as you can adjust the image position automatically. During operating press green button to select the channel you live in horizontal or vertical direction. 5.Press CH+/- button to select the country you need...
User Manual
Page 16
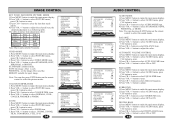
... of picture item adjustment effect Items Contrast Brightness *Hue Saturation Sharpness VOLWeak Dark Green Light Blur VOL+ Strong Bright Red Thick Sharp Note: Hue is as following table. button to select PICTURE menu, press CH- button to select AUDIO menu, press CH- button to enter. 3.Press CH+/- button to select the picture modes. SOFT: the image effect is soft. Note: You can also press S.STD button on the remote control to select VIDEO MODE...
... of picture item adjustment effect Items Contrast Brightness *Hue Saturation Sharpness VOLWeak Dark Green Light Blur VOL+ Strong Bright Red Thick Sharp Note: Hue is as following table. button to select PICTURE menu, press CH- button to select AUDIO menu, press CH- button to enter. 3.Press CH+/- button to select the picture modes. SOFT: the image effect is soft. Note: You can also press S.STD button on the remote control to select VIDEO MODE...

