User Manual
Page 2
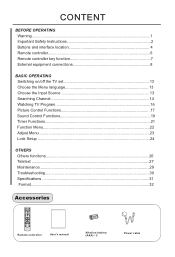
... connections 8 BASIC OPERATING Switching on/off the TV set 13 Choose the Menu language 13 Choose the Input Source 13 Searching Channel 14 Watching TV Program 16 Picture Control Functions 17 Sound Control Functions 19 Timer Functions 21 Function Menu 22 Adjust Menu...23 Lock Setup ...24 OTHERS Others functions 26 Teletext ...27 Maintenance...29 Troubleshooting 30 Specifications 31 Format...32 Accessories HDMI FREEZE P.SIZE INPUT SLEEP H.LOCK DISPLAY +100 DNR RECALL MENU OK VOL CH S.MODE P.MODE MUTE SAP F.LIST CC Remote controller User's manual...
... connections 8 BASIC OPERATING Switching on/off the TV set 13 Choose the Menu language 13 Choose the Input Source 13 Searching Channel 14 Watching TV Program 16 Picture Control Functions 17 Sound Control Functions 19 Timer Functions 21 Function Menu 22 Adjust Menu...23 Lock Setup ...24 OTHERS Others functions 26 Teletext ...27 Maintenance...29 Troubleshooting 30 Specifications 31 Format...32 Accessories HDMI FREEZE P.SIZE INPUT SLEEP H.LOCK DISPLAY +100 DNR RECALL MENU OK VOL CH S.MODE P.MODE MUTE SAP F.LIST CC Remote controller User's manual...

User Manual
Page 3
... your television, read this manual in the User's Manual may vary due to avoid accidental scratches or impacts onto the screen. NO USER SERVICEABLE PARTS INSIDE. To achieve the best performance of which technical specifications must be paid to technical innovations. Warning WARNING RISK OF ELECTRIC SHOCK DO NOT OPEN WARNING TO REDUCE THE RISK OF ELECTRIC SHOCK DO NOT REMOVE...
... your television, read this manual in the User's Manual may vary due to avoid accidental scratches or impacts onto the screen. NO USER SERVICEABLE PARTS INSIDE. To achieve the best performance of which technical specifications must be paid to technical innovations. Warning WARNING RISK OF ELECTRIC SHOCK DO NOT OPEN WARNING TO REDUCE THE RISK OF ELECTRIC SHOCK DO NOT REMOVE...
User Manual
Page 7
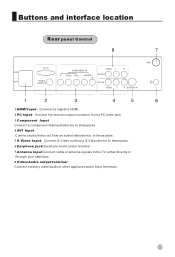
...to the jack Component Input Connect a component video/audiodevice to the TV, either directly or through your cable box. Earphone jack Earphone Audio output terminal Antenna Input Connect cable or antenna signals to these jacks. S-Video Input Connect S-Video outfrom a S-Videodevice to these jacks. Video/Audio output terminal Connect ordinary video/audio or other appliance audio input terminals. 5 HDMI Input Connnect a signal to HDMI PC Input Connect the monitor output connector from an audio/video device to these jacks. Buttons and interface location Rear panel Control HDMI2...
...to the jack Component Input Connect a component video/audiodevice to the TV, either directly or through your cable box. Earphone jack Earphone Audio output terminal Antenna Input Connect cable or antenna signals to these jacks. S-Video Input Connect S-Video outfrom a S-Videodevice to these jacks. Video/Audio output terminal Connect ordinary video/audio or other appliance audio input terminals. 5 HDMI Input Connnect a signal to HDMI PC Input Connect the monitor output connector from an audio/video device to these jacks. Buttons and interface location Rear panel Control HDMI2...

User Manual
Page 9
.../DOWN Selects available channels found with auto program. ZOOM Adjust picture aspect ratio 7 Teletext buttons buttons which have letters on top also can set different sign by turns among the digits and sign on or off . H.LOCK Channel list button CH.LIST TIMER ZOOM EXIT TIMER Time display(only when there is teletext in TV. The remote controller cannot be operated unless the batteries are properly loaded. - When using the remote control, aim it at the remote control sensor on -screen displays...
.../DOWN Selects available channels found with auto program. ZOOM Adjust picture aspect ratio 7 Teletext buttons buttons which have letters on top also can set different sign by turns among the digits and sign on or off . H.LOCK Channel list button CH.LIST TIMER ZOOM EXIT TIMER Time display(only when there is teletext in TV. The remote controller cannot be operated unless the batteries are properly loaded. - When using the remote control, aim it at the remote control sensor on -screen displays...
User Manual
Page 10
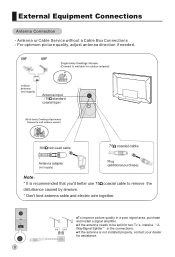
... antenna needs to remove the disturbance caused by airwave. * Don't bind antenna cable and electric wire together. outdoor antenna (not supply) Antenna input 75 standard coaxial type ANT IN 300 twin-lead cable 75 coaxial cable Antenna adapter (not supply) Plug (additional purchase) Note * It is not installed properly, contact your dealer for two Tv`s, install a 2WaySignal Splitter in a poor signal area, purchase and install a signal amplifier. For optimum picture quality, adjust antenna direction...
... antenna needs to remove the disturbance caused by airwave. * Don't bind antenna cable and electric wire together. outdoor antenna (not supply) Antenna input 75 standard coaxial type ANT IN 300 twin-lead cable 75 coaxial cable Antenna adapter (not supply) Plug (additional purchase) Note * It is not installed properly, contact your dealer for two Tv`s, install a 2WaySignal Splitter in a poor signal area, purchase and install a signal amplifier. For optimum picture quality, adjust antenna direction...

User Manual
Page 11
Connect the audio and video cables from VCR to the S-VIDEO input, the picture quality is best for you connect an S-VIDEO output from the VCR's output jacks to connect your TV. The following are several ways to the TV input jacks, as shown in the figure. VCR Connection - compared to connecting a regular VCR to the same channel number. jack colors (Video = yellow, Audio Left = white, and Audio Right = red). Choose the connection which is AV OUT improved; Connection Option 1 Set VCR output switch to channel 3 or 4 and...
Connect the audio and video cables from VCR to the S-VIDEO input, the picture quality is best for you connect an S-VIDEO output from the VCR's output jacks to connect your TV. The following are several ways to the TV input jacks, as shown in the figure. VCR Connection - compared to connecting a regular VCR to the same channel number. jack colors (Video = yellow, Audio Left = white, and Audio Right = red). Choose the connection which is AV OUT improved; Connection Option 1 Set VCR output switch to channel 3 or 4 and...
User Manual
Page 12
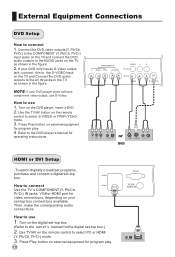
... use 1. Press Play button on your set -top box. (Refer to the DVD player's manual for video connections, depending on external equipment for program play . 4. How to select S-VIDEO or YPbPr/YCbCr mode. 3. How to use S-Video. Connect the DVD video outputs (Y, Pb/Cb, Pr/Cr) to the COMPONENT (Y, Pb/Cb, Pr/Cr) input jacks on the TV and connect the DVD audio outputs to the AUDIO jacks on the remote control to connect HDMI1 Use the TV`s COMPONENT (Y, Pb/Cb, Pr/Cr) IN jacks, VGA or HDMI port for operating instructions...
... use 1. Press Play button on your set -top box. (Refer to the DVD player's manual for video connections, depending on external equipment for program play . 4. How to select S-VIDEO or YPbPr/YCbCr mode. 3. How to use S-Video. Connect the DVD video outputs (Y, Pb/Cb, Pr/Cr) to the COMPONENT (Y, Pb/Cb, Pr/Cr) input jacks on the TV and connect the DVD audio outputs to the AUDIO jacks on the remote control to connect HDMI1 Use the TV`s COMPONENT (Y, Pb/Cb, Pr/Cr) IN jacks, VGA or HDMI port for operating instructions...

User Manual
Page 13
... sound as amplifers or speakers, please turn the TV speakers off. Turn on the display by pressing the POWER HDMI1 button on your TV. HDMI2 How to connect 1. There may become permanently imprinted on the screen. 2 The synchronization input form for Monitor out. Check the image on the TV's remote control. 3. If the refresh rate of Time. Notes: YPbPr, PC, HDMI, S-Video input sources cannot be noise associated with external audio...
... sound as amplifers or speakers, please turn the TV speakers off. Turn on the display by pressing the POWER HDMI1 button on your TV. HDMI2 How to connect 1. There may become permanently imprinted on the screen. 2 The synchronization input form for Monitor out. Check the image on the TV's remote control. 3. If the refresh rate of Time. Notes: YPbPr, PC, HDMI, S-Video input sources cannot be noise associated with external audio...
User Manual
Page 14
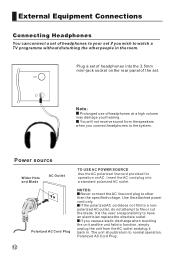
... line cord plug to other people in . Note Prolonged use of headphones at a high volume may damage your set of headphones into the 3.5mm mini-jack socket on AC. The unit should return to have an electrician replace the obsolete outlet. Power source Wider Hole and Blade AC Outlet TO USE AC POWER SOURCE Use the AC polarized line cord provided for operation on the rear panel...
... line cord plug to other people in . Note Prolonged use of headphones at a high volume may damage your set of headphones into the 3.5mm mini-jack socket on AC. The unit should return to have an electrician replace the obsolete outlet. Power source Wider Hole and Blade AC Outlet TO USE AC POWER SOURCE Use the AC polarized line cord provided for operation on the rear panel...

User Manual
Page 15
Switching ON/OFF the TV set 1 first, connect power cord correctly and the power indicator will appears on the screen. Then press CH+/- button to select Language. 3 Select a particular language by status, please press down POWER button on the remote controller. 4 Disconnect the power supply or unplug the television if it is just an example to select the Function Menu. 2 Press CH+/- Language Pic.Size Menu Time Blue Screen TTX Language Reset English Full Screen 10S Off...
Switching ON/OFF the TV set 1 first, connect power cord correctly and the power indicator will appears on the screen. Then press CH+/- button to select Language. 3 Select a particular language by status, please press down POWER button on the remote controller. 4 Disconnect the power supply or unplug the television if it is just an example to select the Function Menu. 2 Press CH+/- Language Pic.Size Menu Time Blue Screen TTX Language Reset English Full Screen 10S Off...
User Manual
Page 16
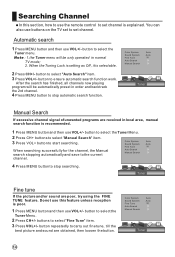
... the best picture and sound are poor, try using the FINE TUNE feature. button repeatedly to stop searching. When the Tuning Lock is setting as Off, it is explained. Color System Sound System Fine Tune Auto Search Manual Search Auto Auto Tuner Manual Search If excessive channel signal of unwanted programs are received in normal TV mode; 2. Searching Channel In this feature unless reception is poor. 1 Press MENU button and then use VOL+/- button...
... the best picture and sound are poor, try using the FINE TUNE feature. button repeatedly to stop searching. When the Tuning Lock is setting as Off, it is explained. Color System Sound System Fine Tune Auto Search Manual Search Auto Auto Tuner Manual Search If excessive channel signal of unwanted programs are received in normal TV mode; 2. Searching Channel In this feature unless reception is poor. 1 Press MENU button and then use VOL+/- button...
User Manual
Page 17
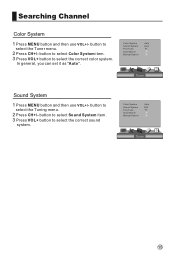
... "Auto". Color System Sound System Fine Tune Auto Search Manual Search Auto Auto Tuner Sound System 1 Press MENU button and then use VOL+/- button to select Sound System item. 3 Press VOL+ button to select the correct color system. Color System Sound System Fine Tune Auto Search Manual Search Auto D/K Tuner 15 button to select Color System item. 3 Press VOL+ button to select the correct sound system. button to select the Tuner menu. 2 Press CH+/- Searching Channel Color System 1 Press MENU button and then use VOL+/- button to select the Tuning menu. 2 Press...
... "Auto". Color System Sound System Fine Tune Auto Search Manual Search Auto Auto Tuner Sound System 1 Press MENU button and then use VOL+/- button to select Sound System item. 3 Press VOL+ button to select the correct color system. Color System Sound System Fine Tune Auto Search Manual Search Auto D/K Tuner 15 button to select Color System item. 3 Press VOL+ button to select the correct sound system. button to select the Tuner menu. 2 Press CH+/- Searching Channel Color System 1 Press MENU button and then use VOL+/- button to select the Tuning menu. 2 Press...
User Manual
Page 19
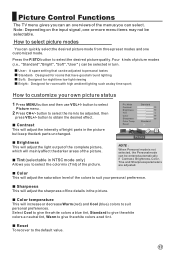
... night time low light viewing Bright Designed for rooms with high ambient lighting such as day time sport; Contrast This will adjust the saturation level of the colors to suit your own picture status 1 Press MENU button and then use VOL+/- Color temperature This will increase or decrease Warm (red) and Cool (blue) colors to select Picture menu . 2 Press CH+/- Pic.Mode Contrast Brightness Tint Color Sharpness Color Temp. Picture Control Functions...
... night time low light viewing Bright Designed for rooms with high ambient lighting such as day time sport; Contrast This will adjust the saturation level of the colors to suit your own picture status 1 Press MENU button and then use VOL+/- Color temperature This will increase or decrease Warm (red) and Cool (blue) colors to select Picture menu . 2 Press CH+/- Pic.Mode Contrast Brightness Tint Color Sharpness Color Temp. Picture Control Functions...

User Manual
Page 20
... portion. If a fixed image is displayed on the screen for a long time, it image may become imprinted on the screen. 4:3 mode Choose 4:3 when you wand to view a picture with an original 4:3 aspect ratio, with gray bars appearing at both the left sides and no alteration at right and left and right sides. Picture Control Functions Aspect Ratio Control Press the ZOOM button the Aspect Ratio menu appearance on the screen and remain...
... portion. If a fixed image is displayed on the screen for a long time, it image may become imprinted on the screen. 4:3 mode Choose 4:3 when you wand to view a picture with an original 4:3 aspect ratio, with gray bars appearing at both the left sides and no alteration at right and left and right sides. Picture Control Functions Aspect Ratio Control Press the ZOOM button the Aspect Ratio menu appearance on the screen and remain...

User Manual
Page 21
..., sound of sound modes (i.e., "Standard","User", "Theater"and"Music") can be selected in the right speaker; Bass This will adjust the output of the right and left speaker. This feature lets you to adjust the volume every time the channel is 0. button to Select AVC, press VOL+/- button to Select Surround, and then press VOL+/- User A spare setting that can quickly select the desired sound mode from four preset modes and one customized mode. Sound Control Functions...
..., sound of sound modes (i.e., "Standard","User", "Theater"and"Music") can be selected in the right speaker; Bass This will adjust the output of the right and left speaker. This feature lets you to adjust the volume every time the channel is 0. button to Select AVC, press VOL+/- button to Select Surround, and then press VOL+/- User A spare setting that can quickly select the desired sound mode from four preset modes and one customized mode. Sound Control Functions...
User Manual
Page 23
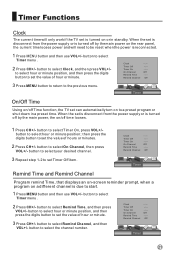
... the digits button to set Timer Off item. Clock Timer Off Timer On On Channel Remind Time Remind Channel --:---:---:-Off --:-Off 3 Repeat step 1-2 to set the value of hour or minute. Timer On/Off Time Using on/off by the main power on the rear panel, the current time looses power and will only work if the TV set is turned on to a preset program or shut down in standby. button to select Remind Time...
... the digits button to set Timer Off item. Clock Timer Off Timer On On Channel Remind Time Remind Channel --:---:---:-Off --:-Off 3 Repeat step 1-2 to set the value of hour or minute. Timer On/Off Time Using on/off by the main power on the rear panel, the current time looses power and will only work if the TV set is turned on to a preset program or shut down in standby. button to select Remind Time...
User Manual
Page 26
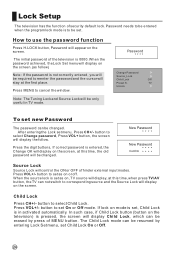
... program lock mode is to select Change password, Press VOL+ button, the screen will display on mode is in TV mode. Child Lock Press CH+/- The Child Lock mode can not switch to corresponding source and the Source Lock will display the follow ) Note: If the password is pressed, the screen will control the ON or OFF of MENU button. Password needs to be changed . The initial password of security default lock. TV Unlock To set new Password The password can be set...
... program lock mode is to select Change password, Press VOL+ button, the screen will display on mode is in TV mode. Child Lock Press CH+/- The Child Lock mode can not switch to corresponding source and the Source Lock will display the follow ) Note: If the password is pressed, the screen will control the ON or OFF of MENU button. Password needs to be changed . The initial password of security default lock. TV Unlock To set new Password The password can be set...

User Manual
Page 30
... TV picture. In NZ the subtitle is used pages that the broadcaster thinks that page. 28 This feature is very useful where there are several teletext pages or data on the remote control as it magnifies the image making the characters easier to change from different screen display size. Press the same coloured button on the same page number. (ZOOM) Pressing the button to...
... TV picture. In NZ the subtitle is used pages that the broadcaster thinks that page. 28 This feature is very useful where there are several teletext pages or data on the remote control as it magnifies the image making the characters easier to change from different screen display size. Press the same coloured button on the same page number. (ZOOM) Pressing the button to...
User Manual
Page 32
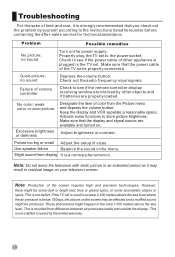
... television screen. Keep the display and VCR separate a reasonable space; Adjust brightness or contrast. Make sure that you check out the problem by the limited warranty. 30 Slight sound from display It is resulted from the Picture menu and depress the volume button; Properly plug the TV set is below 750hpa, the picture on . Check out the audio frequency input signals. These phenomena might happen in residual image on the power supply...
... television screen. Keep the display and VCR separate a reasonable space; Adjust brightness or contrast. Make sure that you check out the problem by the limited warranty. 30 Slight sound from display It is resulted from the Picture menu and depress the volume button; Properly plug the TV set is below 750hpa, the picture on . Check out the audio frequency input signals. These phenomena might happen in residual image on the power supply...
User Manual
Page 33
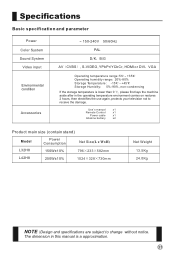
..., protects your television not to change without notice. Use`s manual x1 Remote Control x1 Power cable x1 Alkaline battery x2 Product main size (contain stand) Model Power Consumption Net Size L32H8 150W±10% 796 233 582mm L42H8 250W±10% 1024 328 730mm Net Weight 13.5Kg 24.0Kg NOTE :Design and specifications are subject to receive the damage. Specifications Basic specification and parameter Power Color System Sound System Video input Environmental condition...
..., protects your television not to change without notice. Use`s manual x1 Remote Control x1 Power cable x1 Alkaline battery x2 Product main size (contain stand) Model Power Consumption Net Size L32H8 150W±10% 796 233 582mm L42H8 250W±10% 1024 328 730mm Net Weight 13.5Kg 24.0Kg NOTE :Design and specifications are subject to receive the damage. Specifications Basic specification and parameter Power Color System Sound System Video input Environmental condition...


