
User Manual
Page 3
... the Input Source 13 Searching Channel 14 Watching TV Program 17 Picture Control Functions 18 Sound Control Functions 20 Timer Functions 22 Function Menu 23 Adjust Menu...26 Lock Setup ...27 OTHERS Others functions 29 Maintenance...30 Troubleshooting 31 Specifications 32 Format...33 Accessories DVD SELECT RETURN ENTER ZOOM HELP HDMI TV/AV USB SWAP ZOOM/MOVE PIP PIC.SIZE I/II SCAN DISPLAY CH+ O K VOL- MENU VOL+ SHUTTLE CH- Remote controller User's manual Alkaline battery (AAA) 2 Power cable TIME.SKIP H.LOCK SLEEP PSM Q.VIEW SSM...
... the Input Source 13 Searching Channel 14 Watching TV Program 17 Picture Control Functions 18 Sound Control Functions 20 Timer Functions 22 Function Menu 23 Adjust Menu...26 Lock Setup ...27 OTHERS Others functions 29 Maintenance...30 Troubleshooting 31 Specifications 32 Format...33 Accessories DVD SELECT RETURN ENTER ZOOM HELP HDMI TV/AV USB SWAP ZOOM/MOVE PIP PIC.SIZE I/II SCAN DISPLAY CH+ O K VOL- MENU VOL+ SHUTTLE CH- Remote controller User's manual Alkaline battery (AAA) 2 Power cable TIME.SKIP H.LOCK SLEEP PSM Q.VIEW SSM...

User Manual
Page 4
...OF ELECTRIC SHOCK DO NOT REMOVE COVER (OR BACK). To achieve the best performance of screen displays and figures in the User's Manual may vary due to avoid accidental scratches or impacts onto the screen. REFER TO QUALIFIED SERVICE PERSONNEL. *To avoid electric...Major part or accessory of this manual in an area with heavy moisture. Caution: Please read this manual carefully before using your television receiver in a good place for future reference. NO USER SERVICEABLE PARTS INSIDE. Attention should be replaced. Caution: Unauthorized disassembly of which technical specifications must...
...OF ELECTRIC SHOCK DO NOT REMOVE COVER (OR BACK). To achieve the best performance of screen displays and figures in the User's Manual may vary due to avoid accidental scratches or impacts onto the screen. REFER TO QUALIFIED SERVICE PERSONNEL. *To avoid electric...Major part or accessory of this manual in an area with heavy moisture. Caution: Please read this manual carefully before using your television receiver in a good place for future reference. NO USER SERVICEABLE PARTS INSIDE. Attention should be replaced. Caution: Unauthorized disassembly of which technical specifications must...

User Manual
Page 8
Earphone jack Earphone Audio output terminal Antenna Input Connect cable or antenna signals to these jacks. Video/Audio output terminal Connect ordinary video/audio or other appliance audio input terminals. 5 AV Input Connect audio/video out from a PC to the jack Component Input Connect a component video/audiodevice to these jacks. S-Video Input Connect S-Video outfrom a S-Videodevice to these jacks. Buttons and interface location Rear panel Control L32R1 L40R1 L42R1 8 PC IN HDMI PC AUDIO IN COMPONENT IN VIDEO L Y Pb/Cb Pr/Cr AUDIO AV OUT L R AV IN R S-VIDEO 7 ANT...
Earphone jack Earphone Audio output terminal Antenna Input Connect cable or antenna signals to these jacks. Video/Audio output terminal Connect ordinary video/audio or other appliance audio input terminals. 5 AV Input Connect audio/video out from a PC to the jack Component Input Connect a component video/audiodevice to these jacks. S-Video Input Connect S-Video outfrom a S-Videodevice to these jacks. Buttons and interface location Rear panel Control L32R1 L40R1 L42R1 8 PC IN HDMI PC AUDIO IN COMPONENT IN VIDEO L Y Pb/Cb Pr/Cr AUDIO AV OUT L R AV IN R S-VIDEO 7 ANT...

User Manual
Page 10
... them) Channel list button are properly loaded. - CHANNEL select are not available Digits Program direct option(when edit CH.EDIT program, every press can be used. MENU VOL+ SHUTTLE CH- ZOOM/MOVE (No available) PICTURE SIZE Changes the aspect ratio SCAN Program scan button I /II SCAN DISPLAY CH+ O K VOL- When using the remote control, aim it at the remote control sensor on or off . USB system buttons (No available) USB (No available) USB system ON/OFF. SLEEP Displaying sleep time, adjustable LIGHT Press the light button, white LED will be...
... them) Channel list button are properly loaded. - CHANNEL select are not available Digits Program direct option(when edit CH.EDIT program, every press can be used. MENU VOL+ SHUTTLE CH- ZOOM/MOVE (No available) PICTURE SIZE Changes the aspect ratio SCAN Program scan button I /II SCAN DISPLAY CH+ O K VOL- When using the remote control, aim it at the remote control sensor on or off . USB system buttons (No available) USB (No available) USB system ON/OFF. SLEEP Displaying sleep time, adjustable LIGHT Press the light button, white LED will be...
User Manual
Page 11
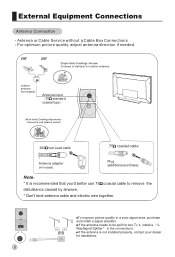
... antenna cable and electric wire together. Antenna or Cable Service without a Cable Box Connections - If the antenna is recommended that you'd better use 75 coaxial cable to be split for assistance. 8 External Equipment Connections - To improve picture quality in the connections. For optimum picture quality, adjust antenna direction if needed. outdoor antenna (not supply) Antenna input 75 standard coaxial type ANT IN 300 twin-lead cable 75 coaxial cable Antenna adapter (not supply) Plug (additional purchase) Note * It is not installed...
... antenna cable and electric wire together. Antenna or Cable Service without a Cable Box Connections - If the antenna is recommended that you'd better use 75 coaxial cable to be split for assistance. 8 External Equipment Connections - To improve picture quality in the connections. For optimum picture quality, adjust antenna direction if needed. outdoor antenna (not supply) Antenna input 75 standard coaxial type ANT IN 300 twin-lead cable 75 coaxial cable Antenna adapter (not supply) Plug (additional purchase) Note * It is not installed...

User Manual
Page 12
...+/- VCR Connection - Select the input source with the TV. External Equipment Connections NOTE: All cables shown are not included with using the TV/AV button on the VCR. (Refer to VCR, match the jack colors (Video = yellow, Audio Left = white, and Audio Right = red). Choose the connection which is improved; When connecting the TV to the VCR owner`s manual.) 3. button to select the source, press the VOL+ button to the same channel number. PC IN HDMI PC AUDIO IN COMPONENT...
...+/- VCR Connection - Select the input source with the TV. External Equipment Connections NOTE: All cables shown are not included with using the TV/AV button on the VCR. (Refer to VCR, match the jack colors (Video = yellow, Audio Left = white, and Audio Right = red). Choose the connection which is improved; When connecting the TV to the VCR owner`s manual.) 3. button to select the source, press the VOL+ button to the same channel number. PC IN HDMI PC AUDIO IN COMPONENT...

User Manual
Page 13
... R S-VIDEO or DVD HDMI or DVI Setup -To watch digitally broadcast programs, purchase and connect a digital set -top box.) 2. Turn on the digital set -top box connections available. External Equipment Connections DVD Setup How to select S-VIDEO or YPbPr/YCbCr mode. 3. PC IN PC AUDIO IN NOTE: If your DVD only has an S-Video output jack, connect this to the S-VIDEO input on the TV, as shown in the figure. Use the S-Video button on the remote control to the DVD player's manual for the digital set -top box. Refer to select VGA or HDMI...
... R S-VIDEO or DVD HDMI or DVI Setup -To watch digitally broadcast programs, purchase and connect a digital set -top box.) 2. Turn on the digital set -top box connections available. External Equipment Connections DVD Setup How to select S-VIDEO or YPbPr/YCbCr mode. 3. PC IN PC AUDIO IN NOTE: If your DVD only has an S-Video output jack, connect this to the S-VIDEO input on the TV, as shown in the figure. Use the S-Video button on the remote control to the DVD player's manual for the digital set -top box. Refer to select VGA or HDMI...

User Manual
Page 14
... monitor. Turn on the TV's remote control. 3. Turn on the display by pressing the POWER button on the PC and the TV. 2. Monitor Out Setup The TV has a special signal output capability which allows you to use 1. the refresh rate to connect 1. Notes: YPbPr, VGA, HDMI, S-Video input sources cannot be noise associated with external audio equipments, such as required. External Equipment Connections PC Setup How to another resolution, change PC IN HDMI PC AUDIO IN COMPONENT IN VIDEO...
... monitor. Turn on the TV's remote control. 3. Turn on the display by pressing the POWER button on the PC and the TV. 2. Monitor Out Setup The TV has a special signal output capability which allows you to use 1. the refresh rate to connect 1. Notes: YPbPr, VGA, HDMI, S-Video input sources cannot be noise associated with external audio equipments, such as required. External Equipment Connections PC Setup How to another resolution, change PC IN HDMI PC AUDIO IN COMPONENT IN VIDEO...
User Manual
Page 16
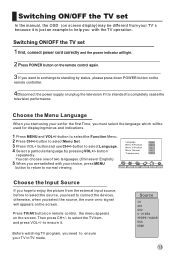
... set 1 first, connect power cord correctly and the power indicator will light. 2 Press POWER button on the remote control again. 3 If you want to exchange to standing by pressing VOL+/- button repeatedly. Switching ON/OFF the TV set In the manual, the OSD (on screen display) may be used for the first Time, you must select the language which will be different from the external input source, before to select the source, you need...
... set 1 first, connect power cord correctly and the power indicator will light. 2 Press POWER button on the remote control again. 3 If you want to exchange to standing by pressing VOL+/- button repeatedly. Switching ON/OFF the TV set In the manual, the OSD (on screen display) may be used for the first Time, you must select the language which will be different from the external input source, before to select the source, you need...

User Manual
Page 17
... mode; After the search has finished, all channels now playing program will be automatically preset in local area, manual search function is selectable. 2 Press use VOL+/- Picture Sound Tuning Function Adjust Timer 3 Press VOL+ button to select the Auto search >>> Tuning menu. 2 Press CH+/- When searching successfully for the channel, the Manual search stopping automatically and save to the current channel. 5 Press MENU button to set channel. Automatic search 1 Press MENU button and then use...
... mode; After the search has finished, all channels now playing program will be automatically preset in local area, manual search function is selectable. 2 Press use VOL+/- Picture Sound Tuning Function Adjust Timer 3 Press VOL+ button to select the Auto search >>> Tuning menu. 2 Press CH+/- When searching successfully for the channel, the Manual search stopping automatically and save to the current channel. 5 Press MENU button to set channel. Automatic search 1 Press MENU button and then use...
User Manual
Page 20
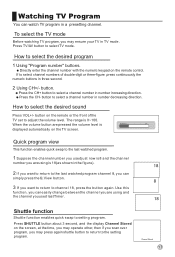
... the button again. button on the remote control. If to select channel numbers of the TV set to adjust the volume level. Shuttle function Shuttle function enables quick swap to select TV mode. Quick program view This function enables quick swap to the last watched program. 1 Suppose the channel number you used just now is 8 and the channel number you may operate other, then if you scan over program, you caneasily change betweenthe channel youare using and the channel youused...
... the button again. button on the remote control. If to select channel numbers of the TV set to adjust the volume level. Shuttle function Shuttle function enables quick swap to select TV mode. Quick program view This function enables quick swap to the last watched program. 1 Suppose the channel number you used just now is 8 and the channel number you may operate other, then if you scan over program, you caneasily change betweenthe channel youare using and the channel youused...
User Manual
Page 21
... the input signal, one customized mode. How to select the desired mode. button to select the item to enter submenu. button to select Palette item, and then press VOL+ button to be selectable. Picture Sound Tuning Function Adjust Timer Adjust Adjust: Press VOL+ button to personal tastes Standard Designed for rooms that can be selected in turn . Personal A spare setting that have good all round lighting Soft Designed for night time low light viewing Bright...
... the input signal, one customized mode. How to select the desired mode. button to select the item to enter submenu. button to select Palette item, and then press VOL+ button to be selectable. Picture Sound Tuning Function Adjust Timer Adjust Adjust: Press VOL+ button to personal tastes Standard Designed for rooms that can be selected in turn . Personal A spare setting that have good all round lighting Soft Designed for night time low light viewing Bright...
User Manual
Page 22
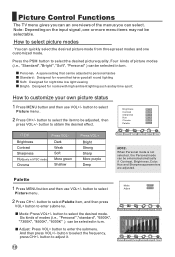
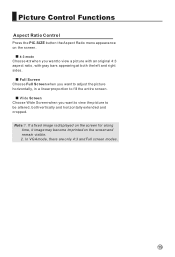
... adjust the picture horizontally, in a linear proportion to fill the entire screen. Note:1. Picture Control Functions Aspect Ratio Control Press the PIC.SIZE button the Aspect Ratio menu appearance on the screen and remain visible. 2. Full Screen Choose Full Screen when you want to be altered, both the left and right sides. In VGA mode, there are only 4:3 and Full screen modes. 19 If a fixed image is displayed on the screen for a long time, it image...
... adjust the picture horizontally, in a linear proportion to fill the entire screen. Note:1. Picture Control Functions Aspect Ratio Control Press the PIC.SIZE button the Aspect Ratio menu appearance on the screen and remain visible. 2. Full Screen Choose Full Screen when you want to be altered, both the left and right sides. In VGA mode, there are only 4:3 and Full screen modes. 19 If a fixed image is displayed on the screen for a long time, it image...
User Manual
Page 25
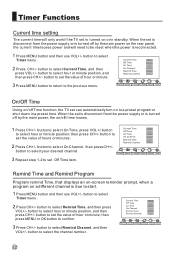
... select the channel number. On Channel 1 Remind Time --:-- Timer Functions Current time setting The current time will need to be reset when the power is reconnected. 1 Press MENU button and then use VOL+/- Picture Sound Tuning Function Adjust Timer 3 Repeat step 1-2 to set Off Time item. When the set is turned on /offt time looses. 1 Press CH+/- Picture Sound Tuning Function Adjust Timer On/Off Time Using on/off by the main power on the rear panel, the current time looses power and will only work...
... select the channel number. On Channel 1 Remind Time --:-- Timer Functions Current time setting The current time will need to be reset when the power is reconnected. 1 Press MENU button and then use VOL+/- Picture Sound Tuning Function Adjust Timer 3 Repeat step 1-2 to set Off Time item. When the set is turned on /offt time looses. 1 Press CH+/- Picture Sound Tuning Function Adjust Timer On/Off Time Using on/off by the main power on the rear panel, the current time looses power and will only work...
User Manual
Page 27
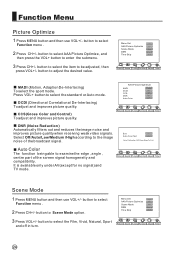
... , angle , centre part of the broadcast signal. Menu Set AAA Picture Optimize Scene Mode DSM Time Skip >>> >>> Film Demo off in turn. Function Menu Picture Optimize 1 Press MENU button and then use VOL+/- CCS(Gross Color and Control) To adjust and improves picture quality. Press MenuTo Exit Auto Color The function being able to enter the submenu. 3 Press CH+/- Picture Sound Tuning Function Adjust Timer Scene Mode 1 Press MENU button and then use VOL+/- button to select the Film, Vivid...
... , angle , centre part of the broadcast signal. Menu Set AAA Picture Optimize Scene Mode DSM Time Skip >>> >>> Film Demo off in turn. Function Menu Picture Optimize 1 Press MENU button and then use VOL+/- CCS(Gross Color and Control) To adjust and improves picture quality. Press MenuTo Exit Auto Color The function being able to enter the submenu. 3 Press CH+/- Picture Sound Tuning Function Adjust Timer Scene Mode 1 Press MENU button and then use VOL+/- button to select the Film, Vivid...
User Manual
Page 30
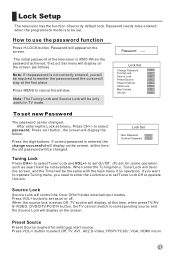
... Volume 100 UnLock >>> To set On, some operation such as Off, TV source will display, at this time, when press TV/AV, S-VIDEO, DVD/DTV,PC/DVI button, the TV can not switch to set On/Off. (To set new Password The password can be not available. Press the digit buttons, If correct password is set Tuner Lock Off or operate UnLock. Press VOL+/-button to reenter the password and the cursor will display on the screen...
... Volume 100 UnLock >>> To set On, some operation such as Off, TV source will display, at this time, when press TV/AV, S-VIDEO, DVD/DTV,PC/DVI button, the TV can not switch to set On/Off. (To set new Password The password can be not available. Press the digit buttons, If correct password is set Tuner Lock Off or operate UnLock. Press VOL+/-button to reenter the password and the cursor will display on the screen...
User Manual
Page 31
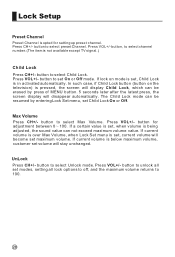
... Max Volume, when Lock Set menu is being adjusted, the sound value can not exceed maximum volume value. UnLock Press CH+/- button to select Max Volume. Press VOL+/- Press VOL+/- Press VOL+/- Press CH+/- button to unlock all lock options to off, and the maximum volume returns to select channel number.(The item is not available except TV signal.) Child Lock Press CH+/- button to select preset Channel. Press VOL+/- button to set modes, setting all set On...
... Max Volume, when Lock Set menu is being adjusted, the sound value can not exceed maximum volume value. UnLock Press CH+/- button to select Max Volume. Press VOL+/- Press VOL+/- Press VOL+/- Press CH+/- button to unlock all lock options to off, and the maximum volume returns to select channel number.(The item is not available except TV signal.) Child Lock Press CH+/- button to select preset Channel. Press VOL+/- button to set modes, setting all set On...
User Manual
Page 32
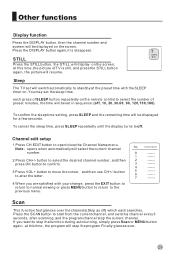
... channel number and system will be displayed for a few seconds. Sleep The TV set will select the current channel number. 2 Press CH+/- Channel edit setup 1 Press CH.EDIT button to open/close the Channel Name menu, Note opens when automatically will switch automatically to the previous menu. Press the SCAN button to move the cursor, and then use CH+/- Scan This function fast glances over . 29 To confirm the sleep time setting, press SLEEP...
... channel number and system will be displayed for a few seconds. Sleep The TV set will select the current channel number. 2 Press CH+/- Channel edit setup 1 Press CH.EDIT button to open/close the Channel Name menu, Note opens when automatically will switch automatically to the previous menu. Press the SCAN button to move the cursor, and then use CH+/- Scan This function fast glances over . 29 To confirm the sleep time setting, press SLEEP...

User Manual
Page 34
... that the power cable of remote controller Check to see if the remote controller display receiving window are blocked by the limited warranty. 31 If the TV set . Make sure that the display and signal source are properly loaded. Note: Do not leave the television with static picture in an extended period as it is used in residual image on . Good picture, no sound Turn on the screen may...
... that the power cable of remote controller Check to see if the remote controller display receiving window are blocked by the limited warranty. 31 If the TV set . Make sure that the display and signal source are properly loaded. Note: Do not leave the television with static picture in an extended period as it is used in residual image on . Good picture, no sound Turn on the screen may...
User Manual
Page 35
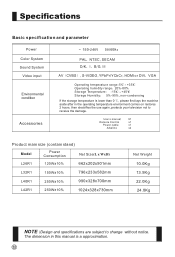
Specifications Basic specification and parameter Power Color System Sound System Video input Environmental condition Accessories ~ 150- 4 /60 PAL NTSC, SECAM D/K I B/G, M AV CVBS , S-VIDEO, YPbPr/YCbCr, HDMI or DVI VGA Operating temperature range: 5 +35 Operating humidity range 20%-80% Storage Temperature: -15 +45 Storage Humidity 5%-90%, non-condensing If the storage temperature is a approximation. 32 Use`s manual X1 Remote Control x1 Power cable x1 Alkaline x2 Product main size (contain stand) Model Power Consumption Net Size L26R1...
Specifications Basic specification and parameter Power Color System Sound System Video input Environmental condition Accessories ~ 150- 4 /60 PAL NTSC, SECAM D/K I B/G, M AV CVBS , S-VIDEO, YPbPr/YCbCr, HDMI or DVI VGA Operating temperature range: 5 +35 Operating humidity range 20%-80% Storage Temperature: -15 +45 Storage Humidity 5%-90%, non-condensing If the storage temperature is a approximation. 32 Use`s manual X1 Remote Control x1 Power cable x1 Alkaline x2 Product main size (contain stand) Model Power Consumption Net Size L26R1...


