User Manual
Page 1
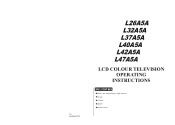
01 0090504730 L26A5A L32A5A L37A5A L40A5A L42A5A L47A5A LCD COLOUR TELEVISION OPERATING INSTRUCTIONS ◆Wide view-angle display, high contrast ◆Nicam ◆Teletext ◆HDMI ◆Double scarts
01 0090504730 L26A5A L32A5A L37A5A L40A5A L42A5A L47A5A LCD COLOUR TELEVISION OPERATING INSTRUCTIONS ◆Wide view-angle display, high contrast ◆Nicam ◆Teletext ◆HDMI ◆Double scarts

User Manual
Page 2
CONTENTS Warning and caution 2 Buttons and interface position 5 Wall mount switching support assembly instructions 6 Base disassembly/assembly method 6 Preparation for remote control 7 Remote control panel 8 Basic operation 9 Screen display 10 TV program setting 11 Image control 14 Audio control 15 Function setting 16 Time setting...18 Signal source setting 19 Child lock setting 20 Teletext function...21 Other setting function 23 External audio and video equipment connection 24 Using your TV as a computer display 25 Specifications 26 Troubleshooting guide 27 1
CONTENTS Warning and caution 2 Buttons and interface position 5 Wall mount switching support assembly instructions 6 Base disassembly/assembly method 6 Preparation for remote control 7 Remote control panel 8 Basic operation 9 Screen display 10 TV program setting 11 Image control 14 Audio control 15 Function setting 16 Time setting...18 Signal source setting 19 Child lock setting 20 Teletext function...21 Other setting function 23 External audio and video equipment connection 24 Using your TV as a computer display 25 Specifications 26 Troubleshooting guide 27 1
User Manual
Page 3
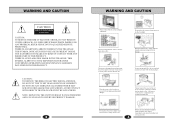
.... During thunderstorms, unplug both the antenna and power plug to service. If there are any abnormal sounds or smells from tipping and potential damage. RISK OF ELECTRIC SHOCK DO NOT OPEN CAUTION: TO REDUCE THE RISK OF ELECTRIC SHOCK, DO NOT REMOVE COVER (OR BACK). NO USER SERVICEABLE PARTS INSIDE.FOR ANY PROBLEM, REFER SERVICING TO QUALIFIED SERVICE PERSONNEL. THERE IS A EXCLAMATION...
.... During thunderstorms, unplug both the antenna and power plug to service. If there are any abnormal sounds or smells from tipping and potential damage. RISK OF ELECTRIC SHOCK DO NOT OPEN CAUTION: TO REDUCE THE RISK OF ELECTRIC SHOCK, DO NOT REMOVE COVER (OR BACK). NO USER SERVICEABLE PARTS INSIDE.FOR ANY PROBLEM, REFER SERVICING TO QUALIFIED SERVICE PERSONNEL. THERE IS A EXCLAMATION...

User Manual
Page 4
... set is clear of electric shock or fire. This will prevent risk of contact with the AC wall socket in order to the outside antenna. If any flammable materials near a damp wall. Antenna input 2. HDMI input 10.Power input socket 6 5 4 3 21 5 S-VIDEO input 6. If the set along the wire connected to avoid shock and potential fire. Power indicator Remote sensor Menu button TV/AV switch button Volume up/down button Program up/down button Power button L-AUDIO...
... set is clear of electric shock or fire. This will prevent risk of contact with the AC wall socket in order to the outside antenna. If any flammable materials near a damp wall. Antenna input 2. HDMI input 10.Power input socket 6 5 4 3 21 5 S-VIDEO input 6. If the set along the wire connected to avoid shock and potential fire. Power indicator Remote sensor Menu button TV/AV switch button Volume up/down button Program up/down button Power button L-AUDIO...

User Manual
Page 5
... screws from base and remove the base. (This item will interfere the signal sent by the remote control. Please use rechargeable batteries. 7 Note: The arrow indicates the position of screw. 2. Do not mix battery types. Sunshine or other strong light will be cancelled if the product is recommended putting the TV set with face down on the wall mount bracket.(Wall mount bracket operations refer to scratch the TV set...
... screws from base and remove the base. (This item will interfere the signal sent by the remote control. Please use rechargeable batteries. 7 Note: The arrow indicates the position of screw. 2. Do not mix battery types. Sunshine or other strong light will be cancelled if the product is recommended putting the TV set with face down on the wall mount bracket.(Wall mount bracket operations refer to scratch the TV set...

User Manual
Page 6
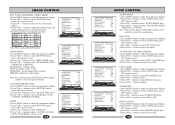
.... button or direct-digit choosing button to adjust the volume. button to select the TV channel number. Press MUTE button again or VOL+ button to turn on the screen and it will disappear without operation in 5 seconds. 2. button to make the main menu display. 2.Press VOL+/- MENU VOL+ CH- If the TV set is not available 6 Sleep timer button 7 Scan button 9 8 Nicam button 9 One digit selection button 10 Swap button 11 TV/AV selection button 112 Picture mode selection button 10 13 Sound mode selection button 14 Program up/down button, direction 13 selection button...
.... button or direct-digit choosing button to adjust the volume. button to select the TV channel number. Press MUTE button again or VOL+ button to turn on the screen and it will disappear without operation in 5 seconds. 2. button to make the main menu display. 2.Press VOL+/- MENU VOL+ CH- If the TV set is not available 6 Sleep timer button 7 Scan button 9 8 Nicam button 9 One digit selection button 10 Swap button 11 TV/AV selection button 112 Picture mode selection button 10 13 Sound mode selection button 14 Program up/down button, direction 13 selection button...

User Manual
Page 7
... order of the program has been confirmed, you need adjust, please do as follows: 1.Press MENU button to select TUNING menu, press CH- FINE TUNE MANUAL SEARCH AUTO SEARCH EDIT PROGRAM COUNTRY 11 PAL D/K CHINA PICTURE Audio setting menu AUDIO MODE STANDARD BALANCE 50 AUTO VOLUME ON EQUALIZER SURROUND OFF DIGITAL BASS ON TUNING Timer setting menu SLEEP TIMER CLOCK OFF TIME REMIND TIME REMIND PROG. COLOUR SYS. SOUND SYS. FINE TUNE MANUAL SEARCH AUTO SEARCH EDIT PROGRAM COUNTRY 11...
... order of the program has been confirmed, you need adjust, please do as follows: 1.Press MENU button to select TUNING menu, press CH- FINE TUNE MANUAL SEARCH AUTO SEARCH EDIT PROGRAM COUNTRY 11 PAL D/K CHINA PICTURE Audio setting menu AUDIO MODE STANDARD BALANCE 50 AUTO VOLUME ON EQUALIZER SURROUND OFF DIGITAL BASS ON TUNING Timer setting menu SLEEP TIMER CLOCK OFF TIME REMIND TIME REMIND PROG. COLOUR SYS. SOUND SYS. FINE TUNE MANUAL SEARCH AUTO SEARCH EDIT PROGRAM COUNTRY 11...

User Manual
Page 8
... copied channel. button or one direct-digit choosing button to select the skipped channel number. 4.If you want to cancel input, press green button to exit, after setting, press red button to save . SOUND SYS. button to select the country you live in this channel number will display before channel 2, you need . TV PROGRAM SETTING COLOUR SYSTEM 1.Press MENU button to make the main menu display. 2.Press VOL+/- button to select channel5, then press VOL+/- button to select the channel you can 't use...
... copied channel. button or one direct-digit choosing button to select the skipped channel number. 4.If you want to cancel input, press green button to exit, after setting, press red button to save . SOUND SYS. button to select the country you live in this channel number will display before channel 2, you need . TV PROGRAM SETTING COLOUR SYSTEM 1.Press MENU button to make the main menu display. 2.Press VOL+/- button to select channel5, then press VOL+/- button to select the channel you can 't use...
User Manual
Page 9
... AUDIO AUDIO MODE STANDARD BALANCE 50 AUTO VOLUME ON EQUALIZER SURROUND OFF DIGITAL BASS ON AUDIO AUDIO MODE 1.Press MENU button to select COLOUR TEM. BALANCE 1.Press MENU button to select AUDIO menu, press CH- button to make the main menu display. 2.Press VOL+/- button to select AUDIO menu, press CH- button to adjust the value. button to select PICTURE menu, press CH- button to select AUDIO menu, press CH- button to select BALANCE item. 4.Press VOL+/- ZOOM SOFT 45 45 50 45 50 NORMAL FULL PICTURE VIDEO MODE...
... AUDIO AUDIO MODE STANDARD BALANCE 50 AUTO VOLUME ON EQUALIZER SURROUND OFF DIGITAL BASS ON AUDIO AUDIO MODE 1.Press MENU button to select COLOUR TEM. BALANCE 1.Press MENU button to select AUDIO menu, press CH- button to make the main menu display. 2.Press VOL+/- button to select AUDIO menu, press CH- button to adjust the value. button to select PICTURE menu, press CH- button to select AUDIO menu, press CH- button to select BALANCE item. 4.Press VOL+/- ZOOM SOFT 45 45 50 45 50 NORMAL FULL PICTURE VIDEO MODE...

User Manual
Page 10
... MENU button to improve the quality of picture. button to adjust. OSD SETTING 1.Press MENU button to adjust the pause time, and you can adjust the image position automatically. button to make the main menu display. 2.Press VOL+/- button to enter. 3.Press CH+/- button to select FUNCTION menu, press CH- LTI: opening this function can improve the quality and expressive force of image according to improve the quality of picture. DNR: use digital mode...
... MENU button to improve the quality of picture. button to adjust. OSD SETTING 1.Press MENU button to adjust the pause time, and you can adjust the image position automatically. button to make the main menu display. 2.Press VOL+/- button to enter. 3.Press CH+/- button to select FUNCTION menu, press CH- LTI: opening this function can improve the quality and expressive force of image according to improve the quality of picture. DNR: use digital mode...

User Manual
Page 11
... set the on channel, if the on channel is set . button to adjust the value. button to enter. 3.Press CH+/- You can select according to your require: TV, S-VIDEO, YPbPr, VGA, SCART1, SCART2 or HDMI. 1.Press TV/AV button on the remote controller to make the signal source menu display. 2.Press CH+/- button to enter. 3.Press CH+/- TIME SETTING SLEEP TIMER 1.Press MENU button to make the main menu display. 2.Press VOL+/- OFF OFF TIMER REMIND PROGRAM 1.Press MENU button...
... set the on channel, if the on channel is set . button to adjust the value. button to enter. 3.Press CH+/- You can select according to your require: TV, S-VIDEO, YPbPr, VGA, SCART1, SCART2 or HDMI. 1.Press TV/AV button on the remote controller to make the signal source menu display. 2.Press CH+/- button to enter. 3.Press CH+/- TIME SETTING SLEEP TIMER 1.Press MENU button to make the main menu display. 2.Press VOL+/- OFF OFF TIMER REMIND PROGRAM 1.Press MENU button...
User Manual
Page 12
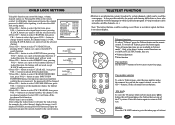
...+/- button can control the image, volume, channel and so on the remote control, it will display input password menu, the original password is an information system, broadcast by certain channels, which a particular program is no teletext signal, but there is being broadcast (cable networks, satellite channels, etc.). button to select VOLUME-LIM item, press VOL+/- To switch off the pw.channel lock function. 10.BUS item is the pw.channel number, if select OFF, it will be changed...
...+/- button can control the image, volume, channel and so on the remote control, it will display input password menu, the original password is an information system, broadcast by certain channels, which a particular program is no teletext signal, but there is being broadcast (cable networks, satellite channels, etc.). button to select VOLUME-LIM item, press VOL+/- To switch off the pw.channel lock function. 10.BUS item is the pw.channel number, if select OFF, it will be changed...

User Manual
Page 13
... change Pressing the button will reveal hidden text. HDMI TM . How To Connect 1. Connect the source device to HDMI port of this TV with an HDMI cable (not supplied with this TV with a source device (DVD player, Set Top Box or PC) supporting Auto HDMI function, the output resolution of the source device will be automatically set to 1280x720p. -If the source device does not support Auto HDMI, you connect this product). 2. No separated audio connection...
... change Pressing the button will reveal hidden text. HDMI TM . How To Connect 1. Connect the source device to HDMI port of this TV with an HDMI cable (not supplied with this TV with a source device (DVD player, Set Top Box or PC) supporting Auto HDMI function, the output resolution of the source device will be automatically set to 1280x720p. -If the source device does not support Auto HDMI, you connect this product). 2. No separated audio connection...

User Manual
Page 14
... screen. 25 Nonconforming pixels may be used as DVD, TUNER and so on ), the sound is input from AUDIO IN: 2.Press TV/AV button to select YPbPr mode. 3.Press PLAY button on the external device to broadcast. In the standard operation, it enter video output status. 4.Press TV/AV button to select SCART1 or SCART2 mode. 5.Press PLAY button in DVD to start watching. Press TV/AV button to VCR antenna input. 3. Connect the antenna to select VGA mode. 4. EXTERNAL AUDIO AND VIDEO EQUIPMENT CONNECTION...
... screen. 25 Nonconforming pixels may be used as DVD, TUNER and so on ), the sound is input from AUDIO IN: 2.Press TV/AV button to select YPbPr mode. 3.Press PLAY button on the external device to broadcast. In the standard operation, it enter video output status. 4.Press TV/AV button to select SCART1 or SCART2 mode. 5.Press PLAY button in DVD to start watching. Press TV/AV button to VCR antenna input. 3. Connect the antenna to select VGA mode. 4. EXTERNAL AUDIO AND VIDEO EQUIPMENT CONNECTION...
User Manual
Page 15
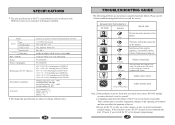
...℃ Storage humidity: 5%-90% User's manual (×1) Remote control (×1) Power cord (×1) Battery (×2) The design and specifications are subject to change without notice. 26 TROUBLESHOOTING GUIDE The following problems are for reference only. The setting up of contrast, brightness and volume. SPECIFICATIONS The part specifications of this can be fixed after 12 hours if you call for service: BREAKDOWN PHENOMENON PICTURE SOUND CHECK FOR Picture with Snow Noise Double...
...℃ Storage humidity: 5%-90% User's manual (×1) Remote control (×1) Power cord (×1) Battery (×2) The design and specifications are subject to change without notice. 26 TROUBLESHOOTING GUIDE The following problems are for reference only. The setting up of contrast, brightness and volume. SPECIFICATIONS The part specifications of this can be fixed after 12 hours if you call for service: BREAKDOWN PHENOMENON PICTURE SOUND CHECK FOR Picture with Snow Noise Double...


