User Manual
Page 2
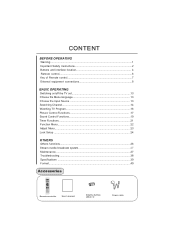
... Remote control 7 External equipment connections 8 BASIC OPERATING Switching on/off the TV set 13 Choose the Menu language 13 Choose the Input Source 13 Searching Channel 14 Watching TV Program 16 Picture Control Functions 17 Sound Control Functions 19 Timer Functions 21 Function Menu 22 Adjust Menu...23 Lock Setup ...24 OTHERS Others functions 26 Stream media broadcast system 27 Maintenance...37 Troubleshooting 38 Specifications 39 Format...40 Accessories ENTER HDMI INPUT RETURN HELP USB SAP DISPLAY DNR MENU OK CC SLEEP...
... Remote control 7 External equipment connections 8 BASIC OPERATING Switching on/off the TV set 13 Choose the Menu language 13 Choose the Input Source 13 Searching Channel 14 Watching TV Program 16 Picture Control Functions 17 Sound Control Functions 19 Timer Functions 21 Function Menu 22 Adjust Menu...23 Lock Setup ...24 OTHERS Others functions 26 Stream media broadcast system 27 Maintenance...37 Troubleshooting 38 Specifications 39 Format...40 Accessories ENTER HDMI INPUT RETURN HELP USB SAP DISPLAY DNR MENU OK CC SLEEP...
User Manual
Page 3
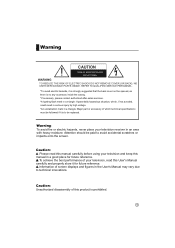
... television, read this manual carefully before using your television and keep this User's Manual carefully and properly store it for future reference. NO USER SERVICEABLE PARTS INSIDE. Information of which , if not avoided, could result in serious injury by high voltage. *An exclamation mark in a triangle: Major part or accessory of screen displays and figures in a triangle: A potentially hazardous situation, which technical specifications...
... television, read this manual carefully before using your television and keep this User's Manual carefully and properly store it for future reference. NO USER SERVICEABLE PARTS INSIDE. Information of which , if not avoided, could result in serious injury by high voltage. *An exclamation mark in a triangle: Major part or accessory of screen displays and figures in a triangle: A potentially hazardous situation, which technical specifications...

User Manual
Page 7
...jack Earphone Audio output terminal Antenna Input Connect cable or antenna signals to these jacks. Buttons and interface location Rear panel Control HDMI2 HDMI1 PC IN PC/DVI AUDIO IN COMPONENT IN VIDEO L Y Pb/Cb Pr/Cr AUDIO L R AV OUT AV1 IN VIDEO L R R S-VEDIO IN ANT. COMPONENT IN ANT IN HDMI Input Connnect a signal to HDMI PC Input Connect the monitor output connector from an audio/video device to these jacks. AV1 Input Connect audio/video out from a PC to the jack Component Input Connect a component video/audiodevice to these jacks. Video/Audio output terminal Connect...
...jack Earphone Audio output terminal Antenna Input Connect cable or antenna signals to these jacks. Buttons and interface location Rear panel Control HDMI2 HDMI1 PC IN PC/DVI AUDIO IN COMPONENT IN VIDEO L Y Pb/Cb Pr/Cr AUDIO L R AV OUT AV1 IN VIDEO L R R S-VEDIO IN ANT. COMPONENT IN ANT IN HDMI Input Connnect a signal to HDMI PC Input Connect the monitor output connector from an audio/video device to these jacks. AV1 Input Connect audio/video out from a PC to the jack Component Input Connect a component video/audiodevice to these jacks. Video/Audio output terminal Connect...
User Manual
Page 9
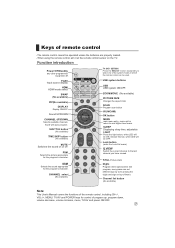
... (No available) PICTURE SIZE Changes the aspect ratio SCAN Program scan button I /II DISPLAY SCAN OK MENU SHUTTLE TIME.SKIP H.LOCK SLEEP PSM SSM -/-- When using the remote control, aim it at the remote control sensor on top of them) Channel list button (No available) Note: This User's Manual covers the functions of the remote control, including CH+/-, VOL-/+, MENU, TV/AV and POWER keys for control of remote control - USB system buttons USB USB system ON/OFF. STILL Picture static Digits Program direct option(when edit program, every press can...
... (No available) PICTURE SIZE Changes the aspect ratio SCAN Program scan button I /II DISPLAY SCAN OK MENU SHUTTLE TIME.SKIP H.LOCK SLEEP PSM SSM -/-- When using the remote control, aim it at the remote control sensor on top of them) Channel list button (No available) Note: This User's Manual covers the functions of the remote control, including CH+/-, VOL-/+, MENU, TV/AV and POWER keys for control of remote control - USB system buttons USB USB system ON/OFF. STILL Picture static Digits Program direct option(when edit program, every press can...
User Manual
Page 10
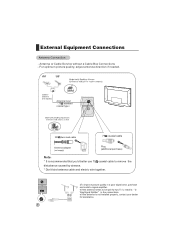
..., contact your dealer for two Tv`s, install a 2WaySignal Splitter in a poor signal area, purchase and install a signal amplifier. If the antenna needs to remove the disturbance caused by airwave. * Don't bind antenna cable and electric wire together. To improve picture quality in the connections. If the antenna is recommended that you'd better use 75 coaxial cable to be split for assistance. 8 External Equipment Connections - Antenna or Cable Service without a Cable Box Connections -
..., contact your dealer for two Tv`s, install a 2WaySignal Splitter in a poor signal area, purchase and install a signal amplifier. If the antenna needs to remove the disturbance caused by airwave. * Don't bind antenna cable and electric wire together. To improve picture quality in the connections. If the antenna is recommended that you'd better use 75 coaxial cable to be split for assistance. 8 External Equipment Connections - Antenna or Cable Service without a Cable Box Connections -
User Manual
Page 11
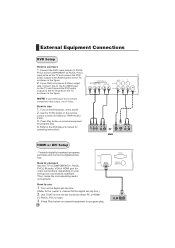
... channel number. To avoid picture noise (interference), leave an adequate distance between the VCR and TV. AV1 IN VIDEO L R S-VEDIO IN 2. Insert a video tape into the VCR and press PLAY on the remote control, and then press CH+/- button to select the source, press the VOL+ button to the TV input jacks, as shown in the figure. Connection Option 2 1. Connect the audio and video cables from VCR to the VCR owner`s manual.) 3. Choose the connection...
... channel number. To avoid picture noise (interference), leave an adequate distance between the VCR and TV. AV1 IN VIDEO L R S-VEDIO IN 2. Insert a video tape into the VCR and press PLAY on the remote control, and then press CH+/- button to select the source, press the VOL+ button to the TV input jacks, as shown in the figure. Connection Option 2 1. Connect the audio and video cables from VCR to the VCR owner`s manual.) 3. Choose the connection...
User Manual
Page 12
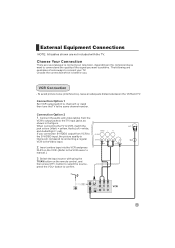
... your DVD only has an S-Video output jack, connect this to the S-VIDEO input on the TV and Connect the DVD audio outputs to the owner`s manual for the digital set -top HDMI2 box. Use the TV/AV button on the remote control to use S-Video. How to connect 1. Press Play button on external equipment for program play . 4. External Equipment Connections DVD Setup How to connect HDMI1 Use the TV`s COMPONENT (Y, Pb/Cb, Pr/Cr) IN jacks, VGA or HDMI port for video connections, depending on your set-top box connections available. Connect the DVD video outputs (Y, Pb...
... your DVD only has an S-Video output jack, connect this to the S-VIDEO input on the TV and Connect the DVD audio outputs to the owner`s manual for the digital set -top HDMI2 box. Use the TV/AV button on the remote control to use S-Video. How to connect 1. Press Play button on external equipment for program play . 4. External Equipment Connections DVD Setup How to connect HDMI1 Use the TV`s COMPONENT (Y, Pb/Cb, Pr/Cr) IN jacks, VGA or HDMI port for video connections, depending on your set-top box connections available. Connect the DVD video outputs (Y, Pb...
User Manual
Page 13
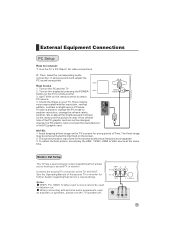
... separate. 3 To obtain the best picture, do not play the USB, YPbPr, HDMI or VGA source at the same time. See the Operating Manual of the second TV or monitor for video connections. 2. Then, make the corresponding audio connection. If using a sound card, adjust the PC sound as amplifers or speakers, please turn the TV speakers off. Use the TV`s PC IN port for further details regarding that device`s input settings. Use TV/AV on the...
... separate. 3 To obtain the best picture, do not play the USB, YPbPr, HDMI or VGA source at the same time. See the Operating Manual of the second TV or monitor for video connections. 2. Then, make the corresponding audio connection. If using a sound card, adjust the PC sound as amplifers or speakers, please turn the TV speakers off. Use the TV`s PC IN port for further details regarding that device`s input settings. Use TV/AV on the...
User Manual
Page 15
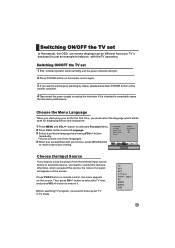
... no signal will appears on screen display) may be different from your set 1 first, connect power cord correctly and the power indicator will be used for the first Time, you must select the language which will light. 2 Press POWER button on the remote control again. 3 If you with your TV in TV mode. 13 Press TV/AV button on remote control, the menu appears on the remote controller. 4 Disconnect the power supply or unplug the television...
... no signal will appears on screen display) may be different from your set 1 first, connect power cord correctly and the power indicator will be used for the first Time, you must select the language which will light. 2 Press POWER button on the remote control again. 3 If you with your TV in TV mode. 13 Press TV/AV button on remote control, the menu appears on the remote controller. 4 Disconnect the power supply or unplug the television...
User Manual
Page 17
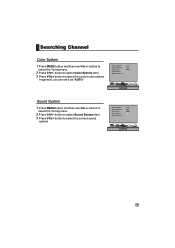
button to select the correct color system. Color System Sound System Fine Tune Auto Search Manual Search Auto D/K Tuner 15 Color System Sound System Fine Tune Auto Search Manual Search Auto Auto Tuner Sound System 1 Press MENU button and then use VOL+/- button to select Color System item. 3 Press VOL+ button to select the Tuning menu. 2 Press CH+/- button to select Sound System item. 3 Press VOL+ button to select the Tuning menu. 2 Press CH+/- Searching Channel Color System 1 Press MENU button and then use VOL+/- button to select the correct...
button to select the correct color system. Color System Sound System Fine Tune Auto Search Manual Search Auto D/K Tuner 15 Color System Sound System Fine Tune Auto Search Manual Search Auto Auto Tuner Sound System 1 Press MENU button and then use VOL+/- button to select Color System item. 3 Press VOL+ button to select the Tuning menu. 2 Press CH+/- button to select Sound System item. 3 Press VOL+ button to select the Tuning menu. 2 Press CH+/- Searching Channel Color System 1 Press MENU button and then use VOL+/- button to select the correct...
User Manual
Page 19
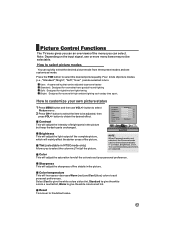
... selected in NTSC mode only) Allows you can be entered automatically if Contrast, Brightness, Color, Tine and Sharpness parameters are adjusted. Brightness This will adjust the light output of the complete picture, which will mainly affect the darker areas of the colors to suit your own picture status 1 Press MENU button and then use VOL+/- Tint (selectable in turn. Color This will increase or decrease Warm (red...
... selected in NTSC mode only) Allows you can be entered automatically if Contrast, Brightness, Color, Tine and Sharpness parameters are adjusted. Brightness This will adjust the light output of the complete picture, which will mainly affect the darker areas of the colors to suit your own picture status 1 Press MENU button and then use VOL+/- Tint (selectable in turn. Color This will increase or decrease Warm (red...

User Manual
Page 21
... Reset toward -50, sound of sound modes (i.e., "Standard", "Theater","Music"and"User") can quickly select the desired sound mode from four preset modes and one customized mode. button to obtain the desired effect. button to increase the audio output in turn. button to enhance the movie experience; User A spare setting that can be adjusted to personal tastes Standard Normal sound with moderate bass and treble setting Music Designed the sound to best suit music programs...
... Reset toward -50, sound of sound modes (i.e., "Standard", "Theater","Music"and"User") can quickly select the desired sound mode from four preset modes and one customized mode. button to obtain the desired effect. button to increase the audio output in turn. button to enhance the movie experience; User A spare setting that can be adjusted to personal tastes Standard Normal sound with moderate bass and treble setting Music Designed the sound to best suit music programs...
User Manual
Page 23
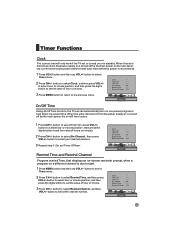
... turned on or in a preset time. button to select Timer On, press VOL+/- Timer On --:-- Timer Functions Clock The current time will need to be reset when the power is reconnected. 1 Press MENU button and then use VOL+/- button to select Timer menu . 2 Press CH+/- button to select hour or minute position; Remind Channel Off 3 Press MENU button to return to select Timer menu . 2 Press CH+/- Timer On/Off Time Using on/off by the main power, the on the rear panel...
... turned on or in a preset time. button to select Timer On, press VOL+/- Timer On --:-- Timer Functions Clock The current time will need to be reset when the power is reconnected. 1 Press MENU button and then use VOL+/- button to select Timer menu . 2 Press CH+/- button to select hour or minute position; Remind Channel Off 3 Press MENU button to return to select Timer menu . 2 Press CH+/- Timer On/Off Time Using on/off by the main power, the on the rear panel...
User Manual
Page 26
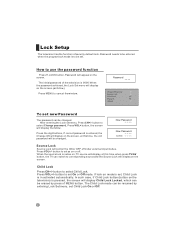
... changed . TV Unlock To set . New Password * * * * New Password * * * * Confirm * * * * Source Lock Source Lock will display on the television) is 0000. The initial password of hinder external input modes. button to cancel the window. Child Lock Press CH+/- Press VOL+/- In such case, if Child Lock button (button on the screen.(as on the screen. Password * * * * Change Password Source Lock Child Lock off . When the source lock is entered, the Change OK will display on the screen, at this time...
... changed . TV Unlock To set . New Password * * * * New Password * * * * Confirm * * * * Source Lock Source Lock will display on the television) is 0000. The initial password of hinder external input modes. button to cancel the window. Child Lock Press CH+/- Press VOL+/- In such case, if Child Lock button (button on the screen.(as on the screen. Password * * * * Change Password Source Lock Child Lock off . When the source lock is entered, the Change OK will display on the screen, at this time...
User Manual
Page 29
... and digital camera. 2.Equipment supporting PTP agreement includes some AVI and MPG files of this kind of USB mobile devices are used by computers, and cannot be connected to particularity of file code and file mode, It is of AVI and MPG. Those files with suffix of picture operation response might be affected. 3.Before starting operation, verify USB storage device is possible that the external devices...
... and digital camera. 2.Equipment supporting PTP agreement includes some AVI and MPG files of this kind of USB mobile devices are used by computers, and cannot be connected to particularity of file code and file mode, It is of AVI and MPG. Those files with suffix of picture operation response might be affected. 3.Before starting operation, verify USB storage device is possible that the external devices...
User Manual
Page 31
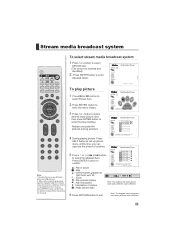
... this time, you can operate the picture of picture Mode pictures scan PICTURE Note: The analysis rate basis picture itself clarity different and is different. 6 Press RETURN button to confirm. Note: 1.the play the pictures among selected. Stream media broadcast system ENTER HDMI TV/AV RETURN HELP USB PIP I/II DISPLAY SCAN OK MENU SHUTTLE TIME.SKIP H.LOCK SLEEP PSM SSM -/-- Noteyou may play file menu are different with your USB devices. 2. May carry on the programming playing...
... this time, you can operate the picture of picture Mode pictures scan PICTURE Note: The analysis rate basis picture itself clarity different and is different. 6 Press RETURN button to confirm. Note: 1.the play the pictures among selected. Stream media broadcast system ENTER HDMI TV/AV RETURN HELP USB PIP I/II DISPLAY SCAN OK MENU SHUTTLE TIME.SKIP H.LOCK SLEEP PSM SSM -/-- Noteyou may play file menu are different with your USB devices. 2. May carry on the programming playing...
User Manual
Page 37
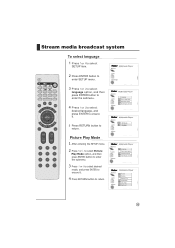
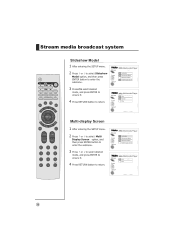
... . 5 Press RETURN button to return. DEVICE COPY SETUP Multimedia Player Language Picture play Mode Slideshow Model Multi Display Screen DEVICE COPY Multimedia Player Chinese English SETUP DEVICE COPY SETUP Multimedia Player Language Picture play Mode Slideshow Model Multi Display Screen DEVICE COPY SETUP Multimedia Player Normal Random Bottom_Top Top-Bottom Left_Right Right_Left 35 DEVICE Multimedia Player COPY SETUP ENTER HDMI TV/AV RETURN HELP USB PIP I/II DISPLAY SCAN OK MENU SHUTTLE TIME.SKIP H.LOCK SLEEP PSM SSM -/-- 3 Press or to select language option...
... . 5 Press RETURN button to return. DEVICE COPY SETUP Multimedia Player Language Picture play Mode Slideshow Model Multi Display Screen DEVICE COPY Multimedia Player Chinese English SETUP DEVICE COPY SETUP Multimedia Player Language Picture play Mode Slideshow Model Multi Display Screen DEVICE COPY SETUP Multimedia Player Normal Random Bottom_Top Top-Bottom Left_Right Right_Left 35 DEVICE Multimedia Player COPY SETUP ENTER HDMI TV/AV RETURN HELP USB PIP I/II DISPLAY SCAN OK MENU SHUTTLE TIME.SKIP H.LOCK SLEEP PSM SSM -/-- 3 Press or to select language option...
User Manual
Page 38
... broadcast system ENTER HDMI TV/AV RETURN HELP USB PIP I/II DISPLAY SCAN OK MENU SHUTTLE TIME.SKIP H.LOCK SLEEP PSM SSM -/-- DEVICE COPY SETUP AAA Multimedia Player Language Picture play Mode Slideshow Model Multi Display Screen DEVICE COPY AAA Multimedia Player 4X3 8X6 SETUP 36 DEVICE COPY AAA Multimedia Player Fast Normal Slow SETUP Multi-display Screen 1 After entering the SETUP menu. 2 Press or to select Multi Display Screen option, and then press ENTER button to enter the...
... broadcast system ENTER HDMI TV/AV RETURN HELP USB PIP I/II DISPLAY SCAN OK MENU SHUTTLE TIME.SKIP H.LOCK SLEEP PSM SSM -/-- DEVICE COPY SETUP AAA Multimedia Player Language Picture play Mode Slideshow Model Multi Display Screen DEVICE COPY AAA Multimedia Player 4X3 8X6 SETUP 36 DEVICE COPY AAA Multimedia Player Fast Normal Slow SETUP Multi-display Screen 1 After entering the SETUP menu. 2 Press or to select Multi Display Screen option, and then press ENTER button to enter the...
User Manual
Page 40
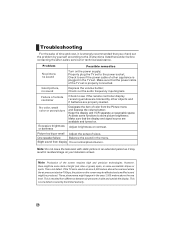
... and turned on your television screen. One speaker failure Balance the sound in residual image on . Check out the audio frequency input signals. Slight sound from difference between air pressures inside and outside the display. This is resulted from display It is properly connected. Make sure that the power cable of color from the Picture menu and depress the volume button; Problem Possible remedies No picture, no sound Depress the volume button; Properly plug the TV set...
... and turned on your television screen. One speaker failure Balance the sound in residual image on . Check out the audio frequency input signals. Slight sound from difference between air pressures inside and outside the display. This is resulted from display It is properly connected. Make sure that the power cable of color from the Picture menu and depress the volume button; Problem Possible remedies No picture, no sound Depress the volume button; Properly plug the TV set...
User Manual
Page 41
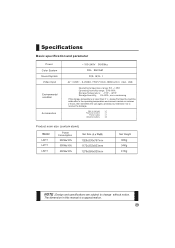
... The dimension in the operating temperature environment carries on restores 2 hours, then electrifies the use again, protects your television not to change without notice. Use`s manual x1 Remote Control x1 Power cable x1 Alkaline battery x2 Product main size (contain stand) Model L42T1 L47T1 L52T1 Power Consumption 250W±10% 300W±10% 350W±10% Net Size 1028x330x767mm 1172x352x833mm 1279x366x935mm Net Weight 30Kg 34Kg 41Kg NOTE :Design and specifications...
... The dimension in the operating temperature environment carries on restores 2 hours, then electrifies the use again, protects your television not to change without notice. Use`s manual x1 Remote Control x1 Power cable x1 Alkaline battery x2 Product main size (contain stand) Model L42T1 L47T1 L52T1 Power Consumption 250W±10% 300W±10% 350W±10% Net Size 1028x330x767mm 1172x352x833mm 1279x366x935mm Net Weight 30Kg 34Kg 41Kg NOTE :Design and specifications...


