
User Manual
Page 1
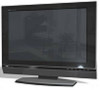
TFT-LCD TELEVISION OWNER`S MANUAL MODELS: L52A18-AK L52A18-A L52A18 L47A18-AK L42A18-AK L42A18-A L42A18 L37A18-AK L32A18-AK Please READ this manual carefully before operating your TV, and retain it for future reference.
TFT-LCD TELEVISION OWNER`S MANUAL MODELS: L52A18-AK L52A18-A L52A18 L47A18-AK L42A18-AK L42A18-A L42A18 L37A18-AK L32A18-AK Please READ this manual carefully before operating your TV, and retain it for future reference.
User Manual
Page 3
thanks for many years to come. You`ve selected one of the most comprehensive warranties and outstanding service networks in the industry. As a member of the best-built, best-backed products available today. We`ll do everything in our power to keep you `re entitled to the "family"! Dear Haier product owner: Thank you for your purchase, and welcome to protection by one of the Haier "family," you happy with your purchase for investing in a Haier product. Congratulations on your confidence in Haier.
thanks for many years to come. You`ve selected one of the most comprehensive warranties and outstanding service networks in the industry. As a member of the best-built, best-backed products available today. We`ll do everything in our power to keep you `re entitled to the "family"! Dear Haier product owner: Thank you for your purchase, and welcome to protection by one of the Haier "family," you happy with your purchase for investing in a Haier product. Congratulations on your confidence in Haier.
User Manual
Page 4
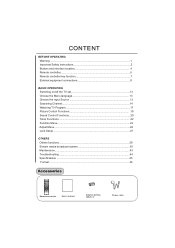
CONTENT BEFORE OPERATING Warning...1 Important Safety Instructions 2 Buttons and interface location 4 Remote controller 6 Remote controller key function 7 External equipment connections 8 BASIC OPERATING Switching on/off the TV set 13 Choose the Menu language 13 Choose the Input Source 13 Searching Channel 14 Watching TV Program 17 Picture Control Functions 18 Sound Control Functions 20 Timer Functions 22 Function Menu 23 Adjust Menu...26 Lock Setup ...27 OTHERS Others functions 29 Stream media broadcast system 30 Maintenance...43 Troubleshooting 44 Specifications 45 Format...
CONTENT BEFORE OPERATING Warning...1 Important Safety Instructions 2 Buttons and interface location 4 Remote controller 6 Remote controller key function 7 External equipment connections 8 BASIC OPERATING Switching on/off the TV set 13 Choose the Menu language 13 Choose the Input Source 13 Searching Channel 14 Watching TV Program 17 Picture Control Functions 18 Sound Control Functions 20 Timer Functions 22 Function Menu 23 Adjust Menu...26 Lock Setup ...27 OTHERS Others functions 29 Stream media broadcast system 30 Maintenance...43 Troubleshooting 44 Specifications 45 Format...
User Manual
Page 5
Caution: Please read this User's Manual carefully and properly store it is to be paid to technical innovations. Warning WARNING RISK OF ELECTRIC SHOCK DO NOT OPEN WARNING TO REDUCE THE RISK OF ELECTRIC SHOCK DO NOT REMOVE COVER (OR BACK). Attention should be replaced. REFER TO QUALIFIED SERVICE PERSONNEL. *To avoid electric hazards, it is strongly suggested that the back cover not be followed if it for future reference. Information of screen displays and figures in a good place for future reference. Warning: To avoid fire or electric hazards, never place your television and ...
Caution: Please read this User's Manual carefully and properly store it is to be paid to technical innovations. Warning WARNING RISK OF ELECTRIC SHOCK DO NOT OPEN WARNING TO REDUCE THE RISK OF ELECTRIC SHOCK DO NOT REMOVE COVER (OR BACK). Attention should be replaced. REFER TO QUALIFIED SERVICE PERSONNEL. *To avoid electric hazards, it is strongly suggested that the back cover not be followed if it for future reference. Information of screen displays and figures in a good place for future reference. Warning: To avoid fire or electric hazards, never place your television and ...
User Manual
Page 6
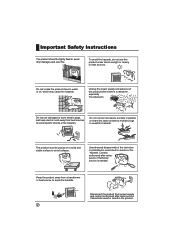
To avoid fire hazards, do not use damaged or worn electric plugs and keep electric cord away from power supply and contact authorized after -sales service if technical service is a rainstorm, especially Thunderstorm. Do not locate the product close to heat sources. Do not connect excessive sockets in the product. 2 Unauthorized disassembly of the product when there is needed. Contact authorized after -sales service if abnormal sound is prohibited to avoid fire hazards. Keep the product away from a transformer or heat source to avoid electric shocks or fire hazards. The product ...
To avoid fire hazards, do not use damaged or worn electric plugs and keep electric cord away from power supply and contact authorized after -sales service if technical service is a rainstorm, especially Thunderstorm. Do not locate the product close to heat sources. Do not connect excessive sockets in the product. 2 Unauthorized disassembly of the product when there is needed. Contact authorized after -sales service if abnormal sound is prohibited to avoid fire hazards. Keep the product away from a transformer or heat source to avoid electric shocks or fire hazards. The product ...
User Manual
Page 7
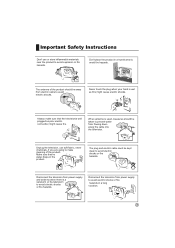
Never touch the plug when your hand is wet as poor electric connection might cause electric shocks. Always make cleaning of the product should be away from power supply and antenna when there is used, measures should be kept clean to avoid electric shocks or fire hazards. The plug and electric cable must be taken to prevent water from power supply to avoid electric shocks or fire hazards in a long vocation. 3 Disconnect the television from electric cable to avoid electric shocks. Don't place the product in a humid area to avoid electric shocks or fire hazards. Make ...
Never touch the plug when your hand is wet as poor electric connection might cause electric shocks. Always make cleaning of the product should be away from power supply and antenna when there is used, measures should be kept clean to avoid electric shocks or fire hazards. The plug and electric cable must be taken to prevent water from power supply to avoid electric shocks or fire hazards in a long vocation. 3 Disconnect the television from electric cable to avoid electric shocks. Don't place the product in a humid area to avoid electric shocks or fire hazards. Make ...
User Manual
Page 8
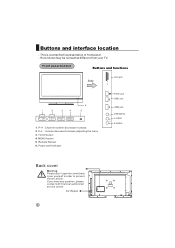
P-/+ : Channel number decrease/ increase 2. Buttons and interface location - This is a simplified representation of front panel. - TV/AV button 4. Remote Sensor 6. V-/+ : Volume decrease/increase,adjusting the menu 3. Front panel Control Buttons and functions Side Card jack CARD P- P+ V- MENU button 5. If you have any question, please contact with the local authorized service centre. Here shown may be somewhat different from your TV. AC IN jack 4 Power and Indicator L AUDIO R VIDEO Printer jack USB1 jack USB2 jack VIDEO(AV2) L AUDIO R AUDIO Back cover Warning ...
P-/+ : Channel number decrease/ increase 2. Buttons and interface location - This is a simplified representation of front panel. - TV/AV button 4. Remote Sensor 6. V-/+ : Volume decrease/increase,adjusting the menu 3. Front panel Control Buttons and functions Side Card jack CARD P- P+ V- MENU button 5. If you have any question, please contact with the local authorized service centre. Here shown may be somewhat different from your TV. AC IN jack 4 Power and Indicator L AUDIO R VIDEO Printer jack USB1 jack USB2 jack VIDEO(AV2) L AUDIO R AUDIO Back cover Warning ...
User Manual
Page 9
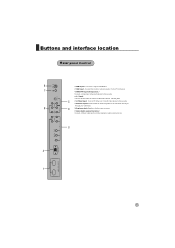
IN S-VIDEO IN L AUDIO R AV OUT AV1 IN VIDEO L AUDIO R IN Buttons and interface location Rear panel Control HDMI Input Connnect a signal toHDMI/DVI VGA Input Connect the monitor outputconnector from a PCto the jack DVD/DTV Input (Component ) Connect a component video/audiodeviceto these jacks. Av1 Input Connect audio/video out froman audio/video device tothese jacks. S-Video Input Connect S-Video out froma S-Video device tothese jacks. Antenna Input Connect cable or antenna signals to the TV, either directly or through your cable box. Earphone jack Earphone Audio output terminal...
IN S-VIDEO IN L AUDIO R AV OUT AV1 IN VIDEO L AUDIO R IN Buttons and interface location Rear panel Control HDMI Input Connnect a signal toHDMI/DVI VGA Input Connect the monitor outputconnector from a PCto the jack DVD/DTV Input (Component ) Connect a component video/audiodeviceto these jacks. Av1 Input Connect audio/video out froman audio/video device tothese jacks. S-Video Input Connect S-Video out froma S-Video device tothese jacks. Antenna Input Connect cable or antenna signals to the TV, either directly or through your cable box. Earphone jack Earphone Audio output terminal...
User Manual
Page 10
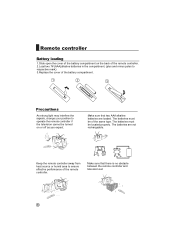
The batteries must be located properly. The batteries are loaded. Remote controller Battery loading 1.Slide open the cover of the battery compartment on the back of the remote controller. 2.Load two 7# (AAA)alkaline batteries in the compartment. (plus and minus poles to respective mark) 3.Replace the cover of the battery compartment. 1 2 3 Precautions As strong light may interfere the signals, change your position to ensure effective performance of the same type. The batteries must be turned on or off as you expect. Make sure that there is no obstacle between the remote ...
The batteries must be located properly. The batteries are loaded. Remote controller Battery loading 1.Slide open the cover of the battery compartment on the back of the remote controller. 2.Load two 7# (AAA)alkaline batteries in the compartment. (plus and minus poles to respective mark) 3.Replace the cover of the battery compartment. 1 2 3 Precautions As strong light may interfere the signals, change your position to ensure effective performance of the same type. The batteries must be turned on or off as you expect. Make sure that there is no obstacle between the remote ...
User Manual
Page 11
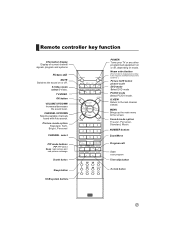
MENU VOL+ CH- PSM SSM 1 2 3 4 5 6 7 8 9 -/-- 0 ZOOM/MOVE PIP SWAP SCAN CH.EDIT SHUTTLE SLEEP H.LOCK Time SKIP USB RETURN ENTER ZOOM HELP POWER Turns your TV or any other programmed equipment on mode. MENU Brings up the main menu to the last channel viewed. Remote controller key function Information display Display of different area or the customer ) Picture SIZE button picture scale DVD mode Select DVD mode PC/DVI mode Select PC/DVI mode. CHANNEL UP/DOWN Selects available channels found with Auto search. Picture mode option Standard, Soft, Bright, Personal CHANNEL ...
MENU VOL+ CH- PSM SSM 1 2 3 4 5 6 7 8 9 -/-- 0 ZOOM/MOVE PIP SWAP SCAN CH.EDIT SHUTTLE SLEEP H.LOCK Time SKIP USB RETURN ENTER ZOOM HELP POWER Turns your TV or any other programmed equipment on mode. MENU Brings up the main menu to the last channel viewed. Remote controller key function Information display Display of different area or the customer ) Picture SIZE button picture scale DVD mode Select DVD mode PC/DVI mode Select PC/DVI mode. CHANNEL UP/DOWN Selects available channels found with Auto search. Picture mode option Standard, Soft, Bright, Personal CHANNEL ...
User Manual
Page 12
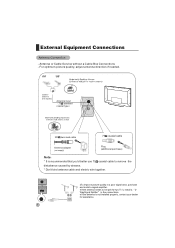
For optimum picture quality, adjust antenna direction if needed. If the antenna is recommended that you'd better use 75 coaxial cable to be split for assistance. 8 To improve picture quality in the connections. outdoor antenna (not supply) Antenna input 75 standard coaxial type ANT IN 300 twin-lead cable 75 coaxial cable Antenna adapter (not supply) Plug (additional purchase) Note * It is not installed properly, contact your dealer for two Tv`s, install a 2WaySignal Splitter in a poor signal area, purchase and install a signal amplifier. If the antenna needs to remove ...
For optimum picture quality, adjust antenna direction if needed. If the antenna is recommended that you'd better use 75 coaxial cable to be split for assistance. 8 To improve picture quality in the connections. outdoor antenna (not supply) Antenna input 75 standard coaxial type ANT IN 300 twin-lead cable 75 coaxial cable Antenna adapter (not supply) Plug (additional purchase) Note * It is not installed properly, contact your dealer for two Tv`s, install a 2WaySignal Splitter in a poor signal area, purchase and install a signal amplifier. If the antenna needs to remove ...
User Manual
Page 13
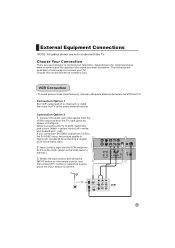
Choose the connection which is improved; To avoid picture noise (interference), leave an adequate distance between the VCR and TV. compared to connecting a regular VCR to confirm. IN 9 Select the input source with the TV. button to select the source, press the VOL+ button to the Video input. 2. VCR Connection - Insert a video tape into the VCR and press PLAY on the VCR. (Refer to the TV input jacks, as shown in the figure. AV OUT L AUDIO R VIDEO L AUDIO R AV IN S-VIDEO IN ANT. Connect the audio and video cables from VCR to achieve. If you connect an S-...
Choose the connection which is improved; To avoid picture noise (interference), leave an adequate distance between the VCR and TV. compared to connecting a regular VCR to confirm. IN 9 Select the input source with the TV. button to select the source, press the VOL+ button to the Video input. 2. VCR Connection - Insert a video tape into the VCR and press PLAY on the VCR. (Refer to the TV input jacks, as shown in the figure. AV OUT L AUDIO R VIDEO L AUDIO R AV IN S-VIDEO IN ANT. Connect the audio and video cables from VCR to achieve. If you connect an S-...

User Manual
Page 14
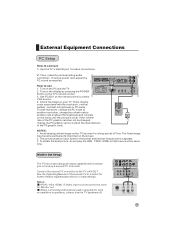
Connect the DVD video outputs (Y, Pb/Cb, Pr/Cr) to the COMPONENT (Y, Pb/Cb, Pr/Cr) input jacks on the TV and connect the DVD audio outputs to select VGA or HDMI (Y, Pb/Cb, Pr/Cr) mode. 3. Use TV/AV on the DVD player, insert a DVD. 2. Turn on the remote control to the AUDIO jacks on the TV, as shown in the figure. 2. AV OUT Y PbPr CbCr IN L AUDIO R VIDEO L AUDIO R AV1 IN S-VIDEO IN or DVD HDMI or DVI Setup -To watch digitally broadcast programs, purchase and connect a digital set -top box connections available. How to use S-Video. Press Play button on external ...
Connect the DVD video outputs (Y, Pb/Cb, Pr/Cr) to the COMPONENT (Y, Pb/Cb, Pr/Cr) input jacks on the TV and connect the DVD audio outputs to select VGA or HDMI (Y, Pb/Cb, Pr/Cr) mode. 3. Use TV/AV on the DVD player, insert a DVD. 2. Turn on the remote control to the AUDIO jacks on the TV, as shown in the figure. 2. AV OUT Y PbPr CbCr IN L AUDIO R VIDEO L AUDIO R AV1 IN S-VIDEO IN or DVD HDMI or DVI Setup -To watch digitally broadcast programs, purchase and connect a digital set -top box connections available. How to use S-Video. Press Play button on external ...
User Manual
Page 15
If using a sound card, adjust the PC sound as amplifers or speakers, please turn the TV speakers off. Turn on your TV. VGA IN Y PbCb PrCr L AUDIO R IN NOTES: 1 Avoid keeping a fixed image on the TV's screen for a long period of the second TV or monitor for Horizontal and Vertical frequencies is separate. 3 To obtain the best picture, do not play the USB, YPbPr, HDMI or VGA source at the same time. Monitor Out Setup The TV has a special signal output capability which allows you to the TV`s AV OUT. Connect the second TV or monitor to hook up a second TV or monitor. AV...
If using a sound card, adjust the PC sound as amplifers or speakers, please turn the TV speakers off. Turn on your TV. VGA IN Y PbCb PrCr L AUDIO R IN NOTES: 1 Avoid keeping a fixed image on the TV's screen for a long period of the second TV or monitor for Horizontal and Vertical frequencies is separate. 3 To obtain the best picture, do not play the USB, YPbPr, HDMI or VGA source at the same time. Monitor Out Setup The TV has a special signal output capability which allows you to the TV`s AV OUT. Connect the second TV or monitor to hook up a second TV or monitor. AV...
User Manual
Page 16
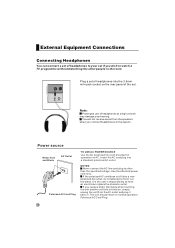
Power source Wider Hole and Blade AC Outlet Polarized AC Cord Plug TO USE AC POWER SOURCE Use the AC polarized line cord provided for operation on the rear panel of the set. ANT IN Note Prolonged use of headphones at a high volume may damage your set if you wish to watch a TV programme without disturbing the other than the specified voltage. Polarized AC Cord Plug. 12 You will not receive sound from the speakers when you cause a static discharge when touching the unit and the unit fails to function, simply unplug the unit from the AC outlet and plug it back in the ...
Power source Wider Hole and Blade AC Outlet Polarized AC Cord Plug TO USE AC POWER SOURCE Use the AC polarized line cord provided for operation on the rear panel of the set. ANT IN Note Prolonged use of headphones at a high volume may damage your set if you wish to watch a TV programme without disturbing the other than the specified voltage. Polarized AC Cord Plug. 12 You will not receive sound from the speakers when you cause a static discharge when touching the unit and the unit fails to function, simply unplug the unit from the AC outlet and plug it back in the ...

User Manual
Page 17
You can choose one of two languages.(Chinese or English) 5 When you select the source, the none or no signal will light . 2 Press POWER button on the remote control again. 3 If you want to exchange to standing by pressing VOL+/- button repeatedly. Picture Sound Tuning Function Adjust Timer Choose the Input Source If you hope to enjoy the picture from your TV`s because it . to select Language. 4 Select a particular language by status, please press down POWER button on the screen. Switching ON/OFF the TV set In the manual, the OSD (on screen display) may be used for the TV ...
You can choose one of two languages.(Chinese or English) 5 When you select the source, the none or no signal will light . 2 Press POWER button on the remote control again. 3 If you want to exchange to standing by pressing VOL+/- button repeatedly. Picture Sound Tuning Function Adjust Timer Choose the Input Source If you hope to enjoy the picture from your TV`s because it . to select Language. 4 Select a particular language by status, please press down POWER button on the screen. Switching ON/OFF the TV set In the manual, the OSD (on screen display) may be used for the TV ...
User Manual
Page 18
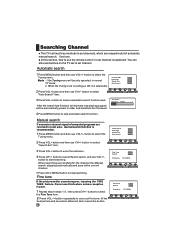
button to the current channel. When the Tuning Lock is setting as Off, it is poor. 1 Repeat above steps 1-3, then press CH+/- In this feature unless reception is selectable. 2 Press VOL+ button and then use buttons on the TV set to set channel. Exchange >>> Search Set >>> Auto Search >>> 2. When searching successfully for the channel, the Manual search stopping automatically and save to select the Tuning menu. Fine Tune 17 Search >>> Frequency 791.22MHz Picture Sound Tuning Function Adjust Timer 5 Press OK or MENU button to stop automatic search ...
button to the current channel. When the Tuning Lock is setting as Off, it is poor. 1 Repeat above steps 1-3, then press CH+/- In this feature unless reception is selectable. 2 Press VOL+ button and then use buttons on the TV set to set channel. Exchange >>> Search Set >>> Auto Search >>> 2. When searching successfully for the channel, the Manual search stopping automatically and save to select the Tuning menu. Fine Tune 17 Search >>> Frequency 791.22MHz Picture Sound Tuning Function Adjust Timer 5 Press OK or MENU button to stop automatic search ...
User Manual
Page 19
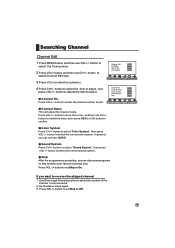
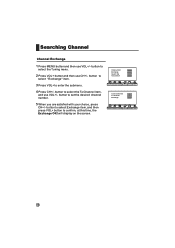
Channel Edit >>> Exchange >>> Search Set >>> Auto Search >>> Picture Sound Tuning Function Adjust Timer 4 Press CH+/- button to select the item to confirm. button to move the cursor, and then use CH+/button to select the letter, then press MENU or OK button to adjust, and press VOL+/- In general, you can skip some programs so that to edit. Sound System Press CH+/- Do the above steps again. 3. Searching Channel Channel Edit 1 Press MENU button and then use CH+/- button to select the channel number to select your favorite channels only. Channel Name Color System ...
Channel Edit >>> Exchange >>> Search Set >>> Auto Search >>> Picture Sound Tuning Function Adjust Timer 4 Press CH+/- button to select the item to confirm. button to move the cursor, and then use CH+/button to select the letter, then press MENU or OK button to adjust, and press VOL+/- In general, you can skip some programs so that to edit. Sound System Press CH+/- Do the above steps again. 3. Searching Channel Channel Edit 1 Press MENU button and then use CH+/- button to select the channel number to select your favorite channels only. Channel Name Color System ...
User Manual
Page 20
Channel Edit >>> Exchange >>> Search Set >>> Auto search >>> 3 Press VOL+ to set the desired channel number. button to select the Tuning menu. 2 Press VOL+ button and then use VOL+/- will display on the screen. Picture Sound Tuning Function Adjust Timer 4 Press CH+/- button to enter the submenu. Picture Sound Tuning Function Adjust Timer 16 button to select Exchange item, and then press VOL+ button to select "Exchange" item. Current Channel 17 To Channel 10 Exchange >>> 5 When you are satisfied with your choice, press CH+/- button to select the To ...
Channel Edit >>> Exchange >>> Search Set >>> Auto search >>> 3 Press VOL+ to set the desired channel number. button to select the Tuning menu. 2 Press VOL+ button and then use VOL+/- will display on the screen. Picture Sound Tuning Function Adjust Timer 4 Press CH+/- button to enter the submenu. Picture Sound Tuning Function Adjust Timer 16 button to select Exchange item, and then press VOL+ button to select "Exchange" item. Current Channel 17 To Channel 10 Exchange >>> 5 When you are satisfied with your choice, press CH+/- button to select the To ...
User Manual
Page 21
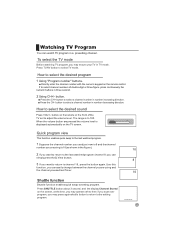
Directly enter the channel number with the numeric keypad on the TV screen. Press the CH- The range is 18(as shown inthe figure). 2 If you want to return to select a channel number in three second. 2 Using CH+/- Channel Stored 17 Watching TV Program You can simply press theQ.View button. 3 If you want to return to the last watched program channel 8, you may operate other, then if you scan over program, you caneasily change betweenthe channel youare using and the channel youused lastTimer. When the volume button are pressed the volume level is Volume displayed ...
Directly enter the channel number with the numeric keypad on the TV screen. Press the CH- The range is 18(as shown inthe figure). 2 If you want to return to select a channel number in three second. 2 Using CH+/- Channel Stored 17 Watching TV Program You can simply press theQ.View button. 3 If you want to return to the last watched program channel 8, you may operate other, then if you scan over program, you caneasily change betweenthe channel youare using and the channel youused lastTimer. When the volume button are pressed the volume level is Volume displayed ...